Preprufe® 300R & 160R Pre-applied Waterproofing Membranes ...
Preprufe® 300R & 160R Pre-applied Waterproofing Membranes ...
Preprufe® 300R & 160R Pre-applied Waterproofing Membranes ...

You also want an ePaper? Increase the reach of your titles
YUMPU automatically turns print PDFs into web optimized ePapers that Google loves.
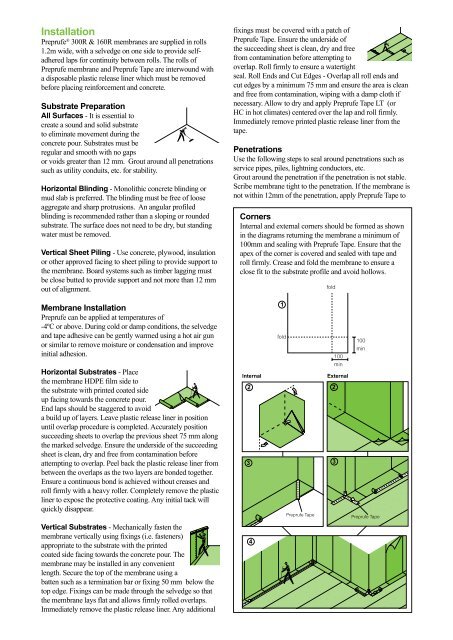
Installation<strong>Pre</strong>prufe ® <strong>300R</strong> & <strong>160R</strong> membranes are supplied in rolls1.2m wide, with a selvedge on one side to provide selfadheredlaps for continuity between rolls. The rolls of<strong>Pre</strong>prufe membrane and <strong>Pre</strong>prufe Tape are interwound witha disposable plastic release liner which must be removedbefore placing reinforcement and concrete.Substrate <strong>Pre</strong>parationAll Surfaces - It is essential tocreate a sound and solid substrateto eliminate movement during theconcrete pour. Substrates must beregular and smooth with no gapsor voids greater than 12 mm. Grout around all penetrationssuch as utility conduits, etc. for stability.Horizontal Blinding - Monolithic concrete blinding ormud slab is preferred. The blinding must be free of looseaggregate and sharp protrusions. An angular profiledblinding is recommended rather than a sloping or roundedsubstrate. The surface does not need to be dry, but standingwater must be removed.Vertical Sheet Piling - Use concrete, plywood, insulationor other approved facing to sheet piling to provide support tothe membrane. Board systems such as timber lagging mustbe close butted to provide support and not more than 12 mmout of alignment.fixings must be covered with a patch of<strong>Pre</strong>prufe Tape. Ensure the underside ofthe succeeding sheet is clean, dry and freefrom contamination before attempting tooverlap. Roll firmly to ensure a watertightseal. Roll Ends and Cut Edges - Overlap all roll ends andcut edges by a minimum 75 mm and ensure the area is cleanand free from contamination, wiping with a damp cloth ifnecessary. Allow to dry and apply <strong>Pre</strong>prufe Tape LT (orHC in hot climates) centered over the lap and roll firmly.Immediately remove printed plastic release liner from thetape.PenetrationsUse the following steps to seal around penetrations such asservice pipes, piles, lightning conductors, etc.Grout around the penetration if the penetration is not stable.Scribe membrane tight to the penetration. If the membrane isnot within 12mm of the penetration, apply <strong>Pre</strong>prufe Tape toCornersInternal and external corners should be formed as shownin the diagrams returning the membrane a minimum of100mm and sealing with <strong>Pre</strong>prufe Tape. Ensure that theapex of the corner is covered and sealed with tape androll firmly. Crease and fold the membrane to ensure aclose fit to the substrate profile and avoid hollows.foldMembrane Installation<strong>Pre</strong>prufe can be <strong>applied</strong> at temperatures of-4ºC or above. During cold or damp conditions, the selvedgeand tape adhesive can be gently warmed using a hot air gunor similar to remove moisture or condensation and improveinitial adhesion.Horizontal Substrates - Placethe membrane HDPE film side tothe substrate with printed coated sideup facing towards the concrete pour.End laps should be staggered to avoida build up of layers. Leave plastic release liner in positionuntil overlap procedure is completed. Accurately positionsucceeding sheets to overlap the previous sheet 75 mm alongthe marked selvedge. Ensure the underside of the succeedingsheet is clean, dry and free from contamination beforeattempting to overlap. Peel back the plastic release liner frombetween the overlaps as the two layers are bonded together.Ensure a continuous bond is achieved without creases androll firmly with a heavy roller. Completely remove the plasticliner to expose the protective coating. Any initial tack willquickly disappear.Internal231fold<strong>Pre</strong>prufe Tape100minExternal23100min<strong>Pre</strong>prufe TapeVertical Substrates - Mechanically fasten themembrane vertically using fixings (i.e. fasteners)appropriate to the substrate with the printedcoated side facing towards the concrete pour. Themembrane may be installed in any convenientlength. Secure the top of the membrane using abatten such as a termination bar or fixing 50 mm below thetop edge. Fixings can be made through the selvedge so thatthe membrane lays flat and allows firmly rolled overlaps.Immediately remove the plastic release liner. Any additional4