Installation Manual - Unical Lattner Condensing Hot Water Boilers
Installation Manual - Unical Lattner Condensing Hot Water Boilers
Installation Manual - Unical Lattner Condensing Hot Water Boilers
You also want an ePaper? Increase the reach of your titles
YUMPU automatically turns print PDFs into web optimized ePapers that Google loves.
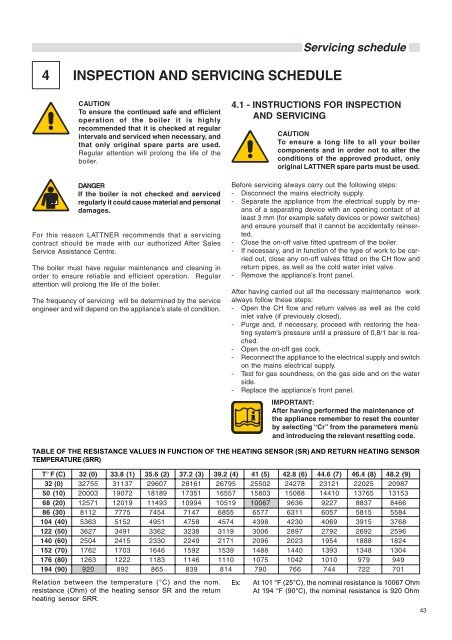
4 INSPECTION AND SERVICING SCHEDULEServicing scheduleCAUTIONTo ensure the continued safe and efficientoperation of the boiler it is highlyrecommended that it is checked at regularintervals and serviced when necessary, andthat only original spare parts are used.Regular attention will prolong the life of theboiler.DANGERIf the boiler is not checked and servicedregularly it could cause material and personaldamages.For this reason LATTNER recommends that a servicingcontract should be made with our authorized After SalesService Assistance Centre.The boiler must have regular maintenance and cleaning inorder to ensure reliable and efficient operation. Regularattention will prolong the life of the boiler.The frequency of servicing will be determined by the serviceengineer and will depend on the appliance’s state of condition.4.1 - INSTRUCTIONS FOR INSPECTIONAND SERVICINGCAUTIONTo ensure a long life to all your boilercomponents and in order not to alter theconditions of the approved product, onlyoriginal LATTNER spare parts must be used.Before servicing always carry out the following steps:- Disconnect the mains electricity supply.- Separate the appliance from the electrical supply by meansof a separating device with an opening contact of atleast 3 mm (for example safety devices or power switches)and ensure yourself that it cannot be accidentally reinserted.- Close the on-off valve fitted upstream of the boiler.- If necessary, and in function of the type of work to be carriedout, close any on-off valves fitted on the CH flow andreturn pipes, as well as the cold water inlet valve.- Remove the appliance’s front panel.After having carried out all the necessary maintenance workalways follow these steps:- Open the CH flow and return valves as well as the coldinlet valve (if previously closed),- Purge and, if necessary, proceed with restoring the heatingsystem’s pressure until a pressure of 0,8/1 bar is reached.- Open the on-off gas cock.- Reconnect the appliance to the electrical supply and switchon the mains electrical supply.- Test for gas soundness, on the gas side and on the waterside.- Replace the appliance’s front panel.IMPORTANT:After having performed the maintenance ofthe appliance remember to reset the counterby selecting “Cr” from the parameters menùand introducing the relevant resetting code.TABLE OF THE RESISTANCE VALUES IN FUNCTION OF THE HEATING SENSOR (SR) AND RETURN HEATING SENSORTEMPERATURE (SRR)T° F (C) 32 (0) 33.8 (1) 35.6 (2) 37.2 (3) 39.2 (4) 41 (5) 42.8 (6) 44.6 (7) 46.4 (8) 48.2 (9)32 (0) 32755 31137 29607 28161 26795 25502 24278 23121 22025 2098750 (10) 20003 19072 18189 17351 16557 15803 15088 14410 13765 1315368 (20) 12571 12019 11493 10994 10519 10067 9636 9227 8837 846686 (30) 8112 7775 7454 7147 6855 6577 6311 6057 5815 5584104 (40) 5363 5152 4951 4758 4574 4398 4230 4069 3915 3768122 (50) 3627 3491 3362 3238 3119 3006 2897 2792 2692 2596140 (60) 2504 2415 2330 2249 2171 2096 2023 1954 1888 1824152 (70) 1762 1703 1646 1592 1539 1488 1440 1393 1348 1304176 (80) 1263 1222 1183 1146 1110 1075 1042 1010 979 949194 (90) 920 892 865 839 814 790 766 744 722 701Relation between the temperature (°C) and the nom.resistance (Ohm) of the heating sensor SR and the returnheating sensor SRR.Ex:At 101 °F (25°C), the nominal resistance is 10067 OhmAt 194 °F (90°C), the nominal resistance is 920 Ohm43


