You also want an ePaper? Increase the reach of your titles
YUMPU automatically turns print PDFs into web optimized ePapers that Google loves.
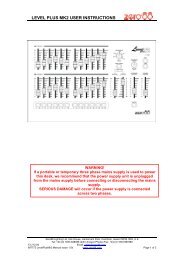
ANALOG CONTROLSGAINGAINGAINGAINGAINGAIN GAIN GAINLEVLEVMONOMONOMIC 48VSTANDBYMIN MAX MIN MAXMIN MAX MIN MAX MINMAXMIN MAX MIN MAXMIN MAX MIN MAXMINMAXPROTECTGAIN Matches the sensitivity of the channel input tothe connected source. Use the headphones monitor tocheck the signal quality and adjust the control untilthe meters read an average 0dB with the loudestpeaks up to ‘+6’. If set too high the signal may clipand produce a harsh distorted sound. If set too lowthe signal to noise ratio is reduced and excessivenoise may be heard. Always turn back the gain if thered channel peak indicator flashes.MONO Press this switch to sum the stereo channelleft and right signals together to produce a monosignal, or when using the channel with a mono sourcesuch as a microphone. If the switch is not pressedthe mic signal will appear on the left channel only.MIC +48V Press this switch when usingmicrophones which require phantom powering. Thisputs +48V DC on all the XLR mic input sockets.Note that you can connect non powered microphonesto powered sockets without damage as long asbalanced leads are used. The switch is recessed toprevent accidental operation and should be operatedwith a pointed object such as a pen.To prevent damage to the microphonesalways use balanced mic leads. Do not connectunbalanced sources to powered inputs. Alwaysplug the microphones in with +48V turned off,and only switch +48V on or off with all outputfaders turned down. Failure to do this may resultin loud thumps and damage to externalequipment.AB LEV These are the volume controls which set thelistening level of the amplifiers. Start with these setto minimum and adjust the faders until the metersread around 0dB for the average signal level. Raisethe level controls until the required sound level isheard from the loudspeakers. When set correctly thefaders and meters may be operated within theircorrect range. When set incorrectly distortion orexcessive background noise may result. The normalposition for loud program should be between 12 and3 o’clock.To avoid the possibility of unexpected highsound volumes always set the AB level controls tominimum when changing the amplifierconfiguration.☺ Tip Take time to set the input and output levelscorrectly. This will ensure that you get the bestperformance from your system. The meters andheadphones monitoring system are provided to helpyou set the levels accurately. If the levels are set toohigh then distortion may result. This will beindicated by the channel peak indicators flashing. Ifthe levels are set too low then excessive backgroundhiss and noise may be heard. This will be indicatedby very low meter readingSTANDBY SWITCH, PROTECT INDICATORLEVMINMAXLEVMINMAXPROTECTSTANDBYPress this switch to put the console into standbymode. This disconnects the loudspeakers usingrelays (DP1000 only), turns off (mutes) all theoutputs, and locks the controls. The sound of therelays switching can be heard when the switch ispressed. Standby should be used when the console isleft unattended to prevent the settings being tamperedwith, when equipment is plugged in or out, and whenthe system configuration is changed.The display shows when standby mode is active.The red indicator also lights when the amplifier is inprotect mode. This occurs for two seconds when theicon is switched on to allow the circuits to stabilisebefore connecting the speakers. It also occursautomatically to protect the speakers if a fault orexcessive temperature is detected.If the red indicator is lit with the switch in the upposition and power applied for longer than twoseconds then a fault may be suspected.3 - 2 icon SERIES