Verg Instructions - SEA (UK)
Verg Instructions - SEA (UK)
Verg Instructions - SEA (UK)

Create successful ePaper yourself
Turn your PDF publications into a flip-book with our unique Google optimized e-Paper software.
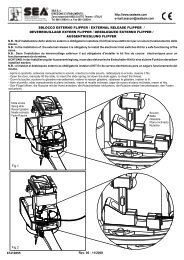
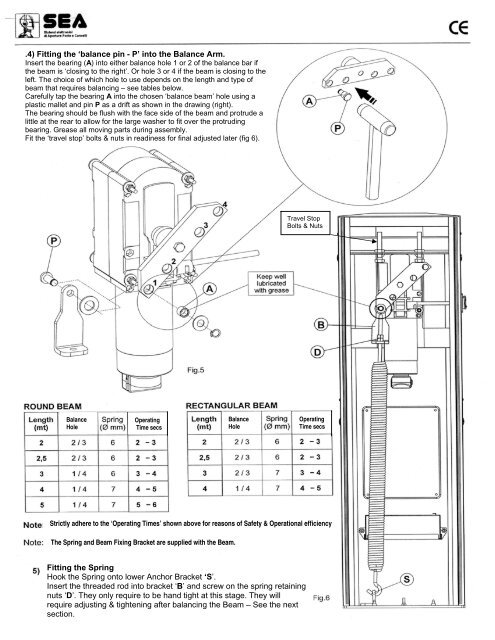
.4) Fitting the ‘balance pin - P’ into the Balance Arm.Insert the bearing (A) into either balance hole 1 or 2 of the balance bar ifthe beam is ‘closing to the right’. Or hole 3 or 4 if the beam is closing to theleft. The choice of which hole to use depends on the length and type ofbeam that requires balancing – see tables below.Carefully tap the bearing A into the chosen ‘balance beam’ hole using aplastic mallet and pin P as a drift as shown in the drawing (right).The bearing should be flush with the face side of the beam and protrude alittle at the rear to allow for the large washer to fit over the protrudingbearing. Grease all moving parts during assembly.Fit the ‘travel stop’ bolts & nuts in readiness for final adjusted later (fig 6).Travel StopBolts & NutsBalanceHoleOperatingTime secsBalanceHoleOperatingTime secsStrictly adhere to the ‘Operating Times’ shown above for reasons of Safety & Operational efficiencyThe Spring and Beam Fixing Bracket are supplied with the Beam.Fitting the SpringHook the Spring onto lower Anchor Bracket ‘S’.Insert the threaded rod into bracket ‘B’ and screw on the spring retainingnuts ‘D’. They only require to be hand tight at this stage. They willrequire adjusting & tightening after balancing the Beam – See the nextsection.