Dear Customer,Our compliments for having chosen a top-quality Immergas product, able to assure well-being and safety for a long period of time. As an Immergascustomer you can also count on a qualified after-sales service, prepared and updated to guarantee constant efficiency of your boiler. Read the followingpages carefully: you will be able to draw useful suggestions regarding the correct use of the appliance, the respect of which, will confirm your satisfactionfor the Immergas product. Contact our area authorised after-sales centre as soon as possible to request commissioning. Our technician will verify thecorrect functioning conditions; he will perform the necessary calibrations and will demonstrate the correct use of the generator. For any interventions orroutine maintenance contact Immergas Authorised Centres: these have original spare parts and boast of specific preparation directly from the manufacturer.General recommendationsThe instruction book is an integral and essential part of the product and must be consigned to the new user also in the case of transfer or succession ofownership. It must be kept well and consulted carefully, as all of the warnings supply important indications for safety in the installation, use and maintenancestages. In compliance with legislation in force, the systems must be designed by qualified professionals, within the dimensional limits established by theLaw. Installation and maintenance must be performed in compliance with the regulations in force, according to the manufacturer’s instructions and byprofessionally qualified staff, intending staff with specific technical skills in the plant sector, as envisioned by the Law. Incorrect installation can cause injuryto persons and animals and damage to objects, for which the manufacturer is not liable. Maintenance must be carried out by skilled technical staff. TheImmergas Authorised After-sales Service represents a guarantee of qualifications and professionalism. The appliance must only be destined for the use forwhich it has been expressly declared. Any other use will be considered improper and therefore potentially dangerous. If errors occur during installation,running and maintenance, due to the non compliance of technical laws in force, standards or instructions contained in this book (or however suppliedby the manufacturer), the manufacturer is excluded from any contractual and extra-contractual liability for any damages and the appliance warranty isinvalidated. For further information regarding legislative and statutory provisions relative to the installation of gas heat generators, consult the Immergassite at the following address: www.immergas.comDECLARATION OF CONFORMITYFor the purpose and effect of the 2009/142/CE Gas Appliance Directive, 2004/108/CE EMC Directive, 92/42/CE Efficiency Directive and 2006/95/CELow Voltage Directive.Mauro GuareschiThe Manufacturer: Immergas S.p.A. v. Cisa Ligure n° 95 42041 Brescello (RE)DECLARES THAT: the Immergas boiler model: Eolo Star <strong>24</strong> 3 EResearch & Development Directoris in compliance with the same European Community DirectivesSignature:INDICEINSTALLATOR pag. USERpag. TECHNICIAN pag.1 Boiler installation. .....................................31.1 Installation recommendations. ................31.2 Main dimensions. ......................................41.3 Main dimensionsrecessing kit (optional). ............................41.4 Anti-freeze protection. .............................41.5 Attachments. ..............................................41.6 Remote controls and roomchronothermostats (optional). ................51.7 Immergas flue systems. .............................61.8 Outdoor installation inpartially protected area. ...........................61.9 Outdoor installation using recessed frame(with direct air intake). .............................61.10 Indoor installation. ...................................91.11 Fume exhaust to flue/chimney...............131.12 Ducting of existing flues. ........................131.13 Flues, chimneys and chimney caps. ......131.14 System filling. ...........................................131.15 Gas system start-up. ................................131.16 Boiler start up (ignition). .......................131.17 Circulation pump. ...................................131.18 Kits available on request. ........................141.19 Boiler components. .................................142 Instructions for use and maintenance. .152.1 Cleaning and maintenance. ...................152.2 General warnings. ...................................152.3 Control panel. ..........................................152.4 Fault and anomaly signals. .....................162.5 Restore heating system pressure............162.6 Draining the system. ...............................162.7 Anti-freeze protection. ...........................162.8 Case cleaning. ..........................................172.9 Decomissioning. ......................................173 Boiler start-up.(Initial check) ...........................................183.1 Hydraulic layout. .....................................183.2 Wiring diagram. ......................................193.3 Troubleshooting. .....................................193.4 Converting the boiler to other types ofgas. .............................................................193.5 Checks following conversion to anothertype of gas. ................................................203.6 Possible adjustments. ..............................203.7 Programming the p.C.B .........................203.8 Automatic slow ignition function withtimed ramp delivery. ...............................213.9 “Chimney sweep function”. ....................213.10 Heating timer. ..........................................213.11 Pump anti-block function. .....................213.12 Funzione antitrafila circuito sanitario. .213.13 Radiators anti-freeze function. ..............213.14 P.C.B. Periodical self-check. ...................213.15 Casing removal. .......................................223.16 Yearly appliance checkand maintenance. ....................................223.17 Variable heat power. ................................<strong>24</strong>3.18 Combustion parameters. ........................<strong>24</strong>3.19 Technical data. .........................................25Immergas S.p.A. declines all liability due to printing or transcription errors, reserving the right to make any modifications to its technical and commercialdocuments without forewarning.
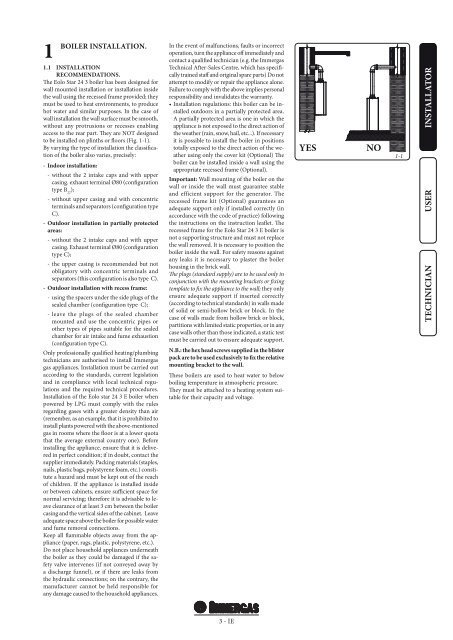
1BOILER INSTALLATION.1.1 INSTALLATIONRECOMMENDATIONS.The Eolo Star <strong>24</strong> 3 boiler has been designed forwall mounted installation or installation insidethe wall using the recessed frame provided; theymust be used to heat environments, to producehot water and similar purposes. In the case ofwall installation the wall surface must be smooth,without any protrusions or recesses enablingaccess to the rear part. They are NOT designedto be installed on plinths or floors (Fig. 1-1).By varying the type of installation the classificationof the boiler also varies, precisely:- Indoor installation:- without the 2 intake caps and with uppercasing. exhaust terminal Ø80 (configurationtype B 22);- without upper casing and with concentricterminals and separators (configuration typeC).- Outdoor installation in partially protectedareas:- without the 2 intake caps and with uppercasing. Exhaust terminal Ø80 (configurationtype C);- the upper casing is recommended but notobligatory with concentric terminals andseparators (this configuration is also type C).- Outdoor installation with recess frame:- using the spacers under the side plugs of thesealed chamber (configuration type C);- leave the plugs of the sealed chambermounted and use the concentric pipes orother types of pipes suitable for the sealedchamber for air intake and fume exhaustion(configuration type C).Only professionally qualified heating/plumbingtechnicians are authorised to install Immergasgas appliances. Installation must be carried outaccording to the standards, current legislationand in compliance with local technical regulationsand the required technical procedures.Installation of the Eolo star <strong>24</strong> 3 E boiler whenpowered by LPG must comply with the rulesregarding gases with a greater density than air(remember, as an example, that it is prohibited toinstall plants powered with the above-mentionedgas in rooms where the floor is at a lower quotathat the average external country one). Beforeinstalling the appliance, ensure that it is deliveredin perfect condition; if in doubt, contact thesupplier immediately. Packing materials (staples,nails, plastic bags, polystyrene foam, etc.) constitutea hazard and must be kept out of the reachof children. If the appliance is installed insideor between cabinets, ensure sufficient space fornormal servicing; therefore it is advisable to leaveclearance of at least 3 cm between the boilercasing and the vertical sides of the cabinet. Leaveadequate space above the boiler for possible waterand fume removal connections.Keep all flammable objects away from the appliance(paper, rags, plastic, polystyrene, etc.).Do not place household appliances underneaththe boiler as they could be damaged if the safetyvalve intervenes (if not conveyed away bya discharge funnel), or if there are leaks fromthe hydraulic connections; on the contrary, themanufacturer cannot be held responsible forany damage caused to the household appliances.In the event of malfunctions, faults or incorrectoperation, turn the appliance off immediately andcontact a qualified technician (e.g. the ImmergasTechnical After-Sales Centre, which has specificallytrained staff and original spare parts) Do notattempt to modify or repair the appliance alone.Failure to comply with the above implies personalresponsibility and invalidates the warranty.• Installation regulations: this boiler can be installedoutdoors in a partially protected area.A partially protected area is one in which theappliance is not exposed to the direct action ofthe weather (rain, snow, hail, etc...). If necessaryit is possible to install the boiler in positionstotally exposed to the direct action of the weatherusing only the cover kit (Optional) Theboiler can be installed inside a wall using theappropriate recessed frame (Optional).Important: Wall mounting of the boiler on thewall or inside the wall must guarantee stableand efficient support for the generator. Therecessed frame kit (Optional) guarantees anadequate support only if installed correctly (inaccordance with the code of practice) followingthe instructions on the instruction leaflet. Therecessed frame for the Eolo Star <strong>24</strong> 3 E boiler isnot a supporting structure and must not replacethe wall removed. It is necessary to position theboiler inside the wall. For safety reasons againstany leaks it is necessary to plaster the boilerhousing in the brick wall.The plugs (standard supply) are to be used only inconjunction with the mounting brackets or fixingtemplate to fix the appliance to the wall; they onlyensure adequate support if inserted correctly(according to technical standards) in walls madeof solid or semi-hollow brick or block. In thecase of walls made from hollow brick or block,partitions with limited static properties, or in anycase walls other than those indicated, a static testmust be carried out to ensure adequate support.N.B.: the hex head screws supplied in the blisterpack are to be used exclusively to fix the relativemounting bracket to the wall.These boilers are used to heat water to belowboiling temperature in atmospheric pressure.They must be attached to a heating system suitablefor their capacity and voltage.YESNO1-1INSTALLATORUSERTECHNICIAN3 - IE