
Create successful ePaper yourself
Turn your PDF publications into a flip-book with our unique Google optimized e-Paper software.
Adding Clips to the Timeline<br />
<strong>Sony</strong> <strong>NXCAM</strong> <strong>Workflow</strong>s in Apple Final Cut Pro7<br />
There are a variety of methods for placing clips in the Timeline. For purposes of illustration,<br />
below are just a few methodologies:<br />
To add a clip to a Sequence without trimming, simply drag the clip from the Bin to<br />
the Timeline.<br />
To trim a clip prior to adding it to the Sequence:<br />
1 – Double-click on a clip in the Browser. This will load the media into the<br />
Viewer window.<br />
2 – Play the clip by pressing either the spacebar or the L key.<br />
3 – Select the yellow Viewer Playhead and scrub to an exact In point. Press I to mark<br />
the In point.<br />
4 – Select the yellow Viewer Playhead and scrub to an exact Outpoint. Press O to<br />
mark the Outpoint.<br />
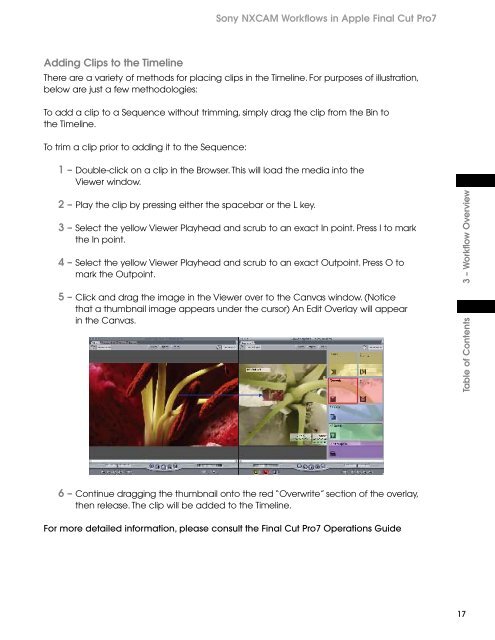
5 – Click and drag the image in the Viewer over to the Canvas window. (Notice<br />
that a thumbnail image appears under the cursor) An Edit Overlay will appear<br />
in the Canvas.<br />
6 – Continue dragging the thumbnail onto the red “Overwrite” section of the overlay,<br />
then release. The clip will be added to the Timeline.<br />
For more detailed information, please consult the Final Cut Pro7 Operations <strong>Guide</strong><br />
Table of Contents 3 – <strong>Workflow</strong> Overview<br />
17