Download issue 8 - Total Amiga Magazine
Download issue 8 - Total Amiga Magazine
Download issue 8 - Total Amiga Magazine
- No tags were found...
Create successful ePaper yourself
Turn your PDF publications into a flip-book with our unique Google optimized e-Paper software.
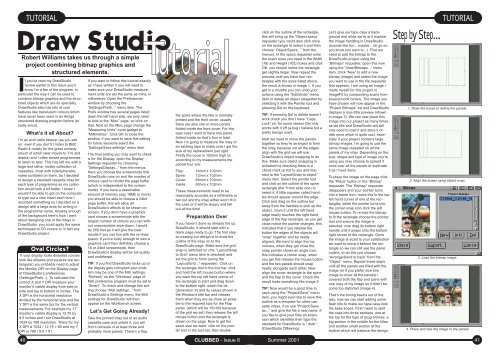
TUTORIALTUTORIALDraw StudioRobert Williams takes us through a simpleproject combining bitmap graphics andstructured elements.If you’ve read my DrawStudioreview earlier in this <strong>issue</strong> you’llknow I’m a fan of the program, inparticular the way it can be used tocombine bitmap graphics and the structuredobjects which are its speciality.DrawStudio also has lots of coolfeatures like translucent colours whichhave never been seen in an <strong>Amiga</strong>structured drawing program before (orsadly since).What’s it all About?I’m an avid radio listener (as you ask(or even if you don’t) I listen to BBCRadio 4 mostly for the great comedy(much of which later moves to TV) anddrama) and I often record programmesto listen to later. This has left me with alarge and rather motley collection ofcassettes, most with indecipherablenotes scribbled on them. So I decidedto design a standard cassette inlay foreach type of programme so my collectionwould look a bit better. I knew Iwouldn’t be able to get on the computerto type out a new insert each time Irecorded something so I decided on adesign with a large area for writing inthe programme name. Anyway enoughof the background here’s how I wentabout designing one of the inlays inDrawStudio, you could apply the sametechniques to CD covers or in fact anyDrawStudio project.Oval Circles?If your display looks distorted (circleslook like ellipses and squares are rectangular)you probably need to adjustthe Monitor DPI on the Display pageof DrawStudio’s preferences(Settings/Prefs...). To calculate thecorrect X and Y DPI measure yourmonitor’s visible display from side toside and top to bottom in inches. TheX DPI is the horizontal resolutiondivided by the horizontal size and theY DPI is the same but for the verticalmeasurements. For example my 17”monitor’s visible display is 12.75 by9.5 inches and I run DrawStudio at1024 by 768 resolution. There for myX DPI is 1024 / 12.75 = 80 and my YDPI is 768 / 9.5 = 81.TutorialIf you want to follow this tutorial exactlyas I have written it you will need tomake sure your DrawStudio measurementunits are set the same as mine, inmillimetres. Open the Preferenceswindow by choosing the“Settings/Prefs...” menu item. ThePrefs window has several pages listeddown the left hand side, we only needto look at the “Misc” page, so click onthat. Now on the Misc page change the“Measuring Units” cycle gadget to“Millimetres”. Click OK to close thewindow, if you want to save this settingfor future sessions select the“Settings/Save settings” menu item.The final setting you may want to checkis for the Display, open the DisplaySettings requester by choosing“Settings/Display...” from the menus.Here you choose the screenmode thatDrawStudio runs on and the number ofcolours used to render the page buffer(which is independent to the screenmode).If you have a reasonableamount of memory (say 16Mb or more)you should be able to choose a 24bitpage buffer, this will allow allDrawStudio’s effects to be shown onscreen. If you don’t have a graphicscard choose a screenmode with thelargest number of colours you can withoutunacceptable slow-down, I wouldtry 256 first as it will give the bestresults if you can live with the re-drawspeed. If you’re lucky enough to own agraphics card then definitely choose a16 or 24bit screenmode, thenDrawStudio’s display will be full qualityand undithered.TIP: If you find DrawStudio locks up orthe display gets corrupted your problemmay be one of the MUI settings,“Refresh” on the “Windows” page ofMUI preference program must be set to“Smart”. To check and change this settingchoose “MUI settings...” fromDrawStudio’s Settings menu, the MUIsettings for DrawStudio will thenappear on the Workbench screen.Let’s Get Going Already!Take the printed inlay out of an audiocassette case and unfold it, you willfind it consists of at least three andprobably more panels. There’s a flap,the spine where the title is normallyprinted and the front cover, usuallythere are also one or more panelsfolded inside the front cover. For thistape case I want to have one panelfolded inside so that’s four in total.Now I’m going to measure the inlay ofan existing tape to make sure I get thesize of my replacement just right.Firstly the cover is 102mm high soaccording to my measurements thepanels four are:Flap: 16mm x 102mmSpine: 12mm x 102mmCover: 65mm x 102mmInside: 60mm x 102mmThese measurements need to bereasonably accurate as a millimetre ortwo out and the inlay either won’t fit inthe case or it will be sloppy and fallout all the time!Preparation OverIf you haven’t done so already fire upDrawStudio, it should start with ablank page ready to go. The first stepat creating our design is to draw theoutline of the inlay on to theDrawStudio page. Make sure the gridsnap is switched on (the “Layout/Snapto Grid” menu item is checked) andset the grid to 5mm (using the“Layout/Grid...” requester). Click onthe rectangle tool in the tool bar, clickand hold the left mouse button whereyou want the top left hand corner ofthe rectangle to start and drag downto the bottom right, watch the dx(dimension X) and dy values shown inthe Window’s title bar and releasethem when they are as close as possibleto the required size for the Flappanel, (which will be 15x100 becauseof the grid we set) then release the leftmouse button and the rectangle isdrawn on the page. Now to get theexact size we want, click on the pointertool in the tool bar, then doubleclick on the outline of the rectangle,this will bring up the “Object specs”requester (you could also click onceon the rectangle to select it and thenchoose “Object/Specs...” from themenus). In the specs requester enterthe exact sizes you need in the Width(16) and Height (102) boxes and clickOK, you should notice the rectangleget slightly larger. Now repeat theprocess until you have four rectangleswith the sizes listed above,the result is shown in image 1. If youget in a muddle you can undo youractions using the “Edit/Undo” menuitem or delete an object altogether byselecting it with the Pointer tool andpressing Del on the keyboard.TIP: If pressing Del to delete doesn’twork check you don’t have “CapsLock” on, for some reason Del onlyworks with it off (a bug I believe but apretty benign one!).Next we need to move the panelstogether so they’re arranged to formthe inlay, because not all the edgesalign with the grid we will useDrawStudio’s object snapping to dothis. Make sure object snapping isactivated by checking there is acheck mark (a tick to you and me)next to the “Layout/Snap to object”menu item. Select the pointer tooland click on the outline of the spinerectangle (the 11mm wide one) toselect it, 8 little squares called handlesshould appear around the edge.Click and drag on the outline butaway from the handles to pick up theobject, move it until the left handedge nearly touches the right handedge of the flap rectangle, as you getclose notice the pointer changes, thisindicates that if you release thebutton the edges of the objects will“snap” together and be neatlyaligned. We want to align the topcorners, when they get close thesnap pointer shows an angle icon,this indicates a corner snap, whenyou get this release the mouse buttonand the two panels should snapneatly alongside each other. Nowalign the cover rectangle to the spineand the flap to the cover. Check theresult looks something like image 2.TIP: Now would be a good time tosave using the “Project/Save” menuitem, you might even like to save thisoutline as a template for other cassetteinlays, if so use “Project/Saveas...” and give the file a new name. Ifyou like to give your files an extensionwhich identifies their type thestandard for DrawStudio is “.dsdr “(DrawStudio DRawing).Let’s give our tape case a backgroundand while we’re at it explorethe image handling in DrawStudio(sounds like fun... maybe... oh go on,you know you want to...). First weneed to add the bitmap to theDrawStudio project using the“Bitmaps” requester, open this nowusing the “View/Bitmaps...” menuitem. Click “New” to add a newbitmap (image) and select the imageyou want to use in the file requesterthat appears, I am using an image Imade myself for this project inImageFX by compositing scans fromseveral book covers. The image youhave chosen will now appear in the“Project Bitmaps” list and DrawStudiodisplays a nice little preview (shownin image 3). We can now place thisimage into our project as many timesas we like and DrawStudio will stillonly need to load it and store it ondisk once which is quite cool, especiallyif your project contains largebitmap images. I’m going to use thesame image repeated on all thepanels of my inlay. Depending on thesize, shape and type of image you’reusing you may choose to spread itonce over all the panels or duplicateit as I have done.To place the image on the page clickthe “Place” button in the “Bitmap”requester. The “Bitmap” requesterdisappears and your pointer turnsinto a frame icon, move this to the topleft hand corner of one of the rectangles,when the pointer turns intothe corner snap icon click the leftmouse button. To re-size the bitmapto fit the rectangle choose the pointertool and ensure the image isselected, now drag its bottom righthandle until it snaps onto the bottomright corner of the rectangle. Oncethe image is sized to your satisfactionwe want to move it behind the rectangleso we can still see the paneloutline, to do this just choose“Arrange/Send to back” from the“Object” menu. Repeat these stepsuntil all the panels are filled with theimage (or if you prefer size oneimage to cover all the panels) Icovered both the flap and spine withone copy of my image so it didn’t becometoo distorted (image 4).That’s the boring basics out of theway, now we can start adding someflash bits to make our tape case lookthe bees knees. First I want to splitthe case into three sections, one atthe top for the type of programmes, abig section in the middle for the titlesand another small section at thebottom which will balance the design.Step by Step...1. Draw the boxes to define the panels.2. Align the boxes using object snap.3. Load the bitmap image.4. Place and size the image in the panels40 CLUBBED - Issue 8Summer 200141


