Modification SportyShirtDress ENG - My Label 3D Fashion Pattern ...
Modification SportyShirtDress ENG - My Label 3D Fashion Pattern ...
Modification SportyShirtDress ENG - My Label 3D Fashion Pattern ...
- No tags were found...

You also want an ePaper? Increase the reach of your titles
YUMPU automatically turns print PDFs into web optimized ePapers that Google loves.
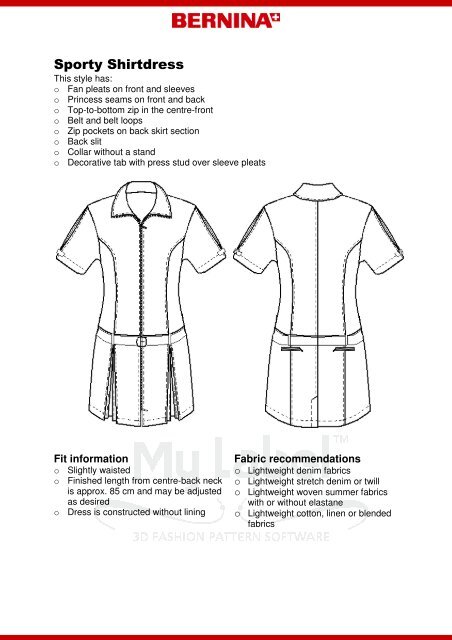
Define hip-lineDraw waistline on front, back, and both side sections, from marking point to markingpoint. This line serves as a guide for better placement of the new hip-line. <strong>Pattern</strong>pieces will need to be enlarged here.Next, draw hip-line parallel to the waistline on all four pattern pieces, approx. 12 cmbelow the waistline (or ¼ of the way down on the lower dress section).Construct facingFirst mark the centre-front with a line running lengthways. Now mark the facing line onthe left-hand half of the front.As per the illustration, this runs in a slight curve from the centre of the shoulder to thecentre of the hem edge.
Zip markingDraw a cutting line for the zip pockets across the lengthways seams of the back skirtsection, approx. 6 cm below the hip-line.Print pattern piecesArrange the pattern pieces so as to save as much space as possible, ‘stacking up’ thefacings and the blue lining sections which are not needed – see example below.The layout of the pattern pieces will vary according to paper format and model size.Save and print out style.
Cut out pattern pieces and make alterations by handCut skirt sections apartDivide centre-front. Cut out facing.Cut front, back and side sections apart along the new hip-lines in each case.Add 1.6cm seam allowance onto all cut edges (see illustration below).Re-label the bottom skirt sections thus created.Adjust shoulder and necklineExtend shoulder length on front and back sections towards the neckline by approx.2.5cm. Raise neckline edge in the centre-front by 4 cm, place paper underneath andeven out towards the shoulder point. Adjust back neckline to the shape of the frontsection, so that the neckline curves harmoniously.Match neckline facing to the front section.
Iron interfacing onto the appropriate pattern pieces.Sewing instructionsBelt loopsNeaten the long edges of the belt loops with the overlocker. Fold belt loops into thirdsso that the long edges overlap, and topstitch.Cut out belt loops in the required length of 7 cm.Sleeve tabsSew sleeve tabs together on the long edges with right sides facing. Press seams apart,sewing one short side in each case. Turn tabs right-side-out, press and edgestitch.Insert press studs.BeltWith right sides facing, stitch together the long edges and one short side of the belt; turnright-side-out, press and topstitch.Mark distances between eyelets as desired and insert eyelets. The centre eyelet shouldmatch the hip circumference.Insert buttonhole for belt-buckle pin approx. 5 cm from end of belt (distance depends onsize of buckle).Thread buckle onto belt end and sew in place.Zip underlapWith right sides facing, stitch together both short sides of the underlap and turn; pressand topstitch.Front skirt sectionSew together side and centre skirt sections. Press seam allowances apart and neaten.Neaten hem edge and press over.Iron in pleats as per markings. Pleats may be held in place with pins or basting thread toprevent them from falling apart.
Back skirt sectionClose centre-back.Sew up to the beginning of the slit with a normal stitch length, then ‘baste together’ up tothe hem edge with the longest stitch length. Neaten seams individually.Sew together side-back and centre-back skirt sections. Press seams to the side seam;neaten lengthways seams and topstitch.Edgestitch the seam allowance of the slit underlap. Press centre-back seam of slitopening onto one side accordingly.Remove basting thread from slit. Neaten hem edge and press over.If desired, topstitch centre-back seam up to beginning of slit.Mitred-corner slit endTurn under hemline and mark hem width on the slit edge on wrong side of fabric (tailor’schalk).Press over slit edge and mark slit width on the hem edge.Join markings diagonally.
With right sides facing, place the slit edge on the hem edge so that the previouslymarked line lies on top of itself. Stitch along the line, then cut off the tip ½ cm short ofthe stitch line. Press seam apart and turn corner right-side-out.Construct zip pocketsIron an interfacing strip measuring approx. 6 x 16 cm onto both sides of the pocket forreinforcement.Place pocket facing on pocket marking with right sides together and pin.Sew around pocket marking as per drawing.Cut pocket opening from centre on each side to within approx. 1 cm of the end, thensnip diagonally into each corner.Turn pocket facing to wrong side and pin.Sew both pocket bags to the zip tapes mirror-inverted as required.Baste zip underneath the pocket opening and edgestitch, pushing the pocket bag to theside to avoid sewing over it at the same time.
Close pocket bags with right sides facing and neaten all around.Skirt side seamsClose side seams of front and back skirt sections. Iron seam allowances apart andneaten.Topstitch hemTopstitch slit overlay and hem edges up to the centre-front in each case, then lock slitcrossways with a diagonal, straightstitched line.Topstitch pleatsTopstitch pleats in skirt front in the same way as the lengthways seams of the skirtback.Secure pleats in the hip seam.Sew together top-back sectionsSew together centre-back and side sections. Press, neaten and topstitch the seams inthe same way as the skirt seams.
Sew together top front sectionsSew together front and side sections. Press seams to the side seam; neaten andtopstitch.Shoulder seamsWith right sides facing, sew back and front sections together along the shoulders.Neaten seam together, press to the back and topstitch.Side seamsWith right sides facing, sew together side seams. Press seams apart and neaten.Sew on belt loopsSew belt loops onto the lengthways seams of the skirt section, approx. 6 cm below thehip seam, making sure that the wrong side of the loop faces outwards and downwards.Fold belt loops over towards the hip seam and pin in the seam allowance.Hip seamWith right sides facing, sew together top and bottom dress sections, making sure that alllengthways seams match up.Neaten seam and press towards top section. This seam too can be topstitched, ifwished.Under collarWith right sides facing, stitch together the under collar in the centre-back. Press seamapart.Sew under collar to neckline as per markings.Trim seam and press into the collar.
ZipBaste zip to closure edges of front section, making sure that the collar seams and hipseams meet up.Pin or baste underlap to left zip tape.The underlap finishes at the same level as the zip.
Facing/CollarNeaten both facing sections along the shoulder, hem, and outside edges. Press overseam allowance of upper collar (base of neck).Stitch facings to upper collar. Press seam allowance to collar.With right sides facing, stitch facing with upper collar to the closure edge and the undercollar of the dress and turn, at the same time turning under the facing hem edge.Grade collar seam allowance to approx. 0.5 cm on one side and press.Close back neckline seam of upper collar by topstitching close to the edge.Topstitch collar and facings all around.
SleeveNeaten hem edges; press over and topstitch.Iron pleats as per markings. Pleats can be pinned or basted in place to prevent themfalling apart.Topstitch pleats and pin in the seam allowance of the sleeve head.Stitch on the prepared button tabs to the left and right of the pleats in such a way thatthe tabs still lie inside the hem width and the closures close towards the back of thesleeve.Sew together sleeve seams; press apart and neaten.Fold under seam allowances on sleeve hem and stitch to hem.Gather sleeve heads and sew in as per the markings.Neaten seam allowances.Finish dressStitch facing by hand to hem, hip-line, and, if necessary, to the shoulders.Pull through belt.You’ll find further detailed information in your <strong>My</strong> <strong>Label</strong> program underHelp > Sewing techniques. This option offers detailed instructions on how to sew beltloops, collars, pockets, linings (and much more) properly. In addition, the basics ofsewing techniques are dealt with for newcomers.