Tucked-Front Blouse - My Label 3D Fashion Pattern Software
Tucked-Front Blouse - My Label 3D Fashion Pattern Software
Tucked-Front Blouse - My Label 3D Fashion Pattern Software

Create successful ePaper yourself
Turn your PDF publications into a flip-book with our unique Google optimized e-Paper software.
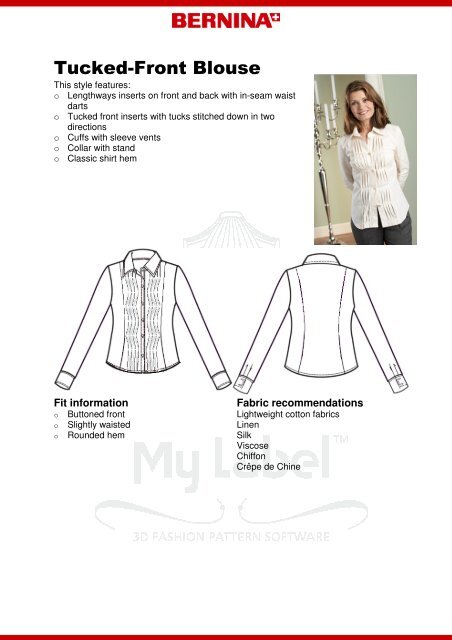
Lengthways inserts on front and backUse the stitch placement to mark the waist darts on the front, drawing them from dartend (bust point) to the shoulder in a slight curve. The line ends on the shoulder, approx.4 cm from the neckline (or, depending on the size, approx. at one third of the shoulderwidth).The back waist darts are also extended up to the shoulder and marked in the same wayas the front darts.The sleeves, collar and cuffs remain in their 'original' forms.Print out pattern piecesPosition, save and print out pattern pieces.Cut out pattern pieces and make alterations by handAfter printing out the pieces, check all new cutting and marking lines and correct them ifrequired.Sleeves, collar and cuffs are cut from their original pieces.<strong>Front</strong> tucksCut out front, leaving approx. 5 cm paper allowance at the shoulders and neckline.Cut front section apart at 5 cm from the button placket.Then insert a 12-cm wide tissue paper strip.Mark the tucksMark 4 tucks (3 cm wide each and 2 cm spaced)Pleat the tucks, adjust the neckline and seam allowances at the shoulder and hem.(see following figures)
Cutting front apartAdding the insertMarking the tucks
Marking the tucksPleating the tucks and aligning the necklineMove bust dart into lenghtways seamExtend bust point to the lengthways line at a right angle, actually drawing the line on thefront as a cross marking.Draw a second line going exactly through the centre of the waist dart.Mark the new grainline parallel to the centre of the waist dart. Cut front side sectionthrough the centre of the waist dart up to the shoulder.Cut apart the bust darts on the marked line. Rejoin the bust dart pieces as shown in thefigure. Cut out waist dart.Add seam allowance (1.6cm) and markings/captions.Recheck the fit of the altered pattern pieces before cutting out.
Fabric requirementFabric KeyFabric, right Fabric, wrongsidesideSymbols and Markings KeyCFCBB9Lining, rightsideLining, wrongsideInterfacingCentre <strong>Front</strong>Centre BackSheetnumberingReference points – helpin combining theindividual sheetsGrainMarkingpoints onfront sectionsMarking pointson backsectionsPleating indirection ofarrowMarking of dart ends.(1cm before the darttip)ButtonmarkingThe figure shows one way the pattern pieces can be laid out a folded length of fabric.Since the pattern pieces are created according to your own measurements andpersonal preferences, they may differ in size and shape from the pattern layout.Fabric 140cm wide, folded.Materials and miscellaneousooButtonsInterfacing
Cutting outFabricooooooo2 x centre front2 x side front2 x side back1 x center back to fabric fold2 x sleeves1 x outer collar stand to fold1 x upper collar to foldInterfaced pieceso 1 x inner collar stand to foldo 1 x undercollar to foldo 2 x cuffTip: Leave ample seam allowance when cutting out the front neckline and shoulder. Theneckline and shoulders will be cut to proper size after the tucks have been stitched.Sewing instructions:Preparation:Lay out paper pattern pieces on fabric as per the cutting-layout illustration. Transfer allmarkings to the fabric after the pieces have been cut out. Fuse interfacing to collar,collar stand, cuffs and button placket.<strong>Front</strong>:Mark the pleat depths (1.5cm) before stitching.Edgestitch foot no. 10 or the seam guide are great aids when stitching the tucks.Straight-stitch all four tucks in a continuous line in each case. Sew with normal stitchlength from the shoulder to the top buttonhole, secure. Then close the remaining seamwith the longest possible stitch length (basting stitch). Iron tucks towards armhole.With right sides facing, stitch side and centre front together. Neaten the seamallowances together and iron towards side seam.Doublefold the buttonhole placket part under – first 1cm, then 3cm. Edgestitch the foldof the buttonhole placket.
Edgestitch the tucks from the shoulder down to the level of the top buttonhole. Thenremove the basting stitches from the tuck grooves.In alternating directions stitch down the tucks with a cross line at each button/buttonholelevel, laying the tucks once towards the centre front and once towards the side seamand stitching across the tucks.The bottom part of the tucks should open towards the side seam.Back:With rigth sides facing, stitch side back sections to centre back. Neaten the seamallowances together and iron towards the side seam in each case.Shoulder seam:With rights sides together, close the shoulder seams, neaten the seam allowances andpress.Collar:Place collar pieces right sides together, matching edges. Stitch outer edges, leavinginside edge of collar open.Grade the seam allowances. Press seam allowances apart - with the aid of a pointpresser if required. Turn collar right-side out. If wished, edgestitch or topstitch theedges.Turn under seam allowances of the interfaced collar stand along the long edges.Place collar stand sections with rights sides together, sliding the collar in-between (seefigure). The stand section with the interfacing lies against the collar section withoutinterfacing and vice-versa. Stitch curved collar stand side together.Grade seam allowances and notch curves. Turn collar stand right-side out and press.
With right sides facing, pin outer collar stand to neckline, matching markings. Stitch,taking care not to catch the inner collar stand in the stitching. Grade and notch seamallowances, then press seam allowances towards collar.Pin the folded edge of the inner collar stand in place over the seam; the folded edgeshould just cover the stitching. Baste in place.Edgestitch the lower edge of the collar stand in place. If wished, edgestitch all aroundthe collar with an edgestitch foot (BERNINA edgestitch foot no. 10/10C).Side seam:With right sides together, close side seams, press seam allowances apart and neaten.Sleeve vent:Staystitch around vent marking 3mm from the marked vent line, sewing 3 short stitchesacross the end of the vent. Cut open the vent up to but not through the stitching at theend of the vent.Place vent on fabric strip right sides together, aligning the vent edge approx. 4mm fromthe edge of the strip. Stitch just to the left along the staystitching on the sleeve side,slightly stretching the vent end.Fold under the seam allowance 7mm and turn over. Pin the fold to the sleeve inside sothat the staystitching is just covered. Edgestitch the strip.Place the vent right sides together and stitch diagonally across the end of the vent (seefigure).
Fold back the front strip to the wrong side and pin. The back part of the strip extends asan underlap.Fold pleat towards vent according to the markings and stitch in place approx. 1.3cmfrom the edge.With right sides facing, close sleeve seam. Press seam allowances apart and neaten.Cuffs:Fold and press the seam allowance along one of the long edges of the cuff. Pin, thenedgestitch the second cuff edge to the sleeve edge according to the markings, takingcare that the seam allowance of the short cuff sides protrudes approx. a seam's width.Trim seam allowances on sleeve and press them towards cuff.Fold cuff right sides together and stitch the short ends (1.6cm) together.Turn cuff right side out, pin open cuff edge to sleeve, then edgestitch in place.Insert sleeve:Inserting a sleeve is easier if a gathering thread is used. Simply stitch from the front tothe back marking with the longest possible straight stitch.Then ease the arm cap into the arm scye by pulling the gathering thread until themarkings match.Insert the sleeve with right sides facing, pin and stitch in place. Press seam and neaten.
Hem:Doublefold hem, press and edgestitch. As an alternative, trim hem allowance to 1 cm,neaten, fold under, press and topstitch a presser-foot's width from the edge.Button and buttonholesSew the buttonholes lengthways according to the markings and sufficiently large to fitthe size of the buttons.Sew on the buttons.Find further detailed information in your <strong>My</strong> <strong>Label</strong> program underHelp > Sewing techniques. This option offers detailed instructions on how to sew beltloops, collars, pockets, linings (and much more) properly. In addition, the basics ofsewing techniques for beginners are explained.