Dangerous Power G3 Spec R Manual - Mcarterbrown.com
Dangerous Power G3 Spec R Manual - Mcarterbrown.com
Dangerous Power G3 Spec R Manual - Mcarterbrown.com
- No tags were found...

Create successful ePaper yourself
Turn your PDF publications into a flip-book with our unique Google optimized e-Paper software.
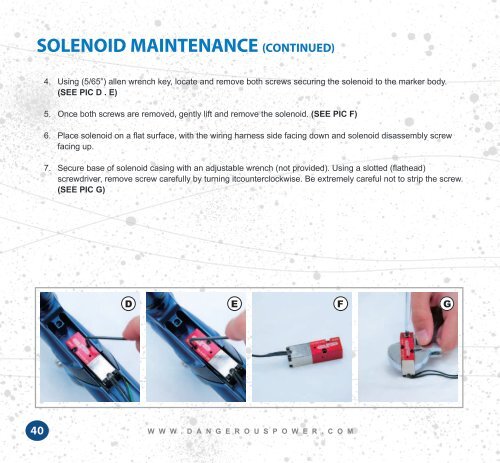
SOLENOID MAINTENANCE (CONTINUED)SOLENOID MAINTENANCE (CONTINUED)4. Using (5/65”) allen wrench key, locate and remove both screws securing the solenoid to the marker body.(SEE PIC D . E)5. Once both screws are removed, gently lift and remove the solenoid. (SEE PIC F)6. Place solenoid on a flat surface, with the wiring harness side facing down and solenoid disassembly screwfacing up.7. Secure base of solenoid casing with an adjustable wrench (not provided). Using a slotted (flathead)screwdriver, remove screw carefully by turning itcounterclockwise. Be extremely careful not to strip the screw.(SEE PIC G)8. Remove solenoid spring. (SEE PIC H)9. With thin tweezers or needle nose pliers, carefully remove the solenoid piston by gently securing the tipand pulling it out. (SEE PIC I)10. Carefully inspect and clean solenoid piston o-rings. Make sure the o-rings are not cracked, broken, or showsigns of wear. Replace parts if necessary.11. With a cotton swab, lightly apply a small amount of DP-40 lube to the solenoid piston assembly. (SEE PIC J)12. Replace in reverse order.WARNINGNEVER USE FORCE WHEN REMOVING OR REINSTALLING THE SOLENOID AND ITS SENSITIVEINTERNALS. BE CAREFUL NOT TO BEND, TWIST, OR BREAK DELICATE WIRES, AS DOING SO MAYRENDER THE UNIT INOPERATIVE OR CAUSE IT TO MALFUNCTION.DEFGHIJ40 W W W . D A N G E R O U S P O W E R . C O M41