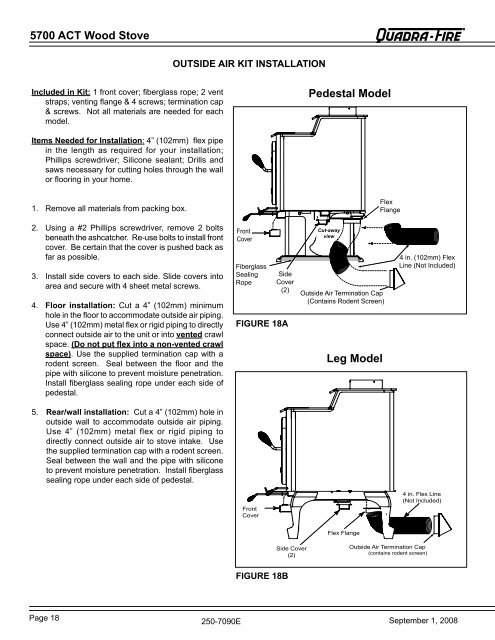
R<strong>5700</strong> ACT Wood StoveOUTSIDE AIR KIT INSTALLATIONIncluded in Kit: 1 front cover; fiberglass rope; 2 ventstraps; venting flange & 4 screws; termination cap& screws. Not all materials are needed for eachmodel.Pedestal ModelItems Needed for Installation: 4” (102mm) flex pipein the length as required for your installation;Phillips screwdriver; Silicone sealant; Drills andsaws necessary for cutting holes through the wallor flooring in your home.1. Remove all materials from packing box.FlexFlange2. Using a #2 Phillips screwdriver, remove 2 boltsbeneath the ashcatcher. Re-use bolts to install frontcover. Be certain that the cover is pushed back asfar as possible.3. Install side covers to each side. Slide covers intoarea and secure with 4 sheet metal screws.4. Floor installation: Cut a 4” (102mm) minimumhole in the floor to accommodate outside air piping.Use 4” (102mm) metal flex or rigid piping to directlyconnect outside air to the unit or into vented crawlspace. (Do not put flex into a non-vented crawlspace). Use the supplied termination cap with arodent screen. Seal between the floor and thepipe with silicone to prevent moisture penetration.Install fiberglass sealing rope under each side ofpedestal.FrontCoverFiberglassSealingropeSideCover(2)FIGURE 18ACut-awayviewOutside Air Termination Cap(Contains rodent Screen)Leg Model4 in. (102mm) FlexLine (Not Included)5. Rear/wall installation: Cut a 4” (102mm) hole inoutside wall to accommodate outside air piping.Use 4” (102mm) metal flex or rigid piping todirectly connect outside air to stove intake. Usethe supplied termination cap with a rodent screen.Seal between the wall and the pipe with siliconeto prevent moisture penetration. Install fiberglasssealing rope under each side of pedestal.FrontCover4 in. Flex Line(Not Included)Flex FlangeSide Cover(2)Outside Air Termination Cap(contains rodent screen)FIGURE 18BPage 18250-7090ESeptember 1, 2008
ROPERATING INSTRUCTIONSIMPORTANT - PLEASE READ BEFORE USING <strong>STOVE</strong><strong>5700</strong> ACT Wood StoveBURNING PROCESSIn recent years there has been an increasing concern about airquality. Much of the blame for poor air quality has been placedon the burning of wood for home heating. In order to improve thesituation, we at Quadra-Fire have developed cleaner-burning woodstoves that surpass the requirements for emissions establishedby our governing agencies. These wood stoves, like any otherappliances, must be properly operated in order to ensure that theyperform the way they are designed to perform. Improper operationcan turn most any wood stove into a smoldering environmentalhazard.KINDLING or 1st STAGEIt helps to know a little about the actual process of burning inorder to understand what goes on inside a stove. The first stageof burning is called the kindling stage. In this stage, the wood isheated to a temperature high enough to evaporate the moisturewhich is present in all wood. The wood will reach the boilingpoint of water (212°F) and will not get any hotter until the wateris evaporated. This process takes heat from the coals andtends to cool the stove.Fire requires three things to burn: fuel, air and heat. So, if heatis robbed from the stove during the drying stage, the new load ofwood has reduced the chances for a good clean burn. For thisreason, it is always best to burn dry, seasoned firewood. Whenthe wood isn’t dry, you must open the air controls and burn thestove at a high burn setting for a longer time to start it burning.The heat generated from the fire should be warming your homeand establishing the flue draft, not evaporating the moisutre outof wet, unserasoned wood, resulting in wasted heat.The air control on the right side of the stove is called the Start -UpAir Control; it is used during the kindling stage of burning. It mustbe closed (pulled out) after the first 5 to 15 minutes.2nd STAGEThe next stage of burning, the secondary stage, is the period whenthe wood gives off flammable gases which burn above the fuelwith bright flames. During this stage of burning it is very importantthat the flames be maintained and not allowed to go out. This willensure the cleanest possible fire. If you are adjusting your stovefor a low burn rate, you should close down the air to the pointwhere you can still maintain some flame. If the flames tend togo out, the stove is set too low for your burning conditions. Theair control in the center of the stove beneath the ashcatcher, isthe one used to adjust the stove for burn rates. This is called thePrimary Control. See Figure 19A.FINAL STAGEThe final stage of burning is the charcoal stage. This occurs whenthe flammable gases have been mostly burned and only charcoalremains. This is a naturally clean portion of the burn. The coalsburn with hot blue flames.It is very important to reload your stove while enough lively hotcoals remain in order to provide the amount of heat needed to dryand rekindle the next load of wood. It is best to open the aircontrols for a short while before reloading. This livens upthe coalbed. Open door slowly so that ash or smoke doesnot exit stove through opening. You should also break up anylarge chunks and distribute the coals so that the new woodis laid on hot coals.Air quality is important to all of us, and if we choose to usewood to heat our homes we should do so responsibly. To dothis we need to learn to burn our stoves in the cleanest waypossible. Doing this will allow us to continue using our woodstoves for many years to come.START-UP AIR SYSTEMThe combustion air enters at the rear of the firebox throughthe rear air tubes. This air supply is controlled by theStart-up Air Control.PRIMARY AIR SYSTEMThe primary air enters at the upper front of the firebox,near the top of the glass door. This preheated air suppliesthe necessary fresh oxygen to mix with the unburnedgases, helping to create secondary, tertiary and quaternarycombustions. This air is regulated by the Primary Control.For more primary air push control in, for less air pullcontrol out.OPEN - PUSH IN RodFIGURE 19AAIR CONTROLSPRIMARY AIRCONTROLSTART-UP AIRCONTROLCLOSE - PULL OUT RodOPERATION OF TWO-STEP DOOR HANDLEThe <strong>5700</strong> is equipped with a two-step door handle. Turn thedoor handle counter clockwise and open the door. The doorwill open approximately one inch and stop. This allows forthe air flow to stablize and flow up the chimney and helpsprevent smoke spillage into the room. We recommend thatyou pause at this stage to allow this to take place. Continueto turn counter clockwise and now you can completely openthe door for refueling. See Figure 24A on page 24 for installationinstructions.September 1, 2008250-7090EPage 19


