Formulas Online - TTB
Formulas Online - TTB
Formulas Online - TTB

You also want an ePaper? Increase the reach of your titles
YUMPU automatically turns print PDFs into web optimized ePapers that Google loves.
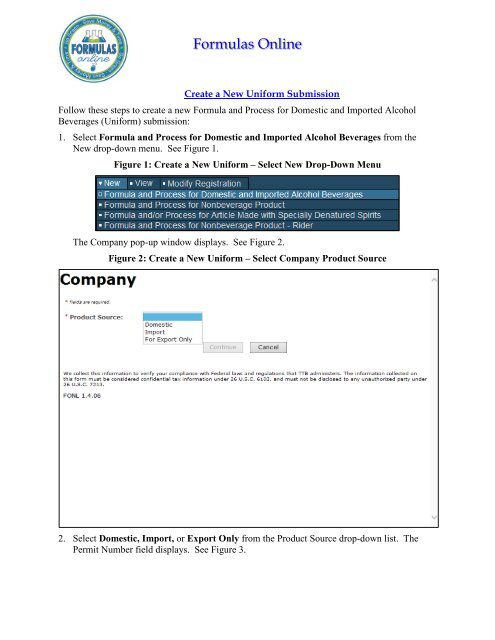
<strong>Formulas</strong> <strong>Online</strong>Create a New Uniform SubmissionFollow these steps to create a new Formula and Process for Domestic and Imported AlcoholBeverages (Uniform) submission:1. Select Formula and Process for Domestic and Imported Alcohol Beverages from theNew drop-down menu. See Figure 1.Figure 1: Create a New Uniform – Select New Drop-Down MenuThe Company pop-up window displays. See Figure 2.Figure 2: Create a New Uniform – Select Company Product Source2. Select Domestic, Import, or Export Only from the Product Source drop-down list. ThePermit Number field displays. See Figure 3.
Create a New Uniform SubmissionFigure 3: Create a New Uniform – Select Company Permit Number3. Select the permit number for the company for which you are creating this submission. Thesystem pre-populates the company address information.►Note: If you select Domestic or For Export Only as the product source, the Permit Holderand Submitter mailing address information displays. See Figure 4. If you select Importer as theproduct source, the Foreign Manufacturer address information also displays. See Figure 5.Page 2
Create a New Uniform SubmissionFigure 5: Create a New Uniform – Company (Import)4. Edit Submitter mailing address information or Foreign Manufacturer address information ifapplicable.►Note: Fields marked with asterisks (*) are required fields.►Note: Permit Holder address information is not editable.Page 4
Create a New Uniform Submission5. Select the Continue button. The Superseded Formula pop-up window displays. See Figure6.Figure 6: Create a New Uniform – Superseded Formula Pop-Up Window►Note: Fields marked with asterisks (*) are required fields.6. Create a new formula or supersede an existing formula.a. If you are creating a new formula:i. Select the Create New Formula radio button.ii.Select the Continue button and proceed to Company/Address Detail. The Companytab displays with the address information added. See Figure 8.b. If you are superseding an existing formula:i. Select the Supersede Existing Formula radio button. The Superseded Formula fieldsdisplay. See Figure 7.Page 5
Create a New Uniform SubmissionFigure 7: Create a New Uniform – Supersede Existing Formulaii.Enter the Formula Identifier by either entering the <strong>TTB</strong> Formula ID (if known) or byselecting the Permit Number from the drop-down list and then entering CompanyFormula Number.►Note: This must be an approved and closed submission formula if the formula exists in<strong>Formulas</strong> <strong>Online</strong>.►Note: You may also add additional superseded formulas through the Main tab of thesubmission. A single formula may supersede multiple formulas.iii.Select the Continue button and proceed to Company/Address Detail. The Companytab displays with the address information added. See Figure 8.Company/Address DetailFigure 8: Create a New Uniform – Company Tab with Company Address Added►Note: Whenever you see a Company or Address screen, you will also see the Start Date andEnd Date fields. These fields indicate the dates during which the entity (generally thePage 6
Create a New Uniform SubmissionManufacturer) had ownership of a given submission or formula and/or when a given address wasactive and/or valid (for any submission type). The majority of submissions will never show anEnd Date. End Dates are generated only when formulas are adopted by, transferred to, orremoved from, a given company. This is referred to as formula adoption.►Note: Please contact the ALFD directly if you need assistance with formula adoption. Youre-mail request should include information for both the sending and receiving companies(company names, company codes, permit numbers, formula numbers, and dates of adoption,removal, or transfer) involved for both the sending and receiving companies.1. Confirm the Company/Address Detail information.►Note: Select the Address Type link to edit any necessary information for the address type.You cannot edit the Manufacturer address, but you may add a different one and then delete theone you have selected. Select the checkbox next to the address and select the Delete button todelete the address. A confirmation message box displays prompting you to confirm your action.See Figure 9. Select the OK button to confirm.Figure 9: Create a New Uniform – Delete Address Confirmation2. Select the Add button to add a new address. The Address pop-up window displays. SeeFigure 10.Page 7
Create a New Uniform Submission4. Enter the company address information in the available fields. See Figure 13. If you selectForeign for Address Format, additional address fields display. See Figure 14.Figure 13: Create a New Uniform – Address Fields (Domestic)Page 9
Create a New Uniform SubmissionFigure 14: Create a New Uniform – Address Fields (Foreign)►Note: Fields marked with asterisks (*) are required fields.5. Select the OK button. The Address pop-up window closes and the Company tab displayswith the address information added.6. Repeat the steps for all additional addresses needed for the submission.►Note: If you add any company for which you are not an authorized Submitter, even after youhave either started with or entered one for which you are an authorized Submitter, you will notbe able to submit the submission. You will only be able to save as draft.►Note: Available and/or required addresses vary depending on type of Uniform submissionbeing entered. Imported submissions have two additional address types: Foreign Manufacturerand Importer.7. Select the Next button. The Main tab displays. See Figure 16.►Note: For convenience, the system displays Contacts information at the bottom of the Maintab as well as on the Company tab. See Figure 15.Page 10
Create a New Uniform SubmissionContactsFigure 15: Create a New Uniform – Contacts1. Confirm Contacts information (if any).2. Add, edit, or delete Contacts through the Company tab if applicable following the steps inCompany/Address Detail.Main TabFigure 16: Create a New Uniform – Main Tab►Note: Fields marked with asterisks (*) are required fields.1. Create a new formula or supersede an existing formula.a. If you are creating a new formula:i. Enter the Company Formula Number in the text box to the right of the PermitNumber. This must be a numeric value.b. If you are superseding an existing formula:i. Select the Supersede Existing Formula radio button. The Supersedes Formula fieldsdisplay below the radio buttons. See Figure 17.Page 11
Create a New Uniform Submission►Note: If you initially superseded an existing formula during the submission creation, thesuperseded formula would display in the Supersedes Formula section. You may add additionalsuperseded formulas to the list. A single formula may supersede multiple formulas.Figure 17: Create a New Uniform – Supersedes Formula Fieldsii.Select the Add button. The Superseded Formula pop-up window displays. SeeFigure 18.Superseded FormulaFigure 18: Create a New Uniform – Superseded Formula Pop-Up Windowi. Enter the <strong>TTB</strong> Formula ID.orii. Select the Company Code and enter the Company Formula #.iii.Select the OK button. The Superseded Formula Pop-Up window closes and the Maintab displays with the superseded formula added. See Figure 19.Page 12
Create a New Uniform SubmissionFigure 19: Create a New Uniform – Superseded Formula Added►Note: Select the checkbox next to the superseded formula and select the Delete button todelete the superseded formula. You may add additional superseded formulas by selecting theAdd button to display the Superseded Formula pop-up window and following Steps i – ii.Class/TypeFigure 20: Create a New Uniform – Class/Type Specified1. Select the options from the drop-down lists.c. Commodity Type• Malt• Wine• Distilled Spirits►Note: Commodity types are available in this drop-down list according to whether the specificmanufacturer produces that commodity type.Page 13
Create a New Uniform Submissiond. Product Source• Domestic• Import• For Export Onlye. Class/Type►Note: Class/Type options vary depending on commodity selected.2. Enter the Product Name and Type Description in the available fields.3. Select the Next button. The Formula tab displays. See Figure 21.SummaryFigure 21: Create a New Uniform – Formula Tab (Volume/Weight Measurement Type)Figure 22: Create a New Uniform – Formula Tab (Percentage Measurement Type)1. Enter the Summary information in the available fields.►Note: Fields marked with asterisks (*) are required fields.a. Measurement Type• Percentage• Volume/Weightb. Measurement UnitsPage 14
Create a New Uniform Submission• Englisho Gallonso Barrels• Metrico Milliliterso Liters►Note: Measurement Type and Measurement Units will pre-populate the type of Units ofMeasurement used in the Ingredients pop-up windows.►Note: When the Product Source is “Domestic,” then the unit of measure should be “English.”When the Product Source is “Import,” then the unit of measure should be “Metric.”c. Total Yieldd. Alcohol Content of Finished ProductIngredients• Low• High• Unito % by Volumeo ProofFigure 23: Create a New Uniform – IngredientsPage 15
Create a New Uniform SubmissionThe Ingredients section of the Formula tab contains multiple sections to add specific types ofingredients information and to group ingredients together by type.►Note: If the Commodity Type is “Wine” or “Distilled Spirits,” you will see FermentableIngredients, Finished Alcohol, Flavors, and Other Ingredients. If Commodity Type is “Malt,”you will not see Finished Alcohol.Follow these steps to add ingredients information to the submission:1. Enter all ingredients information.a. Ingredients (Fermentable Ingredient)b. Ingredients (Finished Alcohol Ingredient)c. Ingredients (Flavor Ingredient)d. Ingredients (Other Ingredient)Ingredients (Fermentable Ingredient)Figure 24: Create a New Uniform – Fermentable Ingredient Pop-Up WindowFollow these steps to add fermentable ingredient information to the submission:1. Select the Add button in the Fermentable Ingredients section. The Fermentable Ingredientpop-up window displays. See Figure 24.2. Enter the fermentable ingredient information in the available fields.►Note: Fields marked with asterisks (*) are required fields.Page 16
Create a New Uniform Submission3. Optional Step: Attach a file specific to this ingredient. See Add/Edit Attachments (for allingredients).4. Select the OK button. The Fermentable Ingredient pop-up window closes and the Formulatab displays. The ingredient is added in the Fermentable Ingredients section. See Figure 25.Figure 25: Create a New Uniform – Fermentable Ingredients Information Added5. Repeat the steps to add all fermentable ingredient information to the submission.►Note: Select the Ingredient Name link to display the Fermentable Ingredient pop-up windowand edit the ingredient. Select the checkbox next to the fermentable ingredient and select theDelete button to delete the ingredient. A confirmation message box displays prompting you toconfirm your action. See Figure 26. Select the OK button to confirm.Figure 26: Create a New Uniform – Delete Fermentable Ingredient ConfirmationPage 17
Create a New Uniform SubmissionIngredients (Finished Alcohol Ingredient)Figure 27: Create a New Uniform – Finished Alcohol Ingredient Pop-Up WindowFollow these steps to add finished alcohol ingredient information to the submission:1. Select the Add button in the Finished Alcohol section. The Finished Alcohol Ingredient popupwindow displays. See Figure 27.2. Enter the finished alcohol ingredient information in the available fields.►Note: Fields marked with asterisks (*) are required fields.3. Optional Step: Attach a file specific to this ingredient. See Add/Edit Attachments (for allingredients).4. Select the OK button. The Finished Alcohol Ingredient pop-up window closes and theFormula tab displays. The ingredient is added in the Finished Alcohol section. See Figure28.Page 18
Create a New Uniform SubmissionFigure 28: Create a New Uniform – Finished Alcohol Information Added5. Repeat the steps to add all finished alcohol ingredient information to the submission.►Note: Select the Ingredient Name link to display the Finished Alcohol Ingredient pop-upwindow and edit the ingredient. Select the checkbox next to the finished alcohol ingredient andselect the Delete button to delete the ingredient. A confirmation message box displaysprompting you to confirm your action. See Figure 29. Select the OK button to confirm.Figure 29: Create a New Uniform – Delete Finished Alcohol Ingredient ConfirmationPage 19
Create a New Uniform SubmissionIngredients (Flavor Ingredient)Figure 30: Create a New Uniform – Flavor Ingredient Pop-Up WindowFollow these steps to add flavor ingredient information to the submission:1. Select the Add button in the Flavors section. The Flavor Ingredient pop-up window displays.See Figure 30.2. Enter the flavor ingredient information in the available fields.►Note: Fields marked with asterisks (*) are required fields.►Note: If you select the “Compound Flavor?” checkbox, you may specify a <strong>TTB</strong> Formula ID.►Note: If the flavor alcohol ingredient is a previously submitted formula, this allows you tosearch for a submission and populate the existing formula information (e.g., <strong>TTB</strong> Formula ID,Permit Number, and Company Formula ID).3. Optional Step: Select the Select button next to <strong>TTB</strong> Formula ID. The Search <strong>Formulas</strong> popupwindow displays. See Figure 31.Page 20
Create a New Uniform Submission►Note: If there is no FID sheet found, a warning message box displays recommending that youupload a FID sheet. This warning message box does not display if a FID sheet has already beenuploaded for this ingredient in a previous submission. See Figure 33.Figure 33: Create a New Uniform – No FID Sheet Found Error5. Optional Step: Attach a FID sheet or other document specific to this ingredient. SeeAdd/Edit Attachments (for all ingredients).6. Select the OK button. The Flavor Ingredient pop-up window closes and the Formula tabdisplays. The ingredient is added in the Flavors section. See Figure 34.Figure 34: Create a New Uniform – Flavor Ingredient Information Added7. Repeat the steps to add all flavor ingredient information to the submission.►Note: Select the Ingredient Name link to display the Flavor Ingredient pop-up window andedit the ingredient. Select the checkbox next to the flavor ingredient and select the Delete buttonto delete the ingredient. A confirmation message box displays prompting you to confirm youraction. See Figure 35. Select the OK button to confirm.Figure 35: Create a New Uniform – Delete Flavor Ingredient ConfirmationPage 22
Create a New Uniform SubmissionIngredients (Other Ingredient)Figure 36: Create a New Uniform – Other Ingredient Pop-Up WindowFollow these steps to add other ingredient information to the submission:1. Select the Add button in the Other Ingredients section. The Other Ingredient pop-up windowdisplays. See Figure 36.2. Enter the other ingredient information in the available fields.►Note: Fields marked with asterisks (*) are required fields.3. Optional Step: Attach a file specific to this ingredient. See Add/Edit Attachments (for allingredients).4. Select the OK button. The Other Ingredient pop-up window closes and the Formula tabdisplays. The ingredient is added in the Other Ingredients section. See Figure 37.Page 23
Create a New Uniform SubmissionFigure 37: Create a New Uniform – Other Ingredient Information Added5. Repeat the steps to add all other ingredient information to the submission.►Note: Select the Ingredient Name link to display the Other Ingredient pop-up window andedit the ingredient. Select the checkbox next to the other ingredient and select the Delete buttonto delete the ingredient. A confirmation message box displays prompting you to confirm youraction. See Figure 38. Select the OK button to confirm.Figure 38: Create a New Uniform – Delete Other Ingredient ConfirmationAdd/Edit Attachment (for all ingredients)Figure 39: Create a New Uniform – Attachment Pop-Up WindowFollow these steps to add/edit attachments for all ingredients:1. Select the Add button. The Attachment pop-up window displays. See Figure 39.2. Enter the attachment information in the available fields.Page 24
Create a New Uniform Submission►Note: Fields marked with asterisks (*) are required fields.3. Select the Browse button to browse and select a file specific to this ingredient.4. Select the Open button to attach the selected file.5. Select the OK button. The Attachment pop-up window closes and the Ingredient pop-upwindow displays. The attachment is added in the ingredient documents section.Figure 40: Create a New Uniform – Attachment Information Added►Note: Select the edit link next to the attachment to display the Attachment pop-up windowand edit the attachment.Ingredients (Group Ingredients)Follow these steps to group ingredients by type:►Note: You cannot “share” ingredients across groups. You may only group ingredients withinthe same types (e.g., flavors with flavors). This is typically used to indicate that, for a givenbatch, only one of the ingredients in the group will be used. The ingredients are so similar thatthey are interchangeable and would not require a change in formulation1. Select the checkboxes next to the ingredients within types. See Figure 41.Figure 41: Create a New Uniform – Group Ingredients Selected2. Select the Group button. A confirmation message box displays prompting you to confirmyour action. See Figure 42.Page 25
Create a New Uniform SubmissionFigure 42: Create a New Uniform – Group Ingredients Confirmation3. Select the OK button to confirm. The confirmation message box closes and the IngredientGroup pop-up window displays. See Figure 43.Figure 43: Create a New Uniform – Ingredient Group Pop-Up Window4. Enter the group information in the available fields.►Note: Fields marked with asterisks (*) are required fields.5. Select the OK button. The Ingredient Group pop-up window closes and the Formula tabdisplays. The group name is added in the ingredient section. See Figure 44.Figure 44: Create a New Uniform – Ingredient Group Information Added►Note: To ungroup ingredients, select the checkboxes next to the ingredients and select theUngroup button. A confirmation message box displays prompting you to confirm your action.Page 26
Create a New Uniform SubmissionSee Figure 45. Select the OK button to confirm. The confirmation message box closes and thegroup name is removed from the ingredient section.Figure 45: Create a New Uniform – Ungroup Ingredients ConfirmationMethod of Manufacture/Process of ProductionFigure 46: Create a New Uniform – Method of Manufacture/Process of ProductionFollow these steps to add Method of Manufacture Process/Process of Production information tothe submission:1. Select the “Method of Manufacture Process will be provided separately” checkbox if it willbe provided separately by the manufacturer after you submit the formula to <strong>TTB</strong>.►Note: If you make this choice or if this is an import, remember to ask the manufacturer tosend it directly to <strong>TTB</strong> with a reference to the Submission ID. The formula will not be processedby <strong>TTB</strong> until the method of manufacture has been received.Alternatively, describe the method details or enter “see attached” in the text box and attachmethod of manufacture or process of production. See Uploading Attachments and LinkingSubmissions for information on uploading attachments. You must make sure the Typeselected is Method of Manufacture.2. Select the Next button to proceed with the submission creation. The Samples tab displays.See Figure 47.Page 27
Create a New Uniform SubmissionSample DetailFigure 47: Create a New Uniform – Samples Tab►Note: Submissions may require you to mail a sample of the product for laboratory analysis,depending on the source, class and type of the product selected on the Main tab. If you will beproviding a sample, it must be added to the submission through the Samples tab.Follow these steps to add a sample to the submission:1. Select the Add button in the Samples tab. The Sample pop-up window displays. See Figure48.Figure 48: Create a New Uniform – Sample Pop-Up Window2. Enter the sample information in the available fields.Page 28
Create a New Uniform Submission►Note: Fields marked with asterisks (*) are required fields.3. Select the OK button. The Sample pop-up window closes and the Sample tab displays. Thesample is added in the Sample Detail section. See Figure 49.Figure 49: Create a New Uniform – Samples Tab with Sample Added4. Repeat the steps to add each sample you are sending to <strong>TTB</strong>.►Note: The system generates submission ID and sample IDs after you save as draft or submit.Until then, sample IDs appear as “Pending.” The system prompts you to generate the sample IDsheet once you submit. When it does, enter dates sent, print sample ID sheets, and affix them tothe physical samples or include them in the mailing package.►Note: Select the Sample ID link to display the Sample pop-up window and edit the sample.Select the checkbox next to the sample and select the Delete button to delete the sample. Aconfirmation message box displays prompting you to confirm your action. See Figure 50. Selectthe OK button to confirm.Figure 50: Create a New Uniform – Delete Sample ConfirmationValidate/Save as DraftBefore submitting, you may either:a. Validate (check for errors without saving or submitting as final to <strong>TTB</strong>) to ensure thatyou have completed the submission correctly. Select the Validate button. Red errormessages display indicating any issues found with the submission. See Figure 51.Page 29
Create a New Uniform SubmissionAlternatively, a green message displays indicating no issues were found with thesubmission. See Figure 52. Correct any errors and repeat this step until the submission issuccessfully validated. You may save as draft with errors, but you must correct all errorsbefore submitting a draft.Figure 51: Create a New Uniform – Unsuccessful Validation MessageFigure 52: Create a New Uniform – Successful Validation Messageorf. Save as Draft if you are not yet ready to submit, or if you are the Preparer/Reviewer(since only a Submitter may actually submit the submission). Select the Save as Draftbutton. <strong>Formulas</strong> <strong>Online</strong> stores your submission until you or an authorized Submitterreturn to finalize the submission. See Figure 53.Figure 53: Create a New Uniform – Save As Draft ConfirmationSubmit Uniform SubmissionFollow these steps to submit your uniform submission:1. Select the Submit button. The Perjury Statement pop-up window displays, which requiresthat you attest to the correctness of your application. See Figure 54.Page 30
Create a New Uniform SubmissionFigure 54: Create a New Uniform – Perjury Statement Pop-Up Window2. Select the “I agree” checkbox to acknowledge you have read, understood, and complied withinstructions for filing the application. The OK button is enabled.3. Select the OK button. The Submission Confirmation page displays with links to theSubmission ID, Unauthorized Users tab, and the Samples tab (where applicable). Theuniform submission is successfully submitted. See Figure 55.Figure 55: Create a New Uniform – Submission Confirmation<strong>TTB</strong> will contact you by e-mail when analysis has been completed or if additionalinformation is needed.►Note: Unauthorized Users data is used by COLAs <strong>Online</strong>. By default, unless you excludethem, all COLAs <strong>Online</strong> users who are registered for this company will be able to reference thisapproved formula on a COLAs <strong>Online</strong> e-application. You may use the Unauthorized Usersfunction to disable given users. This is not common. See Unauthorized Users Tab – Uniformfor more information.Page 31
Create a New Uniform Submission4. Select the return to the Samples link in the submission confirmation to enter sample sentdates and print sample ID sheets if you included samples in the submission.►Note: Only users with authenticated Submitter roles may submit submissions. Users withauthenticated Preparer/Reviewer roles for any of the permit numbers included with thesubmission may perform all other submission preparation functions, but are not allowed tosubmit as final to <strong>TTB</strong> for processing.Unauthorized Users TabFigure 56: Create a New Uniform – Unauthorized Users TabThe Unauthorized Users tab will only display after you have submitted the submission. This taballows you to restrict an individual’s use of this formula in COLAs <strong>Online</strong>.Follow these steps to restrict an individual’s access to this formula:1. Select the Add button. The Add Unauthorized User pop-up window displays. See Figure57.Page 32
Create a New Uniform SubmissionFigure 57: Create a New Uniform – Add Unauthorized Users Pop -Up Window2. Select the checkbox next the user you want to designate as “unauthorized.”3. Select the Add button. The Add Unauthorized Users pop-up window closes and theUnauthorized Users tab displays with the unauthorized user’s name. See Figure 58.Figure 58: Create a New Uniform – Unauthorized User Tab with User Added4. Select the Save button.Page 33
Create a New Uniform Submission►Note: Select the checkbox next to the user and select the Delete button to delete the user. Aconfirmation message box displays prompting you to confirm your action. See Figure 59. Selectthe OK button to confirm.Figure 59: Create a New Uniform – Delete Unauthorized User ConfirmationEnter a Sample Sent Date for Uniform SubmissionsSee Entering Sample Sent Date for sample sent date instructions.Print a Sample ID Sheet for Uniform SubmissionsSee Printing Sample ID Sheets for sample sending instructions.Comments and Docs/Links for Uniform SubmissionsSee Adding, Editing, and Deleting Comments for comment instructions. See UploadingAttachments and Linking Submissions for upload and link instructions.Edit, Correct, and Resubmit a Uniform SubmissionBefore submitting, you may edit the submission at will. After submitting, you will be unable toedit until/unless <strong>TTB</strong> informs you that your submission needs correction. See Editing,Correcting, and Resubmitting Submissions for editing, correction, and resubmission instructions.Copy an Existing Uniform SubmissionSee Copying Existing Submissions for copy instructions.Print a Uniform SubmissionSee Printing Submissions for print instructions.Withdraw a Uniform SubmissionSee Withdraw a Submission for instructions on how to withdraw an active submission prior to<strong>TTB</strong> process completion.Page 34