The Safety Handbook ABB Jokab - Automation Systems and Controls
The Safety Handbook ABB Jokab - Automation Systems and Controls
The Safety Handbook ABB Jokab - Automation Systems and Controls
- No tags were found...

You also want an ePaper? Increase the reach of your titles
YUMPU automatically turns print PDFs into web optimized ePapers that Google loves.
<strong>The</strong> <strong>Safety</strong> <strong>H<strong>and</strong>book</strong>Experience - <strong>Systems</strong> - ProductsMachine safety offering from<strong>ABB</strong> <strong>Jokab</strong> <strong>Safety</strong><strong>Safety</strong>
Machine safetyProductivity <strong>and</strong> safetygo h<strong>and</strong> in h<strong>and</strong><strong>Jokab</strong> <strong>Safety</strong> was acquired by <strong>ABB</strong> in march 2010. This gives us extra strength <strong>and</strong> a sales networkin 120 countries. Our goal is to become even better at supporting you as a customer through cooperationwithin <strong>ABB</strong> <strong>Jokab</strong> <strong>Safety</strong> globally <strong>and</strong> locally.<strong>The</strong> fact that the leading power <strong>and</strong> automation technologycompany, <strong>ABB</strong>, <strong>and</strong> a leader in machine safety, <strong>Jokab</strong><strong>Safety</strong>, are joining forces means a lot more than just a neworganisational chart. <strong>ABB</strong> has a huge footprint in the industry- from power supply to the control of each individual motor- <strong>and</strong> has been delivering reliable solutions for decadesthat boost productivity in the industry. <strong>The</strong> acquisition of<strong>Jokab</strong> <strong>Safety</strong> now means the last building block is in place.We can now offer our customers tailored, turnkey solutionswhere machine safety is an integral <strong>and</strong> value-enhancingcomponent.Since its inception in 1988, <strong>Jokab</strong> <strong>Safety</strong> has been adheringto the business concept of developing innovativeproducts <strong>and</strong> solutions for machine safety. <strong>The</strong> companyhas supplied everything from individual safety componentsto fully installed protection systems for entire productionlines <strong>and</strong> works on a daily basis with the practical applicationof safety requirements in combination with productionrequirements. <strong>Jokab</strong> <strong>Safety</strong> is also represented on avariety of international st<strong>and</strong>ards committees concernedwith the safety of machinery which means that we havenow added this very valuable experience <strong>and</strong> knowledgeto our offering. Similarly, <strong>ABB</strong> has always been a pioneer<strong>and</strong> a representative for its business areas <strong>and</strong> a powerfulvoice in professional organisations <strong>and</strong> committees.All in all, this creates an enormous bank of knowledge<strong>and</strong> experience that we look forward to sharing with ourcustomers.Productivity <strong>and</strong> safety are not contradictory terms. Onthe contrary, safety solutions that are properly executed<strong>and</strong> adapted from the beginning will increase productivity.A partner that can deliver integrated <strong>and</strong> well thought outturnkey solutions enables a production-friendly safety environment.By building up <strong>and</strong> upgrading safety solutionsin existing environments in a smart way, the mode of productionwill not need to be adapted to meet the requirementsthat safety sets. Instead, this allows a system thatis manufacturing-friendly <strong>and</strong> that takes into account thebusiness <strong>and</strong> its productivity objectives.
IntroductionWe develop innovative products <strong>and</strong> solutions for machine safety, <strong>Safety</strong> history, Directives <strong>and</strong> St<strong>and</strong>ards,Working method as specified in EN ISO 13849-1, What defines a safety function?, Applying EN 62061,A mechanical switch does not give a safe function! We train you on safety requirementsPluto <strong>Safety</strong> PLCPluto, Gateway, Profibus, DeviceNet, CANopen, Ethernet, Safe Encoder, IDFIX, program examplesPluto AS-iPluto AS-i, Urax, FlexPluto ManagerSoftware for programming of PlutoVital <strong>and</strong> Tina safety systemsVital, Tina <strong>and</strong> Connection examples<strong>Safety</strong> relaysRT series, JSB series, <strong>Safety</strong> timers, Expansion relays, Connection examplesLight curtains, Light grids, Light beams<strong>and</strong> ScannerFocus, Spot, Look, Bjorn, Focus Wet, Blanking programmer, Connection examplesStop time measurement <strong>and</strong> machine diagnosisSmart, Smart ManagerSensors/SwitchesEden, JSNY series, Magne, Dalton, KnoxControl devices3-position device JSHD4, Two-h<strong>and</strong>ed control unit SafeballEmergency stop devicesInca, Smile, Smile Tina, Line emergency stopContacts rails/Bumpers/<strong>Safety</strong> matsFencing systemsQuick-Guard, Quick-Guard E, SafeCad, Roller doorsEC Declaration of Conformity1234567891011121314
We develop innovative products <strong>and</strong>solutions for machine safetyWe make it simple to build safety systems. Developing innovative products <strong>and</strong> solutionsfor machine safety has been our business idea since the company <strong>Jokab</strong> <strong>Safety</strong>,now <strong>ABB</strong> AB, was founded in Sweden in 1988. Our vision is to become “Your partnerfor machine safety – globally <strong>and</strong> locally”.Many industries around the world, have discovered how much easier it has becometo build protection <strong>and</strong> safety systems with our components <strong>and</strong> guidance.ExperienceWe have great experience of practical application of safetyrequirements <strong>and</strong> st<strong>and</strong>ards from both authorities <strong>and</strong>production. We represent Sweden in st<strong>and</strong>ardisation organisationsfor machine safety <strong>and</strong> we work daily with thepractical application of safety requirements in combinationwith production requirements. You can use our experiencefor training <strong>and</strong> advice.<strong>Systems</strong>We deliver everything from a safety solution to completesafety systems for single machines or entire productionlines. We combine production dem<strong>and</strong>s with safety dem<strong>and</strong>sfor production-friendly solutions.ProductsWe market a complete range of safety products, whichmakes it easy to build safety systems. We develop theseinnovative products continuously, in cooperation with ourcustomers Our extensive program of products, safety solutions<strong>and</strong> our long experience in machine safety makes usa safe partner.Mats Linger <strong>and</strong> Torgny Olsson founded <strong>Jokab</strong> <strong>Safety</strong> ABin Sweden in 1988, together with Gunnar Widell, whoremained in the company until 2001. In 2002 <strong>Jokab</strong><strong>Safety</strong> North America was established, by means of amerger with the North American company NCC electronics,which had been founded in 1987 by BrianSukarukoff <strong>and</strong> Scott Campbell (inset picture).St<strong>and</strong>ards <strong>and</strong>regulationsDo you need to learn about the new safety requirements forrobots? If so, please contact us.We help to develop st<strong>and</strong>ardsDirectives <strong>and</strong> st<strong>and</strong>ards are very important to machinery<strong>and</strong> safety component manufacturers. We therefore participatein several international committees that developst<strong>and</strong>ards, for among other things industrial robots, safetydistances <strong>and</strong> control system safety features. This is experiencethat we absorb so that the st<strong>and</strong>ards will presentrequirements that benefit production efficiency allied to ahigh level of safety. We are happy to share our knowledgeof st<strong>and</strong>ards with our customers.1:2<strong>ABB</strong>
Our products revolutionise the market1FlexibilityProgrammablePlutoAS-i2Not programmable3VitalDynamic "doubled up"safety signal that tests asensor, for example, 200times per second.Pluto All-Master<strong>Safety</strong> PLC with static <strong>and</strong> dynamicsafety inputs.Master4<strong>Safety</strong> relayDouble static inputs thatonly test the switcheseach time they are used.SlavesTraditional safety PLCMaster-Slave with static inputs5Our dynamic safety circuits <strong>and</strong> our comprehensive safetyPLC are probably the most revolutionary ideas that havehappened in the safety field in the control <strong>and</strong> supervisionof protection, in many respects:• <strong>The</strong>y save on inputs: a dual safety circuit with oneconductor instead of two. In addition, many protectiondevices can be connected to the same input while maintainingthe highest level of safety.• Reliability is better. Our electronic sensors have muchlonger lives than mechanical switches• <strong>The</strong>y are safer, since our dynamic safety sensors arechecked 200 times per second. Traditional switches ona door can only be checked each time they are used, forexample once per hour or even once a month.Number of machines/different stopsWe train both machine builders<strong>and</strong> machine operatorsDo you construct machinery?We can provide the training you need to construct machinerythat meets the requirements. Example subjects:• Practical implementation of the requirements in the newMachinery Directive 2006/42/EC, which is valid for machinesthat was delivered/put into service from the 29thof december 2009• Risk analysis – in theory <strong>and</strong> practice• Control systems safety, st<strong>and</strong>ards EN ISO 13849-1 <strong>and</strong>EN 62061• With the All-Master <strong>Safety</strong> PLC it is easy to connect <strong>and</strong>disconnect machinery from a safety viewpoint. Commonemergency stop circuits <strong>and</strong> sensors can be createdas soon as the buses are interconnected between oursafety PLCs.We are continuously designing safety systems for difficultenvironments <strong>and</strong> also to create new safety solutions wherepractical solutions are missing. New technical improvementsgive new possibilities <strong>and</strong> therefore we continuously developenew products.Do you purchase <strong>and</strong> use machinery?As a machinery user it is your responsibility to ensure thatthe correct requirements are complied with – regardless ofwhether your machinery is “new” or “old”, i.e. CE-labelledor not. Unfortunately many have purchased CE-labelled machinerythat does not meet the requirements. This must notbe used. Having it brought into compliance by the suppliercan take a long time <strong>and</strong> be expensive in terms of loss ofproduction, etc. We can educate you on this <strong>and</strong> help youto set the right dem<strong>and</strong>s when buying new or even secondh<strong>and</strong>machinery.678910111213<strong>ABB</strong>1:314
<strong>Safety</strong> historyDevelopments of the 70'sOur background in safety started in the seventies when therewas a significant focus on the safety of manually operatedpresses, the most dangerous machine in those days. <strong>The</strong> probabilityof loosing a finger or h<strong>and</strong> while working with thesemachines was very high. New safety solutions for both safetydevices as well as for the control systems for presses weredeveloped <strong>and</strong> introduced on both old <strong>and</strong> new machines.We were directly involved in this work through the design ofTwo-H<strong>and</strong> devices, control systems for presses, making safetyinspections for the Health <strong>and</strong> <strong>Safety</strong> authorities <strong>and</strong> writingregulations for safety of these machines. This work provided anexcellent base for our knowledge in machinery safety.<strong>The</strong> numbers of accidents involving presses decreased significantlyduring these years however there is still room for newideas to enable safety equipment become more practical <strong>and</strong>ergonomic.<strong>The</strong>re were a lot of discussions as to whether one couldhave both safety <strong>and</strong> practical requirements in a st<strong>and</strong>ard,such as a safe stop function, which allowed an easy restartof the machine. Three-position enabling devices were also introducedfor safety during programming, testing <strong>and</strong> troubleshooting of Irb’s <strong>and</strong> other equipment. In the robot st<strong>and</strong>ardthe three-position enabling function was first defined by onlyallowing for hazardous machinery functions in the mid switchposition. Releasing or pressing the three-position push buttonin panic leading to a stop signal.Three-position enabling devices were alsointroduced for safety during programming.We protected people from loosingfingers or/<strong>and</strong> h<strong>and</strong>s in dangerousmachines.Developments of the 80'sDuring the eighties, industrial robots (Irb’s) started to becomecommonplace in manufacturing industry. This meant that workerswere outside of the dangerous areas during production buthad at certain times to go inside the machine in order to e.g.adjust a product to the correct position, inspect the productioncycle, troubleshoot <strong>and</strong> to programme the Irb. New riskswere introduced <strong>and</strong> new safety methods required. It was forexample hard to distinguish whether production machines hadstopped safely or simply waiting for the next signal, such as asensor giving a start signal while a product was being adjustedinto the correct position. Mistakes in safety system designresulting in serious accidents were made, such as the omissionof safety devices to stop the Irb, unreliable connection ofsafety devices <strong>and</strong> unreliable safety inputs on the Irb.In the mid eighties the st<strong>and</strong>ards committee for safety inIndustrial Robot <strong>Systems</strong> EN 775/ISO 775 was started. Thiswas the first international st<strong>and</strong>ard for machine safety. In orderto give the correct inputs to the st<strong>and</strong>ard, work around Irb’swas closely studied in order to meet production integratedsafety requirements. <strong>The</strong> introduction of a production orientedsafety stop function was made, using for example, softwareto stop machines smoothly <strong>and</strong> then safety relays/contactorsto disconnect the power to the machines actuators after themachine had stopped. This technique allows easy restart ofproduction after a stop situation by the machine safeguards.Developments of the 90'sIn Europe, during the nineties, the machinery directive was thestart of a tremendous increase in co-operation across bordersto get European st<strong>and</strong>ards for safety for machinery <strong>and</strong> safetydevices. <strong>The</strong> experience from different European countries hasled to a wide range of safety st<strong>and</strong>ards <strong>and</strong> this has madework in safety much easier. With the integration of Europe it isnow only necessary for a safety company such as ourselves toget one approval for our components for all of Europe insteadof one per country.European st<strong>and</strong>ards for safety for machinery <strong>and</strong> safety devices.Developments 2000 –Internationally the work on safety has now been intensifiedwithin ISO. <strong>The</strong> objective is to have the same structure of safetyrequirements <strong>and</strong> st<strong>and</strong>ards within ISO as within EN. <strong>ABB</strong><strong>Jokab</strong> <strong>Safety</strong> is active both internationally <strong>and</strong> nationally in differentst<strong>and</strong>ard working groups. <strong>The</strong> co-operation betweencountries is leading to better safety solutions, making it mucheasier to create safe working environments around the world.1:4<strong>ABB</strong>
<strong>Jokab</strong> <strong>Safety</strong>s developments of the 80's1<strong>Jokab</strong> <strong>Safety</strong>s first safety relay<strong>Jokab</strong> <strong>Safety</strong>s first steel fencing system2<strong>Jokab</strong> <strong>Safety</strong>s developments of the 90's3Timer reset <strong>and</strong> first light beamSmallest safety relaysJSBT5 <strong>and</strong> JSBR4Stop timemeasurementQuick-Guard aluminiumfencing system45Three-positionswitch for robots3-positiondevices<strong>Jokab</strong> <strong>Safety</strong>s developments 2000 –Safeball - ergonomiccontrol deviceRT series universal relaysSafeCad forQuick-Guard6Pluto All-Master safety PLCAS-i720 I/O 46 I/O 42 I/O12 I/O(A/D)+31 AS-i nodesSensors withintegrated AS-isafety nodes8PlutoManager<strong>Safety</strong> nodes forconnection of sensorson the AS-i cable9Vital with dynamic safety circuits1011Vital 1 Vital 2 Vital 3Non-contact sensor Eden, guard locks, Focus light beam, E-stops Inca <strong>and</strong> Smile, Smart for machine diagnosis <strong>and</strong>three-position device with h<strong>and</strong> detection1213<strong>ABB</strong>1:514
Directives <strong>and</strong>St<strong>and</strong>ardsDirectives <strong>and</strong> st<strong>and</strong>ards are of great importance for manufacturersof machines <strong>and</strong> safety components. EU Directives giving requirementsfor the minimum level of health <strong>and</strong> safety are m<strong>and</strong>atory formanufacturers to fulfil. In every member country the Directives areimplemented in each countries legislation.Machines which have been put on the market since december 29,2009, must comply with the new Machinery Directive 2006/42/EC.Before that, the old Machinery Directive 98/37/EC was valid.<strong>The</strong> objectives of the Machinery Directive, 2006/42/EC,are to maintain, increase <strong>and</strong> equalise the safety level ofmachines within the members of the European Community.Based on this, the free movement of machines/productsbetween the countries in this market can be achieved. <strong>The</strong>Machinery Directive is developed according to “<strong>The</strong> NewApproach” which is based on the following principles• <strong>The</strong> directives give the basic health <strong>and</strong> safety requirements,which are m<strong>and</strong>atory.• Detailed solutions <strong>and</strong> technical specifications are foundin harmonised st<strong>and</strong>ards.• St<strong>and</strong>ards are voluntary to apply, but products designedaccording to the harmonised st<strong>and</strong>ards will fulfil the basicsafety requirements in the Machinery Directive.Harmonised st<strong>and</strong>ardsHarmonised st<strong>and</strong>ards give support on how to fulfil therequirements of the Machinery Directive. <strong>The</strong> relationshipbetween the Machinery Directive <strong>and</strong> the harmonised st<strong>and</strong>ardsis illustrated by the diagram below.Within ISO (<strong>The</strong> International Organization for St<strong>and</strong>ardization)work is also going on in order to harmonisethe safety st<strong>and</strong>ards globally in parallel with the Europeanst<strong>and</strong>ardisation work. One consequence of this is that manyexisting EN-st<strong>and</strong>ards will, when revised, change number.For example, EN 954-1 will when revised change number toEN ISO 13849-1. Due to the New Machinery Directive,all harmonised st<strong>and</strong>ards will be reviewed <strong>and</strong> revised tosome extent.<strong>ABB</strong> <strong>Jokab</strong> <strong>Safety</strong> takes an active part in the workinggroups both for the ISO <strong>and</strong> EN st<strong>and</strong>ards.Examples of st<strong>and</strong>ards<strong>The</strong> MachineryDirective2006/42/ECA-st<strong>and</strong>ardB1-st<strong>and</strong>ardB2-st<strong>and</strong>ardGiving basic concepts, principles for design, <strong>and</strong> general aspects that canbe applied to all machineryB1: St<strong>and</strong>ards on particular safety aspects (e.g. safety distances, surfacetemperature, noise)B2: St<strong>and</strong>ards on safeguards,e.g. two-h<strong>and</strong> controls, interlocking devices,pressure sensitive devices, guardsDealing with detailed safety requirements for a particularmachine or group of machinesC-st<strong>and</strong>ard1:6<strong>ABB</strong>
<strong>The</strong> Machinery Directive; for machines<strong>and</strong> safety components<strong>ABB</strong>From 2006/42/EC1 § This Directive applies to the following products:a) machinery;b) interchangeable equipment;c) safety components;d) lifting accessories;e) chains, ropes <strong>and</strong> webbing;f) removable mechanical transmission devices;g) partly completed machinery.<strong>The</strong> Machinery Directive gives the following definition:a) machinery’ means:— an assembly, fitted with or intended to be fitted with adrive system other than directly applied human or animaleffort, consisting of linked parts or components, at leastone of which moves, <strong>and</strong> which are joined together for aspecific application,— an assembly referred to in the first indent, missing onlythe components to connect it on site or to sources ofenergy <strong>and</strong> motion,— an assembly referred to in the first <strong>and</strong> second indents,ready to be installed <strong>and</strong> able to function as it st<strong>and</strong>sonly if mounted on a means of transport, or installed in abuilding or a structure,— assemblies of machinery referred to in the first, second<strong>and</strong> third indents or partly completed machinery referredto in point (g) which, in order to achieve the same end,are arranged <strong>and</strong> controlled so that they function as anintegral whole,— an assembly of linked parts or components, at least oneof which moves <strong>and</strong> which are joined together, intendedfor lifting loads <strong>and</strong> whose only power source is directlyapplied human effort;CE-marking <strong>and</strong> Declaration ofconformityMachines manufactured or put on the market fromdecember 29, 2009, shall be CE-marked <strong>and</strong> fulfil the requirementsaccording to the European Machinery Directive2006/42/EC. This is also valid for old machines (manufacturedbefore 1 January 1995) if they are manufactured ina country outside the EEA <strong>and</strong> imported to be used in acountry in the EEA.For mahcines manufactured <strong>and</strong>/or released to the marketbetween january 1, 1995, <strong>and</strong> december 28, 2009, the oldMachinery Directive (98/37/EC) is valid.NOTE <strong>The</strong> point in time when the Machinery Directive wasimplemented in each Member Country varies.Machines have to be accompanied by a Declaration ofConformity (according to 2006/42/EC, Annex II 1.A) thatstates which directive <strong>and</strong> st<strong>and</strong>ards the machine fulfils.It also shows if the product has gone through EC TypeExamination.<strong>Safety</strong> components have to be accompanied with a Declarationof ConformityRequirements for the use of machineryFor a machine to be safe it is not enough that the manufacturerhas been fulfilling all valid/necessary requirements. <strong>The</strong>user of the machine also has requirements to fulfil. For theuse of machinery there is a Directive, 89/655/EEC (withamendment 96/63/EC <strong>and</strong> 2001/45/EC).About CE-marked machinery the Directive gives the followingrequirementFrom 89/655/EEC (with amendment 96/63/EC <strong>and</strong> 2001/45/EC)1. Without prejudice to Article 3, the employer mustobtain <strong>and</strong>/or use:(a) work equipment which, if provided to workers inthe undertaking <strong>and</strong>/or establishment for the first timeafter 31 December 1992, complies with:(i) the provisions of any relevant Community directivewhich is applicable;(ii) the minimum requirements laid down in Annex I,to the extent that no other Community directive isapplicable or is so only partially;This means that when repair/changes are made on themachine it shall still fulfil the requirements of the MachineryDirective. This doesn´t have to mean that a new CE-markingis required. (Can be required if the changes are extensive)NOTE! This means that the buyer of a machine also has tomake sure that a new machine fulfills the requirements in thedirectives. If the machine does not fulfill the requirements thebuyer is not allowed to use it.“Old” machinesFor machines delivered or manufactured in the EEA before1 January 1995 the following is valid.(b) work equipment which, if already provided to workersin the undertaking <strong>and</strong>/or establishment by 31December 1992, complies with the minimum requirementslaid down in Annex I no later than four yearsafter that date.(c) without prejudice to point (a) (i), <strong>and</strong> notwithst<strong>and</strong>ingpoint (a) (ii) <strong>and</strong> point (b), specific work equipmentsubject to the requirements of point 3 of Annex I,which, if already provided to workers in the undertaking<strong>and</strong>/or establishment by 5 December 1998,complies with the minimum requirements laid down inAnnex I, no later than four years after that date.Annex l contains minimum requirements for health <strong>and</strong> safety.<strong>The</strong>re can also be additional national specific requirementsfor certain machines. NB <strong>The</strong> point in time when the MachineryDirective was implemented in each Member Countryvaries. <strong>The</strong>refore it is necessary to check with the nationalauthorities in ones own country, to find out what is consideredas “old” <strong>and</strong> respectively “new” machines.1:71234567891011121314
"Old" machinesMachine that is put on themarket or put into servicebefore 1995 in the EEA.1. Machine that is put onthe market or put intoservice after 1/1 1995 inthe EEA."New" machines2. All machines that areimported to the EEAirrespective of date oforigin.CE-marking +Declaration ofconformityCouncil Directive 89/655/EEC(with amendment 96/63/EC <strong>and</strong>2001/45/EC)concerning the minimum safety <strong>and</strong>health requirements for the use ofwork equipment by workers at work.Possible national legislation onspecific machinesCouncil Directive 89/655/EEC(with amendment 96/63/EC<strong>and</strong> 2001/45/EC) concerningthe minimum safety <strong>and</strong> healthrequirements for the use of workequipment by workers at work. N.B!Not annex 1, instead use applicabledirectives.<strong>The</strong> Machinery Directive98/37/EC(Jan 1, 1995 - Dec 28, 2009)2006/42/EC(from December 29, 2009)Low Voltage Directive2006/95/ECEMC-directive 2004/108/ECPossiblymoredirectivesRisk assessment – an important tool both when constructing a new machine <strong>and</strong>when assessing risks on older machinesA well thought-out risk assessment supports manufacturers/users of machines to develop production friendly safetysolutions. One result of this is that the safety componentswill not be a hindrance. This minimizes the risk of thesafety system being defeated.New machines<strong>The</strong> following requirement is given by the Machinery Directive<strong>The</strong> manufacturer of machinery or his authorised representativemust ensure that a risk assessment is carriedout in order to determine the health <strong>and</strong> safety requirementswhich apply to the machinery. <strong>The</strong> machinerymust then be designed <strong>and</strong> constructed taking intoaccount the results of the risk assessment.Machines in useRisk assessment must be carried out on all machines thatare in use; CE-marked as well as not CE-marked.To fullfil the requirements from Directive 89/655/EEC(concerning the minimum safety <strong>and</strong> health requirementsfor the use of work equipment by workers atwork) risk assessment have to be made.Documentation of risk assessment<strong>The</strong> risk assessment shall be documented. In the assessmentthe actual risks shall be analysed as well as the levelof seriousness.<strong>The</strong> st<strong>and</strong>ard EN ISO 12100 gives guidance on the informationrequired to allow risk assessment to be carried out.<strong>The</strong> st<strong>and</strong>ard does not point out a specific method to beused. It is the responsibility of the manufacturer to select asuitable method.1:8<strong>ABB</strong>
Protection or warning?How is it possible to choose safety measures that are production friendly <strong>and</strong>in every way well balanced? <strong>The</strong> Machinery Directive gives an order of priorityfor the choice of appropriate methods to remove the risks. Here it is furtherdeveloped in a five step method.Prioritize safety measures according to the five step method1. Eliminate or reduce risks by design <strong>and</strong> construction2. Move the work tasks outside the risk area3. Use guards/safety devices4. Develop safe working routines/information/education5. Use warnings as pictograms, light, sound etc.<strong>The</strong> further from middle of the circle, the greater the responsibility for the safetyis put onto the user of the machine. If full protection is not effectively achieved inone step, one has to go to the next step <strong>and</strong> find complementary measures.What is possible is dependant on the need for accessibility, the seriousness ofthe risk, appropiate safety measures etc.Example on prioritizing according to the 5-step-methodPriorityExample of hazard <strong>and</strong> safety measure taken12345123451. Make machine safe by Hazard: Cuts <strong>and</strong> wounds from sharp edges <strong>and</strong> corners on machinerydesign <strong>and</strong> construction<strong>Safety</strong>measure: Round off sharp edges <strong>and</strong> corners.2. Move the work tasks Hazard: Crushing of fingers from machine movements duringoutside the risk areainspection of the production inside the risk area<strong>Safety</strong>measure: Installation of a camera.3. Use guard/safety Hazard: Crushing injuries because of unintended start duringdevicesloading of work pieces in a mechanical press<strong>Safety</strong>measure: Install a light curtain to detect operator <strong>and</strong> provide safestop of the machinery.4. Safe working Hazard: Crushing injuries because the machine can tip duringroutines/informationinstallation <strong>and</strong> normal use.<strong>Safety</strong>measure: Make instructions on how the machine is to be installedto avoid the risks. This can include requirements on thetype of fastening, ground, screw retention etc.5. Warnings Hazard: Burns because of hot surfaces in reach<strong>Safety</strong>measure: Warning signs<strong>The</strong> possibilities will increase to achieve a well thought-through safety system if each risk is h<strong>and</strong>ledaccording to the described prioritizing.Combine the five step method with production friendly thinking.This can give you e.g.• fast <strong>and</strong> easy restart of machines after a stop from a safety device• enough space to safely program a robot• places outside the risk area to observe the production• electrically interlocked doors, instead of guards attached with screws, to be able to take thenecessary measures for removing production disturbances• a safety system that is practical for all types of work tasks, even when removing productiondisturbances678910111213<strong>ABB</strong>1:914
Examples of regularly used EN/ISO st<strong>and</strong>ardsEN ISO 12100(replaces EN ISO 12100-1/-2<strong>and</strong> EN ISO 14121-1)<strong>Safety</strong> of machinery - General principlesfor design - Risk assessment <strong>and</strong> riskreductionPart 1: This st<strong>and</strong>ard defines basic terminology <strong>and</strong> methodology used inachieving safety of machinery. <strong>The</strong> provisions stated in this st<strong>and</strong>ard areintended for the designer.Part 2: This st<strong>and</strong>ard defines technical principles to help designers inachieving safety in the design of machinery.EN ISO 13857EN 349(ISO 13854)EN ISO 13850EN 574EN 953EN ISO 13849-1(replaces EN 954-1)EN ISO 13849-2<strong>Safety</strong> of machinery - <strong>Safety</strong> distances toprevent hazard zones being reached byupper <strong>and</strong> lower limbs<strong>Safety</strong> of machinery – Minimum gapsto avoid crushing of parts of the humanbody<strong>Safety</strong> of machinery – Emergency stop– Principles for design<strong>Safety</strong> of machinery – Two-h<strong>and</strong> controldevices – Functional aspects – Principlesfor design<strong>Safety</strong> of machinery – Guards – Generalrequirements for the design <strong>and</strong> constructionof fixed <strong>and</strong> movable guards<strong>Safety</strong> of machinery – <strong>Safety</strong> relatedparts of control systems –Part 1: General principles for design<strong>Safety</strong> of machinery. <strong>Safety</strong>-related partsof control systems. ValidationThis st<strong>and</strong>ard establishes values for safety distances to prevent danger zonesbeing reached by the upper limbs. <strong>The</strong> distances apply when adequate safetycan be achieved by distances alone.<strong>The</strong> object of this st<strong>and</strong>ard is to enable the user (e.g. st<strong>and</strong>ard makers, designersof machinery) to avoid hazards from crushing zones. It specifies minimumgaps relative to parts of the human body <strong>and</strong> is applicable when adequatesafety can be achieved by this method.This st<strong>and</strong>ard specifies design principles for emergency stop equipment formachinery. No account is taken of the nature of the energy source.This st<strong>and</strong>ard specifies the safety requirements of a two-h<strong>and</strong> control device<strong>and</strong> its logic unit. <strong>The</strong> st<strong>and</strong>ard describes the main characteristics of two-h<strong>and</strong>control devices for the achievement of safety <strong>and</strong> sets out combinations offunctional characteristics for three types.This st<strong>and</strong>ard specifies general requirements for the design <strong>and</strong> constructionof guards provided primarily to protect persons from mechanical hazards.This st<strong>and</strong>ard provides safety requirements <strong>and</strong> guidance on the principlesfor the design (see 3.11 of EN 292-1:1991) of safety-related parts of controlsystems. For these parts it specifies categories <strong>and</strong> describes the characteristicsof their safety functions. This includes programmable systems for allmachinery <strong>and</strong> for related protective devices. It applies to all safety-relatedparts of control systems, regardless of the type of energy used, e.g. electrical,hydraulic, pneumatic, mechanical. It does not specify which safety functions<strong>and</strong> which categories shall be used in a particular case.This st<strong>and</strong>ard specifies the procedures <strong>and</strong> conditions to be followed for thevalidation by analysis <strong>and</strong> testing of:• the safety functions provided, <strong>and</strong>• the category achieved of the safety-related parts of the control system incompliance with EN 954-1 (ISO 13849-1), using the design rationale providedby the designer.EN 62061<strong>Safety</strong> of machinery. Functional safety ofsafety-related electrical, electronic <strong>and</strong>programmable electronic control systems<strong>The</strong> st<strong>and</strong>ard defines the safety requirements <strong>and</strong> guiding principles for thedesign of safety-related electrical/electronic/programmable parts of a controlsystem.EN ISO 13855(replaces EN 999)<strong>Safety</strong> of machinery - Positioning ofsafeguards with respect to the approachspeeds of parts of the human bodyThis st<strong>and</strong>ard provides parameters based on values for h<strong>and</strong>/arm <strong>and</strong> approachspeeds <strong>and</strong> the methodology to determine the minimum distances from specificsensing or actuating devices of protective equipment to a danger zone.EN 1088<strong>and</strong> EN 1088/A1EN 60204-1<strong>Safety</strong> of machinery. Interlocking devicesassociated with guards. Principles fordesign <strong>and</strong> selection<strong>Safety</strong> of machinery. Electrical equipmentof machines. General requirementsThis st<strong>and</strong>ard specifies principles for the design <strong>and</strong> selection - independentof the nature of the energy source - of interlocking devices associatedwith guards. It also provides requirements specifically intended for electricalinterlocking devices. <strong>The</strong> st<strong>and</strong>ard covers the parts of guards which actuateinterlocking devices.This part of IEC 60204 applies to the application of electrical <strong>and</strong> electronicequipment <strong>and</strong> systems to machines not portable by h<strong>and</strong> while working,including a group of machines working together in a co-ordinated mannerbut excluding higher level systems aspects (i.e. communications betweensystems).1:10<strong>ABB</strong>
New st<strong>and</strong>ards for safety incontrol systemsBuilding a protection system that works in practice <strong>and</strong> provides sufficient safety requires expertise inseveral areas. <strong>The</strong> design of the safety functions in the protection system in order to ensure they providesufficient reliability is a key ingredient. As help for this there is, for example, the EN ISO 13849-1 st<strong>and</strong>ard.<strong>The</strong> purpose of this text is to provide an introduction to the st<strong>and</strong>ard <strong>and</strong> its application in conjunctionwith our products.Introducing the new st<strong>and</strong>ard<strong>The</strong> generation change for st<strong>and</strong>ards on safety in controlsystems involving new concepts <strong>and</strong> calculations for machinebuilders <strong>and</strong> machine users. <strong>The</strong> EN 954-1 st<strong>and</strong>ard(categories) is being phased out <strong>and</strong> replaced by EN ISO13849-1 (PL, Performance Level) <strong>and</strong> EN 62061 (SIL, <strong>Safety</strong>Integrity Level). Although the deadline for using EN 954-1is set to 31/12/2011, it is beneficial to start applying the newst<strong>and</strong>ards as soon as possible as many new st<strong>and</strong>ards nolonger refer to EN 954-1.PL or SIL? What should I use?<strong>The</strong> st<strong>and</strong>ard you should use depends on the choice oftechnology, experience <strong>and</strong> customer requirements.Choice of technology• PL (Performance Level) is a technology-neutral conceptthat can be used for electrical, mechanical, pneumatic<strong>and</strong> hydraulic safety solutions.• SIL (<strong>Safety</strong> Integrity Level) can, however, only beused for electrical, electronic or programmable safetysolutions.ExperienceEN ISO 13849-1 uses categories from EN 954-1 for definingthe system structure, <strong>and</strong> therefore the step to the newcalculations is not so great if you have previous experienceof the categories. EN 62061 defines the structures slightlydifferently.Customer requirementsIf the customer comes from an industry that is accustomedto using SIL (e.g. the process industry), requirements canalso include safety functions for machine safety being SILrated.We notice that most of our customers prefer PL as it istechnology-neutral <strong>and</strong> that they can use their previousknowledge in the categories. In this document we showsome examples of how to build safety solutions in accordancewith EN ISO 13849-1 <strong>and</strong> calculate the reliability ofthe safety functions to be used for a particular machine. <strong>The</strong>examples in this document are simplified in order to providean underst<strong>and</strong>ing of the principles. <strong>The</strong> values used in theexamples can change.What is PL (Performance Level)?PL is a measure of the reliability of a safety function. PL isdivided into five levels (a-e). PL e gives the best reliability<strong>and</strong> is equivalent to that required at the highest level ofrisk.To calculate which level the PL system achieves youneed to know the following:• <strong>The</strong> system’s structure (categories B, 1-4)• <strong>The</strong> Mean Time To dangerous Failure of the component(MTTF d)• <strong>The</strong> system’s Diagnostic Coverage (DC)You will also need to:• protect the system against a failure that knocks out bothchannels (CCF)• protect the system from systematic errors built into thedesign• follow certain rules to ensure software can be developed<strong>and</strong> validated in the right way<strong>The</strong> five PL-levels (a-e) correspond to certain ranges ofPFH D-values (probability of dangerous failure per hour).<strong>The</strong>se indicate how likely it is that a dangerous failure couldoccur over a period of one hour. In the calculation, it is beneficialto use PFH D-values directly as the PL is a simplificationthat does not provide equally accurate results.What is the easiest way of complying with thest<strong>and</strong>ard?1. Use pre-calculated components.As far as it is possible, use the components with pre-calculatedPL <strong>and</strong> PFH D-values. You then minimise the number ofcalculations to be performed. All <strong>ABB</strong> <strong>Jokab</strong> <strong>Safety</strong> productshave pre-calculated PFH D-values.2. Use the calculation tool.With the freeware application SISTEMA (see page 16) youavoid making calculations by h<strong>and</strong>. You also get help tostructure your safety solutions <strong>and</strong> provide the necessarydocumentation.3. Use Pluto or VitalUse the Pluto safety PLC or Vital safety controller. Not onlyis it easier to make calculations, but above all it is easier toensure a higher level of safety.12345678910111213<strong>ABB</strong>1:1114
Working method as specified inEN ISO 13849-1Step 1StartDetermine the system's scope(space, usage, time, environment)Risk assessmentRisk analysisIdentify risk sources(all work operations during the life cycle)Step 2Estimate the risk(determine PL rwith S, F <strong>and</strong> P)Evaluate the risk(is action required?)Has the risk beenadequatelyminimised?NoYesEndNoYesAre new risksgenerated?NoReduce the risk(redesign, use protection, information)Is the measuredependent on thecontrol system?YesRisk assessment <strong>and</strong> risk minimisationAccording to the Machinery Directive, the machine builder(anyone who builds or modifies a machine) is required toperform a risk assessment for the machine design <strong>and</strong> alsoinclude an assessment of all the work operations that needto be performed. <strong>The</strong> EN ISO 12100 st<strong>and</strong>ard (combinationof EN ISO 14121-1 <strong>and</strong> EN ISO 12100-1/-2) stipulatesthe requirements for the risk assessment of a machine. Itis this that EN ISO 13849-1 is based on, <strong>and</strong> a completedrisk assessment is a prerequisite for being able to workwith the st<strong>and</strong>ard.Step 1 – Risk assessmentA risk assessment begins with determining the scope ofthe machine. This includes the space that the machine <strong>and</strong>its operators need for all of its intended applications, <strong>and</strong>all operational stages throughout the machine’s life cycle.All risk sources must then be identified for all work operationsthroughout the machine’s life cycle.A risk estimation is made for each risk source, i.e. indicationof the degree of risk. According to EN ISO 13849-1 the riskis estimated using three factors: injury severity (S, severity),frequency of exposure to the risk (F, frequency) <strong>and</strong> thepossibility you have of avoiding or limiting the injury (P possibility).For each factor two options are given.Where theboundary between the two options lies is not specified in thest<strong>and</strong>ard, but the following are common interpretations:S1S2F1F2P1P2bruises, abrasions, puncture wounds <strong>and</strong> minorcrushing injuriesskeletal injuries, amputations <strong>and</strong> deathless frequently than every two weeksmore often than every two weeksslow machine movements, plenty of space, lowpowerquick machine movements, crowded, high powerBy setting S, F <strong>and</strong> P for the risk, you will get the PL rPerformanceLevel (required) that is necessary for the risksource.Finally, the risk assessment includes a risk evaluationwhere you determine if the risk needs to be reduced or ifsufficient safety is ensured.1:12<strong>ABB</strong>
Risk estimationTo calculate the performance level required (PL r ).S Severity of injuryS1 slight (usually transient injury)S2 severe (usually permanent injury or death) PL rablow risk12F Frequency <strong>and</strong>/or exposure time to risk sourceF1 rarely less often <strong>and</strong>/or short exposure timeF2 often to continuous <strong>and</strong>/or extended exposure timeP Possibility of avoiding the risk source orminimising the injuryP1 possible under certain circumstancesP2 hardly possible cdehigh risk345Step 3Step 2 – Reduce the riskIf you determine that risk reduction is required, you mustcomply with the priority in the Machinery Directive in theselection of measures:1. Avoid the risk already at the design stage.(For example, reduce power, avoid interference in thedanger zone.)67<strong>ABB</strong>Are all safety functions executed?Identify the safety functionsDetermine PL rDesign <strong>and</strong> implement the solutionfor the safety functionCalculate PLVerify thatPL ≥ PL rJaValidateHave other requirementsbeen met?YesNoNo2. Use protection <strong>and</strong>/or safety devices.(For example, fences, light grids or control devices.)3. Provide information about how the machine can beused safely. (For example, in manuals <strong>and</strong> on signs.)If risk reduction is performed using safety devices, the controlsystem that monitors these needs to be designed asspecified in EN ISO 13849-1.Step 3 - Design <strong>and</strong> calculatethe safety functionsTo begin with you need to identify the safety functions onthe machine. (Examples of safety functions are emergencystop <strong>and</strong> monitoring of gate.)For each safety function, a PL rshould be established(which has often already been made in the risk assessment).<strong>The</strong> solution for the safety function is then designed<strong>and</strong> implemented. Once the design is complete, you cancalculate the PL the safety function achieves. Check thatthe calculated PL is at least as high as PL r<strong>and</strong> then validatethe system as per the validation plan. <strong>The</strong> validation checksthat the specification of the system is carried out correctly<strong>and</strong> that the design complies with the specification.You willalso need to verify that the requirements that are not includedin the calculation of the PL are satisfied, that is, ensurethat the software is properly developed <strong>and</strong> validated, <strong>and</strong>that you have taken adequate steps to protect the technicalapproach from systematic errors.1:13891011121314
PFH DPL10 -4 a10 -5 b3x10 -6c10 -6 dMTTF dlowMTTF dmediumMTTF dhigh10 -7 e10 -8 DCnoneDCnoneDClowDCmediumDClowDCmediumDChighCat. B Cat. 1 Cat. 2 Cat. 3 Cat. 4<strong>The</strong> relationship between categories, the DC avg, MTTF dfor each channel <strong>and</strong> PL. <strong>The</strong> table also shows the PFH D-range that correspondsto each PL.PL calculation in Step 3When you calculate the PL for a safety function, it is easiestto split it into separate, well defined blocks (also calledsubsystems). It is often logical to make the breakdown accordingto input, logic <strong>and</strong> output (e.g. switch - safety relay- contactors), but there may be more than three blocksdepending on the connection <strong>and</strong> the number of componentsused (an expansion relay could for example createan additional logic block) .For each block, you calculate a PL or PFH D-value. Itis easiest if you obtain these values from the componentmanufacturer, so you do not have to calculate yourself.<strong>The</strong> manufacturer of switches, sensors <strong>and</strong> logic devicesoften have PL <strong>and</strong> PFH D-values for their components,but for output devices (such as contactors <strong>and</strong> valves)you do not usually specify a value as it depends on howoften the component will be used. You can then eithercalculate yourself according to EN ISO 13849-1 or usethe pre-calculated example solutions such as those from<strong>ABB</strong> <strong>Jokab</strong> <strong>Safety</strong>.To calculate PL or PFH Dfor a block, you need to know itscategory, DC <strong>and</strong> MTTF d. In addition, you need to protectyourself against systematic errors <strong>and</strong> ensure that an errordoes not knock out both channels, <strong>and</strong> generate <strong>and</strong>validate any software used correctly. <strong>The</strong> following textgives a brief explanation of what to do.<strong>Safety</strong> function (SF)InputLogicOutputPL/PFH DPL/PFH DPL/PFH DPFH D, Total=PFH D, Input+ +PFH D, LogicPFH D, Output1:14<strong>ABB</strong>
Category<strong>The</strong> structure for the component(s) in the block is assessedto determine the category (B, 1-4) it corresponds to. Forcategory 4, for example, individual failures do not result inany loss of the safety function.In order to achieve category 4 with contactors, you needto have two channels - i.e., two contactors - that can cutthe power to the machine individually. <strong>The</strong> contactors needto be monitored by connecting opening contacts to a testinput on, for example a safety relay. For monitoring of thistype to work, the contactors need to have contacts withpositive opening operation.Diagnostic Coverage (DC)A simple method to determine DC is explained in AppendixE in EN ISO 13849-1. It lists various measures <strong>and</strong> whatthey correspond to in terms of DC. For example, DC=99% (which corresponds to DC high) is achieved for a pairof contactors by monitoring the contactors with the logicdevice.Mean Time To dangerous Failure (MTTF d)In calculating the MTTF dfor the block your starting pointis the B 10d-value (average number of cycles until 10 % ofthe components have a dangerous failure). To calculate theMTTF d,you also need to know the average number of cyclesper year that the component will execute.Calculation of the average number of cycles is asfollows:MTTF d=därn opd oph opn op=B 10d0,1 • n opd op• h op• 3600t cycle= Number of cycles per year= Operation days per year= Operation hours per dayt cycle= Cycle time (seconds)Example: d op= 365 days, h op= 24 hours <strong>and</strong> t cycle= 1,800seconds (2 times/hour) which gives n op= 17,520 cycles.With a B 10d=2 • 10 6 this gives a MTTF d=1,141 year whichcorresponds to MTTF d=high.Note that when you calculate MTTF dyou have to calculateaccording to the total number of cycles the component willbe working. A typical example of this is the contactors thatfrequently work for several safety functions simultaneously.This means that you must add the number of estimatedcycles per year from all the safety functions that use thecontactors.For electromechanical, mechanical <strong>and</strong> pneumatic componentswhose MTTF dis calculated from a B 10d-value, thefollowing applies.Also consider that if the MTTF d-value is less than 200years, the component needs to be replaced after 10 % ofthe MTTF d-value (due to the T 10d-value). That is, a componentwith MTTF d= 160 years needs to be replaced after16 years in order for the conditions for achieving PL tocontinue to be valid. This is because EN ISO 13849-1 isbased on a “mission time” of 20 years.Common Cause Failure (CCF)In Appendix F of EN ISO 13849-1 there is a table of actionsto be taken to protect against CCF, to ensure a failure doesnot knock out both channels.Systematic errorsAppendix G of EN ISO 13849-1 describes a range of actionsthat need to be taken to protect against incorporatingfaults into your design.PL for safety functionsPL is given in the table on the facing page. If you want touse an exact PFH D-value instead,this can be produced usinga table in Appendix K in EN ISO 13849-1.Once you have produced the PL for each block, you cangenerate a total PL for the safety function in Table 11 ofEN ISO 13849-1. This gives a rough estimate of the PL.If you have calculated PFH Dfor each block instead, youcan get a total of PFH Dfor the safety function by addingtogether all the values of the blocks. <strong>The</strong> safety function’stotal PFH Dcorresponds to a particular PL in Table 3 ofEN ISO 13849-1.12345678910<strong>ABB</strong>Requirements for safety-related softwareIf you use a safety PLC for implementing safety functions,this places dem<strong>and</strong>s on how the software is developed<strong>and</strong> validated. To avoid error conditions, the softwareshould be readable, underst<strong>and</strong>able <strong>and</strong> be possible totest <strong>and</strong> maintain.A software specification must be prepared to ensurethat you can check the functionality of the program. It isalso important to divide the program into modules thatcan be tested individually. Paragraph 4.6 <strong>and</strong> AppendixJ of EN ISO 13849-1 specify requirements for safetyrelated software.<strong>The</strong> following are examples of requirements for softwarefrom EN ISO 13849-1:• A development life cycle must be produced withvalidation measures that indicate how <strong>and</strong> when theprogram should be validated, for example, followinga change.• <strong>The</strong> specification <strong>and</strong> design must be documented.• Function tests must be performed.• Validated functional blocks must be used wheneverpossible.• Data <strong>and</strong> control flow are to be described using, forexample, a condition diagram or software flow chart.1:1511121314
What defines a safety function?Calculating that you have achieved the PL rthat is required is not difficult, especially if you use “pre-calculated”safety devices <strong>and</strong> logic units. But what parts should then be included in each safety function?This must be resolved before you start calculating phase. To summarise in simple terms you can say thateach safety device gives rise to a safety function for each machine that is affected by the safety device inquestion. Three safety devices that all cut the power to three machines in a cell is therefore equal to ninesafety functions. In the section that follows, we explain the background.Multiple safety functions for a machineMultiple safety devices are often used on a machine in orderto provide satisfactory <strong>and</strong> practical protection for the operators.In the following example, the machine is protectedby three safety devices connected to a logic device. <strong>The</strong> followingfigure illustrates this interconnection schematically.Three safety functions (SF) are defined for the machine <strong>and</strong>are calculated as:SF1: PFH D, F1+ PFH D, K1+ PFH D, Q1= PFH D, SF1SF2: PFH D, B1+ PFH D, K1+ PFH D, Q1= PFH D, SF2SF3: PFH D, S1+ PFH D, K1+ PFH D, Q1= PFH D, SF3SF1F1Light curtainSF2B1Interlocked switchK1Logic unitQ1MachineSF3S1E-Stop buttonMultiple safety functions for multiple machines in a cellMore commonly, several machines in a single cell/zone areto be protected by multiple safety devices. <strong>The</strong> followingfigure illustrates the interconnection schematically for anexample. Each of the machines Q1 – Q3 is shut down separately<strong>and</strong> independently of K1.If the operator enters the cell, he is exposed in this case tothe same type of risk from all three machines. <strong>The</strong> powerto all three machines must be cut when the operator entersthe cell through the door interlocked by B1.F1Light curtainB1Interlocked switchS1E-Stop buttonK1Logic unitQ1Machine 1Q2Machine 2Q3Machine 31:16<strong>ABB</strong>
<strong>The</strong>oretical approach for multiple machines<strong>The</strong> theoretical approach to calculate the safety functionis as follows:Practical approach for multiple machinesA more practical approach is to divide the safety functioninto three parts, one for each of the three machines.1B1Interlocked switchK1Logic unitQ1Machine1Q2Machine 2Sources:www.dguv.de/ifa/de/pub/grl/pdf/2009_249.pdfwww.bg-metall.de/praevention/fachausschuesse/infoblatt/deutsch.html(No 047, Date 05/2010)Q3Machine 3For the full safety function to be performed you require allthe components to be working. Note that if B1 or K1 has adangerous malfunction, the entire safety function is disabled.However, if for example machine Q1 has a dangerousmalfunction, <strong>and</strong> is not shut down, machines Q2 <strong>and</strong> Q3will still be shut down. One disadvantage in consideringthe safety function in this way is that you may have troubleachieving the PL rrequired. But if you achieve the PL rrequired,you can use the theoretical approach.Practical approachIf you use the practical approach the safety functions are as follows:B1Interlocked switchB1Interlocked switchB1Interlocked switchExample of safety functions for multiple machines in a cellFor a cell with three machines (one robot, one hydraulicpress <strong>and</strong> one pneumatic machining tool) a risk assessmentis made resulting in different PL rfor the individual machines.<strong>The</strong> robot <strong>and</strong> the hydraulic press requires PL r= e, whilethe pneumatic machining tool requires PL r= d.Robot:PFH D, B1+ PFH D, K1+ PFH D, Q1= 4,5 • 10 -9 + 2 • 10 -9 + 5.79 • 10 -8 = 6.44 • 10 -8Hydraulic press:PFH D, B1+ PFH D, K1+ PFH D, Q2= 4.5 • 10 -9 + 2 • 10 -9 + 8 • 10 -8 = 8.65 • 10 -8Pneumatic machining tool:PFH D, B1+ PFH D, K1+ PFH D, Q3= 4.5 • 10 -9 + 2 • 10 -9 + 2 • 10 -7 = 2.07 • 10 -7This is an approach that can provide a more accurate way oflooking at the safety functions, especially where a differentPL ris required for the safety functions above. If machineQ1 is a robot <strong>and</strong> machine Q2 is a conveyor which is designedto have negligible risks, the different PL rrequired toprotect against risks from Q1 <strong>and</strong> Q2 will also be different.This practical approach is therefore the one recommended.<strong>The</strong> interpretation is based on information provided by IFA(Institut für Arbeitsschutz der Deutschen Gesetzlichen Unfallversicherung).For more information on this <strong>and</strong> otherissues, see Sources.This is to be done in a similar way with other safety functions for the cell. For each safety device, you define the machinesit affects, <strong>and</strong> establish the various safety functions according to this.<strong>The</strong>oretical approachHow would it have worked if you had used the theoretical approach? Would the safety function have achieved PL e?All machines:PFH D, B1+ PFH D, K1+ PFH D, Q1+ PFH D, Q2+ PFH D, Q3= 4,5 • 10 -9 + 2 • 10 -9 + 5.79 • 10 -8 + 8 • 10 -8 + 2 • 10 -7 = 3.44 • 10 -7 PL dIn this case, the safety function would therefore have not achieved a total PL e, which was required for the risks associatedwith a robot <strong>and</strong> hydraulic press.Conclusions• Use the practical approach.• Use safety devices/logic units with high reliability (low PFH D) to make it easy to achieve the PL rrequired.• With Vital or Pluto, it is easier to achieve the PL rrequired.PL ePL dPL eK1Logic unitK1Logic unitK1Logic unitQ1Machine 1Q2Machine 2Q1Machine 3One of the safety functions is that a non-contact sensor(Eden) supervised by a safety PLC (Pluto) shall disconnectthe energy to all three machines in the hazard zone:• Eden B1 (PFH D,B1 = 4,5• 10 -9 )• Pluto K1 (PFH D, K1= 2 • 10 -9 )• Robot Q1 (PFH D, Q1= 5,79 • 10 -8 )• Hydraulic press Q2 (PFH D, Q2= 8 • 10 -8 )• Pneumatic machining tool Q3 (PFH D, Q3= 2 • 10 -7 ).2345678910111213Please note that the examples on these pages are simplified in order to explain the principles. Values of products can also change.<strong>ABB</strong>1:1714
Applying EN 62061If one chooses to design a safety function in accordance with EN 62061, the level of reliability is expressed asthe <strong>Safety</strong> Integrity Level, SIL. <strong>The</strong>re are a total of 4 levels, but in the EN 62061 st<strong>and</strong>ard SIL 3 is the highestlevel. SIL also (similar to the Performance Level PL), is expressed as the Probability of Dangerous FailurePer Hour.<strong>Safety</strong> Integrity Level, SIL Probability of dangerous Failure per Hour (PFH D )3 ≥10 -8 to
A mechanical switch doesnot give a safe function!A mechanical switch does not give a safe function!When it comes to mechanically operated interlockedswitches, it has long been accepted a Category 1 switchis adequate for many installations, which is also supportedby several st<strong>and</strong>ards. However some companies have nowre-evaluated this <strong>and</strong> have instead started to dem<strong>and</strong> twomechanical switches or non-contact switches/sensors,where they previously accepted single mechanical switches.Many reported incidents form the background to this. <strong>The</strong>requirements for switches to provide safe functioning arethat they are mounted correctly <strong>and</strong> that their positionsdo not change during their life-cycle, in other words, idealconditions. In many installations the location of hatches ordoors changes over time. This has led to a switch not givinga stopping signal when an interlocked gate has opened. <strong>The</strong>reasons for this are many, but they can be summarized inmechanical deterioration or physical damage to a door/hatch.In turn this has led to an interlocked switch being affectedby higher stress than the switch manufacturer’s specifications.To avoid this type of malfunction it is more appropriateto use non-contact switches/sensors because mechanicaldeterioration does not affect the safety function, i.e. the stopsignal is given directly if the position is wrong.A non-contact switch/sensor does not have a guided function<strong>and</strong> is designed to fulfill the requirements in another way.<strong>The</strong> requirements are fulfilled either with dynamic sensorswhere the safety signal is monitored all the time <strong>and</strong> a faultdirectly leads to a stop signal or with a magnetic switch whichhas two independent contact elements which are monitoredevery time a gate opens. From the user's perspective thedynamic function is preferable because several sensors canbe connected to a single safety module <strong>and</strong> still achievePL e. Also the sensor’s safety function is monitored withouthaving to open a gate. For a magnetic switch the requirementsfor PL e are only fulfilled if one switch per monitoringunit is used <strong>and</strong> if the gate is opened regularly.If PL e is to be achieved with electromechanical switches,maximum two switches can be connected to one safety relay.Door 1 Door 2 Door 3Dynamic sensors*Dynamic monitoring,Vital/PlutoThis means that it is only with Eden that several doors canbe supervised with one safety module <strong>and</strong> achieve PL e.Since the st<strong>and</strong>ard EN 954-1 was written, developmenthas progressed <strong>and</strong> the costs to fulfill category 4 havedropped dramatically. Generally mechanical switches arereplaced with non-contact sensors to increase the reliabilityof production equipment. <strong>The</strong> same goes for the safety side.With electronic non-contact switches, with a transmitter<strong>and</strong> a receiver, one avoids the problems of deterioration<strong>and</strong> excessive stress which harm the sensor. For that kindof sensor dynamic monitoring is required to enable a safefunction. This means that its function is constantly beingmonitored, hundred of times per second. <strong>The</strong> reaction timefor a safe stop will then be the same during a malfunctionas during the activation of a stop (e.g. a gate opening). <strong>The</strong>monitoring frequency will also be astronomical compared tothat of mechanical switches <strong>and</strong> magnetic switches, whichare only monitored every time they are used. In the new ENISO 13849-1, which will replace 954-1, probability calculationsare used together with different category levels tocompare different “performance levels”. Even when usingEN ISO 13849-1 it can be so that one achieves reasonablyhigh theoretical reliability with an electromechanicalswitch, although this presumes correct installation, properuse <strong>and</strong> otherwise ideal conditions. A non-contact switchinstead provides high levels of both theoretical <strong>and</strong> practicalreliability.Our conclusion, use dynamic signals!Our conclusion is that today it is more cost effective, safer<strong>and</strong> more reliable to work with dynamic signals to achievecategory 4 for sensors <strong>and</strong> monitoring units. In that caseit is also possible to fulfill the Machinery Directive, 1.2.7.requirement: “A fault in the control circuit logic, or failure ofor damage to the control circuit, must not lead to dangeroussituations”. Also one does not have to discuss whether thecorrect safety category has been chosen!Interlocked switch* *Door 1*Static monitoring,e.g. RT61234567891011Up to 30 doors (Eden sensors) can be connected to the dynamicmonitoring maintaining category 4.Maximum 1 door (2 interlocked switches) canbe connected to the static monitoring for category4 to be maintained for the entire system.1213<strong>ABB</strong>1:1914
We train you on safetyrequirements- enhance your knowledge!What requirements are there today?For international companies there are many new st<strong>and</strong>ards<strong>and</strong> regulations with which to comply. <strong>The</strong>re have also beenchanges <strong>and</strong> revisions of existing st<strong>and</strong>ards <strong>and</strong> directives.As a business <strong>and</strong> designer one is obliged to know about<strong>and</strong> to follow all the regulations. But it can be difficult foreach individual company to keep track of all the new regulations<strong>and</strong> how they should be applied.Your local <strong>ABB</strong> <strong>Jokab</strong> <strong>Safety</strong> sales office can help youwith training <strong>and</strong> analysis during a build-up phase or as acontinuous consulting assignment.Our course trainers have a extensive experience in machine safetyA distinguishing feature of all the engineers at <strong>ABB</strong> <strong>Jokab</strong> <strong>Safety</strong> is that they work daily with practical applications ofst<strong>and</strong>ards <strong>and</strong> regulations. This is true for everything from safety components for individual machines to entire deliveriesof safety systems for larger production lines. Within the company there is also a very good knowledge of machine control<strong>and</strong> production. We are also represented in st<strong>and</strong>ardisation groups which decide on European <strong>and</strong> International st<strong>and</strong>ardsconcerning machine safety. Because <strong>ABB</strong> <strong>Jokab</strong> <strong>Safety</strong> is represented globally, we have the knowledge of safetyrequirements in different countries.Training in machine safetyAre you building machines for sale or for your own use? Are you a user of machines? Are you working with automationof production plants or do you make technical evaluations of machines prior to purchase?Regardless of the purpose, there is a need for knowledge concerning what requirements <strong>and</strong> regulations exist inrespect of machine safety, <strong>and</strong> how they should be applied.We offer company-adapted training in the following fields:• Product liability <strong>and</strong> its consequences• CE-labelling• <strong>The</strong> Machine Directive <strong>and</strong> how to apply it• Choice of certification procedure with examinationof the parts which are required in order to be ableto CE-label a machine• Harmonised st<strong>and</strong>ards <strong>and</strong> the applications ofthese, e.g.- EN ISO 13849-1/-2- EN ISO 12100- EN 60204-1- EN ISO 13850- EN ISO 13857- EN ISO 13855 (previously EN 999)• Machine safety analysis; method <strong>and</strong> cases• Choice of safety measures/safety devices• Requirements for manufacturer´s technicaldocumentation• Requirements for manuals• Requirements for ”old machines”• Specific interpretation cases, e.g. re-construction ofmachines• Forthcoming changes in the Machine DirectiveCompany-adapted training in machine safetyContact your local sales office with questions <strong>and</strong> your currenttraining needs. Together with you, we will customize thetraining to your specific company requirements.1:20<strong>ABB</strong>
Training in risk analysisWe regularly have training courses in our offices. One of these covers risk analysis <strong>and</strong> how to choose productionadapted measures.A course in risk analysis contains the following:• Risk analysis - from theory to practice• What durability towards errors shall the safety system have?• St<strong>and</strong>ard EN ISO 13849-1/-2• <strong>Safety</strong> distances for fencing systems <strong>and</strong> safetycomponents - how do you choose?• Cases, practice <strong>and</strong> briefing of risk analysis <strong>and</strong>choice of actionsProduct trainingOur unique Pluto <strong>Safety</strong> PLC gives new <strong>and</strong> great possibilites to build-up a cost effective <strong>and</strong> flexible safetysystem. With this also comes the dem<strong>and</strong>s of higher knowledge. For you as a customer to be able to quickly getstarted using Pluto in the most effective way <strong>and</strong> to learn about its possibilities, we regularly offer trainings atour local sales offices. In the training course cost is included a Pluto, software for Pluto <strong>and</strong> full documentation.We also offer training on the other <strong>ABB</strong> <strong>Jokab</strong> <strong>Safety</strong> products such as the Vital solution, safety relays <strong>and</strong> lightbeams/curtains.Training - Pluto <strong>and</strong> other <strong>ABB</strong> <strong>Jokab</strong> <strong>Safety</strong> productsContact your local sales office with questions <strong>and</strong> yourcurrent training needs. Together with you, we will customizethe training to your specific company requirements.ConsultingDo you need assistance in CE-marking a machine? Do you want a third party to carry out a risk analysis on a machineline? Do you have the need of a partner to examine how various regulations effect the safety of your machines?12345678910<strong>ABB</strong>We can offer assistance <strong>and</strong> support in both short <strong>and</strong> longer assignments.Here are a few examples of what we can offer you:• Risk analysis with proposal of measures. We do this togetherwith the customer <strong>and</strong> it is often done as a pilot-project so that thecompany afterwards themselves can carry out analysis.• Guide the customer business through a CE-marking of machine/plant.• Write/review technical documentation/manuals• Interpret st<strong>and</strong>ards <strong>and</strong> regulations• Stopping time measurement - We can measure the stopping timeon your machines with our Stopping time <strong>and</strong> motion analyser tool.Knowledge of the stopping time is a prerequisiteto be able to determine the correct safety distance.EN ISO 13855 (previously EN 999) gives the requirements.• Programming of Pluto <strong>Safety</strong>-PLC.Stopping time measurement isrequired in order to be able to determinethe correct safety distance.Consulting - Contact usCome to us with your needs <strong>and</strong> we willplan with you a suitable project programme.You can also contact us with shortquestions which we can solve directlyover the phone or via e-mail.1:2111121314
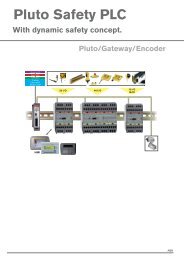
Pluto <strong>Safety</strong> PLCWith dynamic safety concept.Pluto/Gateway/EncoderProfibus DPDeviceNetCANopenProfinetEthernet/IPModbus TCP20 I/O 46 I/O12 I/O(A/D)HMI<strong>ABB</strong>
ContentsPage1Why you should use the Pluto safety PLC _______________________________2:2Pluto safety PLC _____________________________________________________2:6• Pluto without databus ___________________________________________________2:8• Pluto with databus ___________________________________________________ 2:12• Certification _________________________________________________________2:15• Example – Robot cell with Pluto __________________________________________2:16Pluto gateway• Gate P2-Profibus DP ________________________________________________ 2:24• Gate D2-DeviceNet _________________________________________________ 2:26• Gate C2-CANOpen _________________________________________________ 2:28• Gate E2-Profinet, Ethernet/IP, Modbus TCP ________________________________ 2:30Safe Encoder _____________________________________________________ 2:3223456789101112Descriptions <strong>and</strong> examples in this book show how the products work <strong>and</strong> can be used. This does not mean that they can meet the requirements forall types of machines <strong>and</strong> processes. <strong>The</strong> purchaser/user is responsible for ensuring that the product is installed <strong>and</strong> used in accordance with theapplicable regulations <strong>and</strong> st<strong>and</strong>ards. We reserve the right to make changes in products <strong>and</strong> product sheets without previous notice. For the latestupdates, refer to www.abb.com/lowvoltage. 2011.<strong>ABB</strong>2:11314
Why you shouldhave Pluto safetyPLC's.– for simplifying the design of <strong>and</strong> changes to safety systems!Pluto is an ”All-Master” safety PLC concept, that simplifiesthe design of safety systems <strong>and</strong> achieves the highestsafety level PL e according to EN ISO 13849-1 <strong>and</strong> SIL 3according to EN 62061 <strong>and</strong> EN 61508. <strong>The</strong> key differencebetween Pluto <strong>and</strong> conventional safety PLC´s is that thereis no "Master-Slave" relationship between the control unitsconnected to the safety bus. Each Pluto is a 'Master' unit<strong>and</strong> can see the other Plutos' inputs <strong>and</strong> outputs, <strong>and</strong> canthereby make decisions about its own safety environment.This concept enables simple communication, programming<strong>and</strong> changes to the safety system. With the use of a 'Gateway'device, a Pluto can communicate with other bus systems<strong>and</strong> thereby form part of a larger network. Gateway units areavailable for several different bus systems, such as Profibus,CanOpen, DeviceNet, Profinet, Ethernet/IP <strong>and</strong> ModbusTCP. With a Pluto AS-i, both safety slaves <strong>and</strong> st<strong>and</strong>ardslaves can be h<strong>and</strong>led.Pluto offers an economic solution for both single machines<strong>and</strong> for major machine systems.Our solution with All-MasterPluto All-MasterPluto – All Master20 I/O + 20 I/O + 20 I/OPluto All-MasterPluto All-Master4 + 4 + 4Traditional safety PLC12 I/O+31 AS-i safetynodesMasterSafe bus4Pluto AS-iSlaves46 I/O + 20 I/O6 + 42:2<strong>ABB</strong>
– to supervise safety devices!Light beams Light grids/curtains 3-positiondevicesMost safety devices on the market can be connected directlyto Pluto units. By using dynamic signals with sensors from<strong>ABB</strong> <strong>Jokab</strong> <strong>Safety</strong> only one input is needed to achieve thehighest level of safety, compared to two inputs for othermanufacturers' PLCs. It is also possible to connect up to 10sensors in series to a single input on Pluto <strong>and</strong> still achievethe highest level of safety. For example non-contact Eden– to save on inputs!Dynamic signals1–10 doors with one Eden per doorPL ePlutohas inputs for static <strong>and</strong>dynamic sensors. Severalsensors can be connectedto one dynamic input inaccordance with PL e.One inputSensors/switchesTwo-h<strong>and</strong>controlsEmergencystopssensors, Spot light beams <strong>and</strong> Tina emergency stop buttonscan all be connected in series to a single Pluto input. Evenmechanical switches can be connected to the 'dynamic'safety circuit using <strong>ABB</strong> <strong>Jokab</strong> <strong>Safety</strong>'s various Tina adapters.Pluto also has IO connections that can be used as bothinputs <strong>and</strong> outputs.One inputStripsMatsDynamic signals1-10 sensorsPL e12345678910One connectionIO connectionsPluto has IO connections that can be used in three ways:• input• output• both input <strong>and</strong> output at the same time (e.g. for a reset button with lampindication)input/outputTwo inputsStatic inputs (mechanical switches)2 for each door = PL e111213<strong>ABB</strong>2:314
Pluto safety PLC – an overviewPluto with a safety busProfibus DPDeviceNetCANopenProfinetEthernet/IPModbus TCPPluto B2020 I/OSafe bus for connection of up to 32 Pluto unitsPatendedsolutionHMIGateway for two-way databuscommunication between Pluto <strong>and</strong>other control systems.4 independentfailsafe safety outputsPluto is an All-Master-System for dynamic <strong>and</strong> static safetycircuits where the inputs <strong>and</strong> other information are sharedon a databus. Several safety sensors can be connected toone input while still achieving the highest level of safety.Pluto has inputs for all safety devices on the market, <strong>and</strong>the Pluto Manager software selects how each input shallrespond.HMI, An HMI operatorpanel can communicatewith Pluto in both directions.Connection can bemade via the bus or directto the front of the Pluto.<strong>The</strong> interface is RS232<strong>and</strong> the protocol isModbus ASCII 8 bit.Pluto bridgeWith a Gateway set upas a Pluto bridge, it ispossible to:• increase the databuslength• use different databusspeeds for each section• filter information fromone section to reducethe databus loading onother sections.Pluto without a safety bus – Singel-PlutoA single Pluto can be used as a fully programmable safety logic controller.Pluto S20Pluto S46Connector expansionPatendedsolutionPatendedsolutionSeveral expansion relays canbe connected to a single Plutosafety output while retainingthe safety level.Pluto without a bus connection is available in two sizes, with 20 <strong>and</strong> 46 I/O , the S20 <strong>and</strong> S46 respectively. In otherwords, they are similar to the equivalent versions with bus connections, the B20 <strong>and</strong> B46.2:4<strong>ABB</strong>
1Pluto B46Pluto AS-i246 I/OSafe bus<strong>Safety</strong> Monitor/Master12 I/O(A/D)+ 31 AS-i safety slaves3PatendedsolutionPatendedsolutionApprovalsEN 954-1, Category 4EN ISO 13849-1, PL eEN 61496-1, Type 4EN 61508, SIL 3EN ISO 62061, SIL 3EN ISO 60204-1EN 50178EN ISO 574, Type lllc456 independentfailsafe safety outputs4 independentfailsafe safety outputs6Absolute encoder.8 single turn or multiturn absolute encoderscan be connected directlyto the safety bus.Pluto AS-i is an AS-i module which can be connectedto a AS-i bus. It can either be AS-i masteron the bus or work together with an AS-i masteras monitor. It includes AS-i nodes, analogue <strong>and</strong>digital outputs, as well as safety outputs.7IDFIX - identifies PlutoIDFIX is a identification circuit that is unique to each device on the Pluto bus.It includes an identification code <strong>and</strong> makes it possible to distribute a PLC programin the network. <strong>The</strong>re are four different versions: R, RW, DATA <strong>and</strong> PROG. IDFIXPROG also has the current PLC program. If the Pluto PLC module needs to bereplaced, all the information on this is held in memory at IDFIX.8910<strong>ABB</strong>Overview Pluto <strong>Safety</strong>-PLCModelS20S46Number of I/O 20 46 20 16 20 46 12 42Failsafe inputs 8 24 8 8 8 24 4 20Failsafe inputs or non-failsafe outputs 8 8 8 8 8 8 4 16Analog inputs 1 3 1 1 1 3 4 3Failsafe relay outputs 2 4 2 - 2 4 2 4Failsafe transistor outputs 2 2 2 - 2 2 2 2Pluto bus - -Current monitoring - - 2 - - - - -Dimensions (b x h x d) mm 45 x 84x 11890 x 84x 118A2045 x 84x 118B1645 x 84x 118B2045 x 84x 118B4690 x 84x 118AS-i45 x 84x 118B42AS-i90 x 84x 118Supply voltage 24VDC 24VDC 24VDC 24VDC 24VDC 24VDC 24VDC 24VDC2:511121314
<strong>Safety</strong> PLCPlutoApprovals:TÜV Rheinl<strong>and</strong>Control of:<strong>Safety</strong> products in dynamic<strong>and</strong> static circuitsElectrically controlledactuators such ascontactors, valves, motorsIndicators <strong>and</strong> buttonsFeatures:Pluto <strong>Safety</strong> PLC facilitates the design of yoursafety systemsPluto is an All-Master system for dynamic <strong>and</strong> static safetycircuits where inputs <strong>and</strong> other information are shared overthe bus. Multiple safety sensors can be connected to asingle input <strong>and</strong> still achieve the highest level of safety. Plutohas inputs suited for every safety product on the market,<strong>and</strong> each input function is configured in the accompanyingsoftware Pluto Manager.Besides failsafe inputs (I) Pluto has a number of failsaferelay <strong>and</strong> transistor outputs (Q). On every Pluto unit thereis also a possibility of using a number of terminals asfailsafe inputs, non-failsafe outputs or both in <strong>and</strong> outputsimultaneously (IQ). <strong>The</strong> characteristics of the terminals areeasily configured in Pluto Manager.<strong>Safety</strong> in large <strong>and</strong> small systemsPluto models without bus communication are st<strong>and</strong> aloneunits <strong>and</strong> are therefore perfectly suited for smaller systemsthat do not require communication with other Pluto units orgateways. Pluto models with bus communication can beconnected to the Pluto bus where up to 32 Pluto units caninteract <strong>and</strong> control large as well as small safety systems.<strong>The</strong> fact that Pluto is an All-Master system means that eachPluto unit controls their outputs locally, while it is as easy toread other Pluto units' inputs as their own.Specifically for Pluto A20 is that it is equipped with ananalogue input for current measurement, which can beused for e.g. monitoring of muting lamps.Pluto is primarily designed to satisfy the requirements ofEU Machinery Directive (2006/42/EG) regarding safety incontrol systems, but the system can also be used in otherareas as in the process industry, boiler plants etc whichhave similar requirements.A <strong>Safety</strong>-PLC for eachsystem partDispersed constructions ofmachinesGreat flexibilityUp to 10 sensors in seriesconnected to one inputSoftware Pluto Manager freeof chargeH<strong>and</strong>les conventionalcircuit breakers as well asdynamical sensorsCustom made safety busFor product information <strong>and</strong> downloads please visitwww.abb.com/lowvoltageClick on Control Products, or search for our productsat www.abb.com/abblibrary/downloadcenter.2:6<strong>ABB</strong>
Technical info - PlutoDynamic signalA dynamic signal makes it possible to achieve the highestlevel of safety with only one conductor. By transmitting asquare wave <strong>and</strong> then evaluating the signal when it comesback to the controller you achieve the redundancy required.<strong>The</strong> signal is inverted once at each safety sensor (ifthe protection is OK) which makes it possible to detectshort circuits across a sensor. When the signal switchesbetween high (+24 V) <strong>and</strong> low (0V) it can be evaluated <strong>and</strong>tested about 200 times per second.Pluto can generate three unique dynamic signals; Apulse, B pulse or C pulse. Short circuits between twodifferent dynamic signals are detected whenever the signalthat is created is different from the expected signal inPluto. <strong>The</strong> kind of signal Pluto expects at the input terminalis determined in Pluto Manager (A, B or C pulse <strong>and</strong> if thesignal should be inverted or not).Static signalStatic signals (+24 V or 0 V) can be connected to all inputson Pluto. <strong>The</strong> kind of signal Pluto expects at the inputterminal is determined in Pluto Manager. To achieve atwo-channel structure according to EN ISO 13849-1 youneed two inputs.OSSD-signal<strong>The</strong>re are safety products with internal monitoring of dualOSSD signals (the device detects its own faults rather thanPluto doing this). From these devices, at least one of the twosignals is connected to an I-input in Pluto, i.e. both signalsmust not be connected to the IQ-terminals. <strong>The</strong> terminalblocks are then configured in Pluto Manager to expect staticinputs (OSSD signals are filtered internally in Pluto).IQ – individual failsafe inputs <strong>and</strong> non-failsafeoutputs<strong>The</strong> IQ terminals can be used either as individual failsafeinput or non-failsafe output (e.g. for indicator light or statussignal). <strong>The</strong> terminal blocks can also be used as both input<strong>and</strong> output simultaneously, which is useful for example forpush buttons (input) with indicator light (output). This functionis designed primarily for reset buttons to reduce thenumber of used terminal blocks on the controller.I - individual failsafe inputsAll inputs are individually failsafe as each input is connectedseparately to both processors in Pluto. In order to maintainthe redundancy required for two-channel structure <strong>and</strong> thehighest level of safety, the dynamic signal must be used.When using static signals, two inputs must be used to achievetwo-channel structure. <strong>The</strong> expected signal to theterminals blocks is determined in Pluto Manager (static ordynamic signal).Q - individual failsafe outputsAll Q outputs are individually safe <strong>and</strong> are independentlyprogrammable. <strong>The</strong>re are both relay outputs <strong>and</strong> transistoroutputs.Transistor outputs (-24 VDC)<strong>The</strong> transistor outputs are just like the relay outputs, thatis individually safe <strong>and</strong> independently programmable. However,the transistor outputs are different from the relayoutputs as the internal connection provides the nominalinput voltage -24 VDC, which is primarily intended for controllingelectromechanical components such as contactors<strong>and</strong> valves. As -24 VDC is a unique signal in the majorityof electrical cabinets <strong>and</strong> the fact that the output is monitoredby Pluto, short circuits with other potentials can bedetected right away.Pluto-bus<strong>The</strong> Pluto-bus is a CAN-bus with its own safety protocol.<strong>The</strong> bus cable can be up to 600 m long at the minimumbus speed, <strong>and</strong> up to 150 m at 400 kb/s. <strong>The</strong> bus canbe both extended <strong>and</strong> connected to other types of busesthrough gateways.12345678910Pluto Manager <strong>and</strong> IDFIXPluto manager<strong>The</strong> Pluto Manager is a freeware for fast, easy <strong>and</strong> safeprogramming of the PLC program for Pluto. <strong>The</strong> programminglanguage used is ladder, which is supplemented withTÜV-approved function blocks for many common features.<strong>The</strong> software can also be used to configure Pluto's terminalblocks, e.g. to specify the IQ terminals that serve as inputsor outputs, <strong>and</strong> if the controller should expect a static ordynamic signal. Pluto Manager can be downloaded fromwww.abb.com/lowvoltage.IDFIXIDFIX is a identification circuit that is unique to each deviceon the Pluto bus. It includes an identification code <strong>and</strong>makes it possible to distribute a PLC program in the network.<strong>The</strong>re are four different versions: R, RW, DATA <strong>and</strong>PROG. In addition to the identification code, DATA mayalso include safety codes from the AS-i nodes in an AS-isystem. PROG includes the current PLC program <strong>and</strong> isused with single-Pluto for program distribution. IDFIX isconnected between the input terminals ID <strong>and</strong> 0V.111213<strong>ABB</strong>2:714
Pluto without a safety busSingle Pluto controls <strong>and</strong> monitors safety for local systems- large aswell as small systems20/46 I/OPluto S20 Pluto S46 BT51PatentedsolutionPatentedsolutionConnector expansionSeveral expansion relays canbe connected to a single Plutosafety output while retainingthe safety level.HMIA HMI-terminal iseasy to connect toone or more Plutosthrough the Modbuscontact.Pluto ManagerA free of charge softwareis available on our website.<strong>The</strong> Pluto S20 <strong>and</strong> Pluto S46 versions are safety PLC's thatare designed for safety <strong>and</strong> protection products installedlocally on a machine. With a wide range of connectivityoptions, a lot of protection is integrated into a PLC whichin turn controls, for example, one or more safe outputs ina qualified manner without risking a dangerous situation.Using an expansion relay, such as BT50, the number ofsafe outputs in Pluto can be exp<strong>and</strong>ed. <strong>The</strong> connectionwill then be made as shown in the figure. If IDFIX PROG isused for single-Pluto, there is the option of copying a PLCprogram via the identification circuit over to Pluto withouthaving to connect a computer.A1X424VDCType: BT50Connection example of a contactexpansion with Pluto2:8<strong>ABB</strong>
Technical data - generalManufacturer:Colour:Technical data - typespecific<strong>ABB</strong> AB/<strong>Jokab</strong> <strong>Safety</strong>, SwedenGreyOperating voltage: 24V DC ±15%Installation:Electrical insulation:35 mm DIN railLevel of safety:EN 954-1 Kat. 4EN ISO 13849-1 PL e/kat. 4EN 61508 SIL 3EN 62061 SIL 3Category II in accordance withIEC 61010-1PFH dRelay output 2,00×10 -9Transistor output 1,50×10 -9Type:+24 V (for PNP sensors), IQalso configurable as nonfailsafeoutputsCurrent at 24 V5.1 mAMax. overvoltage27 V continuousSafe outputs QQ2–Q3:Output voltage toleranceTransistor, –24VDC, 800 mASupply voltage - 1,5 V at800 mAQ0, Q1, (Q4, 5): Relay outputsAC-1: 250 V/1,5 AAC-15: 250 V/1,5 ADC-1: 50 V/1,5 ADC-13: 24 V/1,5 ANon-failsafe outputs QType:Max. current/output:Transistor +24V, PNP "opencollector" also configurable asfailsafe inputs800 mATemperatureAmbient temperature:Storage <strong>and</strong> transport:Response timesDyn. A or static input to relayoutput:Dyn. A or static input totransistor output:Dyn. B or Dyn. C input torelay output:Dyn. B or Dyn. C input totransistor output:Software setting "NoFilt".Additional Response timesDatabus between Pluto unitsDatabus between Pluto unitson error–10˚C to +50˚C–25˚C to +55˚C
I/O Overview - Pluto without a safety busIDFIXID:I..IQ..Connection for identifier, which has a unique ID number that can be read by the system.<strong>Safety</strong> inputs (24 VDC) that are individually secure. This means that the highest level of safety can beachieved with only one input if <strong>ABB</strong> <strong>Jokab</strong> <strong>Safety</strong> dynamic safety components are used.Otherwise two inputs are required for each safety function.I/O that can be used for safety inputs or signal outputs, e.g. to indicate or control functions that are notsafety-related. For IQ.. as safety inputs, refer to I..Q0, Q1: Failsafe relay outputs that are individually failsafe <strong>and</strong> individually programmable.Q2, Q3: Failsafe transistor outputs (-24 VDC) that are individually failsafe <strong>and</strong> individually programmable.Intended for electro-mechanical components such as contactors <strong>and</strong> valves.Q4, Q5 Failsafe relay outputs with common potential that are individually failsafe <strong>and</strong> individually programmable.2:10<strong>ABB</strong>
Input connection<strong>The</strong> system offers solutions for both single <strong>and</strong> two-channel safety devices. In order to monitor wiring short-circuitsit is possible to use up to three different dynamic signals <strong>and</strong> static voltage (+24 V) tosupply the inputs. <strong>The</strong> inputs are then programmed to only accept one of the signal types.In a two-channel system both channels will be measured, using two different signals. <strong>The</strong> system will thereby beable to detect a short-circuit between the channels.In a single channel system the dynamic signal is modified at each sensor. A short-circuit between the input <strong>and</strong>the output of the sensor will be detected at the Pluto input. PL e according to EN ISO 13849-1 can thus beachieved by using only one channel <strong>and</strong> one input.1234Emergencystop withTinaSpot lightbeamEden sensor5Emergencystop withTina6Two-channel systemInput connection alternative in accordance with PL e EN ISO 13849-1.Single channel dynamic system78Reset button that uses the combined input <strong>and</strong> output facilityResetting with a lampinput/outputBoth a lamp <strong>and</strong> a pushbutton can be connected tothe same terminal. This function is for resetting safetydevices <strong>and</strong> to reduce the number of I/Os used.(Current monitoring)910111213<strong>ABB</strong>2:1114
Pluto with a safety busPluto models with a safety bus controls <strong>and</strong> monitors safety for dispersed systems– large aswell as small systems.Profibus DPDeviceNetCANopenProfinetEthernet/IPModbus TCP20/46 I/OGatewayfor twoway bus communicationbetweenPluto <strong>and</strong> othercontrolsystems.HMIA HMI-terminal iseasy to connect toone or more Plutosthrough the Modbuscontact.Absolutgivare8 single- or multiturnabsolute encoders can beconnected.Pluto ManagerA free of charge softwareis available on our website.Pluto versions with bus have the same properties as single-Pluto unlike bus communication. With the help of the Plutobusnetworks can be created with multiple Plutos in interaction.Gateways can be connected to the Pluto bus forcommunication with other systems. <strong>The</strong> gateway modelsGATE D2 <strong>and</strong> C2 can also be used as an extension of thebus cable to extend the Pluto network. <strong>The</strong> fact that Pluto isan All-master system means that each Pluto device controlsits outputs locally, while it is just as easy to read the inputsof other Pluto-units as it is to read its own. It is also easy toboth read <strong>and</strong> write to global memory locations availableacross the Pluto bus. <strong>The</strong> PLC program is created usingthe Pluto Manager freeware <strong>and</strong> is distributed to all Plutounits. You can also connect speed <strong>and</strong> position sensorsvia the Pluto bus.Current monitoring (Pluto A20 only)Pluto A20 can monitor the current through the IQ16 <strong>and</strong>IQ17 outputs. <strong>The</strong> function is designed for, but not limitedto, ensuring that the muting lamps are working. <strong>The</strong>hardware for current monitoring is not designed with individualredundancy, which means that the function must beused dynamically if it is to be used in a safety function. Thismeans that the current must be read <strong>and</strong> evaluated bothwhen the output is enabled <strong>and</strong> disabled.2:12<strong>ABB</strong>
Technical data - generalManufacturer:Colour:<strong>ABB</strong> AB/<strong>Jokab</strong> <strong>Safety</strong>, SwedenGreyOperating voltage: 24V DC ±15%Installation:Electrical insulation:35 mm DIN rail<strong>Safety</strong> levelEN 954-1 Kat. 4EN ISO 13849-1 PL e/kat. 4EN 61508 SIL 3EN 62061 SIL 3PFH dRelay output 2,00×10 -9Transistor output 1,50×10 -9Failsafe inputs I & IQType:Current at 24 VMax. overvoltageSafe outputs QQ2–Q3:Output voltage toleranceCategory II in accordance withIEC 61010-1+24 V (for PNP sensors), IQalso configurable as nonfailsafeoutputs5.1 mA27 V continuousTransistor, –24VDC, 800 mASupply voltage - 1,5 V at800 mAQ0, Q1, (Q4, 5): Relay outputsAC-1: 250 V/1,5 AAC-15: 250 V/1,5 ADC-1: 50 V/1,5 ADC-13: 24 V/1,5 ANon-failsafe outputs QType:Max. current/output:Technical data -type-specificTransistor +24V, PNP "opencollector" also configurable asfailsafe inputs800 mAPluto safety busMax number of Pluto units onthe databus: 32Databus type:CANDatabus speeds: 100, 125, 200, 250, 400, 500,800, 1000 kb/sDatabus cable length: Up to 600 m, 150 m at 400kb/sTemperatureAmbient temperature:Storage <strong>and</strong> transport:Response timesDyn. A or static input to relayoutput:Dyn. A or static input totransistor output:Dyn. B or Dyn. C input torelay output:Dyn. B or Dyn. C input totransistor output:Software setting "NoFilt".Additional Response timesDatabus between Pluto unitsDatabus between Pluto unitson error–10˚C to +50˚C–25˚C to +55˚C
I/O Overview - Pluto with a safety busIDFIXID:I..IQ..Connection for identifier, which has a unique ID number that can be read by the system.<strong>Safety</strong> inputs (24 VDC) that are individually secure. This means that the highest level of safety can beachieved with only one input if <strong>ABB</strong> <strong>Jokab</strong> <strong>Safety</strong> dynamic safety components are used.Otherwise two inputs are required for each safety function.I/O that can be used for safety inputs or signal outputs, e.g. to indicate or control functions that are notsafety-related. For IQ.. as safety inputs, refer to I..Q0, Q1: Failsafe relay outputs that are individually failsafe <strong>and</strong> individually programmable.Q2, Q3: Failsafe transistor outputs (-24 VDC) that are individually failsafe <strong>and</strong> individually programmable. Intendedfor electro-mechanical components such as contactors <strong>and</strong> valves.Q4, Q5 Failsafe relay outputs with common potential that are individually failsafe <strong>and</strong> individually programmable.2:14<strong>ABB</strong>
Certificates12345678910111213<strong>ABB</strong>2:1514
APPLICATION EXAMPLERobot cell with PlutoDescription:<strong>The</strong> example describes a processing machine served by arobot. <strong>The</strong> machine safety system consists of one (Pluto 1)to which all protection has been connected. <strong>The</strong> robot hasbeen equipped with a (Pluto 0) to which the cell protectionhas been connected. <strong>The</strong> Pluto for the machine has beenconnected via a databus cable to the robot's Pluto so thatcommon functions, such as emergency stop, can be usedby the whole cell.Function:Emergency stop takes priority <strong>and</strong> will stop both the machine<strong>and</strong> the robot. <strong>The</strong> machine hatch acts as the zonedivider, when the hatch is closed the machine forms onezone <strong>and</strong> the robot another zone. When the machine hatchis open, both the machine <strong>and</strong> the robot belong to thesame zone. If the door is opened when the machine hatchis open, the machine <strong>and</strong> the robot will both stop, but if themachine hatch is closed, only the robot will be stopped.After the door has been opened, the system must be resetby means of the reset button on the outside of the door.Emergency stop is reset when the pressed-in button ispulled out. NOTE. <strong>The</strong> cell operating cycle must not howeverstart immediately on resetting the emergency stop orthe door.2:16<strong>ABB</strong>
Electrical connections12345678910111213<strong>ABB</strong>2:1714
APPLICATION EXAMPLEPluto 0 settings – Robot cabinetPluto 0I0.0=P0_ES1_Ch1;Emergency stop 1 channel 1 - StaticI0.1=P0_ES1_Ch2;Emergency stop 1 channel 2 - Dynamic A non-invertedI0.2=P0_Eden1;Door Eden sensor - Dynamic AI0.15=P0_LB1_In;Reset Door - Light button input - Dynamic AQ0.2=P0_AS_OK;Robot auto stop - Expansion BT50 relayQ0.3=P0_ES;Robot emergency stop - Expansion BT50 relayGM0.0=P0_ES_OK ;Emergency stop OK in Pluto 02:18<strong>ABB</strong>
Pluto 1 settings – Machine cabinet123456789Pluto 1I1.1=P2_ES1_Ch1;Emergency stop 1 channel 1 - Dynamic A non-invertedI1.2=P2_ES1_Ch2;Emergency stop 1 channel 2 -StaticI1.3=P2_IS1_Ch1;Interlocking switch channel 1 - Dynamic A non-invertedI1.4=P2_IS1_Ch2;Interlocking switch channel 2 - StaticI1.15=P2_LB1_In;Reset Hatch - Light button input - Dynamic AQ1.0=P2_ES;Machine Emergency stopQ1.1=P2_PS;Machine protective stopGM1.0=P2_ES_OK ;Emergency stop OK in Pluto 1GM1.1=P2_Hatch_OK;Hatch closed10111213<strong>ABB</strong>2:1914
<strong>ABB</strong>2:20PLC code Pluto 0 – Robot cabinetAPPLICATION EXAMPLE
2:21<strong>ABB</strong>1234567891011131412
<strong>ABB</strong>2:22PLC code Pluto 1 – Machine cabinetAPPLICATION EXAMPLE
2:23<strong>ABB</strong>1234567891011131412
Pluto gatewayGATE-P2Use:Bi-directional statusinformation from the Plutosafety PLCFor ProfibusFeatures:Profibus DPDeviceNetCANopenProfinetEthernet/IPModbus TCPTwo-way communicationBuilt-in filter function, sharednetworkOnly 22.5 mm wideCan be located anywhere inthe databusCommon interface withPlutoReady-made function blocksPluto gateway is a unit providing two-way communicationbetween a Pluto safety PLC <strong>and</strong> other field buses.<strong>The</strong> Pluto gateway is a compact unit mounted on a DINrail, <strong>and</strong> can be connected anywhere in a Pluto safety bus.<strong>The</strong> unit has a common interface with Pluto, i.e. the samecabling, <strong>and</strong> the Pluto Manager PC program can be usedfor servicing <strong>and</strong> where necessary programming. Normally,however, all the settings are made via a DIP switches, whichmeans that programming tools are not required to put thegateway itself into operation.For programming Pluto there are ready-made functionblocks which, via a Pluto gateway, send <strong>and</strong> receive datafrom the supervisory system.Data from PlutoVia PROFIBUS a supervisory PLC system can have accessto the I/O <strong>and</strong> other variables in a Pluto safety PLC.Global I/O in a Pluto safety PLC are accessible via PROFI-BUS modules in the gateway, one module for each Plutounit. Local data in Pluto units can be read by a "local data”module together with the PLC codes in the supervisorysystem.Data to PlutoVia PROFIBUS a supervisory PLC system can transmitnon-safety-related information to a Pluto safety PLC. A totalof 64 Boolean values <strong>and</strong> 8 different 16-bit registerscan be transmitted. Function blocks for these functions areavailable in Pluto Manager.PLC function blocksTo simplify the integration of a Pluto gateway PROFIBUSinto the supervisory PLC system, <strong>ABB</strong> <strong>Jokab</strong> <strong>Safety</strong> providesready-made function blocks for several popularbr<strong>and</strong>s of PLC. <strong>The</strong> function blocks make it easier to receive<strong>and</strong> send information to the Pluto system. <strong>The</strong> functionblocks are supplied as open units with full access forthe customer to change <strong>and</strong> add functions. <strong>The</strong>se functionblocks can be obtained via www.abb.com/lowvoltage.Pluto safety bus LED"K" buttonPC portProfibus LEDProfibus connector2:24<strong>ABB</strong>
Technical data - GATE-P2Manufacturer:Article number/orderingdata:Databuses:<strong>ABB</strong> AB/<strong>Jokab</strong> <strong>Safety</strong>, Sweden2TLA020071R8000 GATE-P2-Pluto safety bus CAN(isolated)-PROFIBUS RS485 (isolated)Pluto safety bus speeds: 100, 200, 250, 400, 500, 800<strong>and</strong> 1000 kbit/s(automatic speed detection)PROFIBUS speed:Up to 12 Mbit/s (automaticspeed detection)PROFIBUS address: Setting via DIP switches (0-99)PROFIBUS version:Connections:Status indication:DP slave, DP-V0Top, 3-pole terminal for Plutosafety bus (included)Front, st<strong>and</strong>ard 9-polePROFIBUS connection.Bottom, 2-pole terminal for 24V DC (included)Pluto safety bus statusindication via LEDPROFIBUS status indicationvia LEDOperating voltage: 24 V DC, -15% till +20%Current at 24 V:Dimensions (w x h x d):Installation:< 100 mA (recommended fuse≤6 A)22.5 x 101 x 119 mm35 mm DIN railOperating temperature(ambient): -10°C to + 55ºCTemperature, transport <strong>and</strong>storage: -25°C to + 55ºCHumidity: EN 60 204-1 50% at 40ºC(ambient 90% at 20ºC)Enclosure classification: Enclosure IP 20 - IEC 60 529Terminals IP 20 - IEC 60 529Gateway block schematic diagram - Pluto Profibus119 mm22,5 mm101 mm12345678910111213<strong>ABB</strong> 2:2514
Pluto gatewayGATE-D2Use:Bi-directional statusinformation from the Plutosafety PLCFor DeviceNet <strong>and</strong> PlutobridgeProfibus DPDeviceNetCANopenProfinetEthernet/IPModbus TCPFeatures:Two-way communicationBuilt-in filter function, sharednetworkOnly 22.5 mm wideCan be located anywhere inthe databusCommon interface withPlutoReady-made function blocksPluto gateway is a unit providing two-way communicationbetween a Pluto safety PLC <strong>and</strong> other field buses.<strong>The</strong> Pluto gateway is a compact unit mounted on a DINrail, <strong>and</strong> can be connected anywhere in a Pluto safety bus.<strong>The</strong> unit has a common interface with Pluto, i.e. the samecabling, <strong>and</strong> the Pluto Manager PC program can be usedfor servicing <strong>and</strong> where necessary programming. Normally,however, all the settings are made via a DIP switches,which means that programming tools are not required toput the gateway itself into operation.For programming Pluto there are ready-made functionblocks which, via a Pluto gateway, send <strong>and</strong> receive datafrom the supervisory system.Data from PlutoVia DeviceNet a supervisory PLC system can have accessto the I/O <strong>and</strong> other variables in a Pluto safety PLC. GlobalI/Os in a Pluto safety PLC are accessible via DeviceNet”implicit” messages. Local data in Pluto units can be readvia DeviceNet ”explicit” messages.Data to PlutoVia DeviceNet a supervisory PLC system can transmit nonsafety-relatedinformation to a Pluto safety PLC. A total of64 Boolean values <strong>and</strong> 8 different 16-bit registers can betransmitted (via DeviceNet ”implicit” or ”explicit” messages).Function blocks for these comm<strong>and</strong>s are available inPluto Manager.several sections. This is particularly useful when long databuscables are needed.<strong>The</strong>re is also a built-in filter function which makes it possibleto block any data that is not required for use on theother side of the bridge, which reduces the databus loadingin the other sections <strong>and</strong> thereby permits longer databuscables.<strong>ABB</strong> Robotics IRC5PLUTO GATE-D2 has support for integration into an <strong>ABB</strong>Robotics IRC5-system. <strong>The</strong> documentation that describesthis integration can be obtained via the www.abb.com/lowvoltage.Pluto safety bus LED"K" buttonPC portDeviceNet LEDDeviceNet connectorPluto bridgeA GATE-D2 can also be used to advantage as a CANbridge when it is required to divide a Pluto safety bus into2:26<strong>ABB</strong>
Technical data - GATE-D2ManufacturerArticle number/orderingdata:Databuses:<strong>ABB</strong> AB/<strong>Jokab</strong> <strong>Safety</strong>, Sweden2TLA020071R8200 GATE-D2-Pluto safety bus CAN (isolated)-DeviceNet CAN (isolated)Pluto safety bus speeds: 100, 200, 250, 400, 500, 800<strong>and</strong> 1000 kbit/s(automatic speed detection)DeviceNet speeds:125, 250 <strong>and</strong> 500 kbit/s (setvia DIP switch)DeviceNet address: Setting via DIP switches (1-63)DeviceNet Version: ODVA version 2.0Connections:Status indications:Top, 3-pole terminal for Plutosafety bus (included)Front, 5-pole terminal forDeviceNet (included)Bottom, 2-pole terminal for 24V DC (included)Pluto safety bus statusindication via LEDDeviceNet MNS statusindication via LEDOperating voltage: 24 V DC, -15% till +20%Current at 24 V:Dimensions (w x h x d):Installation:< 100 mA (recommended fuse≤6 A)22.5 x 101 x 119 mm35 mm DIN railOperating temperature(ambient): -10°C to + 55ºCTemperature,transport <strong>and</strong> storage: -25°C to + 55ºCHumidity: EN 60 204-1 50% at 40ºC(ambient 90% at 20ºC)Enclosure classification: Enclosure IP 20 - IEC 60 529Terminals IP 20 - IEC 60 529119 mm22,5 mm101 mm12345678Gateway block schematic diagram - Pluto DeviceNet910111213<strong>ABB</strong> 2:2714
Pluto gatewayGATE-C2Use:Bi-directional statusinformation from the Plutosafety PLCFor CANopen <strong>and</strong> PlutobridgeProfibus DPDeviceNetCANopenProfinetEthernet/IPModbus TCPFeatures:Two-way communicationBuilt-in filter function, sharednetworkOnly 22.5 mm wideCan be located anywhere inthe databusCommon interface withPlutoReady-made function blocksPluto gateway is a unit providing two-way communicationbetween a Pluto safety PLC <strong>and</strong> other field buses.<strong>The</strong> Pluto gateway is a compact unit mounted on a DINrail, <strong>and</strong> can be connected anywhere in a Pluto safety bus.<strong>The</strong> unit has a common interface with Pluto, i.e. the samecabling, <strong>and</strong> the Pluto Manager PC program can be usedfor servicing <strong>and</strong> where necessary programming. Normally,however, all the settings are made via a DIP switches,which means that programming tools are not required toput the gateway itself into operation.For programming Pluto there are ready-made functionblocks which, via a Pluto gateway, send <strong>and</strong> receive datafrom the supervisory system.Data from PlutoVia CANopen a supervisory PLC system can have accessto the I/O <strong>and</strong> other variables in a Pluto safety PLC. GlobalI/Os in a Pluto safety PLC are accessible via CANopenPDO messages. Local data in Pluto units can be read viaCANopen SDO messages together with the PLC codes inthe supervisory system.Data to PlutoVia CANopen a supervisory PLC system can send nonsafety-relatedinformation to a Pluto safety PLC. A total of64 Boolean values <strong>and</strong> 8 different 16-bit registers can betransmitted (CANopen PDO or SDO messages). Functionblocks for these comm<strong>and</strong>s are available in Pluto Manager.Pluto bridgeA GATE-C2 can also be used to advantage as a CANbridge when it is required to divide a Pluto safety bus intoseveral sections. This is particularly useful when long databuscables are needed.<strong>The</strong>re is also a built-in filter function which makes it possibleto block any data that is not required for use on theother side of the bridge, which reduces the databus loadingin the other sections <strong>and</strong> thereby permits longer databuscables.Pluto safety bus LED"K" buttonPC portCANopen LEDCANopen connector:2:28<strong>ABB</strong>
Technical data - GATE-C2ManufacturerArticle number/orderingdata:Databuses:<strong>ABB</strong> AB/<strong>Jokab</strong> <strong>Safety</strong>, Sweden2TLA020071R8100 GATE-C2-Pluto safety bus CAN (isolated)-CANopen CAN (isolated)Pluto safety bus speeds: 100, 200, 250, 400, 500, 800<strong>and</strong> 1000 kbit/s(automatic speed detection)CANopen speeds:CANopen address:CANopen version:Connections:Status indications:125, 250 <strong>and</strong> 500 kbit/s (setvia DIP switch)10, 20, 50, 100, 125, 250,500, 800 <strong>and</strong> 1000 kbit/s (viasoftware)Setting via DIP switches orsoftware (1-63)”Version 4.02 of the CiA DraftSt<strong>and</strong>ard 301”Top, 3-pole terminal for Plutosafety bus (included)Front, 5-pole terminal forCANopen (included)Bottom, 2-pole terminal for 24V DC (included)Pluto safety bus statusindication via LEDCANopen status indication viaLEDOperating voltage: 24 V DC, -15% till +20%Current at 24 V:< 100 mA (recommended fuse≤6 A)Dimensions (w x h x d):Installation:119 mm22,5 mm101 mm22.5 x 101 x 119 mm35 mm DIN railOperating temperature(ambient): -10°C to + 55ºCTemperature, transport <strong>and</strong>storage: -25°C to + 55ºCHumidity: EN 60 204-1 50% at 40ºC(ambient 90% at 20ºC)Enclosure classification: Enclosure IP 20 - IEC 60 529Terminals IP 20 - IEC 60 52912345678Gateway block schematic diagram - Pluto CANopen910111213<strong>ABB</strong>2:292:29 14
Pluto gatewayGATE-E2Use:Bi-directional statusinformation from the Plutosafety PLCProfinet, Ethernet/IP,Modbus TCPProfibus DPDeviceNetCANopenProfinetEthernet/IPModbus TCPFeatures:Two-way communicationBuilt-in filter function, sharednetworkCan be located anywhere inthe databusCommon interface withPlutoReady-made function blocksPluto gateway is a unit providing two-way communicationbetween a Pluto safety PLC <strong>and</strong> other field buses.<strong>The</strong> Pluto gateway is a compact unit mounted on a DINrail, <strong>and</strong> can be connected anywhere in a Pluto safety bus.<strong>The</strong> unit has a common interface with Pluto, i.e. the samecabling, <strong>and</strong> the Pluto Manager PC program can be usedfor servicing <strong>and</strong> where necessary programming. Normally,however, all the settings are made via a DIP switches,which means that programming tools are not required toput the gateway itself into operation.For programming Pluto there are ready-made functionblocks which, via a Pluto gateway, send <strong>and</strong> receive datafrom the supervisory system.ProtocolPLUTO Gateway GATE-E2 h<strong>and</strong>les the status from <strong>and</strong>to Pluto safety PLCs via Ethernet protocols EtherNet/IP,PROFINET, Modbus TCP <strong>and</strong> a simple binary protocolthat uses TCP/IP.For IP-address configuration, etc. there is a simple webserver <strong>and</strong> a terminal server.Data from PlutoVia one of the Ethernet protocols a supervisory PLC systemcan have access to the I/O <strong>and</strong> other variables in a Plutosafety PLC. Global I/Os in a Pluto safety PLC are accessiblevia the usual I/O transfer in the respective protocol.Local data in Pluto units can be read by special comm<strong>and</strong>stogether with the PLC codes in the supervisory system.Data to PlutoVia the Ethernet protocol a supervisory PLC system cantransmit non-safety-related information to a Pluto safetyPLC. A total of 64 Boolean values <strong>and</strong> 8 different 16-bitregisters can be transmitted. Function blocks for thesefunctions are available in Pluto Manager.Pluto safety bus LED"K" buttonPC portEthernet LEDEthernet connector2:30<strong>ABB</strong>
Technical data - GATE-E2ManufacturerArticle number/ordering data:Buses:<strong>ABB</strong> AB/<strong>Jokab</strong> <strong>Safety</strong>, Sweden2TLA020071R8300 GATE-E2Pluto-bus CAN (isolated)Profinet (isolated)Ethernet/IP (isolated)Modbus TCP (isolated)Pluto safety bus speeds 100, 200, 250, 400, 500, 800<strong>and</strong> 1000 kbit/s(automatic speed detection)EthernetEthernet protocolEtherNet/IPPROFINETModbus TCPBinary server (TCP/IP)10/100 Mbit/sHalf <strong>and</strong> full duplexStatus from <strong>and</strong> to Pluto safetyPLC- EtherNet/IP- PROFINET (in development)- Modbus TCP- Binary server (TCP/IP)Note that certain combinationsof server protocols cannot beused simultaneously.Gateway status <strong>and</strong> IP addressconfiguration- Web server- Terminal server (TCP/IP)According to ODVA “CIPEdition 3.2” <strong>and</strong> “EtherNet/IPAdaption of CIP Edition 1.3”.Minimum RPI of 50 msPROFINETAccording to the Modbusorganisation, version 1.0b(approx. 20 messages persecond).Simple TCP/IP protocol tosend status from/to the Plutosystem.Web serverTerminal server (TCP/IP)IP addressGateway configurationConnectionsStatus indicationsFor simple sharing of IPaddresses.Simple server with the samecomm<strong>and</strong>s as via the serialprogramming port in the unit.Static sharing via web server orvia programming port.Takes place via EtherNet/IP,PROFINET, Modbus TCP orvia the binary TCP/IP server.Top, 3-pole terminal for Plutosafety bus (included)Front, Ethernet connection viaRJ-45 (screened cable cat. 5eFTP)Bottom, 2-pole terminal for 24V DC (included)Pluto safety bus statusindication via LED (Pluto safetybus)Ethernet module statusindication via LED (ModStatus)Ethernet network statusindication via LED (Net Status)Operating voltage 24 V DC, -15 % till +20 %Current at 24 VDimensions (w x h x d):Installation< 150 mA (recommended fuse≤6 A)35 x 101 x 120 mm35 mm DIN railOperating temperature(ambient) -10°C to + 55ºCTemperature,transport <strong>and</strong> storage -25°C to + 55ºCHumidity EN 60 204-1 50 % at 40ºC(ambient 90 % at 20ºC)Enclosure classification Enclosure IP 20 - IEC 60 529Terminals IP 20 - IEC 60 52912345678Gateway block schematic diagram - Pluto Ethernet9119 mm1011101 mm1235 mm13 <strong>ABB</strong>2:3114
PlutoSafeEncoderUse:Safe position <strong>and</strong> speeddetermination of machinemovements.Features:High resolutionSelectable resolutionConnected directly to thePluto safety busReady-made function blocksRotational absolute value sensor for safepositioningTogether with a Pluto safety PLC, this rotational absoluteencoder can be used for safe position determination.This is particularly useful in the case of such equipmentas gantry robots, industrial robots, etc. Also in eccentricshaft presses, existing cam mechanisms can be replacedby absolute value position sensors for safe positioning. <strong>The</strong>sensors are available in single <strong>and</strong> multi-turn versions.Up to 16 absolute encoders can be connected to aPluto CAN databus. A Pluto on the databus reads the sensorvalues, which are evaluated. With a special functionblock in the PLC code, it is possible to design two-channelsolutions with the sensors. <strong>The</strong> user can obtain safe valuesfor position <strong>and</strong> speed from these values. This enables supervisionof stationary <strong>and</strong> overspeed conditions.<strong>The</strong> absolute value sensors are st<strong>and</strong>ard sensors withmodified software to meet the safety requirements.Example of an application where 2 sensors provide safe position determination in a gantry robot.2:32<strong>ABB</strong>
Technical data – Safe Encoder RSA 597Manufacturer<strong>ABB</strong> AB/<strong>Jokab</strong> <strong>Safety</strong>, SwedenArticle number/orderingdata: 2TLA020070R3600 RSA 597Ambient temperatureTemperature, transport <strong>and</strong>storageIngress protection classAt shaft inletVibration (55 to 2000 Hz)Shock (6ms)Material, enclosureSurface treatmentWeightAccuracy <strong>and</strong> resolutionResolutionAccuracyOperating voltagePolarity-protectedShort-circuit protectedDatabus speedAddress inputCode typeProgrammable functionsCurrent consumptionMax current consumption-40°C .. +70°C-30°C .. +70°CIP-67 in accordance withIEC 60529IP-66 in accordance withIEC 60529< 300 m/s 2 in accordance withIEC 60068-2-6< 2,000 m/s 2 in accordancewith IEC 60068-2-27AluminiumPainted <strong>and</strong> chromed oranodisedApprox. 300 g13 bits, 8192 positions perrotation± ½ LSB (Least Significant Bit)9-36 V dcYesYes5 kbit/s - 1 Mbit/s, preset at500kbit/sActive lowBinaryResolution, 0 positionDirection, Databus speed50 mA at 24V dc100 mASafe Encoder RSA 597 – single turn12345678910111213<strong>ABB</strong>2:3314
Technical data – Safe Encoder RSA 698Manufacturer<strong>ABB</strong> AB/<strong>Jokab</strong> <strong>Safety</strong>, SwedenArticle number/orderingdata: 2TLA020070R3700 RSA 698Ambient temperatureTemperature, transport <strong>and</strong>storageIngress protection classAt shaft inletVibration (55 to 2000 Hz)Shock (6ms)Material, enclosureSurface treatmentWeightAccuracy <strong>and</strong> resolutionResolution, totalAccuracyOperating voltagePolarity-protectedShort-circuit protectedDatabus speedCode typeProgrammable functionsCurrent consumptionMax current consumption-40°C .. +70°C-30°C .. +70°CIP-67 in accordance withIEC 60529IP-66 in accordance withIEC 60529< 100 m/s 2 in accordance withIEC 60068-2-6< 2,000 m/s 2 in accordancewith IEC 60068-2-27AluminiumAnodisedApprox. 400g25 bit13 bits, 8192 positions perrotation12 bits, 4096 rotations± 1 LSB (Least Significant Bit)9-36 V dcYesYes10 kbit/s - 1 Mbit/sBinaryResolution, 0 position50 mA at 24V dc100 mASafe Encoder RSA 698 – multi turn2:34<strong>ABB</strong>
Safe EncoderFunction block for a single-turn encoderthat generates safe position <strong>and</strong> speedvalues from two absolute encoders.Function<strong>The</strong> block reads <strong>and</strong> evaluates one absoluteencoders. <strong>The</strong> position value is sent tothe 'Position' output. <strong>The</strong> 'Speed' outputis the average value for the speed, at therate of pulses/10 ms. If an error occurs,the 'OK' output is set to zero. In certainapplications the values of 'Position' <strong>and</strong>'Speed' are used in conjunction with the'OK' output.Safe EncoderMultiturnFunction block for a multi-turn encoderthat generates safe position <strong>and</strong> speedvalues from two absolute encoders.Operative system 2.4.4 or higher isrequired.Function<strong>The</strong> block reads <strong>and</strong> evaluates two absoluteencoders. <strong>The</strong> average value for thetwo sensors is calculated <strong>and</strong> sent to the'Position' output. <strong>The</strong> 'Speed' output is theaverage value for the speed, at the rate ofpulses/10 ms. <strong>The</strong> block monitors that theencoder position values do not differ bymore than the input value set by 'MaxDiff'.If an error occurs, the 'OK' output is setto zero. In certain applications the valuesof 'Position' <strong>and</strong> 'Speed' are used in conjunctionwith the 'OK' output.Encoder CamFunction block for electronic cam gear.FunctionOutput Q is activated if the value of theinput register 'PosReg' is within the limitsfor ’MinPos’ <strong>and</strong> ’MaxPos’.NOTE! It is possible to specify a valuethat defines the sensor's zero position.Position
AS-i <strong>Safety</strong>Two-wire bus system<strong>ABB</strong>
ContentsPage1Why should I use the bus system at component level? ___________________3:2AS-i <strong>Safety</strong> from <strong>ABB</strong> <strong>Jokab</strong> <strong>Safety</strong> ____________________________________3:4Pluto AS-i ___________________________________________________________3:6Why should you use safety node Urax? ________________________________3:11<strong>Safety</strong> node Urax-A1/A1R __________________________________________ 3:12<strong>Safety</strong> node Urax-B1R ______________________________________________3:14<strong>Safety</strong> node Urax-C1/C1R ___________________________________________3:16<strong>Safety</strong> node Urax-D1R ______________________________________________3:18<strong>Safety</strong> node Urax-E1 _______________________________________________ 3:20Non-safe node Flex ________________________________________________ 3:2223456789101112Descriptions <strong>and</strong> examples in this book show how the products work <strong>and</strong> can be used. This does not mean that they can meet the requirements forall types of machines <strong>and</strong> processes. <strong>The</strong> purchaser/user is responsible for ensuring that the product is installed <strong>and</strong> used in accordance with theapplicable regulations <strong>and</strong> st<strong>and</strong>ards. We reserve the right to make changes in products <strong>and</strong> product sheets without previous notice. For the latestupdates, refer to www.abb.com/lowvoltage. 2011.<strong>ABB</strong> 3:11314
Why should I use the bussystem at component level?-provides simplicity in the construction ofsystems<strong>The</strong> AS-i system provides benefits both when the system isplanned <strong>and</strong> installed. A single network can, for example, bedivided into monitoring <strong>and</strong> control of different work zones.<strong>The</strong> zones can be dependent on each other or not, eventhough they are controlled <strong>and</strong> are connected to the samegeneral process.-to save installation timeComponents designed for the AS-i bus systemcan easily connect to the network wherever this isrequired. <strong>The</strong> required function is then selected inthe control system.- as it provides a flexible systemYou can use the AS-i cable to move, replace oradd new safety products anywhere as needed.Additional monitors such as Pluto AS-i can also beconnected in the same way.-in order to easily exp<strong>and</strong> thesystem<strong>The</strong> system's construction allows, wherenecessary, the easy extension or expansionof the network. Cable is added whichthereby extends the production line withoutany additional controllers being installed.3:2<strong>ABB</strong>
How does the bus system AS-Interface work?<strong>The</strong> AS-i system is distinguished by its special yellow profilecable. <strong>The</strong> cable connects all sensors, transducers <strong>and</strong>actuators on the network to a master system. <strong>The</strong> componentparts of a system can include both non-safe <strong>and</strong> safeproducts. This means that both operational <strong>and</strong> safety relatedproducts can be mixed in a network. <strong>The</strong> bus systemdrives a Master-Slave (node) configuration where each I/Omodule corresponds to a common master.Communication takes place through the yellow cablewhich also provides the nodes with supply voltage. <strong>The</strong> installationof the cable is usually done along a productionline or centrally around the AS-i system's I/O products.After commissioning the system can always be exp<strong>and</strong>edby adding branches or extensions to the cable. In a similarway, more products can be added, moved or replaced. <strong>The</strong>changes are easily made in the software to the controller.With the AS-i concept, decentralised systems can be designedwith all products, non-safe <strong>and</strong> safe monitored bya device. This advantage means that the system can beh<strong>and</strong>led as zones where one zone can be down, anothercan be in operation <strong>and</strong> a third manually operated. Withoutdegrading operation <strong>and</strong> safety or influencing each other'szones.Voltage <strong>and</strong> communications<strong>The</strong> AS-i network is maintained by a specialAS-i power supply unit that generates a regulatedDC output voltage between 29.5 <strong>and</strong> 31.6V. This supplies voltage to the network nodes atthe same time as communications are transmittedin a superimposed manner.Why is the AS-i <strong>Safety</strong> so good from a safety perspective?<strong>The</strong> simple connection to a cable also applies to safetycomponents. <strong>The</strong> risk of incorrect wiring is thereby minimised.Each safety node, i.e. safety product, has its ownaddress on the AS-i bus along with a unique safety code.<strong>The</strong> additional requirement for an AS-i system to copewith safety products is that there must be extra safe monitoring.<strong>The</strong> control ("Master") does not need to be safe,but is complemented with a safety Monitor (however, safetyPLC Pluto AS-i can act as both Master <strong>and</strong>/or Monitor).<strong>The</strong> advantage of safety within AS-i is that it is easy tointroduce changes without significant costs compared totraditional safety systems that require new cable runningfrom the electrical cabinet for each new protection. Moreover,experience shows that most safety systems need to beretrofitted to adapt the protection to suit the changes toproduction.Nodes<strong>Safety</strong> nodes (maximum 31) <strong>and</strong> A / B-nodes (maximum 62) are connected tothe AS-i for both inputs <strong>and</strong> outputs.1234567891011Two-wire cable<strong>The</strong> AS-i cable is a two-wire cable(2x1.5mm 2) that is not shielded.Connection is made using piercingtechnology, where the cable housingis self-restoring if a connection ismoved. <strong>The</strong> cable retains enclosureprotection class IP67 in this way.Adaptation devicesFor the AS-i cable it is possible toconnect the adaptation devices thatact as a link between a component<strong>and</strong> the AS-i system. <strong>The</strong>se adaptationdevices are available as bothsafety nodes <strong>and</strong> nodes for non-safeproducts.Sensors with integratedsafety nodesSome AS-i adapted componentshave nodes directly built into theproduct, for example, there is onesafety node in the customised SmileEmergency Stop.1213<strong>ABB</strong><strong>The</strong> AS-interface makes it easy to connect <strong>and</strong> remove products to <strong>and</strong> from the AS-i bus.3:314
AS-i <strong>Safety</strong> from <strong>ABB</strong> <strong>Jokab</strong> <strong>Safety</strong><strong>Safety</strong> levelPluto, Urax <strong>and</strong> our other products with integratedsafety nodes achieve up to safety level cat.4/PL e in compliance with EN ISO 13849-1.Pluto AS-iPluto is designed to control (Master) the AS-i bus <strong>and</strong>/or monitor (Monitor) it. Pluto can also serve as a safe I/Omodule for the bus.Zone AZone AZone BAdaptation device Urax with integrated safety nodeUrax is an adaptation device for safety components thatcannot be directly connected to the AS-i bus. You canconnect safety components, local reset, <strong>and</strong> non-safecontrols, such as process locks to Urax. Urax is availablein several versions, adapted to suit specific safetyproducts.<strong>The</strong> AS-i system<strong>The</strong> AS-i cable can be connected to the safety productsseparately or through the adaptation device Urax. Somecomponents have an integrated AS-i node <strong>and</strong> are connectedvia an M12 connection directly to the yellow AS-icable. Traditional products without an integrated AS-i nodeneed to be connected via the safety node Urax. In bothcases, the highest level of safety is maintained.<strong>The</strong> AS-i cable is powered by 30V DC power supply<strong>and</strong> connected to a special AS-i power supply unit. Somecomponents have power requirements that are higher thanthe AS-i cable is able to supply. <strong>The</strong>refore, there is also ablack cable (AUX 24V DC) with secondary supply voltagethat is able to supply more current.Possible connections for a complete system:• all our sensors for AS-i via Urax• all Pluto PLCs, gateways <strong>and</strong> absolute sensors throughPluto's safety bus to the Pluto AS-i• operator panel via the programming port on Pluto• expansion relay for multiple outputs3:4<strong>ABB</strong>
1Easy connections to the AS-i cableAdaptation devices are clamped directly to the AS-i cable.Transition from the AS-i cable to M12 units is made via a Tconnector. Cable branches or extensions of the AS-i cableare made using a splitter box.Sensors with integrated AS-i safety nodesSome of our products can be ordered with integrated AS-i node.<strong>The</strong>se are connected to the yellow cable with a M12 contact directlyto the yellow AS-i cable via a screw terminal which is clamped tothe cable. More information can be found under each product.234Zone CAS-interface- an intelligent cable running system<strong>The</strong> field bus system AS-interface came to light in the 90s.<strong>The</strong> system was the result of a collaboration between severalcomponent manufacturers for machine control. <strong>The</strong> ideawas a bus system at a component level where the goal wassimplicity <strong>and</strong> flexibility. Since the system was launched,many new <strong>and</strong> innovative ideas have been added.Zone DAS-International AssociationIn 1991, the AS-International Association for organisationalcohesion <strong>and</strong> marketing was founded. <strong>The</strong> AS-i associationworks in both an advisory <strong>and</strong> auditing capacity to ensurethe AS-i st<strong>and</strong>ard is maintained.<strong>The</strong> goal of the AS-i Association is that the AS-interfaceis to become a world st<strong>and</strong>ard for easy communication forcomponents within the automation industry.<strong>The</strong> distinguishing feature of the AS-interface is that datacommunication is mixed with the power supply. This is donein a simple two-wire cable. In 2001 safety was integrated inthe AS-interface via the work group <strong>Safety</strong> at Work, whichalso includes <strong>ABB</strong> <strong>Jokab</strong> <strong>Safety</strong>.5678910111213<strong>ABB</strong>3:514
<strong>Safety</strong> PLCPluto AS-iApprovals:TÜV Rheinl<strong>and</strong>Control of:<strong>Safety</strong> products in dynamic<strong>and</strong> static circuits as well asin AS-i networksElectrically controlledactuators such ascontactors, valves, motorsIndicators <strong>and</strong> buttonsFeatures:A safety PLC for AS-i <strong>Safety</strong>Pluto AS-i is a safety PLC designed for the AS-i <strong>Safety</strong>concept where all the safety components are connected toa single cable. Pluto AS-i has the same characteristics asa st<strong>and</strong>ard Pluto <strong>and</strong> works in the same way with the onlydifference being the AS-i bus. As with a st<strong>and</strong>ard Pluto,Pluto AS-i is in an All-Master system with its own safetybus <strong>and</strong> is designed for dynamic <strong>and</strong> static safety circuitswhere inputs <strong>and</strong> other information are shared across thebus. Pluto AS-i also has a reduced number of failsafe inputs(I), failsafe relay <strong>and</strong> transistor outputs (Q) <strong>and</strong> terminals thatare user-defined <strong>and</strong> serve as failsafe inputs or non-failsafeoutputs (IQ).For the AS-i bus, Pluto AS-i acts as a master, monitor,or I/O controller. As a master it controls <strong>and</strong> distributesall communication while it works as a monitor. In monitormode, it listens to the bus <strong>and</strong> controls its safe outputs. Asan I/O controller it serves as a slave node on the AS-i bus<strong>and</strong> communicates with another master or monitor.Pluto AS-i is available in two models<strong>ABB</strong> <strong>Jokab</strong> <strong>Safety</strong>'s Pluto AS-i is available in two differentmodels. A smaller version, Pluto AS-i, <strong>and</strong> a larger modelwith a larger number of I/Os, Pluto B42 AS-i. Both modelshave a model-dependent number of I/Os. If more I/Os arenecessary, you can connect Pluto AS-i to Pluto B16, B20or B46 via the Pluto safety bus.AS-i interface where up to31 safety products can beconnectedDispersed constructions ofmachinesGreat flexibilityUp to 10 sensors in seriesconnected to one inputSoftware Pluto Manager freeof chargeH<strong>and</strong>les conventionalcircuit breakers as well asdynamical sensorsCustom made safety busVery large systems can bemonitored by Pluto AS-iPluto AS-i is programmed using Pluto ManagerProgramming Pluto AS-i is made easy using TÜV-reviewedsoftware with ladder language <strong>and</strong> finished blocks for varioussafety functions. <strong>The</strong> Pluto Manager software is alsofree to download from our website.3:6<strong>ABB</strong>
Technical information – Pluto AS-iI/O propertiesA dynamic signal makes it possible to achieve PL e as specifiedin 13849-1 with only one conductor. By transmitting asquare wave <strong>and</strong> then evaluating the signal when it comesback to the controller you achieve the redundancy required.<strong>The</strong> kind of signal Pluto expects at the input terminal is determinedin Pluto Manager (A or B pulse <strong>and</strong> if the signal isto be inverted or not).Static signals (+24 V or 0 V) can be connected to allinputs on Pluto. <strong>The</strong> kind of signal Pluto expects at theterminal input is determined in Pluto Manager.<strong>The</strong>re are safety products with internal monitoring of dualOSSD signals (the device detects its own faults rather thanPluto doing this). From these devices, at least one of the twosignals is connected to an I-input in Pluto, i.e. both signalsmust not be connected to the IQ-terminals.<strong>The</strong> IQ-terminals can be used either as individual failsafeinputs or as non-failsafe outputs (e.g. for indicator lampor status signal). <strong>The</strong> terminal blocks can also be used asboth input <strong>and</strong> output simultaneously, which is useful forexample for push buttons (input) with indicator lamp (output).This function is designed primarily for reset buttonsto reduce the number of used inputs on the controller. <strong>The</strong>terminal block's I/O characteristics are determined in PlutoManager.All inputs are individually failsafe as each input is connectedseparately to both processors in Pluto. In order tomaintain the redundancy required for a two-channel structure<strong>and</strong> PL e in compliance with 13849-1, the dynamicsignal must be used. <strong>The</strong> expected signal to the terminals isalso determined in Pluto Manager (static or dynamic signal).All Q outputs are individually safe <strong>and</strong> are independentlyprogrammable.<strong>The</strong> transistor outputs are just like the relay outputs,that is individually safe <strong>and</strong> independently programmable.However, the transistor outputs are different from the relayoutputs as the internal connection provides the nominalinput voltage -24 VDC, which is primarily intended for controllingelectromechanical components such as contactors<strong>and</strong> valves.<strong>Safety</strong> bus<strong>The</strong> safety bus is a modified CAN-bus <strong>and</strong> the bus cablecan be up to 600 m long at the lowest bus speed. At 400kb/s the bus can be up to 150 m. Note that the maximumlength of the bus depends on whether <strong>and</strong> how the jointsare used. <strong>The</strong> bus can be both extended <strong>and</strong> connected toother types of buses through gateways.AS-i bus<strong>The</strong> AS-i bus is also a safe bus where safety is based onan alternating code table. <strong>The</strong> bus can be up to 500 m inlength provided that the bus master is placed in the middleof the loop. Each AS-i branch should not be longer than 100m. <strong>The</strong> loop can be extended by using repeaters. However,there should not be more than two repeaters attached inseries due to time constraints.All safety components that are connected to the AS-iloop take a complete adress <strong>and</strong> are interpreted as slaves.<strong>The</strong> AS-i bus can h<strong>and</strong>le 31 different addresses whereeach address can be divided into an A <strong>and</strong> B slave for nonsafety I/O. A separate power supply unit with about 30VDC is required for the AS-i bus.12345678910Pluto Manager <strong>and</strong> ID-fixPluto manager<strong>The</strong> Pluto Manager is freeware for fast, easy <strong>and</strong> safe programmingof the PLC program for Pluto. <strong>The</strong> programminglanguage used is ladder, which is supplemented with TÜVapprovedfunction blocks for many common features. <strong>The</strong>software can also be used to configure Pluto's terminalblocks, e.g. the IQ terminals that serve as inputs or outputsare specified <strong>and</strong> the controller should expect a static ordynamic signal. Pluto Manager can be downloaded fromwww.abb.com/lowvoltage.ID-fixID-fix is an identification circuit that is unique to each deviceon the Pluto bus. It includes an identification code<strong>and</strong> makes it possible to distribute a PLC program in thenetwork <strong>and</strong> to adress Pluto units. <strong>The</strong>re are four differentversions: R, R/W, R/W/Data <strong>and</strong> PROG. In addition tothe identification code, R/W/Data may also include safetycodes from the AS-i nodes in an AS-i system. PROG includesthe current PLC program <strong>and</strong> is used together withPluto for program distribution. ID fix is connected betweenthe input terminals ID <strong>and</strong> 0V.111213<strong>ABB</strong>3:714
Pluto AS-iA Pluto AS-i can be used in three ways - as <strong>Safety</strong> Master,<strong>Safety</strong> Monitor or as <strong>Safety</strong> I/O1. Pluto as <strong>Safety</strong> Master*<strong>The</strong> master distributes <strong>and</strong> controls communication on theAS-i bus <strong>and</strong> acts simultaneously as <strong>Safety</strong> Monitor.2. Pluto as <strong>Safety</strong> Monitor*<strong>The</strong> monitor listens to what is happening on the AS-i bus<strong>and</strong> controls the safe outputs.3. Pluto as <strong>Safety</strong> I/O*Multiple safe inputs <strong>and</strong>/or outputs are controlled <strong>and</strong> communicatewith a safe master or monitor across the AS-i bus.*Whether Pluto is used as a Master, Monitor or I/O it cansimultaneously control <strong>and</strong> monitor the safety of a machine.GatewayGateways allow you to communicateeasily with other bus systems.Profibus DPDeviceNetCANopenEthernetAS-i MasterBus connectionPluto AS-i can be connected withother Pluto units both via the AS-i bus<strong>and</strong> through the Pluto safety bus.AS-i MasterAS-i I/OAS-i Master AS-i Monitor Pluto without AS-i AS-i Monitor AS-i MonitorHow large can you build the system?From a technical aspect there are no constraints on thesize of the system you can build. A Pluto PLC can, in additionto processing a complete AS-i bus, communicate withanother Pluto either through a Pluto safety bus or throughthe AS-i bus.Through Pluto's safety bus, each Pluto can be a party tothe I/Os of others <strong>and</strong> a total of 32 Plutos can be linked inthis way. If two Plutos are connected to each other via theAS-i bus, each Pluto can be connected to 31 other Plutos.Using Gateways the system can be exp<strong>and</strong>ed further toother bus systems for information exchange.3:8<strong>ABB</strong>
Technical data – generalManufacturer:Colour:<strong>ABB</strong> AB/<strong>Jokab</strong> <strong>Safety</strong>, SwedenGreyOperating voltage: 24VDC ±15 %Assembly:Electrical insulation:35 mm DIN busbar<strong>Safety</strong> level:EN 954-1 Cat. 4EN ISO 13849-1 PL e/cat. 4EN 61508 SIL 3EN 62061 SIL 3PFH dRelay output 2.00×10 -9Transistor output 1.50×10 -9Failsafe inputs I & IQType:Current at 24VMax surgeFailsafe transistor outputs QOutput voltage:Tolerance for output voltage:Max current:Failsafe relay outputs QMax voltageMax currentNon-failsafe outputs IQType:Max current/output:IndicatorInput/output LEDDisplay:Category II according to IEC61010-1+24 V (for PNP sensors), IQ isalso configurable as non-safeoutputs5.1 mA27V continuous-24 VDCSupply voltage - 1.5 V at 800 mA800 mA250 VAC1.5 ATransistor +24 V, PNP "opencollector" is also configurableas failsafe inputs800 mA1 per I/O (green)7-segments, two characters* Each address can have an A <strong>and</strong> B node each containing four inputs<strong>and</strong> four outputs. <strong>The</strong> number of slaves can thereby be increasedto 62.Technical data –type specificPluto-busMax number of Pluto on the bus: 32Bus type:CANBus speeds: 100, 125, 200, 250, 400, 500,800, 1,000 kb/sBus cable length:Up to 600 m150 m at 400kb/sAS-i busMaster profile:M2Number of slave units: 31/62*Bus operation mode:Master<strong>Safety</strong> monitor<strong>Safety</strong> monitor, slave <strong>and</strong> safeI/O module.Bus cable length:Up to 500 m100 m between each repeaterTemperatureAmbient temperature:Storage <strong>and</strong> transport:Reaction timesDyn.A or static input to relayoutput:Dyn.A or static input totransistor output:Dyn.B or Dyn.C input to relayoutput:Dyn.B or Dyn.C input totransistor output:Setting "NoFilt":AS-i bus to relay output:AS-i bus to transistor output:Additional reaction timesBus between Pluto unitsBus between Pluto unitsfollowing fault–10˚C - +50˚C-25˚C - +55˚C
I/O – Pluto AS-iIDFIX ID:I..IQ..Connection for identifiers that have a unique ID number that can be read by the system.<strong>Safety</strong> inputs (24 VDC) that are individually safe. This means that you can achieve the highest level ofsafety with only one input when you use <strong>ABB</strong> <strong>Jokab</strong> <strong>Safety</strong>'s dynamic safety components.Otherwise, two inputs per safety function are required.I/O that can be used as safety inputs or signal outputs, e.g. for indicating or controlling functions thatare not safety related. For IQ .. as safety input see I..Q0, Q1: Failsafe relay outputs that are individually failsafe <strong>and</strong> independently programmable.Q2, Q3: Failsafe transistor outputs (-24 VDC) that are individually failsafe <strong>and</strong> independently programmable.Designed for electromechanical components such as contactors <strong>and</strong> valves.Q4, Q5 Failsafe relay outputs with a common potential that are individually failsafe <strong>and</strong> independentlyprogrammable.3:10<strong>ABB</strong>
Why should you usesafety node Urax?- to connect safety sensors to AS-i safety.- to connect non-safe products to AS-i <strong>Safety</strong>- to maintain the highest level of safety PL e incompliance with EN ISO 13849-11234567<strong>The</strong> Urax safety node has safety inputs for sensors<strong>and</strong> reset buttons, <strong>and</strong> outputs such as processlocks.Urax safety node is available in several versions, <strong>and</strong> is designedfor a variety of safety components.Urax has the capability to connect multiple sensors inseries to the highest level of safety PL e in compliance withEN ISO 13849-1.Overview Urax891011ModelDynamic sensor (Eden, Tina)Two-channel sensorsSensors with OSSD SignalsTwo-h<strong>and</strong> stationLocal reset functionExternal power sourceNon-safe outputsA1A1RB1RC1C1RD1RE1FLEX3 3 101 1 3 3 3 41213<strong>ABB</strong>3:1114
<strong>Safety</strong> nodeUrax-A1/A1RApprovals:TÜV NordApplication:Adapts dynamic sensors tothe AS-i busFeatures:Enables dynamic sensors onthe AS-i busMultiple sensors in serieswith maintained safety levelPossibility of local resetOutputs of non-safe control,e.g. process locksAdaptation device for dynamic sensors for AS-i.Urax-A1/A1R is a safety node for the AS-i bus, where it ispossible to connect up to three dynamic sensors, such asEden, in series in compliance with PL e EN ISO 13849-1.Switches adapted to dynamic sensors such as Smile Tinacan also be connected to the safety circuit.Urax-A1/A1R also has an output for non-safe control,where it is possible to control non-safety critical equipmentsuch as process locks. Urax-A1R has an additional featurethat provides local reset button (R) with LED indicator.<strong>The</strong> dynamic safety sensors are controlled by Urax overone hundred times per second which gives a high level ofsafety.Urax-A1/A1R has LED indication for the dynamic loop<strong>and</strong> can be addressed on the bus via the ADDR contact.ResetUrax-A1Urax-A1R0V24V3:12<strong>ABB</strong>
Technical data – Urax-A1/A1RManufacturer:Part number/Ordering data:Urax-A1Urax-A1RColourWeight<strong>ABB</strong> AB/<strong>Jokab</strong> <strong>Safety</strong>, Sweden2TLA020072R00002TLA020072R0100Yellow <strong>and</strong> black155 gAS-i dataAS-i profile Urax-A1/A1R S-7.B.EAddressingJack plugSlave address upon delivery 0Voltage supplyVoltageInsulationTotal current consumptionCurrent limit for the outputs intotalOutput (non-safe)Output voltageCurrentReaction timeReaction time (off)*AS-i yellow cable, 30 V DC.Tolerance 26.5 – 31.6 V DC.0 V is common with AS-i <strong>and</strong>must not be connected to theprotective earth. (<strong>The</strong> AS-ivoltage is floating.)
<strong>Safety</strong> nodeUrax-B1RApprovals:TÜV NordApplication:Adapts dynamic sensorswith higher currentrequirements to the AS-i busFeatures:Adaptation device for dynamic sensors for AS-i.Urax-B1R is a safety node for the AS-i bus, where it is possibleto connect up to ten dynamic sensors, such as Eden,in series in compliance with PL e EN ISO 13849-1.Switches designed for dynamic safety circuit, such asSmile Tina, can also be connected.Urax-B1R also has three outputs for non-safe control.Through these it is possible to control non-safety criticalequipment such as the process lock Magne.Urax-B1R will be supplied with an auxiliary power supply(AUX), which means that more power-consuming equipmentcan be connected to the node.An additional feature is that it is possible to connect alocal reset button (R) with LED indicator.<strong>The</strong> dynamic safety sensors are controlled by Urax overone hundred times per second which gives a high level ofsafety.Urax-B1R has LED indication for the dynamic loop <strong>and</strong>can be addressed on the bus via the ADDR contact.Enables dynamic sensors onthe AS-i busUp to 10 sensors connectedin series while maintainingthe highest level of safetyPossibility of local resetOutputs of non-safe control,e.g. process locksResetUrax-B1R0V24V3:14<strong>ABB</strong>
Technical data – Urax-B1RManufacturer:Part number/Ordering data:Urax-B1RColourWeight<strong>ABB</strong> AB/<strong>Jokab</strong> <strong>Safety</strong>, Sweden2TLA020072R0200Yellow <strong>and</strong> black155 gAS-i dataAS-i profile Urax-B1RS-7.B.EAddressingJack plugSlave address upon delivery 0Voltage supplyVoltage AS-i (Yellow cable) 30 V DC. Tolerance 26.5 –31.6 V DC.Voltage AUX (Black cable) 24 V DC (±15 %)Insulation0 V is common with AS-i <strong>and</strong>must not be connected to theprotective earth. (<strong>The</strong> AS-ivoltage is floating.)Current limit (+24 V)700 mATotal current consumption AS-i
<strong>Safety</strong> nodeUrax-C1/C1RApprovals:TÜV NordApplication:Adapts switches/E-stop withtwo-channel structure to theAS-i busFeatures:Suitable for both normallyopen (NO) <strong>and</strong> normallyclosed (NC) contactsPossibility of local resetAdaptation device for sensors with two-channelstructure on AS-iUrax-C1/C1R is a safety node for the AS-i bus that enablethe connection of switches or emergency stops. Connectionscan be made so that Urax-C1/C1R together with theswitch comply with PL e EN ISO 13849-1.Urax-C1/C1R is configurable depending on the switchyou prefer to use. <strong>The</strong> safety node's two-channel structureworks with both NO+NO <strong>and</strong> NO+NC contacts.Urax-C1R has an additional feature that allows the connectionof a local reset button (R) with LED indicator.<strong>The</strong> safety switches' contacts are controlled by Urax eachtime they are actuated, for example when a door is opened<strong>and</strong> closed.Urax-C1/C1R has LED indicators for all channels <strong>and</strong> canbe addressed on the bus via the ADDR contact.Urax-C1Urax-C1RAlt. 1 Alt. 23:16<strong>ABB</strong>
Technical data – Urax-C1 <strong>and</strong> C1RManufacturer:Part number/Ordering data:Urax-C1Urax-C1RColourWeight<strong>ABB</strong> AB/<strong>Jokab</strong> <strong>Safety</strong>, Sweden2TLA020072R03002TLA020072R0400Yellow <strong>and</strong> black150 gAS-i dataAS-i profile Urax-C1/C1R S-0.B.0AddressingJack plugSlave address upon delivery 0Voltage supplyVoltageTotal current consumption AS-iReaction timeReaction time (off)*EnclosureEnclosure protection classAmbient temperatureEnclosure dimensionsAS-i yellow cable, 30 V DC(26.5 – 31.6)
<strong>Safety</strong> nodeUrax-D1RApprovals:TÜV NordApplication:Adapts safety products withtransistor outputs (OSSD) tothe AS-i busFeatures:H<strong>and</strong>les safety productswith transistor outputs(OSSD)Monitors test pulsesPossibility of local resetOutputs of non-safe controlAdaptation device for sensors with transistor outputs(OSSD) for the AS-i busUrax-D1R is a two-channel safety input slave for the AS-ibus that enables the connection of different protectionwith OSSD outputs. Examples of components of this typeare light curtains, light grids <strong>and</strong> scanners. Connectionscan be made so that the safety node together with thesensor comply with PL e EN ISO 13849-1.<strong>The</strong> safety node is also fitted with three non-safe outputs.Urax-D1R has an additional feature that allows the connectionof a local reset button (R) with LED indicator.Urax-D1R has LED indicators for all OSSD outputs <strong>and</strong>can be addressed on the bus via the ADDR contact.Urax-D1R3:18<strong>ABB</strong>
Technical data – Urax-D1RManufacturer:Part number/Ordering data:Urax-D1RColourWeight<strong>ABB</strong> AB/<strong>Jokab</strong> <strong>Safety</strong>, Sweden2TLA020072R0500Yellow <strong>and</strong> black150 gAS-i dataAS-i profile Urax-C1/C1R S-0.B.0AddressingJack plugSlave address upon delivery 0Voltage supplyVoltageTotal current consumption AS-iAS-i yellow cable, 30 V DC(26.5 – 31.6)
<strong>Safety</strong> nodeUrax-E1Approvals:TÜV NordApplication:Adapts two-h<strong>and</strong> devices tothe AS-i busFeatures:H<strong>and</strong>les two-h<strong>and</strong> deviceswith two channelsSimultaneity requirementAdaptation device for two-h<strong>and</strong> stations for theAS-i busUrax-E1 is a dual channel safety input slave to the AS-i bus,which is designed to connect the two-h<strong>and</strong> station in compliancewith EN 574 model IIIC. Connections can be madeso that the safety node with two-h<strong>and</strong> station complies withPL e EN ISO 13849-1.Urax-E1 has LED indicators for all channels <strong>and</strong> can beaddressed on the bus via the ADDR contact.Urax-E13:20<strong>ABB</strong>
Technical data – Urax-E1Manufacturer:Part number/Ordering data:Urax-E1ColourWeight<strong>ABB</strong> AB/<strong>Jokab</strong> <strong>Safety</strong>, Sweden2TLA020072R0600Yellow <strong>and</strong> black150 gAS-i dataAS-i profile Urax-C1/C1R S-0.B.0AddressingJack contactSlave address upon delivery 0Voltage supplyVoltageTotal current consumption AS-iAS-i yellow cable, 30 V DC(26.5 – 31.6)
Non-safe nodeFlexApprovals:Application:Adapts non-safe products tothe AS-i busFeatures:4 in <strong>and</strong> outputs to the AS-ibusPossibility of external powersourceLED indicationAdaptation device for non-safe components for theAS-i busThrough four inputs <strong>and</strong> outputs, components such as lighttower or keypads are connected <strong>and</strong> controlled from themaster on the AS-i bus. Flex is available in models 4A <strong>and</strong>4B. <strong>The</strong> difference is that the B model is adapted for externalpower supply (700mA per connection). Flex has LEDindicators for all inputs <strong>and</strong> outputs <strong>and</strong> can be addressedon the bus via the ADDR contact. Technical data – FlexManufacturer:Part number/Ordering data:Flex-4AFlex-4BColourWeight<strong>ABB</strong> AB/<strong>Jokab</strong> <strong>Safety</strong>, Sweden2TLA020072R51002TLA020072R5000Grey <strong>and</strong> black150 gAS-i dataAS-i profileS-7.A.EAddressingM12 contactSlave address upon delivery 0Voltage supplyVoltageTotal current consumptionAS-iReaction timeReaction time (off)*EnclosureEnclosure protection classAmbient temperatureEnclosure dimensionsFlex-4A: AS-i yellow cable,30.5 VDC (26.5 to 31.6 VDC)Flex-4B: AS-i yellow cable,30.5 VDC (26.5 to 31.6 VDC)FLEX-4A: Total max 185 mA(unit + connected units)FLEX-4B: Max 700 mA per pin,total max 2.8 AFLEX-4A/B (unit): 10–85 mAFlex-4 separate: 5 msFlex-4 with AS-i bus:
12345678910111213<strong>ABB</strong>3:2314
Pluto ManagerProgramming tool for Pluto <strong>and</strong> AS-i<strong>ABB</strong>
ContentsPage1Pluto Manager ______________________________________________________4:223456789101112Descriptions <strong>and</strong> examples in this book show how the products work <strong>and</strong> can be used. This does not mean that they can meet the requirements forall types of machines <strong>and</strong> processes. <strong>The</strong> purchaser/user is responsible for ensuring that the product is installed <strong>and</strong> used in accordance with theapplicable regulations <strong>and</strong> st<strong>and</strong>ards. We reserve the right to make changes in products <strong>and</strong> product sheets without previous notice. For the latestupdates, refer to www.abb.com/lowvoltage. 2011.<strong>ABB</strong>4:11314
Programming toolPlutoManagerUse:Software for the Pluto safetyPLCA tool to structure the safetyfunctionsFeatures:Free softwareDownloaded fromwww.abb.com/lowvoltageReady to use function blocksfor your safety componentsContains TÜV-approvedfunction blocksProvides an overview of thecurrent projects <strong>and</strong> yourPlutosEasy programming throughladder languageA programming tool for your safety functionsPluto Manager is a software tailored for the safety PLCPluto. Programming is done in ladder <strong>and</strong> together with thefunction block creates the structure of your safety functions.<strong>The</strong> software comes with predefined function blocks approvedby TÜV to facilitate the work on designing the safetyfunctions. Pluto Manager gives you a structured overview ofPluto’s, gateways <strong>and</strong> peripheral components in large <strong>and</strong>small projects. It gives you an overview <strong>and</strong> control of thesensors <strong>and</strong> actuators, <strong>and</strong> the reactions between them.Pluto Manager also contains manuals for the software <strong>and</strong>hardware that are connected <strong>and</strong> needs to be h<strong>and</strong>ledthrough the program.<strong>The</strong> interface gives the option to get the status directlyfrom Pluto’s two bus options, AS-i <strong>and</strong> Pluto bus. <strong>The</strong>reare also diagnostic functions <strong>and</strong> the option to export data.Systematic working method through projectmanagementStep 1 - Configuration of I/OIn every started project, each Pluto is defined individually. Itsinputs <strong>and</strong> outputs are configured as desired <strong>and</strong> dependingon what they connect to. Pluto’s IQ ports are also configuredhere as inputs or outputs, dynamic or static signals.Step 2 - Naming of variablesAfter configuration the system’s variables are determined.Inputs (I), outputs (Q), remanent memories (M), global auxiliarymemories for bus communication (GM) <strong>and</strong> registers(R) are given names that can be used in place of the actualvariable designation in the PLC program.Step 3 - Ladder programming<strong>The</strong> program is built using the named variables connectedto inputs <strong>and</strong> outputs. <strong>The</strong> programming language has afull range of instructions, similar to st<strong>and</strong>ard PLCs on themarket, with timers, arithmetic, sequence programming etc.<strong>The</strong> project is then downloaded to Pluto via a programmingcable. This program is distributed simultaneouslythrough bus communication to the other Plutos in theproject. In this way, you need only access a single Plutowhere each Pluto gets the right information specified inyour project.Pluto Manager is included when purchasing the safetyPLC Pluto. <strong>The</strong> software is Windows based <strong>and</strong> can bedownloaded free from www.abb.com/lowvoltage.4:2<strong>ABB</strong>
List of st<strong>and</strong>ards <strong>and</strong> special function blocks for Pluto Manager<strong>The</strong> safety designer has complete freedom to program the safety functions or to use TÜV-approved pre-defined safetyfunction blocks.Block 3Blocks in the st<strong>and</strong>ard library (func05):1. Two-channel function with input for start2. Two-channel function with test input3. Two-channel function with test <strong>and</strong> reset inputs, <strong>and</strong>reset indication. See example.4. Two-channel function with simultaneous requirement.5. Single channel function with input for start.6. Single channel function with start <strong>and</strong> test inputs.7. Single channel function with reset <strong>and</strong> test inputs.8. Two-channel function with max. time limitation(equivalent to JSHT2). Time begins to count downwhen both inputs are activated.9. Two-channel function with max. time limitation(equivalent to JSHT2). Time begins to count downwhen one of the inputs is activated.10. Single channel pulse function, e.g. for timed reset.11. Two-channel pulse function, e.g. for timed reset.12. Two single channel bypass connection functions withmax. time limiting.13. Single channel bypass connection function with max.time limiting.14. Two-channel bypass connection function with max.time limiting <strong>and</strong> simultaneous requirement.15. Two-channel safety function with max. timelimited bypass connection.16. Two-h<strong>and</strong> control. See example.17. Counter which counts up to preset value.18. Counter which counts down from preset value to 0.19. Off delay.20. Muting lamp_Q16.21. Muting lamp_Q17.22. Muting lamp W_Q16. With possibility to set thepower level in Watts.23. Muting lamp W_Q17. With possibility to set thepower level in Watts.24. Light curtain with single cycle operation.25. Light curtain with single cycle operation <strong>and</strong> resetselection.26. Multiplication.27. Division.Other function blocks1. <strong>Safety</strong> absolute encoder.2. Electronic cam.3. External communication.Special function blocks:1. Program library with program block for eccentricshaft presses.2. Custom special blocks can be made available.TC1RTITwo-channel function with test <strong>and</strong> resetinputs, <strong>and</strong> reset indication.• In1 <strong>and</strong> In2 are safety inputs, to which thesafety device outputs are connected.• Test is a condition that must be true at the moment of switching on, <strong>and</strong> can be usedfor monitoring external components. Testmust be true before the Reset input closes,i.e. the function block cannot be initiated by Test.• Reset is a supervised reset input <strong>and</strong>must be activated (positive flank) after theother inputs have activated for the functionoutput to be activated.• <strong>The</strong> IndReset output is activated when the function block is 0<strong>and</strong> flashes when the function block is ready for resetting.• <strong>The</strong> TCfault output is activated in the case of a two-channelfault, i.e. if the function block is activated <strong>and</strong> only one of In1<strong>and</strong> In2 opens <strong>and</strong> closes.Description<strong>The</strong> function block acts as a conventional two-channel safetyrelay with dual <strong>and</strong> supervised inputs (In1, In2).Block 16Two-h<strong>and</strong> control for devices withNO/NC + NO/NC• Right_NO is right h<strong>and</strong>ed NO contact• Right_NC is right h<strong>and</strong>ed NC contact,etc.• <strong>The</strong> test is a condition that must bemet before any of the other inputs areactuated <strong>and</strong> can be used for monitoringexternal components.FunctionIn st<strong>and</strong>-by, Right_NO must be 0,Right_NC 1, Left_NO 0 <strong>and</strong> Left_NC 1.In order to start, these four inputs switchthe condition within 0.5 seconds <strong>and</strong>then retain their conditions. After shutdown,all inputs must return to st<strong>and</strong>-bybefore any restart can be made.12345678910111213<strong>ABB</strong> 4:314
<strong>Safety</strong> system-VitalSupervision of dynamic safety signals.<strong>ABB</strong>
ContentsPage1<strong>Safety</strong> system – Dynamic safety circuit – Vital-Tina ______________________5:2• Number of Edens that can be used with Vital <strong>and</strong> Pluto ___________________________5:4• Number of Tinas that can be used with Vital <strong>and</strong> Pluto ___________________________5:5Why should you use the Vital safety system? ____________________________5:6• How does a dynamic circuit of Vital work? ____________________________________5:7<strong>Safety</strong> controllers Vital _______________________________________________5:8• Vital 1 ____________________________________________________________ 5:10• Vital 2 ____________________________________________________________ 5:14• Vital 3 ____________________________________________________________ 5:18Why should you use the Tina adapter unit? ____________________________ 5:22• Tina is available in several variants ________________________________________ 5:23• Tina 1A – Blanking plug for connection block ________________________________ 5:24• Tina 2A/B – Adaptation unit ____________________________________________ 5:25• Tina 3A/APS – Adaptation unit __________________________________________ 5:26• Tina 4A – Connection block ____________________________________________ 5:27• Tina 5A – Adaptation unit ______________________________________________ 5:28• Tina 6A – Adaptation unit ______________________________________________ 5:30• Tina 7A – Adaptation unit ______________________________________________ 5:31• Tina 8A – Connection block ____________________________________________ 5:32• Tina 10A/B/C – Adaptation unit _________________________________________ 5:34• Tina 11A – Terminal block ______________________________________________ 5:36• Tina 12A – Terminal block ______________________________________________ 5:37Accessories _______________________________________________________ 5:38• Example of safety sensors connections based on ’Y’ branch _____________________ 5:39Connection examples - Vital <strong>and</strong> Tina ________________________________ 5:4023456789101112Descriptions <strong>and</strong> examples in this book show how the products work <strong>and</strong> can be used. This does not mean that they can meets the requirements forall types of machines <strong>and</strong> processes. <strong>The</strong> purchaser/user is responsible for ensuring that the product is installed <strong>and</strong> used in accordance with theapplicable regulations <strong>and</strong> st<strong>and</strong>ards. We reserve the right to make changes in products <strong>and</strong> product sheets without previous notice. For the latestupdates, refer to www.abb.com/lowvoltage. 2011.<strong>ABB</strong>5:11314
<strong>Safety</strong> systemDynamic safety circuit – Vital-TinaVital is a safety controller witha dynamic safety circuit that canmonitor up to 30 sensors, suchas Eden, in accordance with thehighest safety level. <strong>The</strong> safetyloop can be exp<strong>and</strong>ed by usingTina Duo. Vital has selectablemanual or automatic resetting<strong>and</strong> dual outputs. (<strong>The</strong> Plutosafety PLC has many inputs fordynamic safety circuits.)Active safety sensors for dynamic safety circuitsVital<strong>Safety</strong> circuit category up to PL eaccording to EN ISO 13849-1PatentedsolutionDynamic safetyDynamic “twinned”safety signal that tests asensor, for example, 200times per second.Tina units that convert static/OSSD to dynamic signals0V 24VSensors with static or OSSD outputs thatare connected via Tina unitsEach active sensor <strong>and</strong> Tina unit hasLEDs that indicate OK (green), brokensafety circuit (red) or flashing ifthe loop has been broken by another,earlier, sensor.5:2<strong>ABB</strong>
Vital is available in three variantsDynamiskkrets 1Vital 1• Up to 30 sensors can be connected tothe same dynamic safety circuit123Dynamiskkrets 1Dynamiskkrets 2Vital 2• Two safety circuits are monitored by onemodule• Simple system with extensive functionality4• Up to 10 sensors can be connected to eachdynamic safety circuit• Output group 2 can be set for time delay5• Three different modes of operationKontaktkrets 1Dynamiskkrets 2Vital 3One Vital supervises the entire robot cell!• Two safety circuits are monitored by onemodule• Devices with two-channel, opening contactscan be connected to one circuit• Simple system with extensive functionality• Output group 2 can be set for time delay• Three different modes of operation678This example shows a cell that consists of dynamicprotection sensors connected to a Vitalwith the following functions:FMI9Two charging stationsAt each charging station a light curtain checksfor anyone putting their h<strong>and</strong> into a risk area,<strong>and</strong> an Eden sensor checks whether a robotis inside the same risk area. This means that astop is only ordered if a robot <strong>and</strong> a person arein the same area. When the station is clear, theperson presses the reset button connected tothe light curtain.Transmitter ReceiverABTransmitter ReceiverFMI1011Fence with Eden-interlocked doorIf the door is opened, the robot stops. To resetthe robot system, the door must be closed <strong>and</strong>a supervisory reset button operated.Three emergency stops with Tina unitsIf any of the emergency stop buttons ispressed, the robot performs an immediateemergency stop.Reset Door/Emergency stopDynamic safety circuit in accordance withcategory 4 EN 954-1/EN ISO 13849-1ResetLight curtainABResetLight curtainDoor1213<strong>ABB</strong>5:314
Number of Edens that can be used with Vital <strong>and</strong> Pluto<strong>The</strong> tables below show the number of Edens that can be connected to Vital <strong>and</strong> Pluto with the maximum voltagevariation. <strong>The</strong> values have been established in a laboratory environment. <strong>The</strong> actual possible number of connectedEdens may therefore differ from those given in the table. <strong>The</strong> values should be regarded as guidelines; <strong>ABB</strong><strong>Jokab</strong> <strong>Safety</strong> recommends a maximum of 30 Edens per Vital 1 <strong>and</strong> a maximum of 10 Edens per Pluto <strong>and</strong> Vital 2/3input. <strong>The</strong> table was prepared according to measurements with connection example A. If connection example B<strong>and</strong> 0.34 mm 2 cable is used (with feed voltage from two directions), the values for 0.75 mm 2 in the tables are used.Apparatus enclosureTerminalsX number of metres of cableSensorApparatus enclosureTerminalsX number of metres of cableSensorY number of sensorsY number of sensorsVitalSensorVitalSensorX number of metres of cableNumberof sensorsNumber of Edens that can be used with Vital 1Even 0.34 mm 2 Odd 0.34 mm 2 Even 0.75 mm 2 Odd 0.75 mm 2 metrescableNumberof sensorsNumber of Edens that can be used with Pluto <strong>and</strong> Vital 2/3Even 0.34 mm 2 Odd 0.34 mm 2 Even 0.75 mm 2 Odd 0.75 mm 2metrescable5:4<strong>ABB</strong>
Number of Tinas that can be used with Vital <strong>and</strong> Pluto<strong>The</strong> following tables show the numbers of Tina-3A, Tina-6A, Tina-7A <strong>and</strong> SmileTina that can be connected toVital <strong>and</strong> Pluto with the max voltage variation. <strong>The</strong> values have been established in a laboratory environment. <strong>The</strong>actual possible number of connected units may therefore differ from those given in the table. <strong>The</strong> values should beregarded as guidelines; <strong>ABB</strong> <strong>Jokab</strong> <strong>Safety</strong> recommends a maximum of 30 units per Vital 1 <strong>and</strong> a maximum of 10units per Pluto <strong>and</strong> Vital 2/3 input. <strong>The</strong> table was prepared according to measurements with connection exampleA. If connection example B <strong>and</strong> 0.34 mm 2 cable is used, the values for 0.75 mm 2 in the tables are used.12Apparatus enclosureTerminalsX number of metres of cableSensorApparatus enclosureTerminalsX number of metres of cableSensor3VitalY number of sensorsSensorVitalY number of sensorsSensorX number of metres of cable4Numberof sensorsNumber of Tina-3A, 6A, 7A <strong>and</strong> Smile Tinas that can be used with Vital 15Numberof sensorsEven 0.34 mm 2 Odd 0.34 mm 2 Even 0.75 mm 2 Odd 0.75 mm 2 metresNumber of Tina-3A, 6A, 7A <strong>and</strong> Smile Tinas that can be usedwith Pluto <strong>and</strong> Vital 2/3Even 0.34 mm 2 Odd 0.34 mm 2 Even 0.75 mm 2 Odd 0.75 mm 2cablemetrescable678910111213<strong>ABB</strong>5:514
Why should youuse the Vital safety system?- To be able to connect several safety componentsin series (at category 4) <strong>and</strong> supervisethem with only one safety controller!Vital is the heart of a solution which makes it possible toinstall/connect many different types of safety device inthe same safety circuit <strong>and</strong> still achieve PL e according toEN ISO 13849-1. <strong>The</strong> Vital module is based upon a dynamicsingle-channel concept as opposed to conventionaldual-channel safety relays. Up to 30 dynamic sensorscan be connected directly in the safety circuit <strong>and</strong> besupervised by only one Vital module. <strong>The</strong> Vital thereforereplaces several safety relays. <strong>Safety</strong> components withoutput contacts can be connected to the Vital via low costTina adaptors.<strong>The</strong> Vital also has automatically or manually supervised resetselection, dual safety outputs, <strong>and</strong> an information output forreset indication <strong>and</strong> status information for PLC´s.- To supervise safety components!Most safety components on the market can be connectedto the Vital module. Dynamic sensors enable safety PL e tobe achieved in a single-channel system. For example <strong>ABB</strong><strong>Jokab</strong> <strong>Safety</strong>´s dynamic non-contact Eden sensor, Spot lightbeam <strong>and</strong> emergency stops (via Tina adaptors) can be used.Even mechanical switches can be connected to Vital withthe aid of <strong>ABB</strong> <strong>Jokab</strong> <strong>Safety</strong>´s Tina adaptors.- For easy installation <strong>and</strong> assembly of asafety system!Vital is a small electronic safety controller that dynamicallysupervises a number of safety components. Vital´s detachableconnector blocks simplify the connection, trouble-shooting<strong>and</strong> exchange of modules. <strong>The</strong> Vital <strong>and</strong> other safety componentscan be connected together using st<strong>and</strong>ard cables<strong>and</strong> with cables having M12 connections.- why should you choose Vital?• PL e, according to EN ISO 13849-1dynamic safety circuit• Can accommodate long cable lengths• Manually supervised or automaticreset• Two NO safety outputs• Detachable connector blocks• LED indication of: power supply,dynamic signal <strong>and</strong> outputs• Information output with two functions• Cost-effective cable routing/connections5:6<strong>ABB</strong>
How does a dynamic circuit of Vital work?<strong>The</strong> Eden sensormonitors that doors are closedSmile Tinaemergency stopto stop machinerywhen there is ahazardLight Curtain FocusPrevents passage withintegrated muting functionEmergency stopINCA TinaTo stop the machine incase of danger<strong>Safety</strong>module Vitalmonitors the security sensors inseries according to PLeEN ISO 13849-1.123456789<strong>The</strong> dynamic signal consists of a square wave that is transmittedthrough the safety circuit. <strong>The</strong> signal is inverted ateach safety component <strong>and</strong> is monitored 200 times persecond by Vital or Pluto.<strong>The</strong> dynamic signal is transmitted as single channelthroughout all the protection in the same safety circuit betweeninput terminals T1 <strong>and</strong> R1. If a protection breaks, thedynamic signal is not transmitted which is detected by Vitalwhich breaks its safe outputs. Even short circuits across aprotection are detected when the signal is inverted in eachsensor (the protection is then OK), while Vital expects acorrectly inverted signal at the right time. In this case, aneven number of sensors are connected to the safety loopwhich means that the dynamic signal will be inverted aneven number of times when it is evaluated by Vital. This isdetermined by the terminal inputs S1 <strong>and</strong> B1 being connectedtogether. If an odd number of sensors have beenconnected, connection of S1 is not required. As the signalis evaluated by Vital at each pulse, i.e. more than 200 timesper second, faults <strong>and</strong> short circuits are detected within afew milliseconds.10111213<strong>ABB</strong>5:714
<strong>Safety</strong> controllerVitalApprovals:TÜV Nord – Vital 1TÜV Rheinl<strong>and</strong> – Vital 2 <strong>and</strong> 3Control of:Entire safety system based onthe dynamic safety circuit.Features:Vital is based on a single channel safety concept where multiplesafety sensors can be connected in series <strong>and</strong> monitoredwith a single safety controller. A dynamic signal is sent fromVital through all connected sensors, <strong>and</strong> then returned to Vitalwhich then evaluates the received signal. As each safety sensorinverts the signal, it is possible to detect short circuits orfaults in any of the sensors. Vital 2 <strong>and</strong> Vital 3 are designedfor use with <strong>ABB</strong> <strong>Jokab</strong> Eden sensors, Tina components <strong>and</strong>Spot light grids or similar products. Vital 2 <strong>and</strong> 3 are bothsafety controllers with two safe input functions <strong>and</strong> two outputgroups, the only difference between the two models being inthe input configuration.Easy installationFlexibleCost effectiveDisplay for troubleshooting(Vital 2 <strong>and</strong> 3)A wide range of safety sensorscan be connected into thecircuitSeveral safe outputsInformation outputOutputs with time delay(Vital 2 <strong>and</strong> 3)5:8<strong>ABB</strong>
Vital 1 <strong>Safety</strong> controller1Dynamiccircuit 1• Up to 30 sensors can beconnected to the samedynamic safety circuit234Vital 2 <strong>Safety</strong> controller56Dynamiccircuit 1Dynamiccircuit 2• Two safety circuits aremonitored by one module• Simple system withextensive functionality7• Up to 10 sensors can beconnected to each dynamicsafety circuit• Output group 2 can be setfor time delay8• Three different modes ofoperation9Vital 3 <strong>Safety</strong> controller10Contactcircuit 1Dynamiccircuit 2• Two safety circuits aremonitored by one module• Devices with two-channel,opening contacts can beconnected to one circuit• Simple system withextensive functionality1112• Output group 2 can be setfor time delay• Three different modes ofoperation13<strong>ABB</strong>5:914
Reset connections – Vital 1Manually supervised resetAutomatic resetTesting external contactor statusB1<strong>The</strong> manually supervised reset contactconnected to input X1 must be closed<strong>and</strong> opened in order to activate the relayoutputs.Automatic reset is selected when B1, X1<strong>and</strong> X4 are connected. <strong>The</strong> relay outputsare then activated at the same time as theinputs.Contactors, relays <strong>and</strong> valves can besupervised by connecting ‘test’ contactsbetween B1 <strong>and</strong> X1. Both manuallysupervised <strong>and</strong> automatic reset can beused.Output connection – Vital 1Relay outputsInformation outputs+24V B1Y14+24V B1Y140V B2 Vital 10V B2 Vital 1<strong>The</strong> Vital 1 has two (2 NO) safety outputs.In order to protect the output contactsit is recommended that loads (inductive)are suppressed by fitting correctly chosenVDR’s, diodes etc. Diodes are the best arcsuppressors, but will increase the switch-offtime of the load.Connection of S1Even number of units in series(Eden+Spot+Tina) requires a connectionbetween B1 <strong>and</strong> S1. S1 is not connectedat odd number of units.See drawing below figure A <strong>and</strong> otherexamples in the book0VVital 1 has a switching relay output forinformation. <strong>The</strong> function is determined bya DIP switch.<strong>The</strong> DIP switch position 1 (original position)is the information output Y14 internally connectedto 0V <strong>and</strong> +24 V as per:• Y14 is closed to 0V (B2) internally whenVital 1 has not been reset.• Y14 is closed to +24 V (B1) when Vital1 has been reset.0V0VIn DIP switch position 2 (the purpose ofthe function is to start/restart block, RES)the information output Y14 is internally connectedto 0V <strong>and</strong> +24 V as per:• Y14 is internally closed to 0V (B2) whenthe dynamic safety loop is open or whenthe dynamic safety loop is closed <strong>and</strong> Vital1 has been reset.• Y14 is internally closed to +24 V (B1) whenthe dynamic safety loop is closed but Vital1 has not been reset (RES).Connection examples of safety devices to Vital 15:10<strong>ABB</strong>
Technical data – Vital 1ManufacturerArticle number/Ordering data:Vital 1Level of safetyEN ISO 13849-1EN 62061IEC/EN 61508-1…7EN 954-1<strong>ABB</strong> AB/<strong>Jokab</strong> <strong>Safety</strong>, Sweden2TLA020052R0000PL e, category 4SIL 3SIL 3Category 4PFH d1,01×10 -8ColourWeightPower supplyVital, A1-A2From Vital to sensors/units, B1-B2FuseAn external fuse should be fittedin the supply to A1Max line resistanceat nominal voltage to X1Power consumptionDC supply, nominal voltage(without load)DC supply, nominal voltage(with max load)Dynamic safety circuitT 1R 1Reset input X1Supply for reset inputReset currentMinimum contact closure timefor resetGrey220 g24 VDC ±15%24 VDC3 AT150 Ohm3 W48 WOutput signalInput signal+24VDC30 mA max. (inrush current300 mA during contact closure)80 msConnection of S1Even numbers of sensors (Eden + Spot T/R + Tina) require aconnection between B1 <strong>and</strong> S1. S1 is not connected for oddnumbers of sensors. Odd number, no connection between B1 <strong>and</strong>S1.Number of sensorsMax. number of Eden/Tina toVital 1Total max. cable length to Eden/TinaMax. number of Spot T/R to VitalTotal max. cable length to SpotT/R301000 m6 pairs600 mMaximum number of units varies depending on the installation <strong>and</strong>cable size. For more information, see the examples in this chapter.Response timeAt Power onWhen activating (input-output)When deactivating (input-output)At Power lossRelay outputsNOMax switching capacity, resistiveload< 65 ms< 40 ms< 38 ms< 45 ms26A/250 VAC/1500 VA/150WRelay information output(changeover contact)Y14 –(0V)+(24V)Max. load on Y14LED indicationOnT R1 2MountingDIN railOperating temperature rangeConnection blocks (detachable)Max screw torqueMax connection area:Solid conductorsConductor with socket contactAir <strong>and</strong> creep distanceProtection classEnclosureConnection blocksIndicates Vital is not resetIndicates Vital is reset200 mA (Internal automatic fuse)Fixed light: supply voltage OK,Flashing light: under-voltage oroverload.T: Signal out OK. R: Signal in OK.Indicates that the output relayshave been activated35 mm DIN rail-10°C to + 55°C1 Nm1x4 mm 2 /2x1,5 mm 2 /12AWG1x2,5 mm 2 /2x1 mm 24kV/2 DIN VDE 0110IP 40 IEC 60529IP 20 IEC 60529Conformity EN ISO 12100-1, -2, EN 954-1,EN ISO 13849-1, EN 62061,EN 60204-1, IEC 60664-1,EN 61000-6-2, EN 61000-6-4EN 60947-5-1, EN 1088,EN 61496-1, IEC/EN 61508-1…7Connector blocks are detachable(without cables having to be disconnected)123456789101112Minimum loadContact materialMechanical lifeExternal fuse (EN 60947-5-1)10 mA/10VAgCdO>10 7 operations6.3A or 4A slow13<strong>ABB</strong>5:1114
Connection of units <strong>and</strong> cable lengths to Vital 15:12<strong>ABB</strong>
Three connection alternativesAccording to PL e (EN ISO 13849-1), connection of sensors/adaptorunits in the Vital safety circuit must be madeas the connection examples.ExampleUse separate connection cables from each sensor/adaptorunit to the Vital safety controller. Interconnections to bemade via suitable terminals in the control cabinet.ExampleUse Tina4A/Tina8A connector blocks to simplify the connectionof externally mounted sensors/adaptor units. OnlyTina4A/Tina8A connector blocks may be used. Use of anyother connector blocks will not meet the safety circuitrequirements.ExampleUse M12-3A <strong>and</strong> M12-3B ’Y’ connectors to connect sensorsin series/parallel.Cable lengths <strong>and</strong> number of sensor/adaptorunits for the three connection examples.In order to determine the number of sensor/adaptor unitsthat can be connected to a Vital 1 unit it must be rememberedthat 1 (one) Spot T/R is equivalent to 5 (five) Edenor Tina units. Units in parallel are equal to one unit. <strong>The</strong>following examples provide guidance as to possible configurations<strong>and</strong> cable lengths using suitable cables.ExampleUp to 1000 metres (0.75 mm 2 or 0.34 mm 2 conductors) intotal can be connected to the sensors/units in this example.<strong>The</strong> connection is equivalent to 9 Eden or Tina units.A maximum of 30 Eden or Tina units can be connected tothe Vital 1 unit on a maximum cable length of 500 metres(0.75 mm 2 conductors) or 300 metres (0.34 mm 2 conductors).ExampleUp to 600 metres (0.75 mm 2 conductors) to Tina 8A <strong>and</strong>10 metre cables type M12-C1012 (0.34 mm 2 ) to each sensor/unitconnected to the Tina 8A. This connection exampleis equivalent to 17 Eden or Tina units.A maximum of 3 Tina 8A units, equivalent to 27 Eden/Tinaunits (= 3 x 8 connected to Tina 8A + 3 Tina 8A) can be connectedto one Vital 1 with a total cable length of 600 metres(0.75 mm 2) . Up to 6 Tina 4A units can be connected to oneVital 1 (equivalent to 30 Eden/Tina units) with a total cablelength of 600 metres (0.75 mm 2 ) to Tina 4A.ExampleEither 2 x 500 metre cables (0.75 mm 2 ) from the controlcabinet <strong>and</strong> 10 metre cables (0.34 mm 2 ) to each sensor/unitor 2 x 10 metre cables (0.75 mm 2 ) from the control cabinet<strong>and</strong> 200 metre cables (0.75 mm 2 )to each sensor/unit. <strong>The</strong>connection is equivalent to 16 Eden or Tina units.A Total of 30 Eden/Tina units can be connected using amaximum cable length of 1000 metres (0.75 mm 2 ) or 400 metres(0.34 mm 2 ). If the power supply is only fed from one direction(from one end of the network) the total cable lengthis reduced to approx 300 metres (0.75 mm 2 ) <strong>and</strong> 100 metres(0.34 mm 2 ).Connection advice for dynamic sensors toPluto <strong>and</strong> Vital.Sensors can be connected in many different ways. Hereis some advice that can make connection better <strong>and</strong> morestable. <strong>The</strong> advice is general, but particularly applicable tothe use of Tina 4A <strong>and</strong> Tina 8A units.• Never have more than the recommended number of sensorsin the loop.• If possible use a switched mains power supply that c<strong>and</strong>eliver a stable 24 V DC.• In the sensor system, use as short cables as possible.• When connecting a Tina 4A or Tina 8A unit, the supplyvoltage at the terminal (out at the unit) must not be lessthan 20 Volts.• Use screened cable, preferably 0.75 mm 2 or thicker,from the apparatus enclosure <strong>and</strong> ground it at one end,for example at the apparatus enclosure, not at both ends.• Do not route the signal wiring close to heavy current cablingor close to equipment that gives off a lot of interference,such as frequency converters for electric motors.• Never connect “spare” conductors.• If M12-3B are used for connection of a parallel loop, withsupply to the sensors from two directions, the loop mustbe as short as possible. This is because the conductorsthat are not being used are also connected, whichincreases the capacitive load <strong>and</strong> reduces the stability ofthe system.12345678910111213<strong>ABB</strong>5:1314
Vital 2Vital 2 is a safety controller that combines functionality withthe quick <strong>and</strong> easy installation of safety sensors. With twosafe input functions <strong>and</strong> two different output groups, Vital 2offers the capability to exclusively control smaller machinesafety systems that would otherwise have required a programmablecontroller or multiple safety relays. How the twooutput groups are controlled by the input functions dependson which of the three operating modes is selected (see Selectionof operating mode).Input function 1:A dynamic safety circuit where <strong>ABB</strong> <strong>Jokab</strong> <strong>Safety</strong>'s safetysensors such as Eden, Tina <strong>and</strong> Spot can easily be connectedin series. Up to 10 Eden or Tina devices can be connectedin series per input function.Input function 2:<strong>The</strong> same function as input function 1.Output group 1:A safe relay output in a duplicated series <strong>and</strong> a safe transistoroutput with output voltage of -24 VDC.Output group 2:A safe relay output in a duplicated series <strong>and</strong> a safe transistoroutput with output voltage of -24 VDC. In addition, output group2 contains a non-safe transistor output with output voltageof +24 VDC, intended for information. <strong>The</strong> output group canhave time delay from 0 to 1.5 s.Selection of operating modesVital 2 can be configured to operate in one of three operatingmodes M1, M2 or M3. <strong>The</strong> selection of operating modes is doneby connecting one of the terminals M1, M2 or M3 to +24 V.5:14<strong>ABB</strong>
Operating mode M1 - Separate function Vital 2Input function 1 controls output group 1, <strong>and</strong>input function 2 controls output group 2.12 34Operating mode M2 - Input 1, master function Vital 2Input function 1 stops all outputs, <strong>and</strong> inputfunction 2 stops output group 2. 56 78 9Operating mode M3 - Parallel function Vital 2Input function 1 <strong>and</strong> input function 2 operatein parallel <strong>and</strong> control all outputs. Reset/Autoreset 1 resets both input functions (Reset/Auto Reset 2 is not used).1011 12 13<strong>ABB</strong>5:1514
Connection of protection/sensors - Vital 2Depending on the input function <strong>and</strong> thenumber of sensors connected to the safetycircuit (odd or even number), the dynamicsignal is connected between different terminals;Input function 1:Input function 2: A dynamic signal is transmitted from T1, <strong>and</strong>depending on the number of sensors in thesafety circuit, the signal connects back toR1 (odd number of sensors) or R2 (evennumber of sensors).A dynamic signal is transmitted from T11,<strong>and</strong> depending on the number of sensorsin the safety circuit, the signal connectsback to R11 (odd number of sensors) orR12 (even number of sensors).Connection of outputs - Vital 2Connection of safe transistor output(-24 V)Connection of safe relay outputConnection of information output<strong>The</strong> safe transistor outputs Q2 (outputgroup 1) <strong>and</strong> Q12 (output group 2) havean output voltage of -24 V.<strong>The</strong> safe relay outputs that are duplicated inseries break between 1L-Q1 (output group1) <strong>and</strong> 11L-Q11 (output group 2). <strong>The</strong> loadsthat break should be fitted with spark arrestersto protect the outputs. <strong>The</strong> correctselection of VDR circuit, RC circuit or diodeis appropriate. Note that the diode extendsthe disconnection time of the load.<strong>The</strong> non-safe transistor output Q13 ishigh (+24 V) when the outputs fromoutput group 2 are active. <strong>The</strong> functionis therefore dependent on the operatingmode selected (see Selection ofoperating mode).Connection of reset - Vital 2<strong>The</strong>re are two separate reset functions; Reset1 <strong>and</strong> Reset 2. <strong>The</strong> function of these isdependent on the operating mode selected(see Selection of operating mode). Reset 1<strong>and</strong> Reset 2 can be configured for manualor automatic reset independently of eachother by means of the input's Auto reset 1<strong>and</strong> Auto reset 2.Manual monitored resetFor manual resetting, a push button mustbe connected between X1 (Reset 1) orX11 (Reset 2) <strong>and</strong> +24 V. <strong>The</strong> monitoringcontactors for external devices are to beconnected in series with the push button.For manual reset, X4 (for Reset 1) <strong>and</strong> X14(for Reset 2) serve as output for resettingthe indicator lamps.Automatic resetFor automatic reset, X1 <strong>and</strong> X4 (Auto reset1) or X11 <strong>and</strong> X14 (Auto reset 2) must beconnected to +24 V. Monitoring contactsfor external devices must be connectedbetween +24 V <strong>and</strong> X1 (Auto reset 1) orX11 (Auto reset 2) . If monitoring contactsare not used, X1 <strong>and</strong> X11 must be connectedto +24 V.Time delay - Vital 2Output group 2 can have disconnection delay by connecting inputs 0.5s <strong>and</strong> 1.0s being connected to +24 V. <strong>The</strong> system is binary, whichmeans that the time values of the inputs are added together to give the total delay time.No delay0.5 s delay1.0 s delay1.5 s delay5:16<strong>ABB</strong>
Technical data – Vital 2ManufacturerArticle number/Ordering dataVital 2<strong>ABB</strong> AB/<strong>Jokab</strong> <strong>Safety</strong>, Sweden2TLA020070R4300Level of safetyEN ISO 13849-1 PL e, category 4EN 62061 SIL 3IEC/EN 61508-1…7 SIL 3EN 954-1 Category 4PFH dRelay output 2,00×10 -9Transistor output 1,50×10 -9ColourWeightGrey390 gPower supply 24 VDC ±15%FuseAn external fuse must beconnected in series with thesupply voltage to A1Max line resistanceat nominal voltage to X1Power consumptionTotal current consumptionInput function 1(dynamic safety circuit)Dynamic output signalDynamic input signalInput function 2(dynamic safety circuit)Dynamic output signalDynamic input signalReset input X1/X11Voltage at X1/X11 when resetReset currentMinimum contact closure timefor reset6 A150 Ohm300 mAT1R1 (odd number of sensors ina circuit)R2 (even number of sensors ina circuit)T11R11 (odd number of sensors ina circuit)R12 (even number of sensorsin a circuit)+24VDC30 mA (300 mA peak duringcontact closure)80 msNumber of sensorsMax. number of Eden or Tinaunits per input function 10Total max. cable length(depending on the number ofEden/Tina units)Max. number of light beams(Spot T/R) per input functionSpot 10 1Spot 35 3Total max. cable length(depending on the number ofSpot T/R)500 m100 mMaximum number of units varies depending on the installation<strong>and</strong>cable size. For more information, see the examples in thischapter.Response timeRelay output (Q1, Q11)Safe transistor outputs(Q2, Q12)Non-safe transistor output(Q2, Q12)15 – 24 ms11 – 20 ms11 – 20 msRelay outputsNumber of outputsMax. load capacity, res. loadMax. load capacity, ind. load2 NO6A/250 VACAC-1: 250 V/1,5 AAC-15: 250 V/1,5 ADC-1: 50 V/1,5 ADC-13: 24 V/1,5 ASafe transistor outputsNumber of outputs 2Output voltage (rated) –24VOutput voltage (at load) > 22V at 800 mA/24Vsupply voltage23,3V at 150 mA/24Vsupply voltageMax. load800 mAShort circuit protectionOutput – 0VYesOutput – +24VNormal (not guaranteed)Non-safe transistor output(information)Output voltage (rated)Max. loadMountingDIN rail+24 VDC1 A35 mm DIN railOperating temperaturerange -10°C to + 55°CConnection blocks(detachable)Max screw torque1 NmMax connection area:Solid conductors1x4 mm 2 /2x1,5 mm 2 /12AWGConductor with socketcontact 1x2,5 mm 2 /2x1 mm 2Air <strong>and</strong> creep distance 4kV/2 DIN VDE 0110Protection classEnclosure IP 40 IEC 60529Connection blocks IP 20 IEC 60529Approved st<strong>and</strong>ards EN ISO 13849-1/EN 954-1, EN ISO 13849-2,EN 62061, EN 61496-1,EN 574, EN 692, EN 60204-1,EN 50178, EN 61000-6-2,EN 61000-6-4, EN 61000-4-,IEC/EN 61508-1…7Connector blocks are detachable(without cables having to be disconnected)12345678910111213<strong>ABB</strong>5:1714
Vital 3Vital 3 is a safety controller that combines functionality withthe quick <strong>and</strong> easy installation of safety sensors. With twosafe input functions <strong>and</strong> two different output groups, Vital 3offers the capability to exclusively control smaller machinesafety systems that would otherwise have required a programmablecontroller or multiple safety relays. How the twooutput groups are controlled by the input functions dependson which of the three operating modes is selected (see Selectionof operating mode).Input function 1:A two-channel safety circuit designed for opening contacts,e.g. two-channel emergency stop or <strong>ABB</strong> <strong>Jokab</strong> <strong>Safety</strong>'ssafety switch JSNY5. One channel is fed with the dynamicsignal <strong>and</strong> the other with static +24 VDC.Input function 2:A dynamic safety circuit where <strong>ABB</strong> <strong>Jokab</strong> <strong>Safety</strong>'s safetysensors Eden, Tina <strong>and</strong> Spot can easily be connected in series.Up to 12 Eden or Tina devices can be connected inseries per input function.Output group 1:A safe relay output in a duplicated series <strong>and</strong> a safe transistoroutput with output voltage of -24 VDC.Output group 2:A safe relay output in a duplicated series <strong>and</strong> a safe transistoroutput with output voltage of -24 VDC. In addition, outputgroup 2 contains a non-safe transistor output with outputvoltage of +24 VDC, intended for information. <strong>The</strong> outputgroup can have time delay from 0 to 1.5 s.Selection of operating modesVital 3 can be configured to operate in one of three operatingmodes M1, M2 or M3. <strong>The</strong> selection of operating modesis done by connecting one of the terminals M1, M2 or M3to +24 V.5:18<strong>ABB</strong>
Operating mode M1 - Separate function Vital 3Input function 1 controls output group1, <strong>and</strong> input function 2 controls outputgroup 2.12 3 4Operating mode M2 - Input 1, master function Vital 3Input function 1 stops all outputs, <strong>and</strong>input function 2 stops output group 2. 56 78 Operating mode M3 - Parallel function Vital 3Input function 1 <strong>and</strong> input function 2operate in parallel <strong>and</strong> control all outputs.Reset/Auto reset 1 resets bothinput functions (Reset/Auto Reset 2is not used). 910111213<strong>ABB</strong>5:1914
Connection of protection/sensors - Vital 3Depending on the input function <strong>and</strong> thenumber of sensors connected to the safetyloop (odd or even number), the dynamicsignal is connected between different terminals;Input function 1:Input function 2: One of the two opening contacts is connectedbetween T1 <strong>and</strong> S1 (dynamic signal).<strong>The</strong> second opening contact is connectedbetween +24 V <strong>and</strong> S2 (staticsignal).A dynamic signal is transmitted from T11,<strong>and</strong> depending on the number of sensors inthe safety loop, the signal connects back toR11 (odd number of sensors) or R12 (evennumber of sensors).Connection of outputs - Vital 3Connection of safe transistor output(-24 V)Connection of safe relay outputConnection of information output<strong>The</strong> safe transistor outputs Q2 (outputgroup 1) <strong>and</strong> Q12 (output group 2) havean output voltage of -24 V.<strong>The</strong> safe relay outputs that are duplicated inseries break between 1L-Q1 (output group1) <strong>and</strong> 11L-Q11 (output group 2). <strong>The</strong> loadsthat break should be fitted with spark arrestersto protect the outputs. <strong>The</strong> correctselection of VDR-circuit, RC circuit or diodeis appropriate. Note that the diode extendsthe disconnection time of the load.<strong>The</strong> non-safe transistor output Q13 is high(+24 V) when the outputs from outputgroup 2 are active. <strong>The</strong> function is thereforedependent on the operating mode selected(see Selection of operating mode).Connection of reset - Vital 3<strong>The</strong>re are two separate reset functions; Reset1 <strong>and</strong> Reset 2. <strong>The</strong> function of these isdependent on the operating mode selected(see Selection of operating mode). Reset 1<strong>and</strong> Reset 2 can be configured for manualor automatic reset independently of eachother by means of the input's Auto reset 1<strong>and</strong> Auto reset 2.Manual monitored resetFor manual resetting, a push button mustbe connected between X1 (Reset 1) orX11 (Reset 2) <strong>and</strong> +24 V. <strong>The</strong> monitoringcontactors for external devices are to beconnected in series with the push button.For manual reset, X4 (for Reset 1) <strong>and</strong> X14(for Reset 2) serve as output for resettingthe indicator lamps.Automatic resetFor automatic reset, X1 <strong>and</strong> X4 (Auto reset1) or X11 <strong>and</strong> X14 (Auto reset 2) must beconnected to +24 V. Monitoring contactsfor external devices must be connectedbetween +24 V <strong>and</strong> X1 (Auto reset 1) orX11 (Auto reset 2) . If monitoring contactsare not used, X1 <strong>and</strong> X11 must be connectedto +24 V.Time delay - Vital 3Output group 2 can have disconnection delay by connecting inputs 0.5s <strong>and</strong> 1.0s being connected to +24 V. <strong>The</strong> system is binary, whichmeans that the time values of the inputs are added together to give the total delay time.No delay0.5 s delay1.0 s delay1.5 s delay5:20<strong>ABB</strong>
Technical data – Vital 3ManufacturerArticle number/Ordering dataVital 3<strong>ABB</strong> AB/<strong>Jokab</strong> <strong>Safety</strong>, Sweden2TLA020070R4400Level of safetyEN ISO 13849-1 PL e, category 4EN 62061 SIL 3IEC/EN 61508-1…7 SIL 3EN 954-1 Category 4PFH dRelay output 2,00×10 -9Transistor output 1,50×10 -9ColourWeightGrey390 gPower supply 24 VDC ±15%FuseAn external fuse must beconnected in series with thesupply voltage to A1Max line resistanceat nominal voltage to X1Power consumptionTotal current consumptionInput function 1(two channel, normallyclosed circuit)Dynamic output signalDynamic input signalStatic input signal (+24 V)Input function 2(dynamic safety circuit)Dynamic output signalDynamic input signalReset input X1/X11Voltage at X1/X11 when resetReset currentMinimum contact closure timefor reset6 A150 Ohm300 mAT1S1S2T11R11 (odd number of sensors ina circuit)R12 (even number of sensorsin a circuit)+24VDC30 mA (300 mA peak duringcontact closure)80 msNumber of sensorsMax. number of Eden or Tinaunits per input function 2 10Total max. cable length(depending on the number ofEden/Tina units)Max. number of light beams(Spot T/R) per input function 2Spot 10 1Spot 35 3Total max. cable length(depending on the number ofSpot T/R)500 m100 mMaximum number of units varies depending on the installation<strong>and</strong>cable size. For more information, see the examples in thischapter.Response timeRelay output (Q1, Q11)Safe transistor outputs(Q2, Q12)Non-safe transistor output(Q2, Q12)15 – 24 ms11 – 20 ms11 – 20 msRelay outputsNumber of outputsMax. load capacity, res. loadMax. load capacity, ind. load2 NO6A/250 VACAC-1: 250 V/1,5 AAC-15: 250 V/1,5 ADC-1: 50 V/1,5 ADC-13: 24 V/1,5 ASafe transistor outputsNumber of outputs 2Output voltage (rated) –24VOutput voltage (at load) > 22V at 800 mA/24Vsupply voltage23,3V at 150 mA/24Vsupply voltageMax. load800 mAShort circuit protectionOutput – 0VYesOutput – +24VNormal (not guaranteed)Non-safe transistor output(information)Output voltage (rated)Max. loadMountingDIN rail+24 VDC1 A35 mm DIN railOperating temperaturerange -10°C to + 55°CConnection blocks(detachable)Max screw torque1 NmMax connection area:Solid conductors1x4 mm 2 /2x1,5 mm 2 /12AWGConductor with socketcontact 1x2,5 mm 2 /2x1 mm 2Air <strong>and</strong> creep distance 4kV/2 DIN VDE 0110Protection classEnclosure IP 40 IEC 60529Connection blocks IP 20 IEC 60529Approved st<strong>and</strong>ards EN ISO 13849-1/EN 954-1,EN ISO 13849-2, EN 62061,EN 61496-1, EN 574,EN 692, EN 60204-1,EN 50178, EN 61000-6-2,EN 61000-6-4, EN 61000-4-,IEC/EN 61508-1…7Connector blocks are detachable(without cables having to be disconnected)12345678910111213<strong>ABB</strong>5:2114
Why should youuse the Tinaadapter units?1Tina 2ATina 2BMax 30 Tina-units in series.Tina 3ATina 7ATina 10ATina 10 B/CIndividual indication for everyconnected safety mat, stripor bumper.2Vital/Pluto safety circuit,PL e, using Tina adapter unitsTina 6APlutoVital34Tina 4ATina 1ATina 8ATina 11ATina 12ATina 5ABypassing & lamp supervisionSimple connection arrangements- to adapt safety sensors to the dynamic singlechannel circuit according to PL e!<strong>The</strong> Tina devices adapt safety sensors with mechanical contacts,such as emergency stops, switches <strong>and</strong> light grids/curtains with dual outputs to the dynamic safety circuit inVital <strong>and</strong> Pluto to safety sensors with mechanical contacts,such as emergency stops, switches <strong>and</strong> light grids/curtainswith dual outputs. This means Pluto complies with EN ISO13849-1 <strong>and</strong> SIL 3 in EN 62061 <strong>and</strong> EN 61508 for theconnected safety sensors with the Vital/Pluto controller. Notethat <strong>ABB</strong> <strong>Jokab</strong> <strong>Safety</strong>'s dynamic safety sensors, such asEden <strong>and</strong> Spot can be connected directly to the Vital/Plutocircuit without intermediate Tina devices.- For bypassing of safety sensor in a dynamiccircuit!<strong>The</strong> Tina 5A bypass unit is used for bypassing of safetysensor in a dynamic circuit <strong>and</strong> provides the possibility forsupervision of bypass lamp indication. During bypassing ofsafety devices e.g. a light grid or an interlocked gate switch/sensor, it must only be possible to allow the bypass function ifa lamp indication is given. <strong>The</strong> lamp indication must thereforebe supervised. With this system it is possible to bypass oneor more safety sensor at the same time.- As a connection block for simplified connectionto a dynamic circuit!<strong>The</strong> Tina 4A/8A connection blocks are available with 4 or8 M12 connections. <strong>The</strong>y are used to enable several safetysensor having M12 connection terminated cables to beconnected together. <strong>The</strong> blocks are connected with a suitablemulti-core cable, that contains status information fromeach safety component, to the control cabinet. This enablessimplified wiring. <strong>The</strong> connection block contains electroniccircuits which modify the coded dynamic signal in the safetycircuit. Note Several connection blocks can be connectedto one Vital/Pluto. Using Tina 4A/8A connection blockseliminates connection faults <strong>and</strong> can significantly reducesystem cable costs.5:22<strong>ABB</strong>
Tinais available in several versionsTina is available in several versions depending on the type of safety component that is connected to the Vital or Plutocircuit. Also available is a bypassing unit, three connector blocks with 2, 4 or 8 M12 connectors, <strong>and</strong> a blind plug forun-used connections. As an accessory there is a Y-connector for series or parallel connection <strong>and</strong> even for connectionof light beams with separate transmitter <strong>and</strong> receiver. Tina units are also included in emergency stop models Smile Tina<strong>and</strong> Tina Inca. This is to adapt <strong>ABB</strong> <strong>Jokab</strong> <strong>Safety</strong>'s products to dynamic safety circuits.All Tina-units are designed to decode the dynamic signal in the safety circuit of Vital/Pluto.123134Tina 2ATina 2BTina 3ATina 4ATina 1ATina 8A52Tina 6ATina 7ATina 10ATina 10 B/CTina 2A/B, Tina 3A <strong>and</strong> Tina 7A are used to connect safetycomponents with mechanical contacts, such as emergencystops, switches <strong>and</strong> light curtains/light beams with relayoutputs. NOTE! In order to maintain safety category 4 <strong>and</strong>to reduce the risk of electrical interference, Tina 2 A, 3A <strong>and</strong>7A units must be installed within the same physical encapsulationas the safety component that is to be monitored,<strong>and</strong> this is to be connected to the Tina unit with as short acable as possible.Tina 10A/B/C units are used for connection of Focus lightbeams/curtains to Vital or Pluto. Tina 10B has an extra M12connector that enables reset, a reset lamp <strong>and</strong> switching ofthe Focus supply voltage. <strong>The</strong> Tina 10C has an additionalM12 connector that permits a Focus transmitter to receivepower.Tina 6A is used to connect door sensitive edges <strong>and</strong>safety mats, <strong>and</strong> provides an indication for each unit (Tina7A may also be used). If a Tina 6A is connected closeto the edge or mat, the risk of electrical interference isreduced.- why should I choose Tina?• <strong>Safety</strong> circuit,PL e, EN ISO 13849-1• Individual status indication of every connected unit inthe safety circuit4Tina 5ATina 11ATina 12ATina 4A, Tina 8A, Tina 11A <strong>and</strong> Tina 12A are used as terminalblocks <strong>and</strong> simplify connection to a Vital safety circuit.Each safety component is connected to the terminal blockvia an M12 connection. A terminal block is connected to theapparatus enclosure by means of a cable that also containsstatus information from each safety component that is connectedto Tina 4A/Tina 8A <strong>and</strong> summed information from Tina11A/Tina 12A. Tina 1A must be used as a blanking plug inunused M12 connections.Tina 5A is used to bypass the safety sensors in Vital securityloop <strong>and</strong> for monitoring the indicator light switch off. Tina 5Abypass units are used for bypassing of safety sensors in adynamic circuit <strong>and</strong> provides the possibility for supervisionof bypass lamp indication.• Supervision of lamp indicating bypassing of safetydevice• Quick release M12 connector678910111213<strong>ABB</strong>5:2314
Blanking plug for connectionblockTina 1AApprovals:TÜV NordApplication:Is used as a blanking plug inunused M12 connectors atconnection blocksFeatures:Indication of status by LEDTina 1A is a device that is designed for use with the connection blocks Tina4A or Tina 8A where it is used as a blind plug in unused M12 connections.<strong>The</strong> device is fitted with a LED for status indication of the dynamic safetycircuit.Technical data – Tina 1AManufacturerArticle number/Ordering data<strong>ABB</strong> AB/<strong>Jokab</strong> <strong>Safety</strong>, Sweden2TLA020054R0000 Tina 1ALevel of safetyIEC/EN 61508-1…7SIL3EN 62061SIL3EN ISO 13849-1 PL e, category 4EN 954-1 Category 4PFH d4,50×10 -9Power supplyOperating voltage 24 VDC + +15%, -25%Total current consumption 17 mA (27 mA with maxinformation output)Information output: Max 10 mATime delay t (in/out) t < 60 µsVoltage supply at normal Dynamic input: between 9 <strong>and</strong>operation (protection OK) <strong>and</strong> 13 volt (RMS)24 VDC supply voltage Dynamic output: between 9<strong>and</strong> 13 volt (RMS)Information output: ~ 23 VDCGeneralProtection classAmbient temperatureHumidity rangeIP67Storage: -30…+70°COperation: -10…+55°C35 to 85 % (with no icing orcondensation)Housing materialBased on polyamide,Macromelt OM646 (V0)ConnectorM12 5-pole maleSize 48 × 23 × 15 mm (L x W x H)Weight~20 gColourBlackApproved st<strong>and</strong>ardsCertificates11, 212345European Machinery Directive2006/42/ECEN ISO 12100-1:2003,EN ISO 12100-2:2003,EN 60204-1:2007,EN 954-1:1996,EN ISO 13849-1:2008,EN 62061:2005TÜV Nord5-pin M12 male contact:1. +24 VDC2. Dynamic input signal3. 0 VDC4. Dynamic output signal5. Not used4732LED24, 55:24<strong>ABB</strong>
Adaptation unitTina 2A/BTina 2A/B is a device that adapts the safety sensors with mechanical contacts,such as emergency stops, switches <strong>and</strong> light curtains/light grids withtheir own relay outputs to the dynamic safety circuit.Tina 2A is fitted with M20 contact which simplifies connection to safetysensors prepared for M20 connection. Tina 2B is very small <strong>and</strong> can often beplaced in the safety components' enclosure. Both Tina 2A <strong>and</strong> Tina 2B arefitted with LEDs for status indication of the dynamic safety circuit.Approvals:TÜV NordApplication:Adaptation of safety sensorswith mechanical contactsto the dynamic safetycircuit.Example:Emergency stopsSwitchesLight beams / light curtainswith relay outputsFeatures:Simplifies the system aswellas maintaining the safetylevelIndication of status by LED1234567<strong>ABB</strong>Technical data – Tina 2AManufacturerArticle number/Ordering data<strong>ABB</strong> AB/<strong>Jokab</strong> <strong>Safety</strong>, Sweden2TLA020054R0100 Tina 2A2TLA020054R1100 Tina 2BLevel of safetyIEC/EN 61508-1…7SIL3EN 62061SIL3EN ISO 13849-1 PL e, category 4EN 954-1 Category 4PFH d4,50×10 -9Power supplyOperating voltage 24 VDC + 15 %, –25 %Total current consumption 17 mA (27 mA with maxinformation output)Information output: Max 10 mATime delay t (in/out) t < 60 µsVoltage supply at normal Dynamic input: between 9 <strong>and</strong>operation (protection OK) <strong>and</strong> 13 volt (RMS)24 VDC supply voltage Dynamic output: between 9<strong>and</strong> 13 volt (RMS)Information output: ~ 23 VDCGeneralProtection classAmbient temperatureHumidity rangeHousing materialConnectorSizeIP67Storage: -30…+70°COperation: -10…+55°C35 to 85 % (with no icing orcondensation)Based on polyamide,Macromelt OM646 (V0)5x0.34 mm 2 wires, 0.15 mTina 2A: 43 × 24 × 24 mmTina 2B: 28 × 21 × 7 mm(L x W x H)WeightColourApproved st<strong>and</strong>ardsCertificates11, 2246,81234512345Tina 2A: ~30 gTina 2B: ~20 gBlackEuropean Machinery Directive2006/42/ECEN ISO 12100-1:2003,EN ISO 12100-2:2003,EN 60204-1:2007,EN 954-1:1996,EN ISO 13849-1:2008,EN 62061:2005TÜV NordM20x1,52645, 336, 3LEDCable connection:1. Brown: +24 VDC2. White: Dynamic input signal3. Blue: 0 VDC4. Black: Dynamic output signal5. Grey: Information2126, 55:25891011121314
Adaptation unitApprovals:TÜV NordTina 3A/ApsApplication:Adaptation of safety sensorswith mechanical contacts tothe dynamic safety circuit.Example:Emergency stopsSwitchesLight beams / light curtainswith relay outputsTina 3A/Aps is a device that adapts the safety sensors with mechanical contacts,such as emergency stops, switches <strong>and</strong> light curtains/light grids withtheir own relay outputs to the dynamic safety loop.Both Tina 3A <strong>and</strong> Tina 3Aps are fitted with M20 contacts which simplifiesconnection to safety sensors prepared for M20 connection. <strong>The</strong> devices arethen easily connected to the dynamic safety loop through a 5-pin M12 contactto the Tina device. Tina 3Aps has an extra conductor for the supply voltageto the safety sensor.Features:Simplifies the system aswellas maintaining the safetylevelIndication of status by LEDTechnical data – Tina 3AManufacturerArticle number/Ordering data<strong>ABB</strong> AB/<strong>Jokab</strong> <strong>Safety</strong>, Sweden2TLA020054R0200 Tina 3A2TLA020054R1400 Tina 3ApsLevel of safetyIEC/EN 61508-1…7SIL3EN 62061SIL3EN ISO 13849-1 PL e, category 4EN 954-1 Category 4PFH d4,50×10 -9Power supplyOperating voltage 24 VDC + +15%, -25%Total current consumption 47 mA (57 mA with maxinformation output)Information output: Max 10 mATime delay t (in/out) t < 70 µsCurrent through safety devicecontacts12 mAShort circuit current betweencontacts10 mAVoltage supply at normal Dynamic input: between 9 <strong>and</strong>operation (protection OK) <strong>and</strong> 13 volt (RMS)24 VDC supply voltage Dynamic output: between 9<strong>and</strong> 13 volt (RMS)Information output: ~ 23 VDCGeneralProtection classAmbient temperatureHumidity rangeHousing materialIP67Storage: -30…+70°COperation: -10…+55°C35 to 85 % (with no icing orcondensation)Based on polyamide,Macromelt OM646 (V0)ConnectorsM12 5-pole connectorGreen loop wires (A1 & A2)Orange loop wires (B1 & B2)Brown (+24 VDC), Blue (0VDC) wires (Tina 3Aps only)Size 54 × 24 × 24 mm (L x W x H)Weight~30 gColourBlackApproved st<strong>and</strong>ardsCertificates11, 22411, 2Cable connection:1. <strong>Safety</strong> circuit A1-A22. <strong>Safety</strong> circuit A1-A23. <strong>Safety</strong> circuit B1-B24. <strong>Safety</strong> circuit B1-B25. Brown: +24 VDC(only Tina 3 Aps)6. Blue: 0 VDC(only Tina 3Aps)24123412314M20×1,52Tina 3 3Aps 456M20×1,5M20×1,5European Machinery Directive2006/42/ECEN ISO 12100-1:2003,EN ISO 12100-2:2003,EN 60204-1:2007,EN 954-1:1996,EN ISO 13849-1:2008,EN 62061:2005TÜV Nord36, 347, 156, 136, 347, 156, 1LED × 2LED × 2 15-pin M12 male contact:1. +24 VDC2. Dynamic input signal3. 0 VDC4. Dynamic output signal5. Not usedM1226, 523LED × 2426, 55M12M1212314253455:26<strong>ABB</strong>
Connection blockTina 4ATina 4A is a connection block with four 5-pin M12 connections. It is usedto connect multiple safety sensors with M12 contacts via a single cable toa controller or PLC. This simplifies cable running <strong>and</strong> reduces cable costs.Multiple connection blocks can be connected to a Vital/Pluto. Tina 1A is usedfor unused M12 connections.Approvals:TÜV NordApplication:Connection block for up tofour safety sensors adaptedto the dynamic safety circuit.Features:Simplifies cable routing <strong>and</strong>reduces cable costs.Allows branching of up tofour safety sensors to thedynamic safety circuit.1234567Technical data – Tina 4AManufacturerArticle number/Ordering data<strong>ABB</strong> AB/<strong>Jokab</strong> <strong>Safety</strong>, Sweden2TLA020054R0300 Tina 4ALevel of safetyIEC/EN 61508-1…7SIL3EN 62061SIL3EN ISO 13849-1 PL e, category 4EN 954-1 Category 4PFH d4,50×10 -9Approved st<strong>and</strong>ardsCertificatesEuropean Machinery Directive2006/42/ECEN ISO 12100-1:2003,EN ISO 12100-2:2003,EN 60204-1:2007,EN 954-1:1996,EN ISO 13849-1:2008,EN 62061:2005TÜV Nord89Power supplyOperating voltage 24 VDC + +15%, -15%Total current consumption 10 mA (20 mA with maxinformation summary output)Information output: Max 10 mATime delay t (in/out) t < 60 µsVoltage supply at normal Dynamic input: between 9 <strong>and</strong>operation (protection OK) <strong>and</strong> 13 volt (RMS)24 VDC supply voltage Dynamic output: between 9<strong>and</strong> 13 volt (RMS)Information output: ~ 23 VDCGeneralProtection classIP67Ambient temperatureStorage: -30…+70°COperation: -10…+55°CHumidity range35 to 85 % (with no icing orcondensation)Housing materialBased on polyamide,Macromelt OM646 (V0)ConnectorsM12 5-pole female (4x)9-pin connection blockSize 99 × 50 × 43 mm (L x W x H)Weight~100 gColourBlack<strong>ABB</strong>Σ infoConnection block:1. +24 VDC2. Dynamic input signal3. 0 VDC4. Dynamic output signal5. Information (contact #1)6. Information (contact #2)7. Information (contact #3)8. Information (contact #4)13. Summarized information(contact #1-4)5-pin M12 female contact (x4):1. +24 VDC2. Dynamic input signal3. 0 VDC4. Dynamic output signal5. Information5:271011121314
Adaptation unitApprovals:TÜV NordTina 5AApplication:Bypassing of safety devicesconnectedto the dynamicsafety circuit <strong>and</strong> for supervisionof lamp indication.Features:One or more safety devicescan be bypassedsupervised lamp indicationIndication of status by LEDsFunction<strong>The</strong> Tina 5A is designed for bypassing of safety devicesconnected to the Vital/Pluto safety circuit <strong>and</strong> for supervisionof lamp indication.During bypassing of safety devices e.g. a light grid or aninterlocked gate, it must only be possible to allow the bypassfunction if a lamp indication is on. <strong>The</strong> lamp indication musttherefore be supervised. Whether indication is required dependson the specific situation <strong>and</strong> result of risk analysis.When the Tina 5A receives a coded dynamic signal to S1<strong>and</strong> the bypass indication lamp is on (connected across L1-L2), a bypassing output signal is provided on S2 <strong>and</strong> S3. Abroken or short circuit in the indication lamp leads to an interruptionof the bypass output signal on S2 <strong>and</strong> S3, thereforestopping the bypassing.<strong>The</strong> dynamic signal to S1 on Tina 5A must be the inputsignal from the first of the safety devices intended to bypass.<strong>The</strong> signal can be connected via output contacts from a safetyrelay, a safety timer or be initiated via a unit providing the dynamiccoded signal as for example an Eden sensor or a Spotlight beam. <strong>The</strong> dynamic output from S2 or S3 is connectedto the output of the safeguards to be bypassedS2 is used if:• an odd number of dynamic safety units is to be bypassedusing an odd number of dynamic safety units, i.e.the sum of Tina + Eden <strong>and</strong> Spot units (incl. Tina 5A).See drawing HE3824C• an even number of dynamic safety units is to be bypassedusing an even number of dynamic safety units,i.e. the sum of Tina + Eden <strong>and</strong> Spot units (incl. Tina5A). See drawing HE3824FS3 is used if:• an odd number of dynamic safety units is to be bypassedusing an even number of dynamic safety units,i.e. the sum of Tina + Eden <strong>and</strong> Spot units (incl. Tina5A). See drawing HE3824D• an even number of dynamic safety units is to be bypassedusing an odd number of dynamic safety units, i.e.the sum of Tina + Eden <strong>and</strong> Spot units (incl. Tina 5A).See drawing HE3824E<strong>The</strong> total number of dynamic safety units is calculated byadding the number of Eden, Spot <strong>and</strong> Tina units connectedin the Vital circuit. See the connection examples HE3824C,D, E, F or G.5:28<strong>ABB</strong>
Bypassing of Eden <strong>and</strong> Tina units.If one or more Eden or Tina units are bypassed bya Tina 5A, a diode, such as a 1N4007 must be insertedwith forward current out from pin 4 of the lastbypassed unit. If one or more Eden or Tina units arebypassed by one or more Eden or Tina units directto each other, a diode, such as a 1N4007 must beinserted by the last unit in both loops with forwardcurrent out from pin 4. Refer to example HD3801A.Inthe case of bypassing of a Tina 10A, B or C or of morethan one unit towards each other, it is recommendedthat a Tina 5A or M12-3M is used. See the examplesHE3824C, D, E, F or G.Connections:+A1: +24 VDCY14: Information of bypassL1-L2: Bypass lamp(or 820 ohm/2W resistor)-A2: 0 VDCS1: Dynamic signal inS2: Dynamic signal out,transcodedS3: Dynamic signal out,transcoded twiceTechnical data – Tina 5AManufacturerArticle number/Ordering data<strong>ABB</strong> AB/<strong>Jokab</strong> <strong>Safety</strong>, Sweden2TLA020054R0400 Tina 5ALevel of safetyIEC/EN 61508-1…7SIL3EN 62061SIL3EN ISO 13849-1 PL e, category 4EN 954-1 Category 4PFH d4,50×10 -9Power supplyOperating voltage 24 VDC + +10%, -10%Current consumption, A1-A2No bypass: 10 mABypass using a 5 W indicationlamp: 240 mABypass connection Tina 5A can bypass max. 30Eden/Tina-units or 6 Spot T/RTime delay t (in/out) t < 260 µsVoltage supply at normaloperation (protection OK) <strong>and</strong>24 VDC supply voltageDynamic input: between 9 <strong>and</strong>13 volt (RMS)Dynamic output: between 9<strong>and</strong> 13 volt (RMS)Information output: ~ 23 VDCGeneralProtection classEnclosure: IP40Connection block: IP20Ambient temperature-10…+55°CHumidity range35 to 85 % (with no icing orcondensation)Housing materialBased on polyamide,Macromelt OM646 (V0)ConnectorsConnection blocks with a totalof 8 terminals (2 x 4)Mounting35 mm DIN railSize 120 × 84 × 22,5 mm (L x W x H)Weight~135 gColourGreyApproved st<strong>and</strong>ardsCertificatesEuropean Machinery Directive2006/42/ECEN ISO 12100-1:2003,EN ISO 12100-2:2003,EN 60204-1:2007,EN 954-1:1996,EN ISO 13849-1:2008,EN 62061:2005, EN 61496-1:2004 + A1:2008TÜV Nord12345678910111213<strong>ABB</strong>5:2914
Adaptation unitApprovals:TÜV NordTina 6AApplication:Short circuit monitoring <strong>and</strong>adaptation of safety sensorsto the dynamic safety circuitFor example:Contact railsBumpers<strong>Safety</strong> matsFeatures:Tina 6A monitors short circuits. It is used to adapt the safety sensors withsafety contact strips <strong>and</strong> safety mats with relay outputs to the dynamic safetycircuit. <strong>The</strong> device is fitted with a LED for status indication of the dynamicsafety circuit.Simplifies the system aswellas maintaining the safetylevelIndication of status by LEDTechnical data – Tina 6AManufacturerArticle number/Ordering data<strong>ABB</strong> AB/<strong>Jokab</strong> <strong>Safety</strong>, Sweden2TLA020054R0600 Tina 6ALevel of safetyIEC/EN 61508-1…7SIL3EN 62061SIL3EN ISO 13849-1 PL e, category 4EN 954-1 Category 4PFH d4,50×10 -9Power supplyOperating voltage 24 VDC + +15%, -25%Total current consumption 47 mA (57 mA with maxinformation output)Information output: Max 10 mACurrent through safety devicecontacts12 mAShort circuit current betweencontacts10 mATime delay t (in/out) t < 70 µsVoltage supply at normal Dynamic input: between 9 <strong>and</strong>operation (protection OK) <strong>and</strong> 13 volt (RMS)24 VDC supply voltage Dynamic output: between 9<strong>and</strong> 13 volt (RMS)Information output: ~ 23 VDCGeneralProtection classAmbient temperatureHumidity rangeHousing materialConnectorsIP67Storage: -30…+70°COperation: -10…+55°C35 to 85 % (with no icing orcondensation)Based on polyamide,Macromelt OM646 (V0)M12 5-pole maleM12 5-pole femaleSize 63 × 31 × 15 (L × W × H)Weight~30 gColourBlackApproved st<strong>and</strong>ardsCertificates11, 2M125-pin M12 male contact:1. +24 VDC2. Dynamic input signal3. 0 VDC4. Dynamic output signal5. Information12345European Machinery Directive2006/42/ECEN ISO 12100-1:2003,EN ISO 12100-2:2003,EN 60204-1:2007,EN 954-1:1996,EN ISO 13849-1:2008,EN 62061:2005TÜV Nord3362, 2M12LED× 25-pin M12 female contact:1. <strong>Safety</strong> circuit A1-A22. <strong>Safety</strong> circuit A1-A23. <strong>Safety</strong> circuit B1-B24. <strong>Safety</strong> circuit B1-B25. Not used33123455:30<strong>ABB</strong>
Adaptation unitTina 7ATina 7A is a device that adapts the safety sensors with mechanical contacts, suchas emergency stops, switches <strong>and</strong> light curtains/light grids with their own relayoutputs to the dynamic safety circuit.<strong>The</strong> device is designed for installation in an equipment cabinet where it canbe mounted directly on a 35 mm DIN busbar, <strong>and</strong> the conductors are then connecteddirectly to the screw terminals.Approvals:TÜV NordApplication:Adaptation of safety sensorswith mechanical contactsto the dynamic safetycircuit.Example:Emergency stopsSwitchesLight beams / light curtainswith relay outputsFeatures:Simplifies the system aswellas maintaining the safety levelIndication of status by LEDAdapted for easyinstallation on 35 mmDIN rail in cabinets1234567<strong>ABB</strong>Technical data – Tina 7AManufacturerArticle number/Ordering data<strong>ABB</strong> AB/<strong>Jokab</strong> <strong>Safety</strong>, Sweden2TLA020054R0700 Tina 7ALevel of safetyIEC/EN 61508-1…7SIL3EN 62061SIL3EN ISO 13849-1 PL e, category 4EN 954-1 Category 4PFH d4,50×10 -9Power supplyOperating voltage 24 VDC + +15%, -25%Total current consumption 47 mA (57 mA with maxinformation output)Information output: Max 10 mACurrent through safety devicecontacts12 mAShort circuit current betweencontacts10 mATime delay t (in/out) t < 70 µsVoltage supply at normal Dynamic input: between 9 <strong>and</strong>operation (protection OK) <strong>and</strong> 13 volt (RMS)24 VDC supply voltage Dynamic output: between 9<strong>and</strong> 13 volt (RMS)Information output: ~ 23 VDCGeneralProtection classAmbient temperatureHumidity rangeHousing materialIP20Storage: -30…+70°COperation: -10…+55°C35 to 85 % (with no icing orcondensation)Based on polyamide,Macromelt OM646 (V0)Connectors5-pin connection block (powersupply, dynamic in/out, info)4-pin connection block (safetyloop A1-A2, B1-B2)MountingDIN railSize 61 × 46 × 14 (L × W × H)Weight~35 gColourBlackApproved st<strong>and</strong>ardsEuropean Machinery Directive2006/42/ECEN ISO 12100-1:2003,EN ISO 12100-2:2003,EN 60204-1:2007,EN 954-1:1996,EN ISO 13849-1:2008,EN 62061:2005Certificates6235, 51345, 7123456789TÜV NordConnection block:1. +24 VDC2. Dynamic input signal3. 0 VDC4. Dynamic output signal5. Information6. <strong>Safety</strong> circuit A1-A27. <strong>Safety</strong> circuit A1-A28. <strong>Safety</strong> circuit B1-B29. <strong>Safety</strong> circuit B1-B25:31891011121314
Connection blockApprovals:TÜV NordTina 8AApplication:Connection block for up toeight safety sensors adaptedto the dynamic safety circuit.Features:Tina 8A is a connection block with eight 5-pin M12 connections. It is usedto connect multiple safety sensors with M12 contacts via a single cable toa controller or PLC. This simplifies cable running <strong>and</strong> reduces cable costs.Multiple connection blocks can be connected to a Vital/Pluto. Tina 1A is usedfor unused M12 connections.Simplifies cable routing <strong>and</strong>reduces cable costs.Allows branching of up tofour safety sensors to thedynamic safety circuit.Technical data – Tina 8AManufacturerArticle number/Ordering data<strong>ABB</strong> AB/<strong>Jokab</strong> <strong>Safety</strong>, Sweden2TLA020054R0500 Tina 8ALevel of safetyIEC/EN 61508-1…7SIL3EN 62061SIL3EN ISO 13849-1 PL e, category 4EN 954-1 Category 4PFH d4,50×10 -9Power supplyOperating voltage 24 VDC + +15%, -15%Total current consumption 15 mA (25 mA with maxinformation summary output)Information output: Max 10 mATime delay t (in/out) t < 60 µsVoltage supply at normal Dynamic input: between 9 <strong>and</strong>operation (protection OK) <strong>and</strong> 13 volt (RMS)24 VDC supply voltage Dynamic output: between 9<strong>and</strong> 13 volt (RMS)Information output: ~ 23 VDCGeneralProtection classIP67Ambient temperatureStorage: -30…+70°COperation: -10…+55°CHumidity range35 to 85 % (with no icing orcondensation)Housing materialBased on polyamide,Macromelt OM646 (V0)ConnectorsM12 5-pole female (8x)13-pin connection blockSize 149 × 50 × 43 (L × W × H)Weight~140 gColourBlackApproved st<strong>and</strong>ardsCertificatesΣ infoConnection block:1. +24 VDC2. Dynamic input signal3. 0 VDC4. Dynamic output signal5. Information (contact #1)6. Information (contact #2)7. Information (contact #3)8. Information (contact #4)9. Information (contact #5)10. Information (contact #6)11. Information (contact #7)12. Information (contact #8)13. Summarized information(contact #1-8)European Machinery Directive2006/42/ECEN ISO 12100-1:2003,EN ISO 12100-2:2003,EN 60204-1:2007,EN 954-1:1996,EN ISO 13849-1:2008,EN 62061:2005TÜV Nord5-pin M12 female contact (x8):1. +24 VDC2. Dynamic input signal3. 0 VDC4. Dynamic output signal5. Information5:32<strong>ABB</strong>
Connection examples of safety sensors to Tina 8A12345Tina 4A6<strong>Safety</strong> controller,VitalConnection 1One Eden is connected directly to the Tina 8A. <strong>The</strong> Edenstatus is shown by an LED on the Adam sensor. A statusinformation signal is also connected to Tina 8A.Connection 2One Focus safety light grid is connected to the Tina 8Avia a Tina 10A. <strong>The</strong> output from the Tina 10A is via a M12connector. <strong>The</strong> connection between Tina 10A <strong>and</strong> Tina 8A isachieved using a cable with M12 connectors on each end.<strong>The</strong> Tina 10A has two LED’s which show the status ofthe light grid. <strong>The</strong> same status information signal is connectedto the Tina 8A. Tina10A <strong>and</strong> the Focus transmitterare connected, via an M12-3B, to Tina8A.Connection 3A Spot 10 light beam is connected directly to Tina 8A. A’Y’ connector M12-3B for M12 plugs is connected to thetransmitter <strong>and</strong> the receiver. <strong>The</strong> status information shownon the Spot LED is also connected to Tina 8A.Connection 4A safety mat (same for safety strip <strong>and</strong> safety bumper) isconnected via a Tina 6 A to the Tina 8A. Two LEDs in Tina6A shows the status of the mat. <strong>The</strong> same status informationsignal is connected to Tina 8A.Connection 5One Smile is connected to the Tina 8A. <strong>The</strong> informationshown by an LED on the Smile is also connected to theterminal block on the Tina 8A.Connection 6A safety interlock switch is connected via a Tina 3A mounteddirectly on the switch. <strong>The</strong> output from the Tina 3A is via aM12 connector. <strong>The</strong> connection between the Tina 3A <strong>and</strong>the Tina 8A is therefore simply made with a cable with M12connectors on each end. On the Tina 3A there is a LEDwhich shows the status of the switch. <strong>The</strong> same informationsignal is connected to the Tina 8A.Connection 7A Spot 35, transmitter <strong>and</strong> receiver are connected directlyto to the Tina 8A via a M12-3B ’Y’ connector. <strong>The</strong> statusinformation shown by the LED on the Spot is also connectedto the Tina 8A.Connection 8Tina 1A is a plug which has to be connected to Tina 8Ainputs when no sensor is required, in order to complete thesafety connection circuit.Note: All input connectors on the Tina 8A must be connectedto sensors or have Tina 1A plugs fitted.78910111213<strong>ABB</strong>5:3314
Adaptation unitApprovals:TÜV NordTina 10A/B/CApplication:Adaptation of safety sensorswith OSSD outputs to thedynamic safety circuit.For example:Focus lightcurtain/lightbeamFeatures:Tina 10 A/B/C are three connection units with M12 connections, that makeit easy to connect a light curtain or light beam Focus with OSSD outputsto the dynamic safety circuits of Vital <strong>and</strong> Pluto. This also enables completeexternal interconnections, with M12 cabling, which reduces the cabling to <strong>and</strong>connections in the apparatus enclosure. Tina 10 A/B/C has LEDs for functionindication, with green, red or flashing green/red indications.Simplifies the system aswellas maintaining the safety levelIndication of status by LEDTina 10A: has two M12 connections that are connected to 1: Vital/Pluto <strong>and</strong>2: a light curtain/light beam Focus receiver. See the connection examplesHH3300F, HR7000L-01.Tina 10B: has three M12 connections that are connected to 1: Vital/Pluto <strong>and</strong>2: a light curtain/light beam Focus receiver, <strong>and</strong> 3: An external reset button<strong>and</strong> muting lamp, such as unit FMI-1C.See the connection examples HR7000L-01.Tina 10C: has three M12 connections that are connected to 1: Vital/Pluto <strong>and</strong>2: a light curtain/light beam Focus receiver, <strong>and</strong> 3: a light curtain/light beamFocus Transmitter. See the connection examples HH3302D, HR7000L-01.5:34<strong>ABB</strong>
Technical data – Tina 10A/B/CManufacturerArticle number/Ordering data<strong>ABB</strong> AB/<strong>Jokab</strong> <strong>Safety</strong>, SwedenTina 10A – 2TLA020054R1200Tina 10B – 2TLA020054R1300Tina 10C – 2TLA020054R1600Level of safetyIEC/EN 61508-1…7SIL3EN 62061SIL3EN ISO 13849-1 PL e, category 4EN 954-1 Category 4PFH d4,50×10 -9Power supplyOperating voltage 24 VDC + +20%, -20%Total current consumption 60 mA (70 mA with max. infosignal out)Info signal out: Max. 10 mATime delay t (in/out) t < 120 µsVoltage supply at normal Dynamic input signal: 9 to 13operation (protection OK) <strong>and</strong> V (RMS)24 VDC supply voltage Dynamic output signal: 9 to13 V (RMS)Info signal out: ~23 VDCGeneralProtection classIP67Ambient temperatureStorage: –10…+55° COperation: –10…+55° CHumidity range35 to 85 % (without icing orcondesation)Housing materialBased on polyamide,Macromelt OM646 (V0)Size 74 × 36 × 11 mm (L × W × H)Weight~40 gColourBlackNumber of units connected toVital 1Max. number of Tina 10A:Max. number of Tina 10B/C:64 when Focus is supplied byVital <strong>and</strong> a reset lamp is used6 when Focus is supplied separatelyor no reset lamp is usedConnectorsTina 10ATina 10BTina 10CApproved st<strong>and</strong>ardsCertificates11,213,411,213,44,51: for Vital or Pluto2: for Focus receiver1: for Vital or Pluto2: for Focus receiver3: for Reset unit1: for Vital or Pluto2: for Focus receiver3: for Focus transmitterEuropean Machinery Directive2006/42/ECEN ISO 12100-1:2003,EN ISO 12100-2:2003,EN 60204-1:2007,EN 954-1:1996,EN ISO 13849-1:2008,EN 62061:2005,EN 61496-1:2004 + A1:2008TÜV Nord46,57746,577363612345678Number of units connected toPluto, Vital 2 or 3, per inputMax. number of Tina 10A/B/C: 211,213,446,577369Tina 10A, 10B <strong>and</strong> 10C connections1022111 1 1331213<strong>ABB</strong>5:3514
Terminal blockApprovals:TÜV NordTina 11AApplication:Terminal block for connectionof two safety sensors with5-pin M12 connectors <strong>and</strong>adaptation to the dynamicsafety circuit.Features:Tina 11A is a connection block with two 5-pin M12 connections. It is used toconnect two safety sensors with M12 contacts via a single cable to a controlleror PLC. This simplifies cable running <strong>and</strong> reduces cable costs. Multipleconnection blocks can be connected to a Vital/Pluto.Simplifies cable routing <strong>and</strong>reduces cable costs.Allows connection of twosafety sensors to thedynamic safety circuit.Technical data – Tina 11AManufacturerArticle number/Ordering data<strong>ABB</strong> AB/<strong>Jokab</strong> <strong>Safety</strong>, Sweden2TLA020054R1700 Tina 11ALevel of safetyIEC/EN 61508-1…7SIL3EN 62061SIL3EN ISO 13849-1 PL e, category 4EN 954-1 Category 4PFH d4,50×10 -9Power supplyOperating voltage 24 VDC + +15%, -15%Total current consumption 17 mA (27 mA with maxinformation output)Information output: Max 10 mATime delay t (in/out) t < 60 µsVoltage supply at normal Dynamic input: between 9 <strong>and</strong>operation (protection OK) <strong>and</strong> 13 volt (RMS)24 VDC supply voltage Dynamic output: between 9<strong>and</strong> 13 volt (RMS)Information output: ~ 23 VDCGeneralProtection classAmbient temperatureHumidity rangeHousing materialIP67Storage: -30…+70°COperation: -10…+55°C35 to 85 % (with no icing orcondensation)Based on polyamide,Macromelt OM646 (V0)Connectors Out: M12 5-pole male (nr 2)In: M12 5-pole female (nr 1,3)Size 74 × 36 × 11 mm (L × W × H)Weight~40 gColourBlackApproved st<strong>and</strong>ardsCertificates11, 213, 412345123455-pin M12 female connector(contact #2-3)1. +24 VDC2. Dynamic input signal3. 0 VDC4. Dynamic output signal5. InformationEuropean Machinery Directive2006/42/ECEN ISO 12100-1:2003,EN ISO 12100-2:2003,EN 60204-1:2007,EN 954-1:1996,EN ISO 13849-1:2008,EN 62061:200546, 577TÜV Nord5-pin M12 male connector(contact #1):1. +24 VDC2. Dynamic input signal3. 0 VDC4. Dynamic output signal5. Summarized information(contact #2-3)36123455:36<strong>ABB</strong>
Terminal blockTina 12ATina 12A is a connection block with two 8-pin M12 connections. It is usedto connect two process locks Dalton or Magne 2A/B with integrated Edensensors via a single cable to a controller or PLC. This simplifies cable running<strong>and</strong> reduces cable costs. Multiple connection blocks can be connected toa Vital/Pluto.Tina 12A has three 8-pin M12 contacts that connect to1: Pluto/Vital, information for sensors <strong>and</strong> locks <strong>and</strong> lock signals2: Dalton with Eden No 13: Dalton with Eden No 2Approvals:TÜV NordApplication:Terminal block for connectionof two safety sensorswith 8-pin M12 connectors<strong>and</strong> adaptation to the dynamicsafety circuit.For example:DaltonMagneKnoxFeatures:Simplifies cable routing <strong>and</strong>reduces cable costs.Allows connection of twosafety sensors to thedynamic safety circuit.1234567Technical data – Tina 12AManufacturerArticle number/Ordering data<strong>ABB</strong> AB/<strong>Jokab</strong> <strong>Safety</strong>, Sweden2TLA020054R1800 Tina 12ALevel of safetyIEC/EN 61508-1…7SIL3EN 62061SIL3EN ISO 13849-1 PL e, category 4EN 954-1 Category 4PFH d4,50×10 -9Power supplyOperating voltage 24 VDC + +15%, -15%Total current consumption 60 mA (70 mA with maxinformation output)Information output: Max 10 mATime delay t (in/out) t < 60 µsVoltage supply at normal Dynamic input: between 9 <strong>and</strong>operation (protection OK) <strong>and</strong> 13 volt (RMS)24 VDC supply voltage Dynamic output: between 9<strong>and</strong> 13 volt (RMS)Information output: ~ 23 VDCGeneralProtection classAmbient temperatureHumidity rangeHousing materialConnectorsIP67Storage: -30…+70°COperation: -10…+55°C35 to 85 % (with no icing orcondensation)Based on polyamide,Macromelt OM646 (V0)To Vital/Pluto:M12 8-pole male (nr 2)From safety device:M12 8-pole female (nr 1,3)Size 74 × 36 × 11 mm (L × W × H)Weight~40 gColourBlackApproved st<strong>and</strong>ardsEuropean Machinery Directive2006/42/ECEN ISO 12100-1:2003,EN ISO 12100-2:2003,EN 60204-1:2007,EN 954-1:1996,EN ISO 13849-1:2008,EN 62061:2005Certificates11,213,4TÜV Nord46,577368910111213<strong>ABB</strong>5:3714
Accessories’Y’ branch with M12 connection <strong>and</strong> M12-connection device with screw connectorsM12-3AM12-3BM12-3DM12-3EFemaleFemale FemaleFemaleFemale Female2223231MaleFemaleSee the connectionexamples HA3306C, D– chap. 3.HH3300A, D – chap. 3.3MaleM12-C01 M12-C02 M12-C03 M12-C04* * * *1See the connectionexamples HA3306C, D.HH3300D, F.HH3302D – chap. 3.1MaleFemale3See the connectionexamplesHB0008A– chap. 5.HR7000O, L. – chap. 4.Male1See the connection examplesHB0001A, 2A,4A <strong>and</strong> 6A – chap. 3.See product list for applicationsFemale Male Female Male* Seen from the cable connection sideFemaleMaleCablingAdvantages:Many of <strong>ABB</strong> <strong>Jokab</strong> <strong>Safety</strong>'s products are connected using st<strong>and</strong>ardM12 connectors. This facilitates installation, saving a lot of time, <strong>and</strong> alsodramatically reduces the risk of incorrect connection.We have therefore developed cables with 5 conductors, 5 x 0.34 mm+ screening or 8 conductors; 8 x 0.34 mm + screening which offer theadvantages that we believe a good cable should have. <strong>The</strong>se are availablein any length <strong>and</strong> in various st<strong>and</strong>ard lengths, with moulded straightor angled male or female connectors. Particularly suitable cables for theTina 4A <strong>and</strong> Tina 8A units are C9 <strong>and</strong> C13. <strong>The</strong>y have thicker, 0.75 mm 2conductors for the feed line <strong>and</strong> 0.5 mm 2 for the other conductors +screening. Refer to the component list for the variants that are available.Area 0.34 mm 2Always screened cable<strong>The</strong> screen is always connectedto negative in male connectors.<strong>The</strong> guide pin in the smallconnector is indicated by arecessed arrow that is easy torecognise.Convenient cable in PVC<strong>The</strong> cable is also available inany length5:38<strong>ABB</strong>
1Example of safety sensors connections based on ’Y’ branch22 3 2 22 331Tina-11A 3 Tina-10C Tina-6A M12-3B11142222225131313131313M12-3A.67Vital 1 safety controller8910111213<strong>ABB</strong>5:3914
ContentsPageHA3300A-01 Connection example Vital 1 _________________________________________ 5:41HA3301A Vital 1 with several Eden ______________________________________________ 5:41HA3302A Vital 1 <strong>and</strong> Tina 4A with 4 Eden ________________________________________ 5:42HA3302B Vital 1 <strong>and</strong> 2 Tina 4A <strong>and</strong> 4 Eden <strong>and</strong> emergency stop _____________________ 5:42HA3303A Vital 1 with emergency stop/Tina 2A_____________________________________ 5:43HA3304A Vital 1 with emergency stop/Tina 3A ____________________________________ 5:43HA3305A Vital 1 with Eden <strong>and</strong> lightgrid Focus/Tina 10C ____________________________ 5:44HA3306C Vital 1 with 2 lightbeams Spot _________________________________________ 5:44HA3306D Vital 1 with 3 lightbeams Spot __________________________________________ 5:45HA3307A Vital 1 with Eden, lightgrid/Tina 3A <strong>and</strong> emergency stop/Tina 7A _____________ 5:45HD3800A-01 Vital 1 with safety light beam Spot ___________________________________ 5:46HD3801A-01 Vital 1, series <strong>and</strong> parallel __________________________________________ 5:46HE3811B-01 <strong>Safety</strong> light beam Spot with time-limited reset __________________________ 5:47HE3824C-01 Lightbeam with time-limited bypass 0.2–40 s. _________________________ 5:47HE3824D-01 Eden <strong>and</strong> bypassed lightbeam with Eden _____________________________ 5:48HE3824E-01 Lightbeams with time-limited bypass 0.2–40 s. _________________________ 5:48HE3824F-01 Eden <strong>and</strong> 2 bypass lightbeams with Eden _____________________________ 5:49HE3824G-01 Eden <strong>and</strong> 2 separetely bypassed lightbeams __________________________ 5:49HH3300A Vital 1 with different types of safety devices <strong>and</strong> M12–3A __________________ 5:50HH3300D Vital 1 with Tina 4A <strong>and</strong> different types of safety devices ___________________ 5:50HH3302D Vital 1 with Tina 8A <strong>and</strong> different types of safety devices ___________________ 5:51HH3301E Connection example Vital 1 ____________________________________________ 5:51HH3400A2 Vital 1 Solutions ____________________________________________________ 5:52HB0005A Vital with Eden <strong>and</strong> Inca emergency stop, with separate reset _______________ 5:52HB0006A Vital with 4 Eden units + Reset via M12-3E <strong>and</strong> Tina 4A ____________________ 5:53HB0007A Vital with two Dalton units via Tina 12A __________________________________ 5:53HB0001A Pluto with Smile emergency stop unit + Reset via M12-3E <strong>and</strong> Adam via Tina 4A _ 5:54HB0002A Pluto with five Eden units, for two zones via M12-3E <strong>and</strong> Tina 4A ____________ 5:54HB0003A Pluto with Smile <strong>and</strong> Inca emergency stop units, via Tina 11A <strong>and</strong> Tina 4A _____ 5:55HB0004A Pluto with different zones for Eden + Reset <strong>and</strong> two Eden units + via M12-3E _____ 5:55HH3301D Connection example – Vital 1 <strong>and</strong> Tina 8A with different safety device types ______ 5:56HH3300F Vital 1 with Tina 8B Profibus <strong>and</strong> different types of safety devices _______________ 5:565:40<strong>ABB</strong>
HA3300A-01 Connection example Vital 1123456It is the user's responsibilty to ensure that all control devices are correctly installed, cared for <strong>and</strong> operated to meat European, nationel <strong>and</strong> local codes/regulations. Subject to change without notice.HA3301A Vital 1 with several Eden78910111213<strong>ABB</strong>It is the user's responsibilty to ensure that all control devices are correctly installed, cared for <strong>and</strong> operated to meat European, nationel <strong>and</strong> local codes/regulations. Subject to change without notice.5:4114
HA3302A Vital 1 <strong>and</strong> Tina 4A with 4 EdenIt is the user's responsibilty to ensure that all control devices are correctly installed, cared for <strong>and</strong> operated to meat European, nationel <strong>and</strong> local codes/regulations. Subject to change without notice.HA3302B Vital 1 <strong>and</strong> 2 Tina 4A <strong>and</strong> 4 Eden <strong>and</strong> emergency stopIt is the user's responsibilty to ensure that all control devices are correctly installed, cared for <strong>and</strong> operated to meat European, nationel <strong>and</strong> local codes/regulations. Subject to change without notice.5:42<strong>ABB</strong>
HA3303A Vital 1 with emergency stop/Tina 2A123456It is the user's responsibilty to ensure that all control devices are correctly installed, cared for <strong>and</strong> operated to meat European, nationel <strong>and</strong> local codes/regulations. Subject to change without notice.HA3304A Vital 1 with emergency stop/Tina 3A78910111213<strong>ABB</strong>It is the user's responsibilty to ensure that all control devices are correctly installed, cared for <strong>and</strong> operated to meat European, nationel <strong>and</strong> local codes/regulations. Subject to change without notice.5:4314
HA3305A Vital 1 with Eden <strong>and</strong> lightgrid Focus/Tina 10CIt is the user's responsibilty to ensure that all control devices are correctly installed, cared for <strong>and</strong> operated to meat European, nationel <strong>and</strong> local codes/regulations. Subject to change without notice.HA3306C Vital 1 with 2 lightbeams SpotIt is the user's responsibilty to ensure that all control devices are correctly installed, cared for <strong>and</strong> operated to meat European, nationel <strong>and</strong> local codes/regulations. Subject to change without notice.5:44 <strong>ABB</strong>
HA3306D Vital 1 with 3 lightbeams Spot123456It is the user's responsibilty to ensure that all control devices are correctly installed, cared for <strong>and</strong> operated to meat European, nationel <strong>and</strong> local codes/regulations. Subject to change without notice.HA3307A Vital 1 with Eden, lightgrid/Tina 3A <strong>and</strong> emergency stop/Tina 7A78910111213<strong>ABB</strong>It is the user's responsibilty to ensure that all control devices are correctly installed, cared for <strong>and</strong> operated to meat European, nationel <strong>and</strong> local codes/regulations. Subject to change without notice.5:4514
HD3800A-01 Vital 1 with safety light beam SpotIt is the user's responsibilty to ensure that all control devices are correctly installed, cared for <strong>and</strong> operated to meat European, nationel <strong>and</strong> local codes/regulations. Subject to change without notice.HD3801A-01 Vital 1, series <strong>and</strong> parallelIt is the user's responsibilty to ensure that all control devices are correctly installed, cared for <strong>and</strong> operated to meat European, nationel <strong>and</strong> local codes/regulations. Subject to change without notice.5:46 <strong>ABB</strong>
HE3811B-01 <strong>Safety</strong> light beam Spot with time-limited reset123456It is the user's responsibilty to ensure that all control devices are correctly installed, cared for <strong>and</strong> operated to meat European, nationel <strong>and</strong> local codes/regulations. Subject to change without notice.HE3824C-01 Lightbeam with time-limited bypass 0.2–40 s.78910111213<strong>ABB</strong>It is the user's responsibilty to ensure that all control devices are correctly installed, cared for <strong>and</strong> operated to meat European, nationel <strong>and</strong> local codes/regulations. Subject to change without notice.5:4714
HE3824D-01 Eden <strong>and</strong> bypassed lightbeam with EdenIt is the user's responsibilty to ensure that all control devices are correctly installed, cared for <strong>and</strong> operated to meat European, nationel <strong>and</strong> local codes/regulations. Subject to change without notice.HE3824E-01 Lightbeams with time-limited bypass 0.2–40 s.It is the user's responsibilty to ensure that all control devices are correctly installed, cared for <strong>and</strong> operated to meat European, nationel <strong>and</strong> local codes/regulations. Subject to change without notice.5:48<strong>ABB</strong>
HE3824F-01 Eden <strong>and</strong> 2 bypass lightbeams with Eden123456It is the user's responsibilty to ensure that all control devices are correctly installed, cared for <strong>and</strong> operated to meat European, nationel <strong>and</strong> local codes/regulations. Subject to change without notice.HE3824G-01 Eden <strong>and</strong> 2 separetely bypassed lightbeams78910111213<strong>ABB</strong>It is the user's responsibilty to ensure that all control devices are correctly installed, cared for <strong>and</strong> operated to meat European, nationel <strong>and</strong> local codes/regulations. Subject to change without notice.5:4914
HH3300A Vital 1 with different types of safety devices <strong>and</strong> M12–3AIt is the user's responsibilty to ensure that all control devices are correctly installed, cared for <strong>and</strong> operated to meat European, nationel <strong>and</strong> local codes/regulations. Subject to change without notice.HH3300D Vital 1 with Tina 4A <strong>and</strong> different types of safety devices It is the user's responsibilty to ensure that all control devices are correctly installed, cared for <strong>and</strong> operated to meat European, nationel <strong>and</strong> local codes/regulations. Subject to change without notice.5:50<strong>ABB</strong>
HH3302D Vital 1 with Tina 8A <strong>and</strong> different types of safety devices123456It is the user's responsibilty to ensure that all control devices are correctly installed, cared for <strong>and</strong> operated to meat European, nationel <strong>and</strong> local codes/regulations. Subject to change without notice.HH3301E Connection example Vital 178910111213<strong>ABB</strong>It is the user's responsibilty to ensure that all control devices are correctly installed, cared for <strong>and</strong> operated to meat European, nationel <strong>and</strong> local codes/regulations. Subject to change without notice.5:5114
HH3400A2 Vital 1 SolutionsIt is the user's responsibilty to ensure that all control devices are correctly installed, cared for <strong>and</strong> operated to meat European, nationel <strong>and</strong> local codes/regulations. Subject to change without notice.HB0005A Vital with Eden <strong>and</strong> Inca emergency stop, with separate resetIt is the user's responsibilty to ensure that all control devices are correctly installed, cared for <strong>and</strong> operated to meat European, nationel <strong>and</strong> local codes/regulations. Subject to change without notice.5:52<strong>ABB</strong>
HB0006A Vital with 4 Eden units + Reset via M12-3E <strong>and</strong> Tina 4A123456It is the user's responsibilty to ensure that all control devices are correctly installed, cared for <strong>and</strong> operated to meat European, nationel <strong>and</strong> local codes/regulations. Subject to change without notice.HB0007A Vital with two Dalton units via Tina 12A78910111213<strong>ABB</strong>It is the user's responsibilty to ensure that all control devices are correctly installed, cared for <strong>and</strong> operated to meat European, nationel <strong>and</strong> local codes/regulations. Subject to change without notice.5:5314
HB0001A Pluto with Smile emergency stop unit + Reset via M12-3E <strong>and</strong> Adam via Tina 4AIt is the user's responsibilty to ensure that all control devices are correctly installed, cared for <strong>and</strong> operated to meat European, nationel <strong>and</strong> local codes/regulations. Subject to change without notice.HB0002A Pluto with five Eden units, for two zones via M12-3E <strong>and</strong> Tina 4AIt is the user's responsibilty to ensure that all control devices are correctly installed, cared for <strong>and</strong> operated to meat European, nationel <strong>and</strong> local codes/regulations. Subject to change without notice.5:54<strong>ABB</strong>
HB0003A Pluto with Smile <strong>and</strong> Inca emergency stop units, via Tina 11A <strong>and</strong> Tina 4A123456It is the user's responsibilty to ensure that all control devices are correctly installed, cared for <strong>and</strong> operated to meat European, nationel <strong>and</strong> local codes/regulations. Subject to change without notice.HB0004A Pluto with different zones for Eden + Reset <strong>and</strong> two Eden units +via M12-3E78910111213<strong>ABB</strong>It is the user's responsibilty to ensure that all control devices are correctly installed, cared for <strong>and</strong> operated to meat European, nationel <strong>and</strong> local codes/regulations. Subject to change without notice.5:5514
HH3301D Connection example – Vital 1 <strong>and</strong> Tina 8A with different safety device typesIt is the user's responsibilty to ensure that all control devices are correctly installed, cared for <strong>and</strong> operated to meat European, nationel <strong>and</strong> local codes/regulations. Subject to change without notice.HH3300F Vital 1 with Tina 8B Profibus <strong>and</strong> different types of safety devicesIt is the user's responsibilty to ensure that all control devices are correctly installed, cared for <strong>and</strong> operated to meat European, nationel <strong>and</strong> local codes/regulations. Subject to change without notice.5:56<strong>ABB</strong>
12345678910111213<strong>ABB</strong>5:5714
<strong>Safety</strong> Relays<strong>ABB</strong>
ContentsPage1Why should you use <strong>Safety</strong> relays? _____________________________________6:2<strong>The</strong> smallest <strong>and</strong> most flexible <strong>Safety</strong> relays on the market _______________6:3<strong>Safety</strong> relay summary ________________________________________________6:4<strong>Safety</strong> relay - RT - series• RT6 _________________________________________________________________________ 6:6• RT7 ________________________________________________________________________6:10• RT9 ________________________________________________________________________6:14• JSBRT11 ___________________________________________________________________6:18<strong>Safety</strong> relay - JSB - series• JSBR4 _____________________________________________________________________6:20• JSBT4 ______________________________________________________________________6:22• BT50(T) ____________________________________________________________________6:24• BT51(T) ____________________________________________________________________6:26• JSBT5(T) ___________________________________________________________________6:28<strong>Safety</strong> timers• JSHT1A/B __________________________________________________________________6:30• JSHT2A/B/C ________________________________________________________________6:32Expansion relays• E1T ________________________________________________________________________6:34• JSR1T ______________________________________________________________________6:36• JSR2A ______________________________________________________________________6:38• JSR3T ______________________________________________________________________6:40Connection examples ______________________________________________ 6:4223456789101112Descriptions <strong>and</strong> examples in this book show how the products work <strong>and</strong> can be used. This does not mean that they can meet the requirements forall types of machines <strong>and</strong> processes. <strong>The</strong> purchaser/user is responsible for ensuring that the product is installed <strong>and</strong> used in accordance with theapplicable regulations <strong>and</strong> st<strong>and</strong>ards. We reserve the right to make changes in products <strong>and</strong> product sheets without previous notice. For the latestupdates, refer to www.abb.com/lowvoltage. 2011.<strong>ABB</strong> 6:11314
Why should you usesafety relays?– to meet existing safety st<strong>and</strong>ards!”A fault in the control circuit logic, or failure of or damageto the control circuit must not lead to dangerous situations”.This is the requirement in the EU´s Machinery Directive98/37/EC under the heading 1.2.7. “ Failure of the controlcircuit”. <strong>The</strong> directive implies that no person should be putat risk if for example, a relay sticks or if a transistor or twoelectrical conductors short-circuit.A safety relay will fulfill these requirements. A safety relayhas, for example, inputs that are checked for short-circuits <strong>and</strong>dual redundant circuits that are checked at each operation.This can be compared to the dual brake circuits in a car. Ifone of the circuits is faulty the other will stop the car. In asafety relay there is an additional function which only allowsa machine to start if both circuits are ok.<strong>The</strong> st<strong>and</strong>ard for safety related parts of the control systemdescribes various safety categories depending on thelevel of risk <strong>and</strong> application. One single universal relay withselectable safety categories solves this.– to supervise safety devices!Light beamsLight curtains/Light gridsThree positiondevices<strong>Safety</strong>interlockswitchesTwo-h<strong>and</strong>devicesEmergencystop<strong>Safety</strong> strips& Bumpers<strong>Safety</strong> mats– for safe stops <strong>and</strong> reliable restarts!Dual stop signals when thegate is opened.Entering or putting a h<strong>and</strong> orlimb into a hazardous areamust cause all machinery thatcan cause personal injuryto stop safely. Many seriousaccidents occur whenmachinery is believed tohave stopped but is in factonly pausing in its programsequence. <strong>The</strong> safety relaymonitors the gate interlockswitch <strong>and</strong> cables <strong>and</strong> givesdual stop signals.Supervised reset whenthere can be a personwithin the risk area.To make sure that nobodyis within the restricted areawhen activating the resetbutton. A supervised resetbutton must be pressed <strong>and</strong>released before a reset canoccur. Many serious accidentshave been caused byan unintentional <strong>and</strong> unsupervisedreset.Timed reset when you cannotsee the entire risk area.Sometimes a double resetfunction is necessary to makesure that no one is left behindin the risk area. First, afterensuring no other person isinside the hazardous area, thepre-reset button must be activated,followed by the resetbutton outside the risk areawithin an acceptable timeperiod e.g 10 seconds. Asafety timer <strong>and</strong> a safety relaycan provide this function.Automatic reset for smallhatches.Where body entry is not possiblethrough a hatch, thesafety circuit can be automaticallyreset.<strong>The</strong> safety relays are resetimmediately when the hatchinterlock switch contacts areclosed.6:2<strong>ABB</strong>
<strong>The</strong> most flexible safety relayson the market!We have the most flexible safety relays on the market. Ourfirst universal relay was developed in 1988.Nowadays, the flexibility is even greater <strong>and</strong> size has beenreduced by 85 %.A universal relay is a safety relay with various input optionsfor various safety devices <strong>and</strong> risk levels.Internally, the safety relay is of the highest safety level(PL e according to EN ISO 13849-1). A machine suppliercan therefore, with one single safety relay, select theinput configuration that best suits their customers' safetyrequirements. In addition, our safety relays have detachableconnector blocks for ease of replacement <strong>and</strong> testing. Asour universal relays incorporate all input options, they arecompatible with all our previous safety relays as well as withother manufacturers' products.Is a universal relay expensive? No, our latest patentedconstruction is extremely simple <strong>and</strong> the number of majorcomponents is less compared to our previous universalrelays. This means that the safety relays are even more reliablethan before.We also have a great deal of experience from safetysolutions in our own system developments. It would be ourpleasure to share these experiences with you! Please seethe complete safety solutions in the section “Connectionexamples”. Please do not hesitate to contact us if you shouldrequire any other safety solutions.12345Inputs for various safety devices.RT7: the mostflexible safetyrelay on themarket!Input for manual orautomatic resetting.678Scale 1:1Outputs for program stop, gate openedor closed <strong>and</strong> reset indication.Detachable connector blocks.<strong>Safety</strong> outputs for immediate <strong>and</strong> delayedstops at optional times.91011Some of the advantages with <strong>ABB</strong> <strong>Jokab</strong> <strong>Safety</strong>’s safety relays:• Universal relays• Excellent reliability• Approved in Europe,USA, Canada• Supervised reset• Time reset• Small <strong>and</strong> compact• Detachable connector blocks• Low power consumption• Permits the use of longemergency stop cables• EX compatibility• Functions set by externalhardwired links• LED indication for inputs <strong>and</strong>outputs• Powerful switching capacity1213<strong>ABB</strong>6:314
summarySAFETY RELAYS- Which safety relay should you choose?First of all, we would recommend the selection of one ofour latest universal relays in the RT-series. <strong>The</strong>se are bothpractical <strong>and</strong> cost effective.To facilitate the choice of safety relay or combinations ofsafety relays, please see:– the table below dividing the safety relays intoapplication fields– the table on the opposite page showing possible input<strong>and</strong> output options– the relevant data sheet giving comprehensiveinformation about each specific safety relay– the circuit diagram for various applications in thesection “Connection examples”.Note: All earlier types of relays that can now be replacedby those in this manual are still kept as stock items <strong>and</strong>can be supplied upon request.Application fields<strong>Safety</strong> relays<strong>Safety</strong>timersExpansion relaysRT6RT7RT9JSBRT11JSBR4JSBT4JSBT5T, BT50T, BT51TJSBT5, BT50, BT51JSHT1A/BJSHT2A/B/CE1TJSR1TJSR2AJSR3TInterlocking switch/Gate/HatchLight curtainsLight beams<strong>Safety</strong> matsContact stripsTwo-h<strong>and</strong> control deviceEmergency stopHold to run/enabling deviceFoot control deviceArea supervisionTime resettingTime bypassingInchingOutput expansionDelayed outputInput alternatives (see also technical data on the next page)Single-channel, 1 NO from +24 VCategory 1, up to PL c<strong>The</strong> input must be closed before theoutputs can be activated. A stop signalis given when the input is opened.Two-channel, 2 NO from +24 VCategory 3, up to PL dBoth the inputs must be closed before theoutputs can be activated. A stop signalis given if one or both of the inputs areopened. Both the inputs must be opened<strong>and</strong> reclosed before the outputs can bereactivated. A short-circuit between theinputs is not monitored by the safetyrelay. Category 4 can only be achieved if asafety device with short circuit monitoredoutputs is connected.Two-channel, 1 NO & 1 NC from +24VCategory 4, up to PL eOne input must be closed <strong>and</strong> one mustbe opened before the outputs can beactivated. A stop signal is given if one orboth of the inputs change position or ifthe inputs short-circuit. Both inputs mustbe put into their initial position before theoutputs can be reactivated.Two-channel, 1 NO from 0 V &Category 4, up to PL eBoth the inputs must be closed before theoutputs can be activated. A stop signalis given if one or both of the inputs areopened. Both the inputs must be opened<strong>and</strong> reclosed before the outputs can bereactivated. A Stop signal is given ifthere is a short-circuit between the inputs.6:4<strong>ABB</strong>
1Technical data<strong>Safety</strong> category<strong>Safety</strong> inputSingle-channel, 1 NO from +24 VTwo-channel, 2 NO from +24 VTwo-channel, 1 NO & 1 NC from +24 VTwo-channel, 1 NO from 0 V & 1 NO from + 24 VContact strips/<strong>Safety</strong> matsReset & test inputMonitored manualAutomatic/Unmonitored manualTesting of contactors, relays, valves, etc.OutputNONO delayedNO impulse outputsNCNC delayedInfo. outputSwitching capacity (resistive load)6A/250VAC/1500VA/150W4A/250VAC/1000VA/100W6A/250VAC/1380VA/138W10A/250VAC/1840VA/192WWidth (mm)Supply voltage12VDC24VDC24VAC48VAC115VAC230VACRT6RT7RT9JSBRT11JSBR4<strong>Safety</strong> relaysJSBT4JSBT5TBT50TBT51T1–4 1–4 1–4 1–4 4 4 1–4° 1–4° 1–4° 1–4° 1–4° 1–4 1–4 1–4 1–4 1–4 1–43 2 2 7 3 3 3 4 4* 4* 42 3 † 3 4 4* 4* 2 ¤BT50 (JSBT5)BT51JSHT1A/BJSHT2A/B/C2 ¤ 2 ¤1 1 2 1 1 1 1* 12 3 1 1 1<strong>Safety</strong>timersE1TJSR1T1 † 1 1*4 3 2 9 4 4 4 4 ‡ 4 ‡ 4 4 4 5Expansion relaysJSR2AJSR3T2 ¤ 2 ¤ 2 ¤2 ‡ 545 45 22,5 100 45 45 22,5 22,5 22,5 22,5 22,5 45 45 22,5 45 45 22,5* Indicates the possibility of selecting delayed outputs¤Indicates one relay contact per output (other relays having two contacts per output)‡delayed ° Category 4 depending on connection (When used as expansion relay with Pluto <strong>Safety</strong> PLC, then Category 4)†fixed 0.5 s delay234567891011Contact strips/<strong>Safety</strong> matsCategory 3, up to PL dFor an unpressurised mat/strip, boththe relay inputs must be closed for theoutputs to be activated. In the case of anactivated mat/strip <strong>and</strong> short-circuit inputchannels, the relay will be de-energized.Current limitation prevents the safetyrelay from being overloaded when thechannels short-circuit.T9T114<strong>ABB</strong>Monitored manual resetA monitored reset means that the safetyrelay will not be reset if the reset buttongets jammed when pressed in or if theinput short-circuits. In order for the resettingto be complete, the input must beclosed <strong>and</strong> opened before the outputscan close.Automatic/unmonitored manualresetAutomatic reset means that the outputsare closed immediately when both theinput conditions are satisfied <strong>and</strong> thetest input is closed.Testing of contactors, relays &valvesCan be carried out with both automatic<strong>and</strong> manual reset.6:5121314
<strong>Safety</strong> relayRT6Approvals:TÜV Nord<strong>Safety</strong> relay for:Emergency stopsLight curtainsThree position devicesInterlocked gates/hatchesMagnetic switchesLight beams<strong>Safety</strong> matsContact stripsFoot operated switchesFeatures:Would you like a single safety relay for all yoursafety applications?<strong>The</strong>n choose the RT6 universal relay to supervise both yoursafety devices <strong>and</strong> the internal safety of your machinery. Inaddition you can select the safety level required for each installation.All this is possible because the RT6 has the mostversatile input option arrangement available on the market.Many other relays can therefore be replaced by the RT6.<strong>The</strong> relay also comes with other options such as manualor automatic reset. Manual supervised reset can be usedfor gates <strong>and</strong> other safety devices that can be bypassed.Automatic reset can be used for small hatches, if deemedacceptable from risk assessment.<strong>The</strong> RT6 also has information outputs that follow the inputs<strong>and</strong> outputs of the relay. <strong>The</strong>se outputs will for exampleindicate if a gate is open or closed <strong>and</strong> if the safety relayneeds to be reset.<strong>The</strong> RT6 is designed with a minimum amount ofcomponents thus keeping both production costs <strong>and</strong>component acquisitions to a minimum.Choose the RT6 to simplify your safety circuits <strong>and</strong> reduceyour costs.Five input optionsSingle or dual channel inputManual supervised or automaticresetTest input for supervision ofexternal contactorsWidth 45 mmLED indication of supply,inputs, outputs, short-circuit<strong>and</strong> low voltage level.3 NO/1 NC relay outputsTwo voltage free transistorinformation outputsSupply 24 VDC, 24, 48, 115or 230 VACQuick release connectorblocks6:6 <strong>ABB</strong>
Technical information - RT6Inputs<strong>The</strong> inputs from the safety devices must be connected accordingto one of the following options in order to fulfill the expected safetylevel <strong>and</strong> to avoid unsafe situations.1. Single channel, 1 NO contact from +24 V DC, category 1,up to PL c2. Dual channel, 2 NO contacts from +24 V DC, category 3,up to PL d3. Dual channel 1 NO, 1 NC contact from +24 V DC,category 4, up to PL e4. Dual channel, 1 NO contact from 0V <strong>and</strong> 1 NO contactfrom +24 V DC, category 4, up to PL e5. <strong>Safety</strong> mats/contact strips 1 ‘contact’ from 0V <strong>and</strong> 1‘contact’ from +24 V DC, category 3, up to PL dWhen the input/inputs are activated <strong>and</strong> the test/supervised resetis complete, relays 1 <strong>and</strong> 2 are energized. Simultaneous activationis not required where there are dual channels. <strong>The</strong> two relays arede-energized when the input/inputs are de-activated in accordancewith the input option chosen or in case of a power failure.Relays 1 <strong>and</strong> 2 must both be de-energized before the outputs canbe activated again.Transistor output status information<strong>The</strong> RT6 has two voltage free transistor outputs that can be connectedto a PLC, computer or other monitoring device. <strong>The</strong>seoutputs give the input <strong>and</strong> output status of the relay.Reset <strong>and</strong> testing<strong>The</strong> RT6 has two reset options; manual <strong>and</strong> automatic. <strong>The</strong> manualsupervised reset is used when the RT6 is monitoring safetydevices that can be bypassed, i.e. to ensure that the outputs ofthe safety relay do not close just because a gate is closed. <strong>The</strong>automatic reset should only be used if deemed an acceptable risk.In addition, the RT6 can also test (supervise) whether, for example,contactors <strong>and</strong> valves etc are de-energized/de-activatedbefore a restart is allowed.Indication of low voltage<strong>The</strong> ‘On’ LED will flash if the relay supply voltage falls below anacceptable level. This indication will also be given if a monitoredsafety mat/contact strip is actuated. See connection option 5.<strong>Safety</strong> level<strong>The</strong> RT6 has internal dual <strong>and</strong> supervised safety functions. Ashort-circuit, internal faulty component or external interferencewill not present a risk to options with the highest safety level. Amanual reset requires that the reset input is closed <strong>and</strong> openedbefore the safety relay outputs are activated. A short-circuit or afaulty reset button is consequently supervised.When the RT6 is configured for dual channel input, both theinputs are supervised for correct sequence operation before theunit can be reset.<strong>The</strong> input options 3 <strong>and</strong> 4 have the highest safety levels as allshort-circuits <strong>and</strong> power failures are supervised. This in combinationwith internal current limitation makes the relay ideal forsupervision of safety mats <strong>and</strong> contact strips.Regulations <strong>and</strong> st<strong>and</strong>ards<strong>The</strong> RT6 is designed <strong>and</strong> approved in accordance with appropriatedirectives <strong>and</strong> st<strong>and</strong>ards. See technical data.Connection examplesFor examples of how our safety relays can solve various safetyproblems, see the section “Connection examples”.**Only for AC supply123456789Connection of supply - RT610DC supplyAC supplyDC-supply of AC-units11<strong>The</strong> RT6 DC option should be suppliedwith +24 V on A1 <strong>and</strong> 0 V on A2.<strong>The</strong> RT6 AC option should be suppliedwith the appropriate supply voltage viaconnections A1 <strong>and</strong> A2.<strong>The</strong> S23/ must be connected to protectiveearth.All AC-units can also be supplied by+24 VDC to S53 (0VDC to S23).NOTE!With both DC <strong>and</strong> AC modules, if cableshielding is used this must be connectedto an earth rail or an equivalent earthpoint.<strong>ABB</strong> 6:7121314
Connection of safety devices - RT61. SINGLE CHANNEL, 1 NO from +24V3. DUAL CHANNEL, 1 NO, 1 NC from+24V5. <strong>Safety</strong> mat/Contact strip<strong>The</strong> input (contact to S14) must be closedbefore the outputs can be activated. Whenthe input contact is opened the relay safetyoutput contacts open.2. DUAL CHANNEL, 2 NO from +24VBoth input contacts (S14 <strong>and</strong> S34) mustbe closed before the relay outputs can beactivated. <strong>The</strong> safety relay contacts willopen if one or both of the input contactsare opened. Both the input contacts mustbe opened <strong>and</strong> reclosed before the relaycan be reset. A short-circuit between inputsS14 <strong>and</strong> S34 can only be supervised if thedevice connected to the inputs has shortcircuitsupervised outputs, e.g. JOKABFocus light curtains.One input contact must be closed (S14) <strong>and</strong>one opened (S44) before the relay outputscan be activated. <strong>The</strong> safety relay contactswill open if one or both of the inputschange state or in case of a short-circuitbetween S14 <strong>and</strong> S44. Both inputs mustreturn to their initial positions before therelay outputs can be reactivated.4. DUAL CHANNEL, 1 NO from +24V,1 NO to 0VRelay functions as for option 2, but a shortcircuit,in this case between inputs S14<strong>and</strong> S24, is supervised (safety outputsare opened).Both ‘contact’ inputs from a inactivatedsafety mat/contact strip must be made inorder to allow the RT6 relay outputs to beactivated. When the safety mat/contactstrip is activated or a short-circuit is detectedacross S14-S23, the relay will de-energize(safety outputs open) <strong>and</strong> the ‘ON’ LEDwill flash. As output S13 has an internalcurrent limit of 70 mA, the RT6 will not beoverloaded when the mat/contact strip isactivated or a short-circuit is detected.Reset connections - RT6Manual supervised resetAutomatic resetTesting external contactor status**connected to S13 for safety mat/contact strip<strong>The</strong> manual supervised reset contact connectedto input X1 must be closed <strong>and</strong>opened in order to activate the relay outputs.Output connections - RT6Automatic reset is selected when S53,X1 <strong>and</strong> X4 are linked. <strong>The</strong> relay outputsare then activated at the same time asthe inputs.Contactors, relays <strong>and</strong> valves can besupervised by connecting ‘test’ contactsbetween S53 <strong>and</strong> X1. Both manual supervised<strong>and</strong> automatic reset can be used.Relay outputsTransistor outputs***NOTE<strong>The</strong>se outputs are only for informationpurposes <strong>and</strong> must not be connected tothe safety circuits of the machinery.<strong>The</strong> RT6 has three (3 NO) safety outputs<strong>and</strong> 1 NC information output.In order to protect the output contactsit is recommended that loads (inductive)are suppressed by fitting correctly chosenVDR’s, diodes etc.Diodes are the best arc suppressors,but will increase the switch off time ofthe load.<strong>The</strong> RT6 has two(2) voltage free transistoroutputs for information.<strong>The</strong> transistor outputs are supplied withvoltage to Y13, either from S53 (+24V)or an external 5-30 VDC supply. Y14 <strong>and</strong>Y24 follow the relay inputs <strong>and</strong> outputsas follows:• Y14 becomes conductive when the relayinput conditions are fulfilled.• Y24 becomes conductive when both theoutput relays are activated.6:8 <strong>ABB</strong>
Technical data - RT6ManufacturerArticle number/Ordering dataRT6 24DCRT6 24 ACRT6 115 ACRT6 230 ACColourWeight<strong>ABB</strong> AB/<strong>Jokab</strong> <strong>Safety</strong>, Sweden2TLA010026R00002TLA010026R02002TLA010026R04002TLA010026R0500Grey335 g (24 VDC)485 g (24-230 VAC)SupplyVoltage (A1-A2) 24 VDC +15/-20%,24/48/115/230 VAC,+15/-10%, 50-60 HzPower consumptionDC supply, nominal voltageAC supply, nominal voltage2.3 W5.2 VAConnection S13Short-circuit protected voltage output, 70 mA ± 10% currentlimitation. Is used for the inputs S14, S34 <strong>and</strong> S44.Connection S53Short-circuit protected voltage output, internal automatic fuse270 mA. Is used for the reset <strong>and</strong> autoreset inputs X1 <strong>and</strong> X4Connection S230V connection for input S24<strong>Safety</strong> inputsS14 (+) inputS24 (0V) inputS34 (+) inputS44 (+) inputReset input X1Supply for reset inputReset currentMinimum contact closure timefor reset20 mA20 mA20 mA30 mA+ 24VDC300 mA current pulse atcontact, then 30 mA100 msMaximum externalconnection cable resistanceat nominal voltage forS14, S24, S34 300 OhmS44, X1 150 OhmResponse timeAt Power on DC/ACWhen activating (input-output)When deactivating (input–output)At Power Loss
<strong>Safety</strong> relayRT7Approvals:TÜV Nord<strong>Safety</strong> relay for:Emergency stopsLight curtainsThree position devicesInterlocked gates/hatchesMagnetic switchesLight beams<strong>Safety</strong> matsContact stripsFoot operated switchesFeatures:Universal relay with delayed outputs<strong>The</strong> RT7 is a universal relay that can be used to supervise bothsafety devices <strong>and</strong> the internal safety of your machinery. In addition,you can select the safety level that is required for eachinstallation. All this is possible because the RT7 has the mostversatile input options arrangement available on the market. <strong>The</strong>RT7 can therefore replace many other relays.<strong>The</strong> RT7 has four (4 NO) dual safety outputs of which two maybe delayed for up to three seconds in order to achieve a safe<strong>and</strong> ‘soft’ stop. A ‘soft’ stop allows machinery to brake <strong>and</strong> stopgently before power is removed. A ‘soft’ stop has many benefits:the machinery life will be prolonged, processed products will notbe damaged, <strong>and</strong> restarts from the stopped position are madepossible <strong>and</strong> easier.Another option with the RT7 is manual or automatic resetting. Amanual supervised reset is used for gates <strong>and</strong> other safety devicesthat can be bypassed, while an automatic reset is used for smallsafety hatches if deemed appropriate from a risk point of view.In addition, the RT7 has information outputs that follow theinputs <strong>and</strong> outputs of the relay. <strong>The</strong>se outputs indicate if for examplea gate is opened or closed, if there is a delay or if the relayneeds to be reset.Choose the RT7 to simplify your safety circuits <strong>and</strong> reduceyour costs.4 NO/1 NC relay outputs, 2NO outputs can be delayedfor soft stopsDelay times RT7A 0; 0,5;1,0; 1,5 s RT7B 0; 1,0; 2,0;3,0 sFive input optionsSingle or dual channel inputManual supervised or automaticresetTest input for supervision ofexternal contactorsWidth 45 mmLED indication of supply,inputs, outputs, short-circuit<strong>and</strong> low voltage levelThree voltage free transistorinformation outputsSupply 24 VDC, 24, 48, 115or 230 VACQuick release connectorblocks6:10<strong>ABB</strong>
Technical information - RT7 A/BInputs<strong>The</strong> RT7 can be configured to operate in either of the followinginput options:1. Single channel, 1 NO contact from +24 VDC, safetycategory 1, up to PL c2. Dual channel, 2 NO contacts from +24 VDC, category 3,up to PL d3. Dual channel, 1 NO, 1 NC contact from +24 VDC,category 4, up toPL e4. Dual channel, 1 NO contact from 0V <strong>and</strong> 1 NO contactfrom +24 VDC, category 4, up toPL e5. <strong>Safety</strong> mats/contact strips, 1 ‘contact’ from 0V <strong>and</strong> 1‘contact’ from +24 VDC, category 3, up toPL dWhen the input/inputs are activated <strong>and</strong> the test/supervised resetis complete, relays 1,2,3 <strong>and</strong> 4 are activated. Relays 1 <strong>and</strong> 2are immediately de-energized when the inputs are deactivated inaccordance with the input option selected. Relays 3 <strong>and</strong> 4 areeither de-energized immediately or after the selected time delay.All the relays (1,2,3 <strong>and</strong> 4) must be de-energized before the RT7can be reset.Transistor output status information<strong>The</strong> RT7 has three(3) voltage free transistor outputs that can beconnected to a PLC, computer or other monitoring device. <strong>The</strong>seoutputs give the input <strong>and</strong> output status of the relay.Reset <strong>and</strong> testing<strong>The</strong> RT7 has two reset options; manual <strong>and</strong> automatic.<strong>The</strong> manual supervised reset is utilised when the RT7 is usedto monitor safety devices that can be bypassed, i.e. to ensurethat the outputs of the safety relay do not close just because thegate is closed.<strong>The</strong> automatic reset should only be used if acceptable from arisk point of view. <strong>The</strong> RT7 can also test (supervise), if for example,contactors <strong>and</strong> valves etc are de-energized/de-activated beforea restart is allowed.Indication of low voltage<strong>The</strong> ‘On’ LED will flash if the relay voltage falls below an acceptablelevel. This indication will also be given if a monitored safety matcontact strip is actuated. See connection option 5.Connection examples – RT7DC supplyAC supply<strong>Safety</strong> level<strong>The</strong> RT7 has internal dual <strong>and</strong> supervised safety functions. Powerfailure, an internal faulty component or external interference willnot present a risk to options with the highest safety level. A manualreset requires that the reset input is closed <strong>and</strong> opened beforethe safety relay outputs are activated. A short-circuit or a faultyreset button is consequently supervised.When the RT7 is configured for dual channel input, both theinputs are supervised for correct sequence operation before theunit can be reset. <strong>The</strong> input options 3 <strong>and</strong> 4 have the highest safetylevels as all short-circuits <strong>and</strong> power failures are supervised. Thisin combination with internal current limitation makes the relay idealfor supervision of safety mats <strong>and</strong> contact strips.Regulations <strong>and</strong> st<strong>and</strong>ards<strong>The</strong> RT7 is designed <strong>and</strong> approved in accordance with appropriatedirectives <strong>and</strong> st<strong>and</strong>ards. Se tekniska data.Connection examplesFor examples of how our safety relays can solve various safetyproblems, see the section “Connection examples”.**Only for AC supplyDC-supply of AC-units1234567891011<strong>The</strong> RT7 DC option should be suppliedwith +24 V on A1 <strong>and</strong> 0 V on A2.<strong>The</strong> RT7 AC option should be suppliedwith the appropriate supply voltage viaconnections A1 <strong>and</strong> A2.<strong>The</strong> S23/ must be connected to protectiveearthSamtliga AC-moduler kan också matasmed +24 VDC på S53 och 0V på S23.NOTEWith both DC <strong>and</strong> AC modules, if cableshielding is used this must be connectedto an earth rail or an equivalent earthpoint.1213<strong>ABB</strong>6:1114
Connection of safety devices - RT7 A/B1. SINGLE CHANNEL, 1 NO from +24V3. DUAL CHANNEL, 1 NO, 1 NC from+24V5. <strong>Safety</strong> mat/Contact strip<strong>The</strong> input (contact to S14) must be closedbefore the outputs can be activated. Whenthe input contact is opened the relay safetyoutput contacts open.2. DUAL CHANNEL, 2 NO from +24VBoth input contacts (S14 <strong>and</strong> S34) musbeclosed before the relay outputs can be activated.<strong>The</strong> safety relay contacts will open ifone or both of the input contacts are opened.Both the input contacts must be openedbefore the relay can be reset. A short-circuitbetween the inputs S14 <strong>and</strong> S34 can onlybe supervised if the device connected to theinputs has short-circuit supervised outputs,e.g. <strong>ABB</strong> <strong>Jokab</strong> <strong>Safety</strong>´s Focus light curtains.One input contact must be closed (S14) <strong>and</strong>one opened (S44) before the relay outputscan be activated. <strong>The</strong> safety relay contactswill open if one or both of the inputs changestate or in the case of a short-circuit betweenS14 <strong>and</strong> S44. Both inputs must be returnedto their initial positions before the relay outputscan be reactivated.4. DUAL CHANNEL, 1 NO from +24V, 1NO from 0VRelay functions as option 2, but a short-circuit,in this case between inputs S14 <strong>and</strong> S24,is supervised (safety outputs are opened).Both ‘contact’ inputs from an inactivatedsafety mat/contact strip, must be made inorder to allow the RT7 relay outputs to beactivated. When the safety mat/contact stripis activated or a short-circuit is detectedacross S14-S23, the relay will de-energize(safety outputs open) <strong>and</strong> the ‘ON’ LED willflash. As output S13 has an internal currentlimit of 70 mA, the RT7 will not be overloadedwhen the mat/contact strip is activated or ashort circuit is detected.Reset connections - RT7 A/BManual supervised resetAutomatic resetTesting external contactor status<strong>The</strong> manual supervised reset contact connectedto input X1 must be closed <strong>and</strong>opened in order to activate the relay outputs.**connected to S13 for safety mat/contactstripAutomatic reset is selected when S53, X1<strong>and</strong> X4 are linked. <strong>The</strong> relay outputs are thenactivated at the same time as the inputs.Contactors, relays <strong>and</strong> valves can besupervised by connecting ‘test’ contactsbetween S53 <strong>and</strong> X1. Both manualsupervised <strong>and</strong> automatic reset can be used.Output connections - RT7 A/BRelay outputsTransistor outputsTime delay outputs<strong>The</strong> RT7 has four (4 NO) safety outputsof which two can be delayed, <strong>and</strong> 1 NCinformation output.In order to protect the RT7 output contactsit is recommended that loads (inductive)are suppressed by fitting correctly chosenVDR’s, diodes etc. Diodes are the best arcsuppressors, but will increase the switch offtime of the load.<strong>The</strong> RT7 has three(3) voltage free transistorinformation outputs.<strong>The</strong> transistor outputs are supplied withvoltage to Y13 either from S53 (+24V) orexternally from 5 to 30 VDC. Y14, Y24 <strong>and</strong>Y34 follow the inputs <strong>and</strong> outputs as follows:• Y14 becomes conductive when the relayinput conditions are fulfilled.• Y24 becomes conductive when boththe output relays are activated.• Y34 becomes conductive when boththe delay output relays are activated.Time delays are selected by linking theappropriate T0, T1 <strong>and</strong> T2 connections.When a stop signal is detected a programstop comm<strong>and</strong> is first given to the PLC/servowhich brakes the dangerous machine operationsin a ‘soft’ <strong>and</strong> controlled way.<strong>The</strong> delayed relay safety outputs will thenturn off the power to the motors, i.e. whenthe machinery has already stopped. It takesusually around 0.5 to 3 seconds for a dangerousaction to be stopped softly.***NOTE<strong>The</strong>se outputs are only for information purposes <strong>and</strong> must not be connected to the safety circuits of the machinery.6:12<strong>ABB</strong>
<strong>ABB</strong>Technical data - RT7 A/BManufacturer<strong>ABB</strong> AB/<strong>Jokab</strong> <strong>Safety</strong>, SwedenArticle number/Ordering dataRT7B 24DC 3 s 2TLA010028R1000115AC 3 s2TLA010028R1400230AC 3 s2TLA010028R1500RT7A 24DC 1,5 s 2TLA010028R2000115AC 1,5 s2TLA010028R2400230AC 1,5 s2TLA010028R2500ColourWeightBlack <strong>and</strong> beige405 g (24 VDC)550 g (24-230 VAC)SupplyVoltage (A1-A2) 24 VDC +15/-20%,24/48/115/230 VAC,±15%, 50-60 HzPower consumptionDC supply, nominal voltageAC supply, nominal voltage4.6 W8.8 VAConnection S13Short-circuit protected voltage output, 70 mA ±10% currentlimitation. Is used for the inputs S14, S34 <strong>and</strong> S44.Connection S53Short-circuit protected voltage output, internal automatic fuse, max270 mA. Is used for the reset <strong>and</strong> autoreset inputs X1 <strong>and</strong> X4.Connection S230V connection for input S24.<strong>Safety</strong> inputsS14 (+) inputS24 (0V) inputS34 (+) inputS44 (+) inputReset input X1Supply for reset inputReset currentMinimum contact closure timefor reset20 mA20 mA20 mA25 mA+ 24VDC600 mA current pulse at contactclosure, then 30 mA.100 msMaximum externalconnection cable resistanceat nominal voltage forS14, S24, S34 300 OhmS44, X1 150 OhmResponse timeAt Power on DC/ACWhen activating (input-output)When deactivating (input–output)At Power LossDelay time optionsRT7ART7B
<strong>Safety</strong> relayRT9Approvals:TÜV Nord<strong>Safety</strong> relay for:Emergency stopsLight curtainsThree position devicesInterlocked gates/hatchesMagnetic switchesLight beams<strong>Safety</strong> matsContact stripsFoot operated switchesFeatures:Would you like a small safety relay for all your safetyapplications?<strong>The</strong>n choose the compact RT9 universal relay to supervise bothyour safety devices <strong>and</strong> the internal safety of your machinery. Inaddition, you can select the safety level that is required for eachinstallation. All this is possible due to the RT9 offering the mostversatile input option arrangement available on the market. <strong>The</strong>RT9 can therefore replace many other relays.Other RT9 options include selection of either manual supervisedor automatic resetting. <strong>The</strong> manual supervised reset can be usedfor gates <strong>and</strong> other safety devices that can be bypassed. Automaticreset can be used for small safety hatches, if deemed acceptablefrom risk assessment.In addition, the RT9 has a double information output that willindicate e.g if a gate is open or if the relay needs resetting.<strong>The</strong> RT9 uses the latest component technology <strong>and</strong> modernassembly techniques to ensure a highly cost effective solution.Choose the RT9 to simplify your safety circuits <strong>and</strong> reduce yourcosts.Five input optionsSingle or dual channel inputManual supervised or automaticresetTest input for supervision ofexternal contactorsWidth 22.5 mmLED indication of supply,inputs <strong>and</strong> outputs, shortcircuit<strong>and</strong> low voltage level2 NO relay outputsOne changeover relay witha double information outputSupply 24 VDCQuick release connectorblocks6:14<strong>ABB</strong>
Technical information – RT9Inputs<strong>The</strong> RT9 can be configured to operate in either of the followinginput options:1. Single channel, 1 NO contact from +24VDC, category 1,up to PL c2. Dual channel, 2 NO contacts from +24VDC, category 3,up to PL d3. Dual channel, 1 NO, 1 NC contact from +24VDC, category4, up to PL e4. Dual channel, 1 NO contact from 0V <strong>and</strong> 1 NO contactfrom +24VDC, category 4, up to PL e5. <strong>Safety</strong> mat/contact strips, 1 ‘contact’ from 0V <strong>and</strong> 1‘contact’ +24VDC, category 3, up to PL dWhen the input/inputs are activated <strong>and</strong> the test/supervised resetis complete, relays 1 <strong>and</strong> 2 are energised. <strong>The</strong>se are de-energisedwhen the input/inputs are de-activated in accordance with theinput option chosen or in case of a power failure.Relays 1 <strong>and</strong> 2 must both be de-energized before the RT9 canbe reset.Relay output status information<strong>The</strong> RT9 has a changeover contact relay output that can be connectedto a PLC, control lamp, computer or similar. <strong>The</strong> outputgives information about the status of the relay.Reset <strong>and</strong> testing<strong>The</strong> RT9 has two reset options; manual <strong>and</strong> automatic. <strong>The</strong> manualsupervised reset can be used when the RT9 is monitoring safetydevices that can be bypassed, i.e. to ensure that the outputs ofthe safety relay do not close just because a gate is closed. <strong>The</strong>automatic reset option should only be used if appropriate from arisk point of view.Due to special internal circuits the RT9 can be automaticallyreset regardless of the operational voltage rise time, this beingan important factor when large loads are started up on the samepower supplies at the same time.In addition, the RT9 can also test (supervise), if for example,contactors <strong>and</strong> valves etc are de-energised/de-activated beforea restart is made.Connection of supply - RT9Indication of low voltage<strong>The</strong> ‘On’ LED will flash if the relay supply voltage falls below anacceptable level. This indication will also be given if a monitoredsafety mat/contact strip is actuated. Please see Connection option5.<strong>Safety</strong> level<strong>The</strong> RT9 has internal dual <strong>and</strong> supervised safety functions. Powerfailure, an internal faulty component or external interference willnot present a risk to options with the highest safety level. A manualreset requires that the reset input is closed <strong>and</strong> opened beforethe safety relay outputs are activated. A short-circuit or a faultyreset button is consequently supervised.When the RT9 is configured for dual channel input, both theinputs are supervised for correct operation before the unit canbe reset.<strong>The</strong> input options 3 <strong>and</strong> 4 have the highest safety levels as allshort-circuits <strong>and</strong> power failures are supervised. This in combinationwith an internal current limitation makes the relay ideal forsupervision of safety mats <strong>and</strong> contact strips.Regulations <strong>and</strong> st<strong>and</strong>ards<strong>The</strong> RT9 is designed <strong>and</strong> approved in accordance with appropriatedirectives <strong>and</strong> st<strong>and</strong>ards. See technical data.Connection examplesFor examples of how our safety relays can solve various safetyproblems, please see the section “Connection examples”.12345678910DC supplyShort circuitprotectionAutomaticfuse<strong>The</strong> RT9 should be supplied with +24 V on A1<strong>and</strong> 0 V on A2.NOTEIf cable shielding is used this must be connectedto an earth rail or an equivalent earth point.111213<strong>ABB</strong>6:1514
Connection of safety devices - RT91. SINGLE CHANNEL, 1 NO from+24V3. DUAL CHANNEL, 1 NO, 1 NC from+24V5. <strong>Safety</strong> mat/Contact strip<strong>The</strong> input (contact to S14) must be closedbefore the outputs can be activated. Whenthe input contact is opened, the relay safetyoutput contacts open.2. DUAL CHANNEL, 2 NO from +24VBoth input contacts (S14 <strong>and</strong> S34) mustbe closed before the relay outputs can beactivated. <strong>The</strong> safety relay contacts will open ifone or both of the input contacts are opened.Both the input contacts must be opened<strong>and</strong> reclosed before the relay can be reset.A short-circuit between inputs S14 <strong>and</strong>S34 can only be supervised if the deviceconnected to the inputs has short-circuitsupervised outputs, e.g. <strong>ABB</strong> <strong>Jokab</strong> <strong>Safety</strong>´sFocus light curtainsOne input contact must be closed (S14) <strong>and</strong>one opened (S44) before the relay outputscan be activated.<strong>The</strong> safety relay contacts will open if oneor both of the inputs change state or in caseof a short-circuit between S14 <strong>and</strong> S44. Bothinputs must be returned to their initial statusbefore the relay outputs can be reactivated.4. DUAL CHANNEL, 1 NO from +24V,1 NO from 0VRelay functions as option 2, but a shortcircuit,in this case between inputs S14<strong>and</strong> S24, is supervised (safety outputs areopened).Both ‘contact’ inputs from a inactivatedsafety mat/contact strip must be madein order to allow the RT9 relay outputsto be activated. When the safety mat/contact strip is activated or a short-circuitis detected across S14-S23, the relay willde-energize (safety contacts open) <strong>and</strong>the ‘ON’ LED will flash. As output S13has an internal current limit of 70 mA, theRT9 will not be overloaded when the mat/contact strip is activated or a short-circuitis detected.Reset connections - RT9Manual supervised resetAutomatic resetTesting external contactor status<strong>The</strong> manual supervised reset contactconnected to input X1 must be closed<strong>and</strong> opened in order to activate the relayoutputs.Automatic reset is selected when A1(+), X1<strong>and</strong> X4 are linked. <strong>The</strong> relay outputs are thenactivated at the same time as the inputs.Contactors, relays <strong>and</strong> valves can besupervised by connecting ‘test’ contactsbetween A1(+) <strong>and</strong> X1. Both manualsupervised <strong>and</strong> automatic reset can be used.Output connections - RT9Relay outputsInformation outputs<strong>The</strong> RT9 has two (2 NO) safety outputs.In order to protect the output contactsit is recommended that loads (inductive)are suppressed by fitting correctly chosenVDR’s, diodes etc. Diodes are the best arcsuppressors, but will increase the switch offtime of the load.<strong>The</strong> RT9 has a single changeover contactinformation relay output.<strong>The</strong> relay outputY14 is connected internally to 0V <strong>and</strong> 24Vin the following way:• Y14 is internally closed to 0V whenthe RT9 is not reset.• Y14 is internally closed to +24V whenthe relay is reset.6:16<strong>ABB</strong>
Technical data – RT9Manufacturer<strong>ABB</strong> AB/<strong>Jokab</strong> <strong>Safety</strong>, SwedenArticle number/Ordering dataRT9 24DC 2TLA010029R0000ColourWeightGrey210 gSupplyVoltage (A1-A2) 24 VDC ±20%Power consumptionNominal voltageConnection S13Input currents(at nominal supply voltage)S14 (+) inputS24 (0V) inputS34 (+) inputS44 (+) inputReset input X1Supply for reset inputReset currentMinimum contact closure timefor resetMinimum contact closure time(at low limit voltage -20%)2 WShort-circuit protected voltageoutput70 mA ± 10% currentlimitation. Is used for the inputsS14, S34 <strong>and</strong> S44.30 mA20 mA20 mA25 mA+ 24VDC300 mA current pulse atcontact closure, then 30 mA80 ms100 msMaximum externalconnection cableresistance at a nominalvoltage forS14, S24, S34 300 OhmS44, X1 150 OhmResponse timeAt Power onWhen activating (input-output)When deactivating (input–output)At Power Loss
<strong>Safety</strong> relayJSBRT11Approvals:TÜV Nord<strong>Safety</strong> relay for:Emergency stopLight curtainsThree position devicesInterlocked gates/hatchesMagnetic switchesLight beamsFoot operated switchesFeatures:A flexible safety relay with many outputs<strong>The</strong> JSBRT11 has been designed to provide the safety systemcircuit designer with the ability to select from both a rangeof input connection configurations <strong>and</strong> either automatic orsupervised reset.<strong>The</strong> unit can be hardwire configured to operate in eitherof the following input configurations:• Mode 1: Single Channel (1 NO contact from +24 VDC),category 1 PL c• Mode 2: Dual Channel (2 NO contacts from +24 VDC),category 3 PL d• Mode 3: Dual Channel (1 NO, 1NC contacts from + 24VDC), category 4 PL e.• Mode 4: Dual Channel (1 NO contact from 0 V <strong>and</strong> 1 NOcontact from + 24 VDC), safety category 4.In addition the unit can also be used to test that contactors<strong>and</strong> valves have fallen/returned to their ’reset’ state before anew ’start’ signal is given.<strong>Safety</strong> level<strong>The</strong> JSBRT11 has dual <strong>and</strong> monitored internal safety functions.Power failure, internal component failures or ex ternalinterference (with the exception of short circuiting of inputcontact when used in a single channel input mode) do notresult in a dangerous function.When wired for supervised reset, should a short circuitappear across the reset input the relay will not automaticallyreset when the input/inputs are made. Only when the supervisedreset input is made <strong>and</strong> broken will the relay reset.<strong>The</strong> JSBRT11 provides de tection of contact failure in theinputs when wired in dual channel mode. Both inputs haveto be opened <strong>and</strong> closed in order to enable the reactivationof the relay.Selectable inputs <strong>and</strong> safetycategoryManual supervised or automaticresetWidth 100 mmLED indication for supply,inputs <strong>and</strong> outputs7 NO + 2 NC relay outputsSupply 24 VDC 24, 48, 115or 230 VACQuick release connectorblocks<strong>The</strong> highest safety level of the JSBRT11 is in configurationmode 3 <strong>and</strong> 4 because all short circuits are supervised i.e.a short circuit between the inputs leads to a safe state asthe outputs drop out.Regulations <strong>and</strong> st<strong>and</strong>ards<strong>The</strong> JSBRT11 is designed <strong>and</strong> approved in accordance withappropriate directives <strong>and</strong> st<strong>and</strong>ards. See technical data.Connection examplesFor examples of how our safety relays can solve various safetyproblems, please see the section “Connection examples”.6:18<strong>ABB</strong>
<strong>ABB</strong>Technical data – JSBRT11ManufacturerTechnical description – JSBRT11Supply*******Supervision circuit **Test <strong>and</strong> Automatic reset circuit *** Only for AC-supply<strong>The</strong> supply voltage is connected across A1<strong>and</strong> A2. <strong>The</strong> input connection configuration<strong>and</strong> type of reset required is set by connectingthe unit as shown in the diagrams below.When the input/inputs <strong>and</strong> the test/supervisedreset are made K1 <strong>and</strong> K2 energise.K1 <strong>and</strong> K2 will de-energize if the poweris disconnected or a stop signal is given inaccordance to the configuration mode wired.Both K1 <strong>and</strong> K2 have to be de-activatedbefore the outputs of the JSBRT11 canbe closed again.Configuration mode 1.When the single input opens both K1 <strong>and</strong>K2 relays are deactivated.Electrical connection – JSBRT11SINGLE CHANNEL *, 1 NO from +24VDUAL CHANNEL*, 2 NO from +24VIt is recommended that all switched loadsare adequately suppressed <strong>and</strong>/or fusedin order to provide additional protectionfor the safety contacts.<strong>ABB</strong> AB/<strong>Jokab</strong> <strong>Safety</strong>, SwedenArticle number/Ordering data24 DC 2TLA010025R0000115 AC 2TLA010025R0400230 AC 2TLA010025R0500ColourGreyPower supply A1 - A2 24 VDC ± 15%24, 48, 115, 230 VAC ± 15%,50-60 HzPower consumptionRelay OutputsMax. switching capacityResistive load ACInductive load ACResistive load DCInductive load DCMax. total switching capacityMin. loadContact materialFuses Output (External)Conditional short-circuitcurrent (1 kA)Max. Input wire res. at nom.voltageResponse time at deactivation(input-output)Response time at activation(input-output)3.2 W/7.9 VA7 NO <strong>and</strong> 2 NC6A/250 VAC/1500 VAAC15 240VAC 2A6A/24 VDC/150 WDC13 24VDC 1A21A distributed on all contacts10mA/10 V (if load on contact hasnot exceeded 100 mA)AgSnO 2+ Au flash6A gL/gG6A gG200 Ohm (S14,S24,S34,X1,X4);100 Ohm (S44)
<strong>Safety</strong> relayJSBR4Approvals:TÜV Nord<strong>Safety</strong> relay for:Two-h<strong>and</strong> devices of type IIIcEmergency stopThree position devicesInterlocked Gates/HatchesContact strips<strong>Safety</strong> matsFoot operated switchesFeatures:A universal relay for two-h<strong>and</strong>- <strong>and</strong> many other safetydevices<strong>The</strong> JSBR4 has two inputs, which both have to be closedto keep the safety output contacts closed. A short-circuitacross the inputs will cause the output contacts to open.<strong>The</strong> inputs can however be subjected to a continuousshort-circuit without damaging the safety relay.In order to make the safety outputs close the reset inputmust be closed <strong>and</strong> opened. In this way an unintentionalreset is prevented in the case of a short-circuit in the resetbutton cable or if the button gets jammed in the actuatedposition. <strong>The</strong> reset input can also be used for test/supervisionto ensure that contactors or valves have returnedto their initial off/stop position before a new start can beallowed by the safety relay.When the JSBR4 is used as a two-h<strong>and</strong> device relay,both buttons have to be pressed within 0.5 seconds ofeach other in order to close the outputs.When the JSBR4 is used for <strong>Safety</strong> Mats <strong>and</strong> <strong>Safety</strong>Strips the ”stop” condition is given following detection of ashort-circuit between input channels A <strong>and</strong> B. <strong>The</strong> safetymat, safety strip or the relay will not be damaged by a continuousshort-circuit. This also gives the advantage that ifthere is a failure between the inputs in the installation, thesafety relay will not be damaged.<strong>Safety</strong> level<strong>The</strong> JSBR4 has a twin supervised safety function. Componentfailure, short-circuit or external disturbance (e.g.loss of power supply) will not prevent the safe functionof the relay. This is valid both for the inputs A <strong>and</strong> B aswell as for the reset input. <strong>The</strong> JSBR4 operates at thehighest safety level for safety relays (PL e according toEN ISO 13849-1).Two channel withconcurrency requirement of0,5 sSupervised resetTest inputWidth 45 mmLED indication for supply,inputs <strong>and</strong> outputs3 NO/1NC relay outputsSupply 24 VDC, 24, 48, 115or 230 VACQuick release connectorblocksRegulations <strong>and</strong> st<strong>and</strong>ards<strong>The</strong> JSBR4 is designed <strong>and</strong> approved in accordance withappropriate directives <strong>and</strong> st<strong>and</strong>ards. See technical data.<strong>The</strong> JSBR4 complies with the highest safety level for theconnection of a two-h<strong>and</strong> device of type IIIc in accordancewith EN 574.Connection examplesFor examples of how our safety relays can solve various safetyproblems, please see the section “Connection examples”.6:20<strong>ABB</strong>
Technical data – JSBR4Manufacturer<strong>ABB</strong> AB/<strong>Jokab</strong> <strong>Safety</strong>, SwedenArticle number/Ordering data24 DC 2TLA010002R000024 AC 2TLA010002R0200115 AC 2TLA010002R0400230 AC 2TLA010002R0500ColourBlack <strong>and</strong> beigePower supply 24 VDC ± 15%24/48/115/230 VAC ± 15%, 50 -60 HzPower consumptionRelay OutputsMax. switching capacityResistive load ACInductive load ACResistive load DCInductive load DCMax. res. load total switchingcapacity:Min. loadContact materialFuses Output (External)1,3 W/3,3 VA3 NO + 1 NC6A/250 VAC/1500 VAAC15 240VAC 2A6A/24 VDC/150 WDC13 24VDC 1A12A distributed on all contactsTechnical description – JSBR410mA/10 V (if load on contact hasnot exceeded 100 mA)Ag + Au flash5A gL/gGConditional short-circuit current(1 kA) 6A gGMax. Input wire res. at nom.voltageResponse time at deactivation300 Ohm (S13 - S14 <strong>and</strong> S23 -S24)< 20 ms (145 ms at power loss)Terminals(Max. screw torque 1 Nm)Single str<strong>and</strong>: 1 x 2,5 mm 2 /2 x 1 mm 2 .Conductor with socket contact: 1 x 4 mm 2 /2 x 1,5 mm 2 .Mounting35 mm DIN-railProtection class enclosure/terminals IP 40/20 IEC 60529Operating temperature rangeImpulse Withst<strong>and</strong> VoltagePollution Degree 2-10°C to +55°C (with no icing orcondensation)2.5kVOperating humidity range 35% to 85%LED indicationWeightValues(With Proof test interval 1 year)Conformity4512074mmElectrical Supply, Inputs, Outputs350 g (24 VDC),460 g (24-230 VAC)<strong>Safety</strong> Category 4 according toEN 954-1, PL e, SIL 3,PFH d1.35E-082006/42/EC, 2006/95/EC,2004/108/ECEN 954-1:1996, EN 62061:2005EN ISO 13849-1:2008Connector blocks are detachable(without cables having to bedisconnected)123456Prot.circ.Reset & Supervision circ.* Only for AC-supply<strong>The</strong> electrical supply is connected acrossA1 <strong>and</strong> A2. After Voltage reduction <strong>and</strong>Rectification (AC-versions) or reverse polarityprotection (DC-version) there is an overloadprotection-circuit.When the inputs S13-S14 <strong>and</strong> S23-S24have closed <strong>and</strong> the reset is made, the relaysK1 <strong>and</strong> K2 are activated.A dual stop signal is given when K1 <strong>and</strong>Electrical connection – JSBR4*K2 drop, due to short circuiting betweenthe inputs, opening of the inputs or powerfailure. If one input is opened the other inputmust also be opened for K1 <strong>and</strong> K2 to beactivated again.<strong>The</strong> monitoring circuit checks K1 <strong>and</strong> K2 <strong>and</strong>that the reset circuit to X2 is both closed <strong>and</strong>opened before K1 <strong>and</strong> K2 are energized. Boththe stop <strong>and</strong> reset function therefore complywith the requirement that a component fault,short circuit or external interference do notresult in a dangerous function.<strong>The</strong> safety outputs consist of contactsfrom K1 <strong>and</strong> K2 connected internally inseries across terminals 13 - 14, 23 -24 <strong>and</strong>33 - 34. <strong>The</strong>se contacts are used to cutthe power to components which stop orprevent hazardous movements/functions.It is recommended that all switched loadsare adequately suppressed <strong>and</strong>/or fused inorder to provide additional protection for thesafety contacts.Note: Output 41-42 is intended for indicationpurposes only, e.g. gate opened.No load between S14 <strong>and</strong> S24 allowed.7891011Emergency stop with manual resetting.Interlocked gate with manual reset.Contact mat/strip with manual reset.12<strong>ABB</strong>Two h<strong>and</strong> device with buttons in separateor same enclosure. Buttons to be pressedin within 0.5 s of each other. Footpedalswitches can be connected in the sameconfiguration.Enabling device, JSHD4. Stop conditionis given in both top <strong>and</strong> bottom PBpositions.Control <strong>and</strong> supervision of external conductor,relay, valve or <strong>ABB</strong> <strong>Jokab</strong> <strong>Safety</strong>’sexpansion relays.6:211314
<strong>Safety</strong> relayJSBT4Approvals:TÜV Nord<strong>Safety</strong> relay for:Emergency stopsThree position devicesInterlocked Hatches<strong>Safety</strong> matsContact stripsFoot operated switchesFeatures:<strong>Safety</strong> relay with synchronised dual input channels(within 0.5s)<strong>The</strong> JSBT4 has two inputs, both of which have to beclosed in order to keep the safety output contacts closed.A short circuit between inputs A <strong>and</strong> B will cause the outputcontacts to open. <strong>The</strong> inputs can be continuously shortcircuited without damaging the safety relay.For the outputs to close, the test input must be closed.<strong>The</strong> test input is intended to monitor that contactors orvalves have dropped/returned before a new start is permitted.This test input must not be confused with the reset functionrequired for gates that a person can walk through <strong>and</strong>where there is a high safety requirement (see JSBR4).If the JSBT4 is used for safety Mats <strong>and</strong> safety Strips,the "stop" condition is given following detection of a shortcircuit. <strong>The</strong> safety mat, safety strip or the relay will not bedamaged by a continuous short-circuit. This also providesthe advantage that if there is a failure between inputs A<strong>and</strong> B in the installation, the safety relay will not be damaged.<strong>Safety</strong> level<strong>The</strong> JSBT4 has a twin supervised safety function. Componentfailure, short-circuit or external disturbance (e.g. lossof power supply) will not prevent the safe function of therelay. <strong>Safety</strong> category level 3 or 4, depending on use.<strong>The</strong> true two-channel safety function has the advantagethat the cabling installation dem<strong>and</strong>s for safety can be reduced,due to the fact that a short-circuit between the inputswill directly open the relay's safety outputs.Dual input channelssynchronism 0.5 sTest inputWidth 45 mmLED indications for poweron, inputs <strong>and</strong> outputs3 NO/1NC relay outputsSupply 24 VDC, 24, 48, 115or 230 VACQuick release connectorblocksRegulations <strong>and</strong> st<strong>and</strong>ards<strong>The</strong> JSBT4 is designed <strong>and</strong> approved in accordance withappropriate directives <strong>and</strong> st<strong>and</strong>ards. See technical data.Connection examplesFor examples of how our safety relays can solve various safetyproblems, please see the section “Connection examples”.6:22 <strong>ABB</strong>
Technical data – JSBT4ManufacturerTechnical description – JSBT4Prot.circ.Reset & Supervision circ.<strong>The</strong> electrical supply is connected acrossA1 <strong>and</strong> A2. After Voltage reduction <strong>and</strong>Rectification (AC-versions) or reverse polarityprotection (DC-version) there is an overloadprotection-circuit.When the inputs S13-S14 <strong>and</strong> S23-S24are closed within 0.5 seconds of each otherthe relays K1 <strong>and</strong> K2 are energized . A dualstop signal is given, K1 <strong>and</strong> K2 de-energize,when there is a short circuit between or anopening of the inputs or at power loss. If oneElectrical connection – JSBT4*<strong>ABB</strong> AB/<strong>Jokab</strong> <strong>Safety</strong>, SwedenArticle number/Ordering data24 DC 2TLA010004R0000ColourGreyPower supply 24 VDC ± 15%24/48/115/230VAC ± 15%,50 - 60 HzPower consumptionRelay OutputsMax. switching capacityResistive load ACInductive load ACResistive load DCInductive load DCMax. res. load total switchingcapacity:Min. loadContact materialFuses Output (External)1.6 W/3.8 VA3 NO + 1 NC6A/250 VAC/1500 VAAC15 240VAC 2A6A/24 VDC/150 WDC13 24VDC 1A12A distributed on all contacts10mA/10 V (if load on contact hasnot exceeded 100 mA)Ag + Au flash5A gL/gGConditional short-circuit current(1 kA) 6A gGMax. Input wire res. at nom.voltageResponse time at deactivation300 Ohm (S13 - S14 <strong>and</strong> S23 -S24)< 20 ms, 145 ms with switchedsupply/power loss*Only for AC-supplyinput is opened the other one also has to beopened in order to activate K1 <strong>and</strong> K2 again.<strong>The</strong> test circuit, X1 - X2,has to be closed inorder to activate the outputs, thereafter thetest circuit can be opened or closed continously.If the test circuit is closed after theinputs there is no requirement to close themwithin 0.5 seconds of each other.<strong>The</strong> internal supervision circuit monitorsthe two Inputs <strong>and</strong> relays K1, K2. <strong>The</strong> stopfunction then fulfils the requirement that oneTerminals(Max. screw torque 1 Nm)Single str<strong>and</strong>: 1 x 4 mm 2 /2 x 1,5 mm 2Conductor with socket contact: 1 x 2,5 mm 2 /2 x 1 mm 2Mounting35 mm DIN-railProtection class enclosure/terminals IP 40/20 IEC 60529Operating temperature rangeImpulse Withst<strong>and</strong> VoltagePollution Degree 2-10°C to +55°C (with no icing orcondensation)2.5kVOperating humidity range 35% to 85%LED indicationWeightValues(With Proof test interval 1 year)Conformity4512074mmElectrical Supply, Inputs, Outputs350 g (24VDC),460 g (24-230VAC)<strong>Safety</strong> Category 4 according to EN954-1, PL e, SIL 3, PFH d1.51E-082006/42/EC, 2006/95/EC,2004/108/ECEN 954-1:1996, EN 62061:2005EN ISO 13849-1:2008Connector blocks are detachable(without cables having to bedisconnected)failure (short circuit, component, externaldisturbance) shall not prevent the safe functionof the JSBT4.<strong>The</strong> safety outputs consist of contactsfrom K1 <strong>and</strong> K2 connected internally inseries across terminals 13 - 14, 23 -24 <strong>and</strong>33 - 34. <strong>The</strong>se contacts are used to cutthe power to components which stop orprevent hazardous movements/functions.It is recommended that all switched loadsare adequately suppressed <strong>and</strong>/or fused inorder to provide additional protection for thesafety contacts.<strong>The</strong> NC output 41 - 42 should only be usedfor monitoring purposes e.g. Indication lampor PLC input etc. <strong>The</strong> output contacts areclosed until the module is reset.Note: Output 41-42 is intended for indicationpurposes only, e.g. gate opened. No loadbetween S14 <strong>and</strong> S24 allowed.12345678910TESTTESTTEST11Emergency stop with automatic resetting. Interlocked hatch with automatic resetting. Contact mat/strip with automatic resetTESTTESTTESTLOAD12Monitoring to ensure that the Start buttoncannot stick in pressed position. Shortcircuiting over the closing contact is notmonitored. <strong>The</strong> RT-series <strong>and</strong> JSBR4 havebuilt in short circuiting monitored re setting.Enabling device, JSHD4. Stop conditionis given in both top <strong>and</strong> bottom positions.Control <strong>and</strong> supervision of external contactor,relay, valve or <strong>ABB</strong> <strong>Jokab</strong> <strong>Safety</strong>’s expansionrelays.13<strong>ABB</strong>6:2314
<strong>Safety</strong> relay/expansion relayBT50(T)Approvals:TÜV Nord<strong>Safety</strong> relay for:Emergency stopInterlocked hatchExpansion of PlutoFeatures:<strong>Safety</strong> relay/expansion relay to Pluto<strong>The</strong> BT50 is designed to connect safety devices, such asemergency stops, directly in the voltage supply circuit tothe relay. Despite a maximum built-in width of 22.5 mm therelay is very powerful.With 3NO safety outputs, 1NC output (for monitoringpurposes), a test input <strong>and</strong> complete internal supervision,the BT50 is quite unique. In addition, delayed outputs(BT50T) can be ordered.In order for the safety outputs to close, the supply voltage,e.g. by means of an emergency stop button, must beconnected to A1 <strong>and</strong> A2 <strong>and</strong> the test input closed. Afteractuation of the relay the test input can be opened again.<strong>The</strong> test input is intended to supervise that contactorsor valves have dropped/returned before a new start canbe permitted.<strong>The</strong> test input can also be used for starting<strong>and</strong> the start button can be supervised (see the connectionexample on the next page).More outputsBy connecting a BT50 to a safety relay/PLC it is easy toincrease the number of safe outputs. This means that anunlimited number of dangerous machine operations <strong>and</strong>functions can be stopped by using just one safety-PLC.<strong>Safety</strong> levelBT50 have an internal redundant <strong>and</strong> monitored safetyfunction. Power failure, internal component faults or externalinterference cannot result in dangerous functions.Input via A1 on its own is not protected from shortSingle <strong>and</strong> “dual” channelTest/"reset" inputWidth 22.5 mmLED indication3 NO/1NC relay outputsSupply 24 VDCQuick release connectorblocksBT50 - Additional powerterminalsBT50T - One changeoverrelay with a double informationoutput (Y14)BT50T - Delay times selectablefrom 0 - 1.5 scircuiting, <strong>and</strong> therefore installation is critical for the safetylevel to be achieved. To achieve a higher safety level ascreened cable can be used <strong>and</strong>/or connection made toboth A1 <strong>and</strong> A2 (see the example on the next page).Regulations <strong>and</strong> st<strong>and</strong>ards<strong>The</strong> BT50 is designed <strong>and</strong> approved in accordance withappropriate directives <strong>and</strong> st<strong>and</strong>ards. See technical data.Connection examplesFor examples of how our safety relays can solve varioussafety problems, please see the chapter “Connectionexamples”.6:24 <strong>ABB</strong>
Technical data – BT50(T)ManufacturerArticle number/Ordering dataBT50BT50TColourTechnical description – BT50(T)Supervision circuitWhen supply voltage is connected to A1<strong>and</strong> A2, relays K1 <strong>and</strong> K2 are activated. K1<strong>and</strong> K2 drop if the supply voltage is disconnected.Both relays K1 <strong>and</strong> K2 must drop forthem to be activated again. Another requirementis that the test circuit, A1 - X4, mustbe closed for the outputs to be activated.<strong>The</strong>reafter A1 - X4 can either be open orconstantly closed.<strong>The</strong> supervising circuit ensures that bothK1 <strong>and</strong> K2 have dropped before they canbe reactivated. <strong>The</strong> stop function complieswith the requirement that a component fault<strong>ABB</strong> AB/<strong>Jokab</strong> <strong>Safety</strong>, Sweden2TLA010033R00002TLA010033R1000Black <strong>and</strong> beigeOperational voltage 24 VDC + 15%/-25%Power consumptionRelay OutputsMax. switching capacityResistive load ACInductive load ACResistive load DCInductive load DCMax. res. load total switchingcapacity:Min. loadContact materialFuses Output (External)1,4 W/1,8 W3 NO + 1 NC6A/250 VAC/1500 VAAC15 240VAC 2A6A/24 VDC/150 WDC13 24VDC 1A12A distributed on all contacts10mA/10 V(if load on contact hasnot exceeded 100 mA)Ag + Au flash5A gL/gGConditional short-circuit current(1 kA) 6A gGMax Input Wire res. at nom.voltageResponse time at deactivation(input - output)200 OhmsVersion B
<strong>Safety</strong> relay/expansion relayBT51(T)Approvals:TÜV Nord<strong>Safety</strong> relay for:Emergency stopInterlocked hatchExpansion of PlutoFeatures:<strong>Safety</strong> relay/expansion relay to Pluto<strong>The</strong> BT51 is designed to connect safety devices, such asemergency stops, directly in the voltage supply circuit tothe relay. Despite a maximum built-in width of 22.5 mm therelay is very powerful.With 4 NO safety outputs, test input <strong>and</strong> complete internalsupervising, the BT51 is quite unique. In additionyou can order delayed outputs (BT51T).In order for the safety outputs to close, the supply voltage,e.g. by means of an emergency stop button, must beconnected to A1 <strong>and</strong> A2 <strong>and</strong> the test input closed. Afteractuation of the relay the test input can be opened again.<strong>The</strong> test input is intended to supervise that contactorsor valves have dropped/returned before a new start canbe permitted.<strong>The</strong> test input can also be used for starting<strong>and</strong> the start button can be supervised (see connectionexample on next page).Single <strong>and</strong> “dual” channelTest/"reset" inputWidth 22.5 mmLED indication4 NO relay outputsSupply 24 VDCQuick release connectorblocksBT51 - Additional powerterminalsBT51T - One changeoverrelay with a double informationoutput (Y14)BT51TDelay times selectable from0 - 1.5 sMore outputsBy connecting BT51 to a safety relay/PLC it is easy toincrease the number of safe outputs. This means that anunlimited number of dangerous machine operations <strong>and</strong>functions can be stopped from one safety relay/PLC.<strong>Safety</strong> levelBT50 have an internal redundant <strong>and</strong> monitored safetyfunction. Power failure, internal component faults or externalinterference cannot result in dangerous functions.Input via A1 only is not protected from short circuiting,<strong>and</strong> therefore installation is critical for the safety level to beachieved. To achieve a higher safety level a screened cablecan be used <strong>and</strong>/or connection made to both A1 <strong>and</strong>A2 (see example overleaf).Regulations <strong>and</strong> st<strong>and</strong>ards<strong>The</strong> BT51 is designed <strong>and</strong> approved in accordance withappropriate directives <strong>and</strong> st<strong>and</strong>ards. See technical data.Connection examplesFor examples of how our safety relays can solve various safetyproblems, please see the chapter “Connection examples”.6:26 <strong>ABB</strong>
Technical data – BT51(T)Conductor with socket contact: 2x1mm 2 22,5Mounting 35 mm DIN-railManufacturer<strong>ABB</strong> AB/<strong>Jokab</strong> <strong>Safety</strong>, SwedenProtection class enclosure/terminals IP 40/20 IEC 60529Article number/Ordering dataBT512TLA010033R2000Impulse Withst<strong>and</strong> Voltage 2.5kVBT51T2TLA010033R3000Pollution Degree 2ColourGreyOperating temperature range -10°C to +55°C (with no icing orOperational voltage 24 VDC + 15%/-25%condensation)Power consumption1.4 W/1.8 WOperating humidity range 35% to 85%Relay Outputs4 NOLED indicationElectrical Supply, Relay <strong>and</strong> X4Max. switching capacityWeight200 gResistive load AC6A/250 VAC/1500 VAPerformance (max.)Category 4/PL e (EN ISO 13849-Inductive load ACAC15 240VAC 2AResistive load DC6A/24 VDC/150 WFunctional test: <strong>The</strong> relays must be 1:2008)Inductive load DCDC13 24VDC 1Acycled at least once a year. SIL 3 (EN 62061:2005)PFHMax. res. load total switchingd1.63E-08capacity:12 A distributed on all contacts Conformity2006/42/EC, 2006/95/EC,Min. load10mA/10 V (if load on contact has2004/108/ECnot exceeded 100 mAEN 954-1:1996, EN 62061:2005EN ISO 13849-1:2008Contact materialAg + Au flashFuses Output (External) 5A gL/gGConditional short-circuit current120(1 kA) 6A gGMax Input Wire res. at nom.voltage200 OhmsConnector blocks are detachable84Response time at deactivation
<strong>Safety</strong> relayJSBT5(T)Approvals:TÜV Nord<strong>Safety</strong> relay for:Emergency stopInterlocked hatchFeatures:Single <strong>and</strong> “dual” channelTest/start inputWidth 22.5 mmLED indication3 NO/1NC relay outputs(T) = delayed outputs0.5 sec.Supply 12 VDC, 24 VDC/ACSingle channel safety relay<strong>The</strong> JSBT5 is designed to connect safety devices, such asemergency stops, directly in the voltage supply circuit tothe relay. Despite a maximum built-in width of 22.5 mm therelay is very powerful.With 3 NO safety outputs, 1 NC, test input <strong>and</strong> completeinternal supervising, the JSBT5 is quite unique. In additionyou can order delayed outputs (JSBT5T).In order for the safety outputs to close, the supply voltage,e.g. by means of an emergency stop button, must beconnected to A1 <strong>and</strong> A2 <strong>and</strong> the test input closed. Afteractuation of the relay the test input can be opened again.<strong>The</strong> test input is intended to supervise that contactorsor valves have dropped/returned before a new start canbe permitted.<strong>The</strong> test input can also be used for starting<strong>and</strong> the start button can be supervised (see connectionexample on next page).<strong>Safety</strong> level<strong>The</strong> JSBT5 has a twin <strong>and</strong> supervised internal safety function.Power failure, internal component faults or externalinterference cannot result in dangerous functions.Input via A1 only is not protected from short circuiting,<strong>and</strong> therefore installation is critical for the safety level to beachieved. To achieve a higher safety level a screened cablecan be used <strong>and</strong>/or connection made to both A1 <strong>and</strong>A2 (see example overleaf).Regulations <strong>and</strong> st<strong>and</strong>ards<strong>The</strong> JSBT5 is designed <strong>and</strong> approved in accordance withappropriate directives <strong>and</strong> st<strong>and</strong>ards. See technical data.Connection examplesFor examples of how our safety relays can solve various safetyproblems, please see the section “Connection examples”.6:28<strong>ABB</strong>
Technical data – JSBT5(T)ManufacturerArticle number/Ordering dataJSBT5 24 AC/DCJSBT5 12 VDCJSBT5T 24 AC/DCColour<strong>ABB</strong> AB/<strong>Jokab</strong> <strong>Safety</strong>, Sweden2TLA010005R01002TLA010005R07002TLA010005R1100GreyOperational voltageJSBT5:24 VDC/AC + 15%–25%, 50–60 HzJSBT5T: 12 VDC, 24 VDC/AC + 15% –25%, 50 - 60 HzPower consumptionRelay OutputsMax. switching capacityResistive load ACInductive load ACResistive load DCInductive load DCMax. res. load total switchingcapacity:Min. loadContact materialFuses Output (External)1 W/1.9 VA3 NO + 1 NC6A/250 VAC/1500 VAAC15 240VAC 2A6A/24 VDC/150 WDC13 24VDC 1A9A distributed on all contacts10mA/10 V (if load on contact hasnot exceeded 100 mA)AgCuNi5A gL/gGConditional short-circuit current(1 kA) 6A gGMax Input Wire res. at nom.voltageResponse time at deactivation200 Ohm
<strong>Safety</strong> timerJSHT1Approvals:TÜV Nord<strong>Safety</strong> timer for:Time resetTime bypassingFeatures:<strong>The</strong> JSHT1A/B closes two independent relay outputsduring a guaranteed maximum time when the inputsare opened.Time resetTime reset can prevent uni ntentional reset of safety systemswhen someone is still in the dangerous area of themachine. During a guaranteed maximum time, one or severalPB´s for reset must be activated. <strong>The</strong> reset buttonsshould be sited in such a way that operatives have a clearoverview of the whole area which is guarded. Time resetis made by the combi nation of a safety relay <strong>and</strong> the timerrelay JSHT1A/B.Hardwire time selection5 – 40 sSelectable single or dualchannel inputTest inputWidth 45 mmLED indication for supply,inputs <strong>and</strong> outputs1+1 NO relay outputsSupply 24 VDC, 24, 48, 115or 230 VACQuick release connectorblocksConnection examplesFor examples of how our safety relays can solve various safetyproblems, please see the section “Connection examples”.Time bypassing<strong>The</strong> JSHT1 can also be used for time bypass of lightbeams for e.g. autotruck into a dangerous area.OperationWhen the inputs open the output contacts close. <strong>The</strong> outputcontacts open when the inputs close or when the timeperiod has expired. <strong>The</strong> time period is hardwire selectableon terminals T1, T2 <strong>and</strong> T3. <strong>The</strong> time given is the maximumtime. One or two channel operation is also hardwire selectable.Regulations <strong>and</strong> st<strong>and</strong>ards<strong>The</strong> JSHT1A/B is designed <strong>and</strong> approved in accordance withappropriate directives <strong>and</strong> st<strong>and</strong>ards. See technical data.Light beam being bypassedfor a maximum pre-set timee.g. 5 sec. by the JSHT1during entrance <strong>and</strong> exit withthe JSHD4 Three PositionEnabling device.Time reset procedure. First pushPB1, then exit dangerous area <strong>and</strong>close the door, then push PB2(PB1 <strong>and</strong> PB2 must be pressedwithin the predetermined time periodselected). After this procedurethe machine can be safely restarted.216:30 <strong>ABB</strong>
Technical data – JSHT1 A/BManufacturerArticle number/Ordering dataJSHT1A 24 DCJSHT1B 24 DCColour<strong>ABB</strong> AB/<strong>Jokab</strong> <strong>Safety</strong>, Sweden2TLA010011R00002TLA010011R1000GreyPower supply 24 VDC ± 15 %,24/48/115/230 VAC ± 15 %,50 - 60 Hz (AC versions JSHT1Aonly)Power consumptionMax Input Wire res. at nomvoltage/channelResponse time at activationResponse time at deactivationSelectable time(± 15 % at nom. V.)Relay outputsMax. switching capacityResistive load ACInductive load ACResistive load DCInductive load DCMax. total switching capacity:Min. loadContact materialFuses Output (External)1.8 W/3.7 VA100/200 Ohm (1 Channel/2 Channel)
<strong>Safety</strong> timerJSHT2Approvals:TÜV Nord<strong>Safety</strong> relay for:Time bypassingInchingFeatures:<strong>The</strong> JSHT2A/B/C closes two independent relay outputsduring a guaranteed maximum period of time whenthe inputs are closed.Hardwire time selection0.2 – 40 sSelectable single or dualchannel inputTest inputWidth 45 mmLED indication for supply,inputs <strong>and</strong> outputs1+1 NO relay outputsSupply 24 VDC, 24, 48, 115or 230 VACQuick release connectorblocksTime bypassingSensors detect the autocarrier <strong>and</strong> are connected to theJSHT2 which supervises the sensors <strong>and</strong> by pas ses thelight beam for a maximum predeter mined time.InchingInching applications require safety outputs to be closedfor a predetermined maximum period of time, allowing themachine to move only a short distance each time the inchingcontrol is activated. For each new motion the inchingcontrol e.g. PB or pedal must be released <strong>and</strong> activatedagain.Connection examplesFor examples of how our safety relays can solve various safetyproblems, please see the section “Connection examples”.OperationWhen the inputs close the output contacts close. <strong>The</strong> outputcontacts open when the input opens or when the timeperiod has expired. <strong>The</strong> time is hardwire selectable on theterminals T1, T2 <strong>and</strong> T3. <strong>The</strong> time given is the maximumtime. Single or dual channel operation is also hardwire selectable.Regulations <strong>and</strong> st<strong>and</strong>ards<strong>The</strong> JSHT2A/B/C is designed <strong>and</strong> approved in accordancewith appropriate directives <strong>and</strong> st<strong>and</strong>ards. See technical data.Light beam being bypassedonly for the time it takes theautocarrier to pass.Shaft only turns a smallamount each time the PB ispressed.6:32 <strong>ABB</strong>
Technical data – JSHT2 A/B/CManufacturerArticle number/Ordering dataJSHT2A 24 DCJSHT2B 24 DCJSHT2C 24 DCColour<strong>ABB</strong> AB/<strong>Jokab</strong> <strong>Safety</strong>, Sweden2TLA010012R00002TLA010012R10002TLA010012R2000GreyPower supply 24 VDC ± 15 %24/48/115/230 VAC ± 15 %, 50 - 60 HZPower consumptionMax Input Wire res. at nomvoltage/channelResponse time at activationResponse time at deactivationSelectable time(± 15 % at nom. V.)Relay outputsMax. switching capacityResistive load ACInductive load ACResistive load DCInductive load DCMax. total switching capacity:Min. loadContact materialFuses Output (External)Max Input Wire res. at nom.voltage1.8 W/3.8 VA100/200 Ohm (1 Channel/2 Channel)< 30 ms< 15 msJSHT2A: 0.2 - 0.5 - 0.7 - 1.0 secJSHT2B: 5 - 10 - 15 - 20 secJSHT2C: 5 - 15 - 30 - 40 sec2 x 1 NO4A/250 VAC/1000 VAAC15 250VAC 3A4A/24 VDC/100 WDC13 24VDC 2A8A distributed on all contacts10mA/10 V (if load on contact hasnot exceeded 100 mA)AgCuNi3A gL/gG or 4A fast100 OhmTechnical description – JSHT2 A/B/CTerminals (Max. screw torque1 Nm)Single str<strong>and</strong>: 1 x 4 mm 2 or 2 x 1,5 mm 2Conductor with socket contact: 1 x 2,5 mm 2 or 2 x 1 mm 2Mounting35 mm DIN-railProtection class enclosure/terminals IP 20/IP 40 IEC 60529Impulse Withst<strong>and</strong> VoltagePollution Degree 2Operating temperature range2.5kVOperating humidity range 35% to 85%LED indicationWeightPerformance (max.)Functional test: <strong>The</strong> relays must becycled at least once a year.Conformity4512074mm–10°C to +55°C (with no icing orcondensation)Electrical Supply, Inputs, Outputs24 VDC: 310 g24/48/115/230 VAC: 410 g.<strong>Safety</strong> Category 4/PL e (EN ISO13849-1:2008)SIL 3 (EN 62061:2005)PFH d4.42E-092006/42/EC, 2006/95/EC,2004/108/ECEN 954-1:1996, EN 62061:2005EN ISO 13849-1:2008Connector blocks are detachable(without cables having to be disconnected)1234567Connection <strong>and</strong>monitoring circuitTimer8**<strong>The</strong> electrical supply is connected acrossA1 <strong>and</strong> A2. <strong>The</strong> internal supervising circuit isactivated directly when the supply is on. <strong>The</strong>inputs A <strong>and</strong> B must both be opened <strong>and</strong>then closed. <strong>The</strong>reafter K1 <strong>and</strong> K2 are activated<strong>and</strong> the outputs close. K1 <strong>and</strong> K2are activated for hardwired selected time** Only for AC-supply.(set by connections on the terminals T1,T2 <strong>and</strong> T3). If there is a short circuit betweenthe inputs or the inputs are openedagain before the set time period has expiredthe outputs will open. In order to closethe outputs again both the inputs have tobe opened <strong>and</strong> both internal relays K1 <strong>and</strong>K2 deactivated (controlled by the supervisingcircuit) <strong>and</strong> then the inputs closedagain.By external hardwire connectors theJSHT2 can be made to operate fromeither single or dual channel inputs. Seefigure below.910Electrical connection – JSHT2 A/B/CConnection for single channel inputConnection for dual channel input1112<strong>ABB</strong>Selection of time by hardwire linksJSHT2A JSHT2B JSHT2C* It is recommended that all switched loads areadequately suppressed <strong>and</strong>/or fused in orderto provide additional protection for the safetycontacts. In the figure the monitoring of twocontactors in the test input is shown.6:331314
Expansion relayE1TApprovals:TÜV NordExpansion relay with:More safety outputsDelayed safety outputsFeatures:Width 22.5 mmSupply 24 VDCLED output indication4 NO relay outputsSingle or dual channeloperation optionQuick release connectorblocksMore outputsBy connecting expansion relays to a safety relay it is easyto increase the number of safe outputs. This means thatan unlimited number of dangerous machine operations<strong>and</strong> functions can be stopped from one safety relay.Safe soft stopWhen a gate is opened a program stop is first given to themachine’s PLC/servo which brakes the dangerous operationsin a soft <strong>and</strong> controlled way. <strong>The</strong> safety outputs thenbreak the power to the motors, that is, when the machinehas already stopped. Normally between 0.5 <strong>and</strong> 1 secondis needed to brake a dangerous machine operation softly.Soft stop ensures many advantages:• <strong>The</strong> machine lasts longer.• Parts being processed are not damaged.• Restart from stopped position is enabled <strong>and</strong> simplified.A safe soft stop is achieved by means of a safety relaywhich gives the program stop, <strong>and</strong> an expansion relay,E1T, which gives safe delayed stop signals. See section”Connection examples”. <strong>The</strong> drop time delay on a E1T canas st<strong>and</strong>ard be selected from 0 to 3 seconds. By connectingseveral E1T´s in series even longer times can be achieved.When are delayed safe stops used?Delayed safety stop signals can be used for emergencystops according to EN ISO 13850:2008 § 4.1.4.Stop category 1, i.e. a controlled stop with power to theactuator(s) available to achieve the stop <strong>and</strong> then removalof power when stop is achieved.Stop category 1 may also be permitted when it is notpossible to gain physical access to the machine beforethe safe stop is affected e.g:• Gates, access time is normally over 1 sec.• Covers <strong>and</strong> gates which are locked until dangerousoperations <strong>and</strong> functions have been stopped.• Long distances between a safety device <strong>and</strong> adangerous machine function.<strong>Safety</strong> level<strong>The</strong> E1T has twin stop functions, that is, two relays withmechanically operated contacts. A monitored stop functionis achieved by con necting the test output (terminalsX1 <strong>and</strong> X2) to the test or reset input on the safety relaywhich is being exp<strong>and</strong>ed.One condition for a safe delayed stop is that the delaytime cannot increase in the event of a fault. <strong>The</strong> E1T complieswith this requirement.Regulations <strong>and</strong> st<strong>and</strong>ards<strong>The</strong> E1T is designed <strong>and</strong> approved in accordance withappropriate directives <strong>and</strong> st<strong>and</strong>ards. See technical data.Connection examplesFor examples of how our safety relays can solve various safetyproblems, please see the section “Connection examples”.6:34 <strong>ABB</strong>
Technical data – E1TManufacturerArticle number/Ordering dataE1T 0 s 24DCE1T 0,5 s 24DCE1T 1 s 24DCE1T 1,5 s 24DCE1T 2 s 24DCE1T 3 s 24DCColourTechnical description – E1T<strong>The</strong> E1T has to be connected to a safetyrelay in order to fulfill the necessary safetyrequirements (see connection examplesbelow). <strong>The</strong> safety relay controls <strong>and</strong> monitorsthe E1T (<strong>The</strong> E1T can be connectedfor single or dual channel operation - seebelow). When the inputs S14 <strong>and</strong> S24Electrical connection – E1T<strong>ABB</strong> AB/<strong>Jokab</strong> <strong>Safety</strong>, Sweden2TLA010030R00002TLA010030R10002TLA010030R20002TLA010030R30002TLA010030R40002TLA010030R5000GreyOperational voltage 24 VDC ± 15%Power consumptionRelay OutputsMax. switching capacityResistive load ACInductive load ACResistive load DCInductive load DCMax. total switching capacityMin. switching loadContact materialFuses Output (External)Conditional short-circuitcurrent (1 kA)1.5 W4 NO6A/250VAC/1500VAAC15 240VAC 2A6A/24VDC/150WDC13 24VDC 1A12A distributed on all contacts10 mA/10 V (if load on contact hasnot exceeded 100 mA)Ag + Au flash5A gL/gG6A gGMaximum external resistanceat a nominal voltage 150 Ohm (S14, S24)Response time at deactivation(input - output)< 0,020 s, 0,5 s, 1 s, 1,5 s, 2 s,3 s, ± 20%Response time at activation(input-output)close, relays K1 <strong>and</strong> K2 are activated. A stopsignal is given, K1 <strong>and</strong> K2 drop, if the inputsare opened or during power failure. K1 <strong>and</strong>K2 drop either directly or after a delay* (ifincorporated). Delay time of module is fixed<strong>and</strong> shown on front panel of device. <strong>The</strong> delaycircuit is so arranged that the design timecannot be exceeded.To check that both the relays K1 <strong>and</strong> K2
Expansion relayJSR1TApprovals:TÜV NordExpansion relay with:More safe outputsDelayed safe outputsInformation outputFeatures:Width 45 mmSupply 24 VDCLED function indication4 NO/1 NC relay outputsSingle <strong>and</strong> dual channelQuick release connectorblocksMore outputsBy connecting expansion relays to a safety relay it is easyto increase the number of safe outputs. This means that anunlimited number of dangerous machine operations <strong>and</strong>functions can be stopped from one safety relay.Safe soft stopWhen a gate is opened a program stop is first given to themachine’s PLC/servo which brakes the dangerous operationsin a soft <strong>and</strong> controlled way. <strong>The</strong> safety outputs thenbreak the power to the motors, that is, when the machinehas already stopped. Normally between 0.5 <strong>and</strong> 1 secondis needed to brake a dangerous machine operation softly.Soft stop ensures many advantages:• <strong>The</strong> machine lasts longer.• Parts being processed are not damaged.• Restart from stopped position is enabled <strong>and</strong>simplified.A safe soft stop is achieved by means of a safety relaywhich gives the program stop, <strong>and</strong> an expansion relay, JS-R1T, which gives safe delayed stop signals. See section”Connection examples”. <strong>The</strong> drop time delay on a JSR1Tcan as st<strong>and</strong>ard be selected from 0 to 10 seconds. Byconnecting several JSR1T´s in series even longer timescan be achieved.When are delayed safe stops used?Delayed safety stop signals can be used for emergencystops according to EN418 § 4.1.4 Stop category 1, i.e. acontrolled stop with power to the actuator(s) available toachieve the stop <strong>and</strong> then removal of power when stop isachieved.Stop category 1 may also be permitted when it is notpossible to gain physical access to the machine before thesafe stop is affected e.g:• Gates, access time is normally over 1 sec.• Covers <strong>and</strong> gates which are locked until dangerousoperations <strong>and</strong> functions have been stopped.• Long distances between a safety device <strong>and</strong> adangerous machine function.<strong>Safety</strong> level<strong>The</strong> JSR1T has twin stop functions, that is, two relays withmechanically operated contacts. A monitored stop functionis achieved by con necting the test output (terminals X1<strong>and</strong> X2) to the test or reset input on the safety relay whichis being exp<strong>and</strong>ed.One condition for a safe delayed stop is that the delaytime cannot increase in the event of a fault. <strong>The</strong> JSR1Tcomplies with this requirement.Regulations <strong>and</strong> st<strong>and</strong>ards<strong>The</strong> JSR1T is designed <strong>and</strong> approved in accordance withappropriate directives <strong>and</strong> st<strong>and</strong>ards. See technical data.Connection examplesFor examples of how our safety relays can solve various safetyproblems, please see the section “Connection examples”.6:36<strong>ABB</strong>
Technical data – JSR1TManufacturer<strong>ABB</strong> AB/<strong>Jokab</strong> <strong>Safety</strong>, SwedenArticle number/Ordering dataJSR1T 0 6 A 24 DC 2TLA010015R0000JSR1T 1,5 6 A 24 DC 2TLA010015R0500JSR1T 8 6 A 24 DC 2TLA010015R0600JSR1T 0,5 6 A 24 D 2TLA010015R1000JSR1T 10s 6 A 24 DC 2TLA010015R2000JSR1T 1 6 A 24 DC 2TLA010015R3000JSR1T 2 6 A 24 DC 2TLA010015R4000JSR1T 3 6 A 24 DC 2TLA010015R5000JSR1T 5 6 A 24 DC 2TLA010015R6000ColourGreyPower supply 24 VDC ±15%Power consumptionRelay OutputsMax. switching capacityResistive load ACInductive load ACResistive load DCInductive load DCMax. total switching capacity:Min. loadContact materialFuses Output (External)1.2 W4 NO + 1 NC6A/250 VAC/1500 VAAC15 240VAC 2A6A/24 VDC/150 WDC13 24VDC 1A16A distributed on all contacts10mA/10 V (if load on contact hasnot exceeded 100 mA)Ag + Au flash5A gL/gGConditional short-circuit current(1 kA) 6A gGMax. Input wire res. at nom.voltage 150 Ohm (S14, S24)Response time at deactivation(input- output)< 0,020 s, 0,5 s, 1 s, 1,5 s, 2 s, 3 s,5 s, 8 s, 10 s ± 20 %Terminals (Max. screw torque 1 Nm)Single str<strong>and</strong>: 1 x 2,5 mm 2 /2 x 1mm 2Conductor with socket contact: 1 x 4 mm 2 /2 x 1,5 mm 2Mounting35 mm DIN-railProtection class enclosure/terminals IP 40/20 IEC 60529Impulse Withst<strong>and</strong> VoltagePollution Degree 2Operating temperature range2.5kVOperating humidity range 35% to 85%LED indicationWeightPerformance (max.)Conformity4512074mm-10°C to +55°C (with no icing orcondensation)Output Relay Supplies280 gCategory 4/PL e(EN ISO 13849-1:2008)SIL 3 (EN 62061:2005)PFH d1.55E-08Functional test: <strong>The</strong> relays must becycled at least once a year2006/42/EC, 2006/95/EC,2004/108/ECEN 954-1:1996, EN 62061:2005EN ISO 13849-1:2008Connector blocks are detachable(without cables having to be disconnected)123456Technical description – JSR1T<strong>The</strong> JSR1T has to be connected to a safetyrelay in order to fulfill the necessary safetyrequirements (see connection examples below).<strong>The</strong> safety relay controls <strong>and</strong> monitorsthe JSR1T. (<strong>The</strong> JSR1T can be connectedfor single or dual channel operation - seebelow). When the inputs S14 <strong>and</strong> S24close, relays K1 <strong>and</strong> K2 are activated. A stopElectrical connection – JSR1Tsignal is given, K1 <strong>and</strong> K2 drop, if the inputsare opened or during power failure. K1 <strong>and</strong>K2 drop either directly or after a delay* (Ifincorporated). Delay time of module is fixed<strong>and</strong> shown on front panel of device. <strong>The</strong>delay circuit is so arranged that the designtime cannot be exceeded.To check that both the relays K1 <strong>and</strong>K2 drop during a stop signal they must bemonitored. This is achieved by connectingX1 <strong>and</strong> X2 to the test or reset input on thesafety relay which is exp<strong>and</strong>ed (see below).K1 <strong>and</strong> K2 are mechanically operated relays,therefore, if one of the output contacts shouldstick closed then the relay’s contact in X1-X2 cannot be closed thus preventing a newready signal being given to the safety relay.Inductive loads should be equipped withan arc suppressor to protect the outputcontacts.Diodes are the best arc suppressors butwill increase the switch off time of the load.78910SAFETY RELAY RT6SAFETY RELAY RT611PROGRAM STOP12Expansion of outputs for safety relay connectedto emergency stop with automaticreset.DELAYED SAFETY STOPDual-channel expansion with delayed safetyoutputs for safety relay monitoring a gate.<strong>ABB</strong> 6:371314
Expansion relayJSR2AApprovals:TÜV NordExpansion relay with:More safe outputsGreater current switchingcapacityInformation outputFeatures:More outputs<strong>The</strong> JSR2A expansion relay is used to provide increasedswitching capacity <strong>and</strong> number of safety outputs to a safetyrelay. This means that an unlimited number of dangerousmachine operations <strong>and</strong> functions can be stopped from onesafety relay.Switching capacity of up to10 A/250V per outputWidth 45 mmLED function indication4 NO/1 NC relay outputs5 supply versionsSupply 24 VDC/VAC, 48115 <strong>and</strong> 230 VACQuick release connectorblocksGreater current switching capacity<strong>The</strong> JSR2A Expansion relay enables switching of up to 10amps (AC/DC) per output contact.<strong>Safety</strong> level<strong>The</strong> JSR2A has twin stop functions, that is, two relays withmechanically positively guided contacts. A monitored stopfunction is achieved by connecting the test output (terminalsX1 <strong>and</strong> X2) to the test or reset input on the safety relay whichis to be exp<strong>and</strong>ed.Regulations <strong>and</strong> st<strong>and</strong>ards<strong>The</strong> JSR2A is designed <strong>and</strong> approved in accordance withappropriate directives <strong>and</strong> st<strong>and</strong>ards. See technical data.Connection examplesFor examples of how our safety relays can solve various safetyproblems, please see the section “Connection examples”.6:38 <strong>ABB</strong>
Technical data – JSR2AManufacturerArticle number/Ordering dataJSR2A 10 A 24 AC/DCJSR2A 10 A 115 ACJSR2A 10 A 230 ACColour<strong>ABB</strong> AB/<strong>Jokab</strong> <strong>Safety</strong>, Sweden2TLA010027R01002TLA010027R04002TLA010027R0500GreySupply A1 - A2 24 VDC/AC, 48, 115,230 VAC + 15%, 50-60 HzPower consumptionRelay OutputsMax. switching capacityResistive load ACInductive load ACResistive load DCInductive load DCMax. total switching capacity:Min. loadContact materialFuses Output (External)Conditional short-circuit current(1 kA)Max. Input wire res. at nom.voltageMechanical operational LifeResponse time atdeactivation (input- output)activation (input - output):Terminals (removable)Max. screw torque2.7W/2.4–4 VA4 NO + 1 NC8A/230 VAC/1840 VA10A/115VAC/48VAC/24VAC/1840 VATechnical description – JSR2AAC15 230VAC 4A (NO-contact)1.5A (NC-contact)8A/24 VDC/192 WDC13 24VDC 1.2A (NO/NCcontact)16A distributed on all contacts10mA/10V/100mW (if load oncontact has not exceeded 100 mA)AgSnO 2+ Au flash6A gL ( 8A fast if short-circuitcurrent >500A )10A gG24 VDC/VAC: 100 Ohm48/115/230 VAC: 200 Ohm>10 7 operations
Expansion relayJSR3TApprovals:TÜV NordExpansion relay withdelay with:Safe delay of stop signalswith selectable valueDelayed safe outputsFeatures:Width 22.5 mmSupply 24V AC/DCOutput indication2 x 1 NO relay outputsHardwire Selectable Delay0.5 - 10.0 sec by hardwirelinks <strong>and</strong> Time trim potentiometerDelayed outputsBy connecting the JSR3T expansion relay to a compatible<strong>Safety</strong> relay it is easy to obtain safe "delayed" outputs.<strong>The</strong> JSR3T provides the system designer with the facilityto hardwire selected time delays in steps between 0.5 <strong>and</strong>10 seconds.Use of delayed outputs<strong>The</strong>re are many applications where delayed outputs arenecessary <strong>and</strong> permissible. For example delayed stopsignals can be used for emergency stops according toEN ISO 13850:2008 § 4.1.4 Stop Category 1 (a controlledstop with power to the machine actuator(s) available toachieve the stop <strong>and</strong> then removal of power when stop isachieved). Stop Category 1 may also be permitted whenit is not possible to gain physical access to the machinebefore the safe stop is effected e.g. by:• Covers <strong>and</strong> Gates which are locked until dangerousoperations <strong>and</strong> functions have been stopped.• Long distances between a safety device <strong>and</strong> dangerousmachine functions.Using this technique of stopping a machine provides manyadvantages i.e.:• Machines last longer as they are not subjected to excessiveloading etc when requested to stop.• Parts being processed are not damaged.• Restarting machines from stopped position is simplified.A safe "Soft" stop is achieved by means of a safety relaygiving a programme stop to the machine control system.e.g. when a gate is opened or emergency stop is activated.<strong>The</strong> output of the <strong>Safety</strong> relay is used to provide both a stopsignal to the machine control system i.e. via a PLC whichapplies the necessary braking/stopping of the machine in acontrolled way, <strong>and</strong> to switch a delayed expansion relay e.gJSR3T. <strong>The</strong> delayed safety outputs of the JSR3T expansionrelay are then used to control the safe disconnection of thepower to the actuators/motors etc. of the machine.<strong>Safety</strong> level<strong>The</strong> JSR3T has twin stop functions, using two positivelyguided contact relays.In order to achieve the level of monitoring required theJSR3T must be used with a suitable <strong>Safety</strong> Relay e.g.JSBR4, or RT6. <strong>The</strong> JSR3T test output (terminals X1 <strong>and</strong>X2) must be connected to the test input of the <strong>Safety</strong> relaybeing exp<strong>and</strong>ed (see connection examples).<strong>The</strong> JSR3T provides delay times that even in the event ofan internal fault condition complies with the requirement thatthe set delay cannot increase in time.Regulations <strong>and</strong> st<strong>and</strong>ards<strong>The</strong> JSR3T is designed <strong>and</strong> approved in accordance withappropriate directives <strong>and</strong> st<strong>and</strong>ards. Examples of such are98/37/EC, EN ISO 12100-1/-2, EN 60204-1, EN 954-1/EN ISO 13849-1.Connection examplesFor examples of how our safety relays can solve various safetyproblems, please see the section “Connection examples”.6:40 <strong>ABB</strong>
Technical data – JSR3TManufacturerTechnical description – JSR3T<strong>ABB</strong> AB/<strong>Jokab</strong> <strong>Safety</strong>, SwedenArticle number/Ordering dataJSR3T 24 AC/DC 2TLA010017R0100ColourPower supplyPower consumptionRelay OutputsMax. switching capacityResistive load ACInductive load ACResistive load DCInductive load DCMax. res. load total switchingcapacity:Min. loadContact materialFuses Output (External)Conditional short-circuitcurrent (1 kA)Max Input Wire res. at nom.voltageResponse time at activationResponse time at deactivationGrey24 VAC/DC, 50 - 60 Hz1.3 VA/W2 x 1 NO (See Connectionexamples)4A/250VAC/1000 VAAC15 240VAC 3A4A/24 VDC/100 WDC13 24VDC 2A6A distributed on all contacts10mA/10V (if load on contact hasnot exceeded 100 mA)AgNi3A gL/gG or 4A fast6A gG100 Ohm
Contents - Connection examplesPageHA5400A Connection examples JSBR4 ___________________________________________6:43HA6400A Connection examples JSBT4 ___________________________________________6:43HA6500A Connection examples JSBT5____________________________________________6:44HA6500B Connection examples BT50 ____________________________________________6:44HA6501B Connection examples BT50T ___________________________________________6:45HA6500C Connection examples BT51 ____________________________________________6:45HA6501C Connection examples BT51T ___________________________________________6:46HA7100A Connection examples JSBRT11 _________________________________________6:46HA7600A Connection examples RT6 ______________________________________________6:47HA7600B Principle drawing RT6 _________________________________________________6:47HA7672A Enabling device JSHD4 - EX with RT6 ____________________________________6:48HA7700A Connection examples RT7 ______________________________________________6:48HA7900A Connection examples RT9 ______________________________________________6:49HE3811B <strong>Safety</strong> Light Beam Spot with time-limited reset _____________________________6:49HE3824C Lightbeam with time-limited bypass 0.2–40 s ______________________________6:50HE3824E Lightbeams with time-limited bypass 0.2–40 s _____________________________6:50HG7636B Focus light grid/curtain with three-position device __________________________6:51HG7611A Interlocked door with RT6 <strong>and</strong> pre-reset __________________________________6:51HG7636A Interlocked door with three-position device ________________________________6:52HG7646A Interlocked door with three-position device <strong>and</strong> time-limited entrance/exit ______6:52HG7654A Interlocked door with RT6 <strong>and</strong> output expansion JSR1T _____________________6:53HG7658A Interlocked door with RT6 <strong>and</strong> output expansion JSR2A _____________________6:53HG7673A Interlock switch JSNY8 with RT6 ________________________________________6:54HG7674A <strong>Safety</strong> interlock switch JSNY9M/MLA with RT6 ____________________________6:54HG7674B <strong>Safety</strong> interlock switch JSNY9S/SLA with RT6 _____________________________6:55HH0000C Three-position device JSHD4 with various safety controllers _________________6:55HI8552A Connection examples JSHT2 intermittent running ___________________________6:56HK7600A <strong>Safety</strong> mat/Contact strip with RT6 _______________________________________6:56HL7600B Several JSNY7 connected to one RT6 with unique indication _________________6:57HM0000A Magnetic switch JSNY7 with various safety controllers ______________________6:57HN7660A Delayed outputs RT6 with output expansion JSR3T <strong>and</strong> RT7 _________________6:58HP7600A Machine control - Isolation of PLC inputs <strong>and</strong> outputs _______________________6:58HP7600B Machine control-Isolation of PLC outputs __________________________________6:59HR7200B Focus light curtain/beam _______________________________________________6:59HR7800B Focus lightbeam/curtain ________________________________________________6:60HT5400A Two-h<strong>and</strong> device with safety relay JSBR4 _________________________________6:60HB0008A Focus light curtain/light beam connected to an RT9 with the aid of a M12-3D _____ 6:616:42 <strong>ABB</strong>
HA5400A Connection examples JSBR41234567HA6400A Connection examples JSBT48910111213<strong>ABB</strong>6:4314
HA6500A Connection examples JSBT5HA6500B Connection examples BT506:44 <strong>ABB</strong>
HA6501B Connection examples BT50T1234567HA6500C Connection examples BT518910111213<strong>ABB</strong>6:4514
HA6501C Connection examples BT51THA7100A Connection examples JSBRT116:46 <strong>ABB</strong>
HA7600A Connection examples RT61234567HA7600B Principle drawing RT68910111213<strong>ABB</strong>6:4714
HA7672A Enabling device JSHD4 - EX with RT6HA7700A Connection examples RT76:48 <strong>ABB</strong>
HA7900A Connection examples RT91234567HE3811B <strong>Safety</strong> Light Beam Spot with time-limited reset8910111213<strong>ABB</strong>6:4914
HE3824C Lightbeam with time-limited bypass 0.2–40 sHE3824E Lightbeams with time-limited bypass 0.2–40 s6:50 <strong>ABB</strong>
HG7636B Focus light grid/curtain with three-position device1234567HG7611A Interlocked door with RT6 <strong>and</strong> pre-reset8910111213<strong>ABB</strong>6:5114
HG7636A Interlocked door with three-position deviceHG7646A Interlocked door with three-position device <strong>and</strong> time-limited entrance/exit6:52 <strong>ABB</strong>
HG7654A Interlocked door with RT6 <strong>and</strong> output expansion JSR1T1234567HG7658A Interlocked door with RT6 <strong>and</strong> output expansion JSR2A8910111213<strong>ABB</strong>6:5314
HG7673A Interlock switch JSNY8 with RT6HG7674A <strong>Safety</strong> interlock switch JSNY9M/MLA with RT66:54 <strong>ABB</strong>
HG7674B <strong>Safety</strong> interlock switch JSNY9S/SLA with RT61234567HH0000C Three-position device JSHD4 with various safety controllers8910111213<strong>ABB</strong>6:5514
HI8552A Connection examples JSHT2 intermittent runningHK7600A <strong>Safety</strong> mat/Contact strip with RT66:56 <strong>ABB</strong>
HL7600B Several JSNY7 connected to one RT6 with unique indication1234567HM0000A Magnetic switch JSNY7 with various safety controllers8910111213<strong>ABB</strong>6:5714
HN7660A Delayed outputs RT6 with output expansion JSR3T <strong>and</strong> RT7HP7600A Machine control - Isolation of PLC inputs <strong>and</strong> outputs6:58 <strong>ABB</strong>
HP7600B Machine control-Isolation of PLC outputs1234567HR7200B Focus light curtain/beam8910111213<strong>ABB</strong>6:5914
HR7800B Focus lightbeam/curtainHT5400A Two-h<strong>and</strong> device with safety relay JSBR46:60 <strong>ABB</strong>
HB0008A Focus light curtain/light beam connected to an RT9 with the aid of a M12-3D12345678910111213<strong>ABB</strong>6:6114
Light curtains, Light grids,Light beams <strong>and</strong> Scanner<strong>ABB</strong>
ContentsPage1Why use light beams/light curtains? ___________________________________7:2Reset – 3 alternatives ________________________________________________7:4Muting <strong>and</strong> blanking _________________________________________________7:5Light curtain for short safety distance __________________________________7:6Cycle initiation with light curtain _______________________________________7:7<strong>Safety</strong> distance ______________________________________________________7:8Focus ll _____________________________________________________________________7:10Muting (bypassing) - Focus II ______________________________________________7:15Muting sensors – Mute R ___________________________________________ 7:19Muting sensors – Mute D ___________________________________________ 7:20Bjorn _____________________________________________________________ 7:22Focus Wet ________________________________________________________ 7:24Blanking programming – BP 1 ______________________________________ 7:25Laser aligner JSRL-3 _______________________________________________ 7:26Connection examples Focus ll ______________________________________ 7:27<strong>Safety</strong> Light Beam Spot ____________________________________________ 7:34Laser scanner Look ________________________________________________ 7:3823456789101112Descriptions <strong>and</strong> examples in this book show how the products work <strong>and</strong> can be used. This does not mean that they can meet the requirements forall types of machines <strong>and</strong> processes. <strong>The</strong> purchaser/user is responsible for ensuring that the product is installed <strong>and</strong> used in accordance with theapplicable regulations <strong>and</strong> st<strong>and</strong>ards. We reserve the right to make changes in products <strong>and</strong> product sheets without previous notice. For the latestupdates, refer to www.abb.com/lowvoltage. 2011.<strong>ABB</strong>7:11314
Why use light grids<strong>and</strong> light curtains?Light beams <strong>and</strong> light curtains are a production friendly safety component that do notphysically impact on the actions of the machine operator. Light barrier protection is also agood safety component for use when goods are to be passed in <strong>and</strong> out of a risk area.How does a light beam/light curtainwork?Both light grids <strong>and</strong> light curtains utilise optical transmitter<strong>and</strong> receiver units. From the transmitters beams of infraredlight are sent to the receiver. When a light beam is interrupteda dual stop signal is given to the dangerous machines insidethe light beam/curtain protected area.What is the difference between a lightcurtain <strong>and</strong> a light beam?A light curtain has several beams that are placed closelytogether whereas a light grid consists of only one, two,three or four light beams. <strong>The</strong> beams are closest on a lightcurtain that is used for finger detection. <strong>The</strong>n the resolutionis 14 mm. Light curtain beams are at their widest spacingwhen used for thigh detection (90mm resolution). For lightgrids the beams are normally placed at a relative distanceof 300 to 500 mm. <strong>The</strong> choice between light grid or lightcurtain is often a question of available safety distance, reach<strong>and</strong> price. Light curtains are often chosen for short safetydistances. Light grids are chosen for long distances, up to50 m, <strong>and</strong> for a low price.7:2<strong>ABB</strong>
Light grids for long distancesLight curtain for short safetydistancesLight curtain as areaprotectionLight grids with monitored bypassingduring material transportLight curtain to protect duringcycle initiationLight curtain for inner arealimiting123456789What safety requirements are there for a light protection device?High safety dem<strong>and</strong>s are stated in the st<strong>and</strong>ardEN 61 496-1 which deals with light protection. <strong>The</strong> maindem<strong>and</strong>s are on a safe stopping function <strong>and</strong> that lightfrom light sources other than the transmitter or other disturbancesdo not affect the safety function.Depending on how the safety function is built up thereare safety components of type 2 <strong>and</strong> 4 to choose between.Type 2 <strong>and</strong> 4 relates in principle category 2/PL c <strong>and</strong>category 4/PL e according to EN ISO 13849-1Type 4 which has the highest safety level, states that afault is not allowed to affect the safety function <strong>and</strong> that thefault shall be detected by the outputs falling immediatelyor that they do not re-connect after being disconnected.Maximum allowed scattering angle for the light is ±2°.Type 2 states that a simple but monitored safety functionis required, which means that the safety function shall bemonitored through periodic tests which break the outputwhen a fault occurs. Between the testing times there canthough be faults which result in the safety component malfunctioning.<strong>The</strong> test function can either be built into thesafety device or an external unit (e.g. the machine´s controlsystem) can initiate a test. Maximum allowed scatteringangle for the light is ±4°.Light beams <strong>and</strong> light curtains are included among theproducts in the machine directive´s appendix 4, which meansthat an external certifying procedure with an officially recognisedinstitution is called for.10111213<strong>ABB</strong>7:314
Reset – 3 alternativesSupervised manual resetWhen a light beam/light curtain is interrupted it will givea stop signal to dangerous machines within the risk areait protects <strong>and</strong> a reset-lamp will be lit. For a new start ofthe machine the light beam/light curtain has to be reset.This is done with the reset button which is placed where itcannot be reached from within the area which is protected.<strong>The</strong>re are high requirements on the reset function - neithera short circuit nor a component fault shall give automaticreset. When the reset button has been set the outputs areactivated <strong>and</strong> the reset-lamp is turned off.Reset button with light indication.Supervised time-resetDuring time-reset unintentional reset is prevented whensomeone is inside the risk area. To reset the light beam(see figure) button 1 must first be pressed <strong>and</strong> afterwardsbutton 2 within e.g. 5 seconds. This is especially importantwhen one cannot see the entire area that is protectedby the light beam.12Button 1 is pressed <strong>and</strong> afterwards, within a chosentime e.g. 5 seconds, button 2 is pressed for resettingthe light beam.Automatic resetAutomatic reset is used when the light beam is used forarea monitoring. When the light beam is actuated this indicatesthat e.g. a robot is in the area. <strong>The</strong> robot is stoppedif a person enters the same area e.g. through a gate.When the light beam is free again the control unit will bereset automatically.abABA light beam b indicates that the robot is situated in areaA. In this position it is possible to walk in through the gateto area B without stopping the robot.7:4<strong>ABB</strong>
Muting(bypassing)Automatic bypassing of light beam when an auto industrial truckpasses.Bypassing may be needed for different reasons. One of themost common reasons for bypassing is during in <strong>and</strong> outfeeding of material on a conveyor, auto industrial trucks, etc.Another common application is bypassing while passing witha three-position device to the risk area.Important aspects for bypassing are that it should be safe ,not be activated by mistake <strong>and</strong> be difficult to defeat. In otherwords it should give a reliable bypassing when a loadingcarrier comes but not allow a human to pass. To achieve thehighest safety level a dual <strong>and</strong> supervised bypassing systemis needed (usually with at least two independant signals).If this is done with sensors, it is recommended they be ofdifferent kinds, because of the probability of them both malfunctioningfor the same reason e.g. common mode failure.An example of a solution is to use a mechanical limit switch<strong>and</strong> a photo-cell sensor.To avoid deliberate defeating/ manipulation of the bypassingsensors/signals a safety relay or a safety-PLC is connectedthereby monitoring that the sensors are both activated <strong>and</strong>deactivated in every bypassing cycle.<strong>The</strong> number of variations in bypassing systems are almostinfinite.This depending on the specific requirements of eachplant/machine. For Focus there are a number of bypassingpossibilities prepared.123456789Blanking (fixed or floating)Blanking, (fixed or floating,) means permanent switchingoff of a number of beams in the protected field of a lightcurtain. This is a function that is permitted <strong>and</strong> used when anobject that is larger that the resolution of the light curtain ispermanently located in the protected area, without breakingthe safety outputs (OSSD). If the object is removed from theprotected area, the safety outputs are broken.”Fixed blanking” means that the area that is intentionallyswitched off does not change while the machinery isoperating. Other protected areas remain unaffected, withunchanged resolution.”Floating blanking” means that the area that is intentionally<strong>ABB</strong>switched off can be changed <strong>and</strong> follow the location of theobject that is being moved around in the protected areawhile the machinery is operating. Other beams are active<strong>and</strong> providing normal protection, but often with reducedresolution.When a “blanking” function is used, it is very important thatthe light curtain provides protection <strong>and</strong> can detect objectsas small as a finger or h<strong>and</strong>, depending on the resolution,anywhere outside the area that is rendered inactive becausethe object is there.It must not be possible to select the “blanking function”without using a key, tool or similar unlocking device.7:51011121314
Light curtain for shortsafety distanceA light curtain can be used in a machine or a productionplant in the same way as a hatch. <strong>The</strong>re is a great differencethough when it comes to the risk situation. When one has alight curtain installed with a short safety distance in front ofa dangerous machine, there is a high risk for spontaneousengagement into the machine, often called after-grasp. If thedangerous machine movement does not stop during such anengagement, one has a small chance of avoiding injury becauseone can reach the risk place within maybe 50 ms.<strong>The</strong>refore it is of great importance that the whole chain inthe stopping circuit is fully dualled <strong>and</strong> supervised. Even valves<strong>and</strong> contactors which ultimately control dangerous movementsnormally have to be doubled up <strong>and</strong> supervised.Regulations concerning safety distances are given in specificC-st<strong>and</strong>ards such as EN 692 for mechanical presses.If no specific C-st<strong>and</strong>ard is available, EN ISO 13855 isused.Automatic machinesFor light curtains on automatic machines there shall be areset function which is active when the machine is set forautomatic production whether or not it is a passable protection.After an engagement one must first use a reset functionthen the restart of the cycle should be made with a seperatestarting device. <strong>The</strong> same reset applies for machines withsemi-automatic drive.H<strong>and</strong> resolutionOperator protection during manuallyserviced machinesWith manually operated machines where one or moreoperators pick in <strong>and</strong> out parts between every cycle. Thistype of application is the most risky because the number ofengagements into the machine´s dangerous area is oftenseveral times per minute.Light curtains on pressesLight curtains have traditionally been a common protectionmethod among press applications <strong>and</strong> there has since longexisted detailed information on the usage of light curtainson presses. (see next spread for presses)<strong>Safety</strong> levelOnly light curtains of type 4 are accepted on presses.ResetOn the servicing side i.e. the side or sides where there is anoperator that picks in <strong>and</strong> out parts, there shall be a seperatereset function for the light curtain, usually a button. If thereare several light curtains e.g. on the front <strong>and</strong> back thereshall be one for each. If the light curtain is actuated during adangerous movement the press should not be able to restartFinger resolutionwithout being reset. During engagement after the end of thecycle no reset is needed.For a light curtain which is placed as protection on thosesides which are not servicing sides, there shall be a resetbutton which always needs to be activated after an engagement.7:6<strong>ABB</strong>
Cycle initiation withlight curtain12Cycle initiationCycle initiation is a concept when the machine is designed sothat a new cycle starts when you take your h<strong>and</strong> out from thelight curtain. A cycle is defined as the h<strong>and</strong> being placed in<strong>and</strong> taken out once. Usually it is possible to choose betweenone-cycle <strong>and</strong> two-cycle operation. During one-cycle a newpress stroke is started when the light curtain has has beenactuated once <strong>and</strong> during two-cycle when the light curtainhas been actuated twice. <strong>The</strong> operator thereby operates thepress by the action of putting parts in <strong>and</strong> out.Because the press starts without any particular comm<strong>and</strong>there are some risks involved <strong>and</strong> therefore many conditionshave to be met before the machine operates.To restrict the usage to smaller presses which cannot beentered there are the following limitations: <strong>The</strong> table heightmay not be lower than 750 mm, the stroking length maynot be larger than 600 mm <strong>and</strong> the table depth may not belarger than 1000 mm. <strong>The</strong> light curtain shall have 30 mm orhigher resolution. If the press is not started within approx. 30seconds after the the end of the cycle, a new cycle shouldnot be accepted without the light beam being again manuallyreset. Note. For machines with cycle initiation, the installationof the light curtain must be in accordance with machineparameters <strong>and</strong> all relevant st<strong>and</strong>ards <strong>and</strong> regulations.max 75 mm34567Installation of light curtain<strong>The</strong> light curtain must be installed so no-one can reach atrapping/crushing risk without actuating the light curtain.<strong>The</strong> most important thing is that there are no gaps under,on the sides <strong>and</strong> over the top during cycle operation. <strong>The</strong>lower edge of the light curtain must therefore be slightlybelow the press table edge. Also if it is open above the lightcurtain the height must be adapted so that it is not possibleto reach over the protection area (see ISO 13855). Possiblephysical adjustment possibilities must be limited so that nogaps can occur.Installation – correct <strong>and</strong> incorrect during cycle initiationBetween the light curtains protection area <strong>and</strong> mechanicalparts there shall only be max 75 mm gap to prevent ahuman from st<strong>and</strong>ing there. In practise to acheive this dem<strong>and</strong><strong>and</strong> the required safety distance one usually has tocomplement with e.g. additional mechanical protection oradditional horizontally positioned light curtains i.e. step-inlight curtain. Another solution could be a lying or an angledlight curtain.89101112Correctly installed.<strong>The</strong> operator cannot reachinto the machine withoutactuating the light curtain.Incorrect intallation.Gap below the light curtain.<strong>The</strong> operator can reach intothe machine without actuatingthe light curtain.Incorrect installation. Gapabove the light curtain. <strong>The</strong>operator can reach into themachine without actuating thelight curtain.Correctly installed.Light curtain complementedwith a horizontallight curtain to detectthe operator.13<strong>ABB</strong>7:714
<strong>Safety</strong> distance - light curtain according to EN ISO 13855<strong>The</strong> safety distance ’S’ is a minimum distance betweena light curtain <strong>and</strong> a dangerous area. <strong>The</strong> safety distanceshall guarantee that a person is not able to reacha dangerous machine part before the machine movementhas stopped. This is calculated with the formulafrom EN ISO 13855 - Placement of safety devices withconcern to the speed in which the body approaches therisk area.S = (K x T) + CS = safety distance in mmK = body/part of body (e.g. h<strong>and</strong>) speed in mm/sT = T1 + T2whereT1 = the safety device´s reaction time in secondsT2 = the machine´s reaction time in secondsC = further distance in mm based upon the body´s intrusiontowards the risk area before the safety device hasbeen actuated.Resolution for finger(≤14 mm) gives C = 0* If it is possible to reach the hazard zone by reaching overthe light beam, an addition is made to the formula. In table1 in EN ISO 13855 an alternative safety distance addition(Cro) is given to the formula S = (K x T) + C. <strong>The</strong> greatestvalue out of C <strong>and</strong> Cro is to be used to prevent reaching thehazard zone by reaching over the light curtain/light beam.Calculation of safety distances for vertical <strong>and</strong> horizontal installation accordingto EN ISO 13855S = safety distance in mmH1 = the lower beam may not be situated higher than 300mm above the groundH2 = the upper beam may not be situated lower than 900 mmabove the ground<strong>The</strong> safety distance for vertical installationFor S ≤ 500 mm the safety distance is calculatedwith the following formula:S = (2000 x T) + 8 x (d-14)where d is the light curtain´s resolution in mm.K here is 2000 mm/s which represents the speed ofthe h<strong>and</strong>. <strong>The</strong> expression (8 x (d-14)) may never be lessthan 0. Minimum safety distance S is 100 mm.If the safety distance according to the formulaabove gets larger than 500 mm one can insteaduse:S = (1600 x T) + 8 x (d-14)K is1600 mm/s which represents the speed of the body.Minimum safety distance according to this formula is500 mm.S = safety distance in mmH = the light curtain field must be positioned between 0 <strong>and</strong>1000 mm above the floor<strong>The</strong> safety distance for horizontal installation iscalculated with the following formula:S = (1600 x T) + (1200 - 0,4 x H)where H is the safety field´s height above the referenceplane , e.g. the ground(1200 – 0,4 x H) may not be less than 850 mm. Dependingon the resolution, d, that the light curtain has, there is aminimum height that the safety field may be placed. This iscalculated with:H = 15 x (d – 50).H cannot be less than 0. With a resolution d=14 or 35 mm onecan therefore install the light curtain from H = 0 <strong>and</strong> up. <strong>The</strong>higher it is situated, the shorter the safety distance gets. <strong>The</strong>highest permissable height H of the safety field is 1000 mm.When you use a horizontal light curtain as entry protection,the depth of the light curtain should be at least 750mm to prevent people from inadvertently stepping over it.<strong>The</strong> estimated safety distance is measured from the machine’shazardous section to the outermost beam of thehorizontal light curtain (seen from the machine).7:8<strong>ABB</strong>
<strong>Safety</strong> distance for light beams according to EN ISO 138551For light beams the safety distance is calculatedfrom the following:S = (1600 x T) + 850 mm<strong>The</strong> formula applies whether one installs 2,3 or 4 beams. Itis the risk assessment that decides the number of beamsthat are to be chosen. <strong>The</strong> following possibilities must beconsidered.• to crawl under the lowest beam;• to reach over the top beam;• to reach in between two beams;• that the body passes in between two beams.To fulfill the requirements the beams should be installed atthe following heights:Number of beamsHeight over the referenceplane, e.g. ground4 300, 600, 900, 12003 300, 700, 11002 400, 9002345<strong>Safety</strong> distances for new <strong>and</strong> old presses6New pressesFor new CE-marked presses there are specific requirementsfrom the st<strong>and</strong>ards EN 692 Machine tools – <strong>Safety</strong>– Mechanical presses – <strong>Safety</strong> <strong>and</strong> EN 693 Machine tools– <strong>Safety</strong> – Hydraulic presses.<strong>The</strong> same requirements apply for vertical installation onpresses as with vertical installation on other machines withthe difference that C is given according to the following:Resolution,d, (mm)<strong>Safety</strong> distanceaddition, C (mm)≤ 14 0>14 - 20 80>20 - 30 130CycleinitiationPermitted>30 - 40 240 Not>40 850permittedOther manually serviced machines<strong>The</strong> rules for presses may well be applied to other machineswhich function in a similar way <strong>and</strong> that have the same risksituation. <strong>The</strong>re is no other st<strong>and</strong>ard which is as detailed onthe usage of light curtains.For cycle initiation the light curtains resolution, d, must be≤ 30 mm. This applies to both old <strong>and</strong> new (CE-marked)presses.Old pressesN.B. For old presses there are different rules for eachcountry.<strong>The</strong> formula that applies here is:S = 2500 x T + C<strong>The</strong> safety distance addition C for different resolutions ofthe light curtain is given in the following tableResolution,d, (mm)<strong>Safety</strong> distanceaddition, C (mm)55 85078910111213<strong>ABB</strong>7:914
<strong>Safety</strong> Light Grids <strong>and</strong><strong>Safety</strong> Light CurtainsFocus IIApprovals:Application:Optical protection in anopening or around a risk areaFeatures:A light grid/light curtain with manypossibilitiesType 4 according toEN 61496Flexible assemblyLED indicationHigh protection class (IP65)Range 3-40 mTime resetFixed / floating blankingMutingSingle/Double BreakfunktionExternal Device Monitoring(EDM)Available with differentresolutionsUp to PL e according toEN 954-1/EN ISO 13849-1Focus II is a new version of our previous light beam/lightcurtain Focus. Features such as muting <strong>and</strong> override arest<strong>and</strong>ard in all Focus II light curtains <strong>and</strong> light beams. Forlight curtains, blanking <strong>and</strong> break functions are also st<strong>and</strong>ard.<strong>The</strong> optical sensors on Focus II also have variable frequency.<strong>The</strong> Focus II units are light grids/curtains with safetyfunctions intended for applications where it is of greatimportance to protect persons from a dangerous machine,robot or other automated systems where it is possible toaccess to a dangerous area.Focus II creates a protection field with infrared beams. Ifany beam is interrupted the safety mechanism is triggered<strong>and</strong> the dangerous machine is stopped. Focus II fulfillsthe requirements for non-contact safety equipment type 4(Focus 4 series) according to the international regulationst<strong>and</strong>ard EN 61496-1.Units are available with safety heights between 150 <strong>and</strong>2400 mm. All electronic control <strong>and</strong> monitoring functionsare included in the light curtain profiles. External connectionis made via a M12 connection at the end of the profile.Synchronization between transmitter <strong>and</strong> receiver isachieved optically. No electrical connection between theunits is required. Control <strong>and</strong> monitoring of the beam transmissionis carried out by two micro-processors which alsogive information on the status <strong>and</strong> alignment of the lightcurtain via several LEDs.Muting <strong>and</strong> Override included in all Focus II<strong>The</strong> ”Muting” <strong>and</strong> ”Override” functions are available on allFocus II light grids/curtains <strong>and</strong> is enabled directly whenan indication lamp LMS is connected. Muting implies thatone or more segments or the whole light curtain can bebypassed during in <strong>and</strong> out passage of material.In the Focus II with Muting there is also an Override functionwhich makes it possible to bypass the light grid/curtaini.e. activate the outputs if a machine start is necessary evenif one or more light beams are interrupted. This is the casewhen the muting function is chosen <strong>and</strong> the A <strong>and</strong> B inputs7:10<strong>ABB</strong>
are activated. If for example during the muting operationa loading pallet has stopped inside the safety field after avoltage loss, the override function is used to enable the palletto be driven clear.Floating blanking or fixed blankingIt is also possible to obtain the Focus II light grids/curtainswith either ”floating blanking or fixed blanking”. Floatingblanking makes it possible to ’disconnect’ a definednumber of beams from the safety field. <strong>The</strong> object is thenfree to move in the safety field without the safety functionbeing triggered. During ”fixed blanking” the object is notable to move in the safety field. <strong>The</strong> other beams are activewith normal resolution.<strong>Safety</strong> outputs OSSD1 <strong>and</strong> OSSD2Focus II has two PNP outputs - OSSD1 <strong>and</strong> OSSD2. Ifthe load to be switched is alternating current or requires ahigher current than 500 mA then one should use a safetyrelay e.g. RT9, Pluto PLC or the FRM-1 unit (converts theoutputs to relay contacts) from <strong>ABB</strong> <strong>Jokab</strong> <strong>Safety</strong>. <strong>The</strong>FMC-Tina <strong>and</strong> Tina 10A/10B converts the outputs to a dynamicsignal for connection to Pluto or Vital. Pluto can alsowork directly with the OSSD-outputs.Single/Double Break functionThis function is used for presses when the operator preparesor picks out a detail. With the Single Break functionthe light curtain allows operation after entry <strong>and</strong> withdrawalFocus II light curtainSt<strong>and</strong>ard:• Muting (bypassing) partly or completely• Supervised output for muting lamp• Override• Manually supervised or automatic reset• Time-reset• Fixed or floating blanking• Single/Double Break• EDMOption:• CUT – a light curtain cascadedwith another light curtain. <strong>The</strong>two light curtains can have differentresolutions.out of the curtain. Similarly, the Double Break function allowsoperation after entry <strong>and</strong> withdrawal twice.External Device Monitoring (EDM)In all light beams <strong>and</strong> light curtains an EDM function isavailable which allows Focus II to test if the external controlelement responds correctly. A test channel is connectedthrough the respective contactor, in order to detect anyfaults <strong>and</strong> thereby prevent a reset.ResetOn every Focus II there are inputs for reset <strong>and</strong> other functions:Reset, Alignment <strong>and</strong> Override (bypassing is only possiblewhen muting is used.) <strong>The</strong> reset option is chosen throughdual switches in the Focus II receiver. At delivery, Focus IIis set to automatic reset.• Automatic reset – When the light field is free the outputsare closed directly. (Setting when delivered).• Manual reset – Focus II gives a ready signal when thelight field is free <strong>and</strong> the reset button has been actuated.• Time reset – During manual reset. To reset the Focus IIa pre-reset button must first be actuated <strong>and</strong> after wardswithin 8 seconds a reset button outside the risk areamust be actuated.Focus II ljusbomSt<strong>and</strong>ard:• Muting (bypassing) of one, two, three or four beams• Supervised output for muting lamp• Override• Manually supervised or automatic reset• Time-reset.Option:• Light grids for tough environments with parallel beamsof light for improved reliability.123456789101112With the switches at the bottom of Focus II you can choose thefunction you desire.13<strong>ABB</strong>7:1114
Summary - Focus ll light curtain/grid, Type 4 (FII-4)Type 4ResolutionFII-4-14-zzzz FII-4-30-zzzz FII-4-K4-zzzz FII-4-K3-80014 30 300 400 400Height (mm=zzzz)15030045060075090010501200135015001650180019502100225024001503004506007509001050120013501500165018001950210022502400900 1200 800Range (m)SRLR0,2-33-60,2-77-140,5-2020-400,5-2020-40Reaction time off (ms)Reaction time on (ms)12-68 9-31 13 13138-104 141-119 142 142Manual resetAutomatic resetPre resetMuting inputsMuting lamp supervisionOverrideMuting T/L/XBlanking 3 typesSingle/Double breakEDMDyn. Adaption to Vital/Pluto¤ ¤ ¤ ¤St<strong>and</strong>ard¤ With Tina 10A/10B/10C or FMC-TinaNote!For ordering data <strong>and</strong> article number see the product list. For more information see the manual on our home page.7:12 <strong>ABB</strong>
12FII-4-K2-500 FII-4-K4-zzzz D FII-4-K3-800 D FII-4-K2-500 D FII-4-K2C-zzzz FII-4-K2C-800 FII-4-K1C-500500 300 400 400 500 300 400 800 50034500 900 1200 800 500 900 1200 800 500560,5-2020-400,5-2020-400,5-2020-400,5-2020-400,5-7 0,5-8 0,5-12713 13 13 13 13 13 13142 142 142 142 142 142 1428910¤ ¤ ¤ ¤ ¤ ¤ ¤111213<strong>ABB</strong>7:1314
AccesoriesMuting-unit for FocusSt<strong>and</strong>ard:Muting (bypassing) of light curatin or light grid in one or twodirections(L-form, T-form). <strong>The</strong> unit is connected directly tothe light curtain/grid via a M12-connection.FMC-Focus Muting Connector med M12-kontaktSt<strong>and</strong>ard:FMC is a small, optimised connection block with M12 inputs.FMC is used for M12-connection of muting sensors, mutinglamp, pre-reset (for time reset), reset button with indication,override <strong>and</strong> safety outputs.Technical data – Focus llManufacturer:Supply voltage: 24VDC ±20%Power consumption:TransmitterReceiver<strong>ABB</strong> AB/<strong>Jokab</strong> <strong>Safety</strong>, Sweden70 mA maximum100 mA maximum<strong>Safety</strong> levelEN/IEC 61496 Type 4EN 954-1 Focus II type 4: Category 4EN ISO 13849-1Focus II type 4: PL eEN/IEC 61508 Up to SIL 3PFH d2,5x10 -9Resolution:Wavelength on transmitterLED:Profile dimensions:Protection class:Operating temperature:Storage temperature:Outputs:Max. load:Response time:Connection transmitter:Connection receiver:Indikering:Enclosure:Conformity:14 mm <strong>and</strong> 30 mm880 nm37 x 48 mmIP65-10 to +55° C-25 to +70° C2 supervised PNP outputs withcross circuit monitoring500 mA (overload c.c. protection)9 – 68 ms(depending on model)M12 5-pinM12 8-pinLysdioder på sändareoch mottagare somindikerar injustering, smuts,matningsspänning ochutgångarAluminium painted yellow2006/42/EG,EN/IEC 61496-1/2, EN 954-1,EN ISO 13849-1, EN/IEC 61508 7:14<strong>ABB</strong>
Muting (bypassing)- Focus II12Built-in muting for Focus is available in three ways:• Pre-made muting units MFII-T <strong>and</strong> MFII-L, which haveintegral photo-cells. Units are manufactured with thesame profile as Focus.• Connection of muting sensors via a FMC.• Separate connection of muting sensors (Mute R orMute D) directly to the Focus receiver unit.Muting-lampIn the Focus receiver unit it is also possible to directly connecta muting-lamp. It is also possible to connect the muting-lampvia a FMC. During bypassing the muting-lamp is lit.Bypassing is only possible if the muting-lamp is functioning.Conditions for mutinga) Muting input A must be actuated at least 30ms beforemuting input B for muting to be possible.b) Muting is activated as long as the conditions are fulfilled.See also requirements for muting in IEC/TS 62046chapters 4.7.3 <strong>and</strong> 5.5.345Muting with MFII-T <strong>and</strong> MFII-L unitsMFII-T <strong>and</strong> MFII-L are muting units with integrated photocells in the same profile type as the Focus light grid/curtain.No additional sensors are required because the mutingunits contain the required components. MFII-T/MFII-Lis connected directly to Focus with M12-connectors.Alt.1Fo cusllAlt.2Fo cusllMFII-T (Diagram 1)MFII-T contains four photo cells A1, B1, B2 <strong>and</strong> A2 arrangedas shown. <strong>The</strong>y are configured for installationswhere material is transported ”in” or ”out” or in both directions”in <strong>and</strong> out”.NOTE. All st<strong>and</strong>ard Focus light grids/curtains are deliveredconnected to function together with the MFII-T.MFII-L (Diagram 2)MFII-L contains two photo cells A1 <strong>and</strong> B1 which are actuatedbefore exiting through the light grid/curtain. <strong>The</strong> lightgrid/curtain being bypassed just prior to the exit of the material.6789Focus MF-TM12 to controlcabinetout/in fromrisk areaFocus MFII-Lout fromrisk areaM12 connectionbetween Focus <strong>and</strong>MFII-T.Alternative 3(Alternative 4)NOTE. Unit MFII-L is primarily intended for material transport”out” of a working area. <strong>The</strong> st<strong>and</strong>ard Focus light grid/curtain delivered does not function together with the MFII-Lversion. <strong>The</strong>y need to be ordered separately together withthe MFII-L unit.MFII-T Reflex (Alternative 3)Contains four transmitters/receivers <strong>and</strong> a separate reflectorunit. Range 6m. Used in the muting mode for transport ofmaterial into <strong>and</strong>/or out of hazardous areas. For other functionsrefer to Alternative 1. This unit, together with light beamF4-K1C-500 provides electrical connections on only oneside!MFII-L Reflex (Alternative 4)Contains two transmitters/receivers <strong>and</strong> a separate reflectorunit. Range 6m. Used in the muting mode for transport ofmaterial into <strong>and</strong>/or out of hazardous areas. For other functionsrefer to Alternative 2. This unit, together with light beamF4-K1C-500 provides electrical connections on only oneside!<strong>ABB</strong> 7:151011121314
Examples on how the muting sensors MFII-T <strong>and</strong> MFII-L can be placedA solution with Focus Muting unit MFII-T with integrated muting sensors.Possible direction of movement - in/out of risk area.Risk areaA solution with Focus Muting unit MFII-L with integrated muting sensorsThis solution shall only be used for movement out from a risk area.Risk areaNOTE. the muting sensors A <strong>and</strong> B must be placed sothat the sensor A is always activated at least 30 ms beforesensor B.D: indicates the minimum length of the material that is toactuate the muting sensors that must be maintained duringthe passage through the light grid/curtain.d2: indicates the measurement between the two/four preassembledmuting sensors within the MFII-L <strong>and</strong> MFII-T.7:16<strong>ABB</strong>
Muting with FMC <strong>and</strong> FMI units1234<strong>The</strong> FMC Focus Muting Connector, is a small, optimalunit which is used when the Focus light grid/curtain is requiredto be bypassed for in <strong>and</strong> out passage to <strong>and</strong> froma dangerous area. <strong>The</strong> FMC-unit is easily connected toFocus with a M12 connector.<strong>The</strong> FMI Focus Muting Indicator, is a small unit withbuilt-in muting lamp, reset button, ”power off” (for alignment<strong>and</strong> override). <strong>The</strong> FMI unit is connected to the FMCunit with M12 connectors to facilitate the muting functionconnection.56Various FMC, FMI, FRM- versions <strong>and</strong> Tina units7<strong>The</strong> Tina-versions have dynamic safety outputs for Vital/Pluto.FMC-1(2):with connectors for muting sensors(A+B), reset, power off <strong>and</strong> mutinglamp (R) <strong>and</strong> muting lamp (M).8FMI-1A:with muting lamp only.FMI-1B:FMI-1C:with reset, power off <strong>and</strong> mutinglamp.with reset <strong>and</strong> power off.9FMI-1D:with reset, power off <strong>and</strong> internalresistor for the muting lamp.FMI-1E:FMI-1G:as pre reset connected to connectorA (A2) on FMC-1(2) (Tina).with reset, <strong>and</strong> internal resistor forthe muting lamp.10FMC-1(2)Tina:same as FMC-1(2) but connectedto Vital or Pluto.Tina 10A:Tina 10B:adaptor unit for connecting Focusto Vital or Pluto.simplified FMC-1(2) Tina includingonly the connector (R).11Tina 10C:M12-3MFRM-1A:simplified FMC-1(2) Tina includingonly power supply on con.no.3.bypass unit for easy connectionoutside the cabinettranslates the two OSSD outputsto relay outputs (<strong>and</strong> powersupply).12JS SP-1:JS AP-1:protection plug for not used connectors.adaptor for FMC units to use insteadof FMI-1B or -1D on the (R)connector including muting resistor.13<strong>ABB</strong>7:1714
Connection of Focus <strong>and</strong> muting components with FMC-1 <strong>and</strong> FMI-1Ex 1. Connection of light curtain with connection blockFMC-1, test/reset button <strong>and</strong> switch for supply voltageplaced in (by) the control cabinet.Ex 2. Connection of light curtain with connection blockFMC-1. <strong>The</strong> Reset unit FMI must be placed out of reachfrom the risk area.CabinetCabinetMuting lampPower ”off”FMIMuting lampResetConnectionunit FMC-1Test/ResetPower ”off”Connectionunit FMC-1MutingphotocellsMutingphotocellsConnection of Focus <strong>and</strong> muting components directly to the control cabinetMuting lampTest & resetbuttonsProtectcablesCable tolampSupplycableMutingcableFR-cableFT-cable• <strong>The</strong> TEST /RESET button shall be placed so the operatorcan see the protected area during reset, testing, <strong>and</strong>bypassing. It should not be possible to reach the buttonfrom within the risk area.• <strong>The</strong> LMS lamp for indication of muting <strong>and</strong> bypassingshall be placed so that it can be seen from all directionsfrom where it is possible to access the dangerous area• If photo cells are used as muting sensors then the sensorreceivers should be assembled on the light curtain´stransmitter side to minimise the interference risk.• <strong>The</strong> system is protected against dangerous functionscaused by damage on the transmitter cable <strong>and</strong>/or thereceiver cable. However, we recommend that the cablesbe protected so that physical damage to them can beminimised.M12-connection device with screw connectorsFemale - Connector-wiew from cable side Male - Connector-wiew from cable sideM12-C03M12-C01M12-C04M12-C027:18<strong>ABB</strong>
Muting sensors – Mute RRetro-reflective with polarizing filters1210...30 10...30 VDC VDCPNP PNPDark-on dark-on outputFSTR 1Features:Range adjustableLight reserve warningindicatorTransistor output, PNP1000 Hz switchingfrequencyShort-circuit protection,reverse polarity protection<strong>and</strong> power-up outputsuppressionConnector M12EMC tested according toIEC 801 <strong>and</strong> EN50081-1/EN 50082-234567Technical dataManufacturerArticle number/ordering data:Mute R (FSTR-1)OutputConnectionRange adjustment<strong>ABB</strong> AB/<strong>Jokab</strong> <strong>Safety</strong>, Sweden2TLA022044R0000PNP, dark onConnector M12Range 0.15... 2.5 m (with reflector FZR 1)0.15...5m (with reflector FZR 2A)Light sourceYesVisible-red, 660 nm, pulsed withpolarizing filterSupply voltageAllowable rippleCurrent consumption (without load)Max. load currentResidual voltageMax. switching frequencyProtection classTemperature(operating <strong>and</strong> storage)WeightAll technical data at 25˚ C <strong>and</strong> 24V.10...30 VDC± 10% of U S
Muting sensors – Mute DDiffuse-reflective with background rejectionFeatures:light-on outputdark-on outputElectronically adjustablebackground rejectionLight reserve warningindicatorDual transistor outputs, PNPShort-circuit protection,reverse polarity protection<strong>and</strong> power-up outputsuppressionConnector M12 rotatableEMC tested according toIEC 801 <strong>and</strong> EN50081-1/EN 50082-2Technical dataManufacturerArticle number/ordering data:Mute D (JSOGP800)OutputConnectionRange adjustmentRange (depending on material)Light sourceSupply voltage<strong>ABB</strong> AB/<strong>Jokab</strong> <strong>Safety</strong>, Sweden2TLA022044R10002 PNP (light- <strong>and</strong> dark-on)Connector M12Yes0.2... 0.8 mInfrared-LED, 880 nm, pulsed10...30 VDCAllowable rippleCurrent consumption (withoutload)Max. load currentResidual voltageMax. switching frequencyProtection classOperating temperatureWeightAll technical data at 25° C <strong>and</strong> 24V.± 10% of U S
Muting with Mute R <strong>and</strong> Mute D1A solution with two sensors (here photocells) <strong>and</strong> one (or two) movement directions for material transport:Possible direction of movement - IN (Even IN/OUT is possible)2Risk area3A solution with four sensors <strong>and</strong> one movement direction for material transport:Possible direction of movement - IN.Risk aread3 > 500mmd4 the least possibleS = safety light curtain/light beam4567 89A solution with four sensors <strong>and</strong> two movement directions for material transport:Possible direction of movement - IN/OUT.10Risk area11<strong>ABB</strong>D: indicates the minimum length on the material that is to actuate the muting sensors that must be maintainedduring the passage through the light grid/curtain.d1 must be as short as possible, <strong>and</strong> definitely less than 200 mmd2: indicates the distance between A1 <strong>and</strong> B17:21121314
BjornA strong support for light grids<strong>and</strong> mirrorsApplication:Protects light curtain, lightgrids <strong>and</strong> mirrorFeatures:RobustAdjustableBjorn is a very stable <strong>and</strong> flexible st<strong>and</strong> system in whichFocus safety light beams <strong>and</strong> mirrors are mounted in thest<strong>and</strong>. <strong>The</strong> fixings for the mirrors in the st<strong>and</strong> can be turnedto provide either vertical or horizontal angles. <strong>The</strong> robustmaterial of the Bjorn protects Focus units from direct collisions,<strong>and</strong> thus prevents unnecessary material damage <strong>and</strong>halts in production.Bjorn is available in stock as a st<strong>and</strong>ard version for dualsafety light beams. Bjorn versions can also be ordered forFocus 3 <strong>and</strong> 4-beams.ReceiverM3M4TransmitterM2Bjorn N2Bjorn V2verticalM1Bjorn H2horizontal7:22<strong>ABB</strong>
Technical data – BjornManufacturer:Article number/ordering data:Bjorn H2Bjorn V2Bjorn H3Bjorn H4-1Bjorn H4-2Bjorn N2Bjorn N3Bjorn N4-1Bjorn N4-2Bjorn N5H = Horizontal reflectionV = Vertical reflectionN = Floor st<strong>and</strong> for FocusColour:Material:Dimensions:Cross sectionFootWeight:H2, V2 <strong>and</strong> N2H3H4-1, H4-2N5<strong>ABB</strong> AB/<strong>Jokab</strong> <strong>Safety</strong>, Sweden2TLA022041R40002TLA022041R41002TLA022041R42002TLA022041R43002TLA022041R44002TLA022041R45002TLA022041R46002TLA022041R47002TLA022041R48002TLA022041R4900Yellow powder-coated(RAL 1018)3 mm steel146 mm x 130 mm230 mm x 190 mm15 kg/piece17 kg/piece20 kg/piece27 kg/pieceMirror reduction: ≤10 %12345678910111213<strong>ABB</strong> 7:2314
Focus-Wet– protection against water <strong>and</strong>dust for Focus light curtains <strong>and</strong>light beamsApplication:Protection in severeenvironmentsFeatures:Adjustable ±20°Rotatable <strong>and</strong> replaceabletubeCapable of draining <strong>and</strong>through ventilationWet is used for protection against water (or dust) whereextreme washing conditions are encountered. <strong>The</strong> protectiveencapsulation rating (IP68) now enables Focus light curtains<strong>and</strong> light beams to be used for such applications as the foodindustry where the use of high pressure washing for cleaningmachinery often occurs. <strong>The</strong> draining <strong>and</strong> through ventilationcapabilities mean that condensation can be avoided.Wet, with Focus light curtains or light beams, is pre-assembledcomplete with cabling, on request. During installationon a machine a Wet unit can be adjusted by ± 20° with theaccompanying angle bracket. <strong>The</strong> plastic tube is rotatable<strong>and</strong> the outside is easy to clean.Technical data – WetManufacturer:Article number/ordering data:WET-150 FIIWET-300 FIIWET-450 FIIWET-600 FIIWET-750 FIIWET-900 FIIWET-1050 FIIWET-1200 FIIWET-1350 FIIWET-1500 FIIWET-1650 FIIWET-1800 FIIWET-K-500 FIIWET-K-800 FIIWET-K-900 FIIWET-K-1200 FIIWET-L FIIWET-T FIIColour:<strong>ABB</strong> AB/<strong>Jokab</strong> <strong>Safety</strong>, Sweden2TLA022038R40002TLA022038R41002TLA022038R42002TLA022038R43002TLA022038R44002TLA022038R45002TLA022038R46002TLA022038R47002TLA022038R48002TLA022038R49002TLA022038R50002TLA022038R51002TLA022038R52002TLA022038R53002TLA022038R54002TLA022038R55002TLA022038R56002TLA022038R5700Transparent plasticLength including lid: light curtain/light beam +66 mmMaterial:TubeLidAngle bracketMax. ambient temperature:PCPEHD-300Stainless steel+55°CInstallation adjustment ± 20°Protection ratingIP68 (IP69K)7:24<strong>ABB</strong>
Blanking programmerBP1- a quick way to programblankingApplication:Program blankingFeatures:Easy to connectCan stay fittted duringoperation123456Programming blanking is made easy by using the Blankingprogrammer BP1. <strong>The</strong> BP1 is easily connceted betweenthe receiver unit of the light curtain <strong>and</strong> the cable otherwiseconnected to the receiver. <strong>The</strong> blanking object is placed inthe light curtain <strong>and</strong> the button on the BP1 is then pressed.11 seconds later blanking is programmed for the object.If the object needs to be changed a new programmingis needed.<strong>The</strong> unit can stay fitted during operation if required.Technical data – BP1Manufacturer:Article number/ordering data:BPColour:<strong>ABB</strong> AB/<strong>Jokab</strong> <strong>Safety</strong>, Sverige2TLA022090R00yellow <strong>and</strong> black78910111213<strong>ABB</strong>7:2514
Laser aligner JSRL-3Application:Alignment of light beams/ curtainsFeatures:Facilitates alignmentWhen the solution involves one or more mirrors JSRL-3facilitates alignment of light beams or light curtains. <strong>The</strong>JSRL-3 is easily secured using the accompanying elasticatedtape around the transmitter <strong>and</strong> receiver unit, <strong>and</strong>mustbe placed so that the flat rear of the unit is up againstthe front glass of the light curtain.When the laser aligner isswitched on the red laserspot should be visible at the correspondingunit, even via morrors.<strong>The</strong> JSRL-3 contains two type AAA batteries that arechanged by unscrewing the bottom end cap.Technical data – JSRL-3Manufacturer:Article number/ordering data:JSRL-3Colour:<strong>ABB</strong> AB/<strong>Jokab</strong> <strong>Safety</strong>, Sverige2TLA020008R0200Gul och svart7:26<strong>ABB</strong>
HR7000C-01 Focus - Connection without <strong>and</strong> with muting function1234567HR7000E-01 Focus - Connection with pre-reset function8910111213<strong>ABB</strong> 7:2714
HR7000F-01 Focus - Connection with muting to safety relayHR7000G-01 Focus - Connection with MFII-T/MFII-L units7:28 <strong>ABB</strong>
HR7000H-01 Focus - Connection with FMC/Tina Interface1234567HR7000I-01 FMC8910111213<strong>ABB</strong> 7:2914
HR7000J-01 FMC-1 or FMC-1 Tina with muting sensors <strong>and</strong> reset unitHR7000K-01 FMC-1 or FMC-1 Tina connected with Pre Reset7:30 <strong>ABB</strong>
HR7000L-01 Tina 10A, 10B <strong>and</strong> 10C connection example1234567HR7000M FRM-1 - Changing OSSD outputs to relay contacts8910111213<strong>ABB</strong>7:3114
HR7000O-01 Connection example FMC/FMIHR7000P Cable connection example7:32 <strong>ABB</strong>
HR7000Q Cable connection example1234567HR7000S Focus; Muting with the aid of Pluto, FMC <strong>and</strong> a transfer cable8910111213<strong>ABB</strong>7:3314
<strong>Safety</strong> Light BeamSpotApprovals:Application:Photoelectric guarding ofan entrance or around a riskareaFeatures:A light beam for the highest safety level<strong>The</strong> light beam is available in two versions Spot 10 for distancesup to 10 m <strong>and</strong> Spot 35 for up to 35 m . <strong>The</strong> lightbeams can be mounted at different heights <strong>and</strong> be angledaround a machine using our mirrors <strong>and</strong> brackets.Spot <strong>and</strong> Vital/Pluto in combination fulfils the requirementsfor PL e according to EN ISO 13849-1 <strong>and</strong> type 4 accordingto EN 61496. Several light beams, Eden sensors <strong>and</strong>emergency stops can be connected in series achieving thehigh safety level for the safety circuit. A number of solutionsfor bypassing of light beams for material transport are available.For indication there are LED´s on the transmitter <strong>and</strong> onthe receiver which indicate ’contact’ between transmitter<strong>and</strong> receiver <strong>and</strong> safety status. <strong>The</strong> ’contact’ information isavailable via the light beam receiver connection cables.Function<strong>The</strong> Spot light beam is supervised by the Vital safety controlleror by the Pluto safety-PLC. A unique coded signalis sent out from the control unit to the transmitter (SpotT). <strong>The</strong> signal which comes back from the receiver (SpotR) is then compared in the Vital/Pluto. If the correct codedsignal is received the Vital/Pluto switches the necessarysafety output contacts to permit dangerous machinemovements. Coding guarantees that no output signals canbe produced by light from other sources, interference orfaults in components in the transmitter or receiver. <strong>The</strong> lightbeam is dynamically supervised which means that if thesignal stops pulsating at the correct frequency it is immediatelydetected. By means of coding, the dynamic signalcan pass between up to 6 pairs of transmitters <strong>and</strong> receivers,with only one pair needing to be electrically connectedto a Vital.Transmitter 1 Receiver 1Spot TSpot RCodedpulsetransmission10 m35 m<strong>Safety</strong> level Type 4according to EN 61496Versatile mountingLED indicationProtection class IP6710 m or 35 m rangeBypassing possibilityLight beam, emergencystop <strong>and</strong> Eden in thesame safety circuittogether with Vital/Plutoachieves PL e according toEN SO 13849-1* **Transmitter 2 Receiver 2Spot TSpot R10 m35 mCoded pulse transmission24VDC This supply doesnot need to be the same asconnected to the Vital.Coded pulse transmissionVital <strong>Safety</strong> controller can accomodateup to 6 Spot systems.7:34<strong>ABB</strong>
Mounting <strong>and</strong> alignment – Spot<strong>Safety</strong> distance<strong>The</strong> basic principle is that dangerous machine movementsshould be stopped before a person reaches the dangerousarea, which should be at least 850 mm from the light beams.When determining the correct safety distance the stoppingtime of the machine <strong>and</strong> the risk level must be taken intoaccount (see also EN ISO 13855). Contact us for furtherinformation.Accessories <strong>and</strong> Mounting<strong>The</strong> Spot light beam can be mounted using a variety ofbrackets, posts <strong>and</strong> mirrors. See ordering list for furtherinformation.123490040011007003005mmMounting heights for 2 or 3 light beams.6Different sizes of mirrors, mounting brackets <strong>and</strong> profilesare available. See component ordering list.Note. Every mirror reduces the sensing distance of the beamby approx. 20%.JSM64Pivot M18 bracket for Spot 10or MUTE R (FSTR1) for example78AlignmentWhen aligning the light beam, look towards the transmitter.In the lens will be seen a strong red light. When this lightis seen from the receiver (via mirrors if fitted) the light beamis basically aligned. <strong>The</strong> LED on the receiver is on whenthe receiver is aligned with the transmitter. By moving thetransmitter up/down <strong>and</strong> left/right the best alignment canbe found.When vertically mounting, (as shown in the diagram) thereceiver should be mounted above the transmitter as this willsimplify the alignment <strong>and</strong> minimise the risk of extraneouslight disturbance. In exceptional light disturbance environmentsthe received light can be adjusted by a screw on therear of the Spot 35 receiver. On Spot 10 this adjustmentcan be made on the transmitter. To make the alignment eveneasier the Laser Aligner (JSRL2) can be used for Spot 35.<strong>The</strong> laser has visible light (class IIa) <strong>and</strong> is easy to mount foraligning. Supply to the Laser Aligner is taken from the Spot35 T/R connector.NOTE! When using Laser aligner do not look directly intothe laser. Observe all necessary precautions when usinglaser devices, failing to do so can result in eye damage.RTLaser aligner JSRL2 forlight beam Spot T/R.910111213<strong>ABB</strong>7:3514
Technical data - SpotManufacturerArticle number/Ordering dataSpot 10 T/RSpot 35 T/<strong>Safety</strong> levelEN/IEC 61496EN 954-1EN ISO 13849-1PFH d1,14x10 -8<strong>ABB</strong> <strong>Jokab</strong> <strong>Safety</strong>, Sweden2TLA020009R06002TLA020009R0500Type 4 with Vital/PlutoCategory 4PL ePower supply 17 – 27 VDC, ripple ±10%Current consumptionTransmitter:Receiver:Output currentsInfo. outputDynamic signal out< 25 mA< 15 mA10 mA max.30 mA max.Light source Red visible light, 660 nm,
Connection of Spot T/R to Vital11234567Vital 1 with 3 lightbeams Spot8910111213*For more connection examples see chapters for Vital or Pluto<strong>ABB</strong> 7:3714
Laser scannerLookApprovals:TÜV SüdApplication:Photoelectric guarding ofseveral risk areasFeatures:Type 3, IEC61496-3Easy to installProtected from weldingsparks/arcsEasy to program4 individual programmableprotection areas simultaneouslywith PlutoA laser scanner that has the ability to scanfour individual areas<strong>The</strong> Laser Scanner ’Look’ has the ability to scan fourindividual areas. Each area can be programmed individuallyfor the specific application, making it ideal for auto-carriersthat need to operate along different paths. <strong>The</strong> safety levelis according to Type 3, EN 61496-3. It is approved for useas personnel protection in robot working areas, conveyorequipment etc. <strong>The</strong> small design makes it easy to install.Look is not affected by ambient light levels (sun etc) orwelding arcs/sparks. <strong>The</strong> protection fields are quick <strong>and</strong>easy to create on a PC in a Windows environment. It hasfour individual programmable protection areas. Each areaconsists of one personnel protection field with maximum 4m radius, <strong>and</strong> one warning field of maximum 15 m radius.Changing between the areas is easily achieved usingadditional sensors.7:38<strong>ABB</strong>
Software - Look scannerFunction buttonsDialog box for selectingwhich area pair to displayInactive safeguardedarea pair 3Measured area limits123456Warning indication,an object is inside thesafeguarded areaAn object is detectedinside the detection area,the machine stopsActive safeguadred area pair 1Red: Detection areaGreen: Safeguarded area7Connection example - Look scanner with RT98910111213<strong>ABB</strong>7:3914
Technical Data – LookArticle number/Ordering data 50034195 Look JS4-4<strong>Safety</strong> levelEN/IEC 61496EN 954-1EN ISO 13849-1PFH dGeneral dataScanning rate:Scanning angle:Operating voltage:Transmitter:Current consumption:Angle resolution:Weight:Housing:Personnel protection fieldScanning distance:Area:Output:Resolution:Response time:Reflectance factor:Warning fieldScanning distance:Area:Output:Resolution:Response time:Reflectance factor:Type 3Category 3PL d1,50E-0725 Scans/sec190°24 VDC +20%/ -30%Laserdiode; Protection class 1approx. 300 mA0,36°2 kgH=155 mm, W=140 mm,D=135 mmRadius 0.2 - 4 m4 areas, switchable by 24 VDCinput2 x OSSD; 250 mA; failsafetransistor PNP outputs 24 VDC70 mm at 4 m80 msmin 1,8 %Radius 0 - 15 m4 areas, switchable by 24 VDCinputPNP-transistor, 24 VDC/100 mA150 mm at 15 m, ± 20%80 msmin 20%Contour measurementMeasurement range:Output:Response time:Reflectance factor:Reset:Suitable interface safety relay:Radius 0- 50 mRS 232/42280 msmin 20%manual or automaticRT6, RT7, RT9, JSBRT11 or PlutoConformity:Machine directive2006/42/EGEN ISO 12100-1/2,EN 954-1, EN ISO 13849-1, -2,EN 61496-17:40 <strong>ABB</strong>
12345678910111213<strong>ABB</strong>7:4114
Stopping time <strong>and</strong>machine diagnosis toolSmart<strong>ABB</strong>
ContentsPage1Stopping time _______________________________________________________8:2Stopping time <strong>and</strong> Machine Diagnosis Tool - Smart ______________________8:3Smart Manager _____________________________________________________8:4Smart <strong>and</strong> accessories _______________________________________________8:623456789101112Descriptions <strong>and</strong> examples in this book show how the products work <strong>and</strong> can be used. This does not mean that they can meet the requirements forall types of machines <strong>and</strong> processes. <strong>The</strong> purchaser/user is responsible for ensuring that the product is installed <strong>and</strong> used in accordance with theapplicable regulations <strong>and</strong> st<strong>and</strong>ards. We reserve the right to make changes in products <strong>and</strong> product sheets without previous notice. For the latestupdates, refer to www.abb.com/lowvoltage. 2011.<strong>ABB</strong>8:11314
Stopping timeWhy measure stopping time?— to find out which safety arrangements can be used in a certain areaaround a machine, <strong>and</strong> where they should be located.Stopping time<strong>The</strong> safety distance (how far away from the risk area a safetycomponent must be placed) is based upon the machines stoppingtime. <strong>The</strong> basic idea is that a safety component shouldbe placed so far from the risk area that it is not possible toenter the area before the machine has stopped.<strong>The</strong> stopping time for manually operated machines is especiallyimportant when light beams <strong>and</strong> light curtains are usedas safety components. By reflex action the operator tries tograb or adjust if something has gone wrong in the machinetool, even if the machine has started. It is then imperative thatthe machine stops before the h<strong>and</strong> reaches the risk area.A short stopping distance is also of importance for gettinggood ergonomics.Grabbing or adjusting is also common when using automaticmachines. Usually this is done to prevent productiondown-time by quickly adjusting a work piece. <strong>The</strong> stoppingtime is also of great importance if someone trips <strong>and</strong> fallsinto the machine.Stopping time, walking speed (1.6 m/s) <strong>and</strong> h<strong>and</strong> speed(2.0 m/s) is used for the calculation of safety distances.Sometimes a fixed minimum distance is also used. See thest<strong>and</strong>ard EN ISO 13855 for more details on the calculationof safety distances.Stopping distanceFor safety contact strips it is extra important that the stoppingdistance is monitored. An incorrect stopping distancecould in many cases result in very high risks. <strong>The</strong> stoppingdistance is also needed during area limiting e.g. for robotswhen dividing the working area into sectors.For door sensitive edges, it is important that the stoppingdistance is shorter than the soft part of the sensitive edge.Regulations <strong>and</strong> st<strong>and</strong>ardsIt is also important to measure the stopping time, to meet therequirements set by the machinery st<strong>and</strong>ards, directives <strong>and</strong>regulations. Here we can help, with our long experience inthe practical application of regulations <strong>and</strong> st<strong>and</strong>ards, fromthe viewpoints of both the authorities <strong>and</strong> production. In additionwe collaborate with the st<strong>and</strong>ardisation committeesresponsible for producing these st<strong>and</strong>ards. One exampleis EN ISO 13855, which deals with the placing of safetyWhere the safety distance is small, one can for example sit closeto the machine <strong>and</strong> work, as in the picture on the left. If the safetydistance is greater, it may be necessary to approach the machineto intervene, <strong>and</strong> also perhaps use additional protection to preventstarting when someone is within the protected distance.devices around a machine based on its stopping time. <strong>The</strong>st<strong>and</strong>ard is general for all types of machinery, although forsome, where there is a harmonised C st<strong>and</strong>ard, the requirementsfor minimum distance <strong>and</strong> stopping time measurementwill apply. In the case for example of mechanical press toolsthere is also a requirement in EN 692 for how stoppingtime measurements are to be performed, <strong>and</strong> in the case ofhydraulic press tools this is in EN 693.Annual checksWear in a machine is something that can affect braking <strong>and</strong>motors, which means that the stopping time of a machinecan change with time. Certain other changes in a machine,such as changing the weight of a workpiece or alterations inpneumatic pressure, can also affect the stopping time. Forthese <strong>and</strong> other reasons it is important to perform an annualcheck on the stopping time.How the stopping time affects the choice of protectiveequipment – an example<strong>The</strong>re was a case where we measured the stopping time ofthe rollers in a textile industry company. <strong>The</strong> company hadplanned to place light beams or a light curtain in front of therollers to prevent the operators from being caught in thematerial <strong>and</strong> dragged in. <strong>The</strong> stopping time measurementshowed that it took over one second for the rollers to stop.During this time the material was pulled in by almost twometres. In order to obtain sufficient protection distance, thelight beams would have needed to be positioned almostthree metres from the machinery, <strong>and</strong> a light curtain abouttwo metres away. <strong>The</strong> factory did not have so much space,nor was it realistic. <strong>The</strong> solution became instead verticalsliding safety barriers.8:2<strong>ABB</strong>
Stopping time <strong>and</strong> MachineDiagnosis ToolSmartApprovals:Smart shows graphs/values for:Stopping timeStopping distanceSpeedPosition of stopping signalFeatures:Easy to useMeasurements with orwithout electrical connection12345Smart is ideal for safety supervision <strong>and</strong> fordiagnosis of machine operationSmart has many valuable features for machine diagnosis:• Graphic presentation of measurements• Easy to analyse stopping characteristics <strong>and</strong> movement• Gives parameters for safety design (e.g. stop time)• Calculates minimum allowed safety distance• Shows how the stop distance can be optimised• Electrical reaction time <strong>and</strong> mechanical/hydraulicbreaking can be identified <strong>and</strong> analysed• Digital in/out signals <strong>and</strong> analogue inputsWebbsupport - SmartOn our web site http://customer.jokabsafety.com wehave a special page for you as a Smart customer.Here you can keep up to date by downloading the latestversion of Smart Manager, manuals, drive routines orread the FAQs.Ideal for machineperformance diagnosisCalculation of correct safetydistancesSmart is perfect for periodic monitoring of safety parameters<strong>and</strong> other conditions for the maintenance <strong>and</strong> troubleshootingof machines. Because Smart can compare old<strong>and</strong> new graphs, it becomes easy to find out the reasonsfor machine malfunctions. One can also supervise machinesduring operation <strong>and</strong> compare how they perform over time.Stopping units <strong>and</strong> sensorsSmart is a further development of our well established JSSM1Stopping Analyser. All the stopping units <strong>and</strong> sensors forthe JSSM1 can also be used with Smart. <strong>The</strong> amount ofconnection possibilities have also increased. Smart has 9digital I/O, one input for an incremental sensor (for position<strong>and</strong> speed) <strong>and</strong> two analogue inputs. This makes it easy tomeasure sequences in conjunction with motion lapse <strong>and</strong>other analogue values.678910111213<strong>ABB</strong>8:314
Smart ManagerSmart is controlled in real time by a computer using the Smart Managerprogram. This performs measurements, <strong>and</strong> the measured data can besaved <strong>and</strong> analysed. <strong>The</strong> measurements are saved in an SQL database,with the ability to export data to Microsoft Excel if necessary. <strong>The</strong> programcalculates the stopping time <strong>and</strong> protective distance, <strong>and</strong> can print out theresults, together with a graph of the event sequence. Smart Manager isavailable in several languages: English, Swedish, Danish, German, French,Czech <strong>and</strong> Polish. Translation into other languages can easily be arrangedas necessary. <strong>The</strong> program is free, <strong>and</strong> is available for downloading fromour web site when purchasing equipment to measure stopping times.Benefits:Simple program structureShows the entire stop sequenceProvides a machine movement“fingerprint”Compares measurementsCalculates stopping timeSaves measurements to adatabaseExports measured data to ExcelPrints out a completemeasurement report• Current values from sensors <strong>and</strong> the system• Start conditions• Stop signal conditions• Shutdown conditions• Measuring settings can be savedStart menu• Stop time data• Zoom control• Own cursorsMeasuringformStop signalgivenMeasuredresultRelay contactsdrop outMachinestoppedCalculations• Min., max. <strong>and</strong> average value <strong>and</strong>st<strong>and</strong>ard deviation from a series ofmeasurements• Protective distance can be calculatedSystem requirementsWindows XP/2000/Me/NT100 MB free disk space8:4<strong>ABB</strong>
Saving• Select measurement series• State extra information, e.g.the conditions <strong>and</strong> specialcircumstances for the measurements.Archiving• Search filter• Saved measurements• Exported measurements12Conversion of analogue signalsSmart can measure <strong>and</strong> show graphs for two different analogue sensors at the sametime, with its inputs for 0/4-20 mA. Conversion of the measured current values can bedone automatically by setting minimum <strong>and</strong> maximum values <strong>and</strong> the units for the inputs.In this way, for example, the results from an analogue pressure sensor can be shown <strong>and</strong>calculated as 0-400 bar instead of 4-20 mA, or an analogue load cell as 0-2 kN. This alsomeans that if it is desired for the system to be triggered at a certain force, that force canbe defined instead of needing to calculate the equivalent current value.PrintoutPrinting out is one of the most important functions of the program. Here is shown all the vital information about the measurementsthat is needed for such items as annual checking or providing the basis for CE labelling of a machine. Since theentire measuring sequence is shown in graphical format, one can underst<strong>and</strong> why the stopping time has a certain value <strong>and</strong>also, in some cases, see what needs to be done to minimise the stopping time. <strong>The</strong> graph also acts as a kind of “fingerprint"of the machine movements, which means that different measurements can be compared with each other to see how thestopping sequence varies from time to time, or from year to year. In this way the effects of e.g. worn brakes or the effect onthe machine control system can be seen. In order to get a complete basis from a measurement it is also important to statewhat assumptions have been made <strong>and</strong> what conditions applied when deciding when <strong>and</strong> how the stop signal was given.Among other things, the stop signal details the person measuring, the measuring equipment, the machinery, the calculations<strong>and</strong> the protective distance. <strong>The</strong> printout also has a replaceable company logo <strong>and</strong> a field for extra information.345678910111213<strong>ABB</strong>8:514
Smart <strong>and</strong> accessoriesSmart Logger<strong>The</strong> Smart Logger is the principal unit fordata collection. <strong>The</strong> logger has a USBconnection to the PC <strong>and</strong> 8 off M12 connections:one for the power supply to theI/O, one connection for an incrementalsensor, two connections for analoguesensors <strong>and</strong> four connections for otherI/O signals.<strong>The</strong> Logger encapsulation is watertight,with M12 connections to prevent theentry of particles <strong>and</strong> fluids in the workshopenvironment. To prevent the SmartLogger from being damaged by incorrectcurrents <strong>and</strong> voltages from externalequipment, all inputs <strong>and</strong> outputs, <strong>and</strong>external units, are electrically isolatedfrom the processor in the Smart Loggerby means of opto-couplers.Manufacturer:<strong>ABB</strong> AB/<strong>Jokab</strong> <strong>Safety</strong>, SwedenArticle number/Ordering data: 2TLA070300R0100 Smart LoggerDimensions:62 x 220 x 80 mm. (wxhxd)Weight:0.5 kgProtection class: IP 67Supply voltage:24 VDCResponse speed:max 1 msPositional accuracy:+/- 0.1 mmDigital I/O:8 inputs, 4 outputs (NPN OC)Analogue inputs:2 off, 0/4-20 mAEncoder:1 connection for a pulse sensorSM2 Button unit<strong>The</strong> SM2 is used in conjunction with theSmart Logger for measuring with a manualstop impulse, without an electricalconnection to the machine. When an SM2is, for example, pressed against anemergency stop button to stop themachine, the SM2 sends a signal to theSmart Logger to start the measurement.An LED on the SM2 lights when thedesired stop position is reached. <strong>The</strong> SM2is connected to the Smart Logger by anM12 connection.Manufacturer:Article number/Ordering data:Dimensions:Weight:Application area:Supply voltage:<strong>ABB</strong> AB/<strong>Jokab</strong> <strong>Safety</strong>, Sweden2TLA070300R0200 SM2 Button unitSize: 50 x 100 x 25 mm. (wxhxd)0.2 kgTwo-h<strong>and</strong>ed control unit, Emergencystop, etc.Fed from the Smart LoggerSM3 Relay unit<strong>The</strong> SM3 is used in conjunction with theSmart Logger for automatic stoppingtime measurements at the set position, oralternatively a manual stop pulse. When astop signal comes from the Smart Loggera relay switches in the SM3.<strong>The</strong> SM3 then sends a signal to theSmart Logger to start measuring, <strong>and</strong>also activates the relay outputs to stopthe machine. <strong>The</strong> relay in the SM3 isreset via the software when a newmeasurement is to be made. <strong>The</strong> SM3is connected to the Smart Logger by anM12 connection.Manufacturer:Article number/Ordering data:Dimensions:Weight:Application area:Supply voltage:Relay outputs:Encoder:<strong>ABB</strong> AB/<strong>Jokab</strong> <strong>Safety</strong>, Sweden2TLA070300R0300 SM3 Relay unit85 x 72 x 49 mm. (wxhxd)0.2 kgElectrical connection providing a stoppulse.Fed from the Smart Logger2 NO, 2 NC, 6A/250 VAC.1 connection for a pulse sensorSM11 Flag unit<strong>The</strong> Smart Logger is used in conjunctionwith the SM11 for automatic measurementsof the stopping time <strong>and</strong> stoppingdistance. <strong>The</strong> unit is located in a lightcurtain with the flag parallel to the beam.When the flag is activated, the lightbeam/light curtain is interrupted, <strong>and</strong> themachine stops. <strong>The</strong> SM11 is connectedto the Smart Logger by an M12 connection.Manufacturer:Article number/Ordering data:Dimensions:Weight:Application area:<strong>ABB</strong> AB/<strong>Jokab</strong> <strong>Safety</strong>, Sweden2TLA070300R1100 SM11 Flag unit145 x 85 x 37 (wxhxd). Shaft ø3 x 45 mm0.6 kgProtection class: IP 40Batteries:Power:Temperature:Installation:Charger:Ligh curtain, light beam10 rechargeable 1.2 V NiMH batteries.Total 12 VMax 1200 mAh (approx. 200 operations).0 to +45°C.On a table or a st<strong>and</strong>ard ¼” cameratripodSM148:6<strong>ABB</strong>
SM5 1250/2500 Linear sensor<strong>The</strong> SM5 is an incremental pulse sensorfor connection to a Smart Logger. <strong>The</strong>sensor is protected by a robust enclosure.<strong>The</strong> sensor <strong>and</strong> end of the cableare secured to the machine by powerfulmagnets. <strong>The</strong> SM5 is connected to theSmart Logger by an M12 connection.Manufacturer:Article number/Ordering data:SM5/1250:SM5/2500:Dimensions:Weight:Application area:Supply voltage:Max length:Max speed:Resolution:<strong>ABB</strong> AB/<strong>Jokab</strong> <strong>Safety</strong>, Sweden2TLA070300R0400 Linear sensor2TLA070300R0500 Linear sensorSM5/1250: 106 x 88 x 100 mm (wxhxd)SM5/2500: 114 x 125 x 116 mm (wxhxd)SM5/1250: 1 kgSM5/2500: 1.4 kgLinear movement, e.g. press toolsFed from the Smart Logger1250 or 2500 mm5 m/s0.1 mm123SM7 Rotation sensor<strong>The</strong> SM7 is an incremental sensor forconnection to a Smart Logger. <strong>The</strong>sensor detects rotational movement viaa wheel rolling against a shaft. <strong>The</strong> st<strong>and</strong>secures the sensor with the aid of justone knob. <strong>The</strong> st<strong>and</strong> itself is secured tothe machine by a powerful magnetic foot.<strong>The</strong> SM7 is connected to the Smart Loggerby an M12 connection.Manufacturer:Article number/Ordering data:Dimensions:Weight:Application area::<strong>ABB</strong> AB/<strong>Jokab</strong> <strong>Safety</strong>, Sweden2TLA070300R0700 SM7 RotationsensorSensor size: 46 x 40 x 59 (wxhxd)St<strong>and</strong> size: Extended, approx. 400 x 50 x90 (wxhxd)1.7 kg including st<strong>and</strong>Rotating motion, e.g. lathes, rollers45Supply voltage:Fed from the Smart LoggerMax speed:Resolution:Wheel circumference:5 m/s0.1 mm125 mm6SM13 Battery packSM13 is a battery pack for the SmartLogger, which makes the Smart acompletely mobile measuring tool. Withthe SM13 you don’t need to connect theLogger to a wall socket for power, <strong>and</strong>can easily move it from one machine toanother when you are measuring. Sincethe SM13 battery pack is the samephysical size as the SM11 flag unit, itfits snugly into the SM9 carrying case.<strong>The</strong> charger for the SM13 is called theSM14 <strong>and</strong> provides a charging time ofabout 3 hours 15 minutes (2100 mAh).<strong>The</strong> SM14 also acts as afast charger forthe SM11.Manufacturer:Article number/Ordering data:Dimensions:Weight:<strong>ABB</strong> AB/<strong>Jokab</strong> <strong>Safety</strong>, Sweden2TLA070300R2300 SM13 Battery pack145 x 85 x 37 mm (LxWxH)0.8 kgProtection class: IP 40Connector:Current rating: Maximum 0.9APower:BatteriesNegative pole at the centre of the chargingconnector2100 mAh. With normal use lastsabout 10-12 hours. (Higher capacity onrequest.)20 rechargeable 1.2 V NiMH batteries ofsize AA(R06). Total 24 V789SM9 Carrying case<strong>The</strong> SM9 is a practical carrying case withpockets to suit the various Smart units.Part of the protective foam insert in thelid of the case can be removed to makeroom for a laptop computer, so that allthe equipment required can be carried ina single case.Manufacturer:Article number/Ordering data:Dimensions:Weight:<strong>ABB</strong> AB/<strong>Jokab</strong> <strong>Safety</strong>, Sweden2TLA070300R0900 SM9 Carrying case535 x 155 x 430 mm (LxWxH)3.5 kg1011Other accessoriesName Article number Description<strong>ABB</strong>SM6 2TLA070300R0600 AC/DC converter for SmartSM14 2TLA070300R2400 Charger for flag unit SM11 <strong>and</strong>battery pack SM13.USB cable 2TLA070300R1500 USB cable for communication withcomputerExtension cables2TLA020056R2000,2TLA020056R2100,2TLA020056R2200,2TLA020056R2300 <strong>and</strong>2TLA020056R2400<strong>ABB</strong> <strong>Jokab</strong> <strong>Safety</strong>'s extension cableswith 5 conductors ideal for all Smartaccessories8:7121314
Sensors/switches/locks<strong>ABB</strong>
ContentsPage1Why should you use sensors/switches? ________________________________9:2How safe is a switch/sensor? _________________________________________9:3Non-contact safety sensor Eden _______________________________________9:4<strong>Safety</strong> Interlock switch JSNY5 _________________________________________9:8Magnetic Switch JSNY7 _____________________________________________9:10<strong>Safety</strong> Interlock Switch JSNY8 ______________________________________ 9:12<strong>Safety</strong> Interlock Switch JSNY9 _______________________________________9:14Magnetic lock Magne _______________________________________________9:16Process lock Dalton _______________________________________________ 9:22<strong>Safety</strong> lock Knox __________________________________________________ 9:2823456789101112Descriptions <strong>and</strong> examples in this book show how the products work <strong>and</strong> can be used. This does not mean that they can meet the requirements forall types of machines <strong>and</strong> processes. <strong>The</strong> purchaser/user is responsible for ensuring that the product is installed <strong>and</strong> used in accordance with theapplicable regulations <strong>and</strong> st<strong>and</strong>ards. We reserve the right to make changes in products <strong>and</strong> product sheets without previous notice. For the latestupdates, refer to www.abb.com/lowvoltage. 2011.<strong>ABB</strong> 9:11314
Why should you usesensors/switches?- to supervise doors <strong>and</strong> hatches arounddangerous machines!Assurance that a machine stops when a door or a hatch isopened can be solved by using different types of switches<strong>and</strong> sensors which are monitored with a safety relay or asafety PLC. Switches <strong>and</strong> sensors are available both asnon-contact (dynamic or magnetic) <strong>and</strong> various types ofinterlocking devices. Interlocking devices can be used whenit is required, via a signal, to lock a gate during processesthat cannot be stopped during certain operations. <strong>The</strong>y arealso used with machines that have a long stopping time toprevent someone from entering before the machine hasstopped.- to ensure that a position is reached!<strong>The</strong> sensor monitors that the robot is st<strong>and</strong>ing still in amonitored position when someone enters the robot´s workingarea. <strong>The</strong> robot is then only stopped by the program. Ifthe robot leaves the position the power will be cut directly.This is used when the robot does not stop safely withoutrestarting problems.- to manage the safety in harshenvironments!Non-contact dynamic sensors have a long lifetime becausethey are not physically mechanically operated. <strong>The</strong>y alsoendure very harsh environments, e.g. cold, heat, highpressurewash-down which is important in the food industryfor example. Because the sensors are small, they are veryeasy to position <strong>and</strong> can even be completely concealed indoors <strong>and</strong> hatches.9:2<strong>ABB</strong>
Eden -highest safety level <strong>and</strong> reliabilityOur recommendation is to use the Eden sensor becauseit is the safest <strong>and</strong> most reliable solution. <strong>The</strong> Eden sensoris a non-contact switch <strong>and</strong> has a dynamic function. Alsoit is possible to connect up to 30 Eden sensors in series<strong>and</strong> still achieve PL e according to 13849-1.What requirements should one have onsensors/switches?<strong>The</strong> sensor/switch shall be reliable from both the safety<strong>and</strong> production point of view.• A person must be able to trust that dangerousmovements <strong>and</strong> functions are safely stopped by thesensors/switches.• From the production point of view unintentional stopsshould be avoided.• St<strong>and</strong>ard EN ISO 13 855 now includes requirementsfor safety distances for interlocked doors without lockingfunction.<strong>Safety</strong> level<strong>Safety</strong> InterlockswitchEden -sensor withdynamic signalMagnetic switchReliability1234567How safe is a sensor/switch?In order to trust the safety function it is essential to be aware that a safetysensor/switch must be mounted <strong>and</strong> be used according to the specifications.<strong>The</strong> certification authorities only test the product according to the appropriatest<strong>and</strong>ards <strong>and</strong> to the specifications from the manufacturer.Mechanical switchesFor mechanical switches, e.g. key operated, this means thata door or a hatch has to constructed to small tolerances inorder for the switch, the key or the mounting brackets to lastaccording to the life time specification from the supplier. <strong>The</strong>screws holding the parts have to be locked in such a waythat they cannot be loosened. In order to prevent materialfrom getting into the slot for the key the environment has tobe clean. If a door goes outside the design tolerances fromwear, the screws loosen or material comes into the slot, thismay lead to the interlocked switch not giving a stop signalwhen the door is opened. Even two mechanical switcheson a door could fail to an unsafe state if the door somehowgets outside the tolerances of the switches. To prevent accidentsthe mechanical switch normally needs continuouschecks of both the switch <strong>and</strong> the installation.Non-contact sensors/switchesFor non contact sensors the risks associated with mechanicalswitches (see above) do not exist. If screws, bracketsor sensors get loose, it will lead to a stop signal. <strong>The</strong>reforeonly one sensor with dual or dynamic function is needed inorder to reach the highest safety level. <strong>The</strong>re are two typesof non-contact sensors - active <strong>and</strong> passive. <strong>The</strong> activesensor, Eden, is constantly communicating via a dynamicsignal between the two parts <strong>and</strong> any failure will directlylead to a stop signal. <strong>The</strong> passive type, a magnet switch, hastwo reed contacts which are activated by a coded magnet.Both the passive <strong>and</strong> the active sensors are checked everytime a door is opened. From a safety point of view the activesensor, Eden, is to be preferred because it is checkedconstantly whereas the passive sensor is only checkedwhen a door opens.From the reliability point of view a long detection distancewith large tolerances <strong>and</strong> a well defined on <strong>and</strong> off positionis needed. <strong>The</strong> active sensor, Eden, fulfils these dem<strong>and</strong>s. Amagnet switch has smaller tolerances <strong>and</strong> an intermediateposition where only one contact opens. A bad installationor vibrations can lead to an unintentional stop if one contactopens <strong>and</strong> closes again. <strong>The</strong> supervision of a two channelsystem is based on both contacts having to be operatedin order to permit a new start. In a dynamic safety circuitthere is only one pulsed signal <strong>and</strong> therefore no intermediateposition.8910111213<strong>ABB</strong> 9:314
Non-contact safety sensorEdenApprovals:TÜV Nord<strong>Safety</strong> sensor for:Doors <strong>and</strong> hatchesPosition controlSector detectionSlot detectionFeatures:13 ± 215 ± 213 ± 2 mmFlexible mounting <strong>and</strong><strong>The</strong> ability to operate atlong distances.A non-contact safety sensor for the highestsafety levelEden - Adam <strong>and</strong> Eva is a non-contact safety sensor for use oninterlocked gates, hatches etc. A coded signal is transmitted fromthe control device Vital or from the safety PLC Pluto via Adamto Eva which modifies the signal <strong>and</strong> sends it back again. <strong>The</strong>maximum sensing distance between Adam <strong>and</strong> Eva is currently15 mm ± 2 mm.Up to 30 Edens can be connected in series to Vital <strong>and</strong> stillachieve the same safety level in the safety circuit. It is alsopossible to connect safety light beams <strong>and</strong> E-stops in the samesafety circuit.Adam is available with cable lengths up to 10 m <strong>and</strong> withM12 connectors. <strong>The</strong> LED on Adam provides indication of threedifferent conditions, contact/non-contact between Adam <strong>and</strong>Eva <strong>and</strong> safety status. <strong>The</strong> same information is also availablevia the Adam connection cable. Eden E is available for harshenvironments, as are Adam E <strong>and</strong> Eva E. Rapid blinking servesas an alignment aid. <strong>The</strong>re are also coded versions, Eden C,Eden EC, Adam EC <strong>and</strong> Eva EC.55Cat. 4/PL e according toEN ISO 13849-1 togetherwith Vital or PlutoNon-contact detection, largesensing distance 0 - 15 mm± 2 mmUp to 30 sensors in serieswith the highest level ofsafety PL eVersitile mounting, 360°detectionProtection class IP 67/IP69.<strong>The</strong> dynamic signal passesthrough wood <strong>and</strong> plastic(not metal)Status information with LEDon the sensor <strong>and</strong> in thecable connection.Small hysteresis (< 1mm)9:4<strong>ABB</strong>
Application examples - EdenEden to detect positionAdam <strong>and</strong> Eva has contactonly if they are within 15 mmfrom each other.Adam onwall.Eden used for sector detectionMetal stops the signal between Adam <strong>and</strong>Eva. Additional Eden sensor(s) can bemounted to detect metal plate(s) in place.Eden used to detect the position of thesaw guard.Wood, plastic <strong>and</strong> other non-metallicmaterials let the signal pass betweenAdam <strong>and</strong> Eva.Eva on robot.Metal123456Mounting – EdenDA1DA1 x 2Wood, plasticetc80 mm115120Eden can be hidden in doors <strong>and</strong> hatchesNon-metallic door material betweenAdam <strong>and</strong> Eva allows the signal throughMounting Adam with integral cable.Mounting with one protection plate (DA1) for AdamM12 using prewired moulded M12 connector. For M12connection, a straight contact is recommended.Mounting with two protection plates (DA1) for AdamM12 using M12 connector with gl<strong>and</strong>ed cable.Wrong mounting without protection plate maycause permanent damage to sensor.7891011*Notes:Four protection plates plates are supplied with Adam M12.To protect Adam <strong>and</strong> Eva protection plate (DA1) can beused on both sides.12DA1, protection plate 2,5 mm* <strong>Safety</strong> screwDA2DA2 mounting<strong>The</strong> DA2 mounting spacer must be used in order tophysically protect Eden from damage. Four spacers areprovided with each Adam <strong>and</strong> Eva.<strong>ABB</strong> 9:51314
Connection of Eden to PlutoConnection of Eden to Vital 19:6<strong>ABB</strong>
Technical data – EdenManufacturerArticle number/Ordering data:Eva*Eva E*Adam M12*Adam 3 m*Adam 10 m*Adam 20 mAdam E 10 mAdam E 0,5 M12*Adam E 20 m* also available in grey<strong>Safety</strong> levelIEC/EN 61508-1...7EN 62061EN ISO 13849-1<strong>ABB</strong> AB/<strong>Jokab</strong> <strong>Safety</strong>, Sweden2TLA020046R00002TLA020046R06002TLA020051R00002TLA020051R02002TLA020051R04002TLA020051R05002TLA020051R06002TLA020051R07002TLA020051R0800SIL3SIL3kat. 4/PL ePFH D 4,50×10 -9ColourWeightYellow <strong>and</strong> blackEva: 26 gEva E: 36 gAdam M12: 30 gAdam 3 m: 220 g incl. cableAdam 10 m: 650 g incl. cableAdam E10 m: 660 g incl. cableAdam EC 10 m: 660 g incl. cableAdam E 0,5 m + M12: 100 gincl. cablePower supply 24VDC +15%-25%Power consumptionMax cable lengthAmbient temperatureEden/Eden CEden E/ECProtection classEdenEden EMountingDetection distance maxAdam/Eva 15 ± 2 mmAdam E/Eva E 12 ± 2 mmHysteresis approx. 1 mmAdam: without info output 45 mAwith info output max 55 mAsee Vital technical data-40°C … +70°C (operation)-25°C … +70°C (stock)-40°C … +70°C (operation)(Test ok +90°C ... +100°C)-25°C … +70°C (stock)IP67IP69KMetal may have influence on detection distance.This can be prevented by protection plates, DA1.Minimum distance to metalwhen there is metal on one ormore sides.Adam/EvaAdam E/Eva EInstallation EdenM4 screw, e.g. safety screw20-053-42. Max. torque 2 Nm.Screw to be locked with Loctiteor similar.Installation Eden EM4 screw, e.g. safety screw20-053-42. Max. torque 2 Nm.Screw to be locked with Loctiteor similar.Flash 2 mm before red position.Flash 2 mm before red position.OneMore0 mm 2,5 mm0 mm 0 mmMaterialChemical resistanceMacromelt:PU (EdenE):LED on AdamGreen:Flashing:Macromelt (Based on polyamid)Eden E for extreme surroundings.Cutting oils, vegetable <strong>and</strong>animal oils, hydrogen peroxide,diluted acids <strong>and</strong> bases: goodAlcohol <strong>and</strong> strong acids: notrecommendedCutting oils, vegetable <strong>and</strong>animal oils,hydrogen peroxide,diluted acids <strong>and</strong> bases,alcohols: goodStrong oxidating acids: notrecommendedAdam E 0,5 M12,Minimum distance betweenAdam E 10 mEden pairs50 mmM12<strong>and</strong> Eva ELife>10 7 cyclesfor extremesurroundings.<strong>ABB</strong> 9:7Red:Fast flashing:CableConnectorConnectionsBrown (1)White (2)Blue (3)Black (4)Grey (5)Eva within range, safety circuitclosed (door closed)Eva within range, earlier safetycircuit open (door closed)Eva out of range, safety circuitopen (door open)Eva is within 2 mm from maximumsensing distance (door closed)3 or 10 m, ø 5.7mm, black, PVC5 x 0.34mm² + screen, UL 2464M12: 5-pin male contact+24 VDCDynamic signal in0 VDCDynamic signal outInfo output, see below24 VDC when LED is green or flashing(tolerance -2 VDC), 10 mA max0 VDC when LED is red. (tolerance +2 VDC)Warning: Incorrect connection may cause permanent damage toAdam devices.ConformityCertificationsAdam M12Adam 3 mAdam 10 mEdenEva2006/42/EGEN ISO 12100 1/2, EN 954-1,EN 60204-1, EN ISO 13849-1,EN 1088, GS-ET 15TÜV NordEden E/EC<strong>Safety</strong> screw. For morescrew options see theproduct list.<strong>Safety</strong> screwdriver bit1234567891011121314
<strong>Safety</strong> Interlock switchJSNY5Approvals:Application:GatesHatchesFeatures:2 NC + 1 NO (actuator in)4 actuating positionsActuator holding force 10 or30 NSwitch operational descriptionJSNY5 offers three contacts which gives both the two contactsneeded for high safety level as well as a contact forthe indication of operating status.<strong>The</strong> advanced design offers the choice of four operatingpositions from only two actuator entries by simply rotatingthe head through 180 o .However, when installed <strong>and</strong> in it's working condition onlyone entry can be used, ensuring no other element can tamperwith the switch function.When mounting the switch from the front two elongatedholes are provided to aid alignment with two set screw holesfor accurate fixing. Top fixing is also possible.Three cable entries allow for a variety of cabling optionsincluding through wiring.Positive forced disconnected contacts<strong>The</strong> design assures that the contacts will not fail or be heldin a normally closed position, due to failure of the springmechanism or the welding/sticking of the contacts.Protection from unauthorised or incidental accessTo avoid unauthorised operation the JSNY5 switch ismanufactured using multicoding to GS-ET 15. <strong>The</strong> switchcannot be defeated by screwdrivers, magnets or any othermechanism.<strong>Safety</strong> level<strong>The</strong> positive forced disconnect contacts gives a high safetylevel. By combining the JSNY 5 with one of our suitable safetyAfter opening the snap-on cover, the head portion can be removed(version A), after turning the head through 180 0 (version B) itcan be replaced onto the body of the switch <strong>and</strong> be locked intoposition by closing the snap-on cover. This ensures 4 actuatingpositions are possible.relays as for example from the RT-series, the safety PLCPluto or Vital (Tina) the requirements for both hatch <strong>and</strong> gateswitch supervision can be fulfilled. To obtain the same levelof safety as Eden, two switches per gate are required.Regulations <strong>and</strong> St<strong>and</strong>ards<strong>The</strong> JSNY5 is designed <strong>and</strong> approved in accordance withappropriate directives <strong>and</strong> st<strong>and</strong>ards. See technical data9:8<strong>ABB</strong>
Technical data – JSNY5ManufacturerArticle number/Ordering data:JSNY5A holding force 10 NJSNY5B holding force 30 NColourEnclosure/CoverActuatorMin. opening radius foractuator on a hatchAmbient operatingtemperatureContacts(actuator key inserted)Mechanical lifeMax switching frequencyFixingAssembly - JSNY5<strong>ABB</strong> AB/<strong>Jokab</strong> <strong>Safety</strong>, Sweden2TLA020022R00002TLA020022R0100Black <strong>and</strong> yellow labelPA 6 (UL94-VO)Steel150 mm-30°C to +80°C2 NC + 1NO(NC are direct opening action)1 Million switch operations30/minCable entry 2 x M20 x 1,5WeightDegree of protectionbody 2 x M5, actuator 2 x M5approx. 0.13 kgIP65 IEC 60529 / DIN VDE0470 T1Rated insulation voltageRated operational currentUtilisation categoryShort-circuit protectionCSA400 V AC5AAC-15/DC-13Fuse 6A Slow acting, 16Aquick acting5A 300V AC B300(same polarity)B 10d JSNY 5A: 2,00×10 6JSNY 5B: 2,00×10 6Conformity2006/42/EGEN ISO 12100 1/2, EN 954-1,EN 60204-1, EN ISO 13849-1,EN 1088, GS-ET 151234567Easy accessibility for wiring<strong>The</strong> snap-on cover is released by a screwdriver<strong>and</strong> can be opened to an angle of135 0 providing easy access to the wiringterminals. Should the snap-on covernot provide adequate security, a retainingscrew can be used.Protected contact blockA transparent cover protects the contactblock from external elements during theinstallation <strong>and</strong> wiring process.Prevention of actuator dismantlingA cover plate with a one-way snap-fitwhich seals the mounting screws preventsunauthorised dismantling of the actuatorassembly. <strong>The</strong> cover plate must be mountedto prevent overtravel of the switchingmechanism.89Contact Description - JSNY5mm21,553,53,011-1221-2233-34Traction travelActuatorwithdrawnActuatorinsertedOverlapping contact 33 - 34.<strong>The</strong> overlapping contact 33 -34 enablesoperational status indication of eg. incorrectadjustment of switch before the positiveforced disconnect NC contacts open.Note!<strong>The</strong> switch must not be used as an endstop!101112Accessories <strong>and</strong> spare parts• St<strong>and</strong>ard actuator• Flexible key for smaller opening radius• Cable gl<strong>and</strong>• Snap-on cover• Tina 2A with M20 connection for a dynamic loop• Tina 2B with cable connection• Tina 3A with M12 <strong>and</strong> M20 connections for a dynamic loop13<strong>ABB</strong> 9:914
Magnetic SwitchJSNY7Approvals:Application:GatesHatchesPosition controlFeaturesSmall sizeIP 67Switch operation description<strong>The</strong> magnetic switch is designed to operate in dirty industrialenviron ments <strong>and</strong> is certified to the highest level ofsafety regulation when working together with a suitable<strong>ABB</strong> <strong>Jokab</strong> <strong>Safety</strong> safety relay or <strong>Safety</strong>-PLC Pluto. <strong>The</strong>magnetic switch is small <strong>and</strong> resistant to both dirt <strong>and</strong> water,<strong>and</strong> has no dust collecting cavities making it usefull inenvironments where hygiene is paramount. <strong>The</strong> small sizeof the switch makes it easy to position <strong>and</strong> hide on gates<strong>and</strong> hatches.<strong>The</strong> magnetic switch has a long working life since nomechanical contact is made during operation.Contacts<strong>The</strong> magnetic switch has one closing <strong>and</strong> one openingcontact. Both contacts have to be monitored. <strong>The</strong> contactsmay be monitored by either the RT9 safety relay or othersuitable relays in the new RT-series, i.e. RT6, RT9 or <strong>Safety</strong>PLC Pluto.JSNY7 is resistant to both dirt <strong>and</strong> water.Protection from unauthorised or incidental accessTo avoid unauthorised operation of the JSNY7 switch it isonly possible to actuate the JSNY7R with the coded magnet,JSNY7M. Other magnets, screwdrivers <strong>and</strong> tools have noaffect on the switch contacts.<strong>Safety</strong> level<strong>The</strong> JSNY7 is approved to the highest level of safetyregulations,PL e according to EN ISO 13849-1 togetherwith safety relay in the RT-series or Pluto PLC.Regulations <strong>and</strong> St<strong>and</strong>ards<strong>The</strong> JSNY7 is designed <strong>and</strong> approved in accordance withappropriate directives <strong>and</strong> st<strong>and</strong>ards. See technical data.9:10<strong>ABB</strong>
13Technical data – JSNY7ManufacturerArticle number/orderingdataJSNY7R-3 Magnetic switch3 m cableJSNY7R-6 Magnetic switch6 m cableJSNY7R-10 Magnetic switch10 m cableJSNY7M Magnetic switchColourEnclosure/CoverSupply voltage maxSwitch current maxMax switching frequencyMechanical lifeOperating temperaturerange<strong>ABB</strong> AB/<strong>Jokab</strong> <strong>Safety</strong>, Sweden2TLA020023R00002TLA020023R01002TLA020023R02002TLA020024R0000BlackPA 6 (UL94-VO)30 VDC100 mA1 Hz3 x 108 switch operations,depending on load-5°C to +70°C (moveable)-20°C to +70°C (fixed)Connection Cable ø4.5, 4x0.25 mm2, 3meter ; PVC(other lengths upon request)Switching pointWeightProtection classMin. switch-on point 5 mmMax. switch-off point 14 mmCoded magnet: 32 gSensor with 3m cable: 133 gIP67Electrical connection description - JSNY7B 10d JSNY 7R-3: 3,00×10 7JSNY 7R-6: 3,00×10 7JSNY 7R-10: 3,00×10 7Conformity6,510,77,22,52534,5687888mm14Electrical connectionTwo-channel switching, high safety level.blackgrey2006/42/EGEN ISO 12100 1/2, EN 954-1,EN 60204-1, EN ISO 13849-1,EN 1088, GS-ET 15brownblue501234567Door 1Electrical Connection exampleThree JSNY7 connected to RT6safetyrelay.8Door 2NOTE!<strong>Safety</strong> components drawn in releasedposition.9Door 3NOTE!This solution with 3 magneticswitches only complies with category3 as per EN 954-1/EN ISO13849-1.To reach highest level of safety onlyone magnetic switch should beconnected to the safety relay.10111213<strong>ABB</strong> 9:1114
<strong>Safety</strong> Interlock SwitchJSNY8Approvals:Application:GatesHatchesFeatures:Robust designUniversal installation2 NC + 2 NC outputs1000 N actuator holdingforceDescription<strong>The</strong> JSNY8 <strong>Safety</strong> Interlock Switch, in conjunction with themachine control system, enables gates/movable guards etc tobe locked in their protective positions, thus preventing accessto machinery until dangerous operations have ceased.Applications include:• processes which cannot be interrupted, such as welding.• machinery with a long stopping procedure, such as papermachinery that requires a long braking operation.• prevention of unauthorised access to a particular area.<strong>The</strong> JSNY8 has 2 NC + 2 NC positive force disconnectioncontacts. <strong>The</strong> first pair closes when the actuator key is pushedinto the head. <strong>The</strong> other pair closes when the locking mechanismis in the locked position. <strong>The</strong> head can be set in four positions,thus providing the safety device with four different operatingpositions. <strong>The</strong>se are selected by twisting the head as shownin the diagram above. <strong>The</strong> leading edges of the actuator keyare reinforced <strong>and</strong> bevelled in order to guide it properly into thehole. <strong>The</strong> JSNY8 is encased in a robust metal housing (IP67)providing a high level of protection to the internal operatingcomponents.Two versions<strong>The</strong> JSNY8 is available in two basic versions, either with a springlock or a magnetic lock.In the spring lock (JSNY8S) version, the locking mechanismmoves into the locked position directly when the door is closed<strong>and</strong> the actuator key is pushed into the lock. <strong>The</strong> actuator key canonly be released <strong>and</strong> the gate opened by supplying operationalvoltage to the solenoid (E1-E2).<strong>The</strong> JSNY8S also has a emergency ’unlocking’ facility to enablethe actuator key to be released without the energisationof the solenoid (E1-E2).In the magnetic lock (JSNY8M) version, the locking mechanismis only in the locked position when the solenoid (E1-E2)is supplied with operating voltage. Release of the actuator keyis only possible when the operating voltage is removed fromthe solenoid (E1-E2).Optional features<strong>The</strong> following optional features are available:• actuator to operate at smaller radius.• customer specific applications.Tamper-proof<strong>The</strong> JSNY8 is tamper-proof. <strong>The</strong> safety device cannot be manipulatedby screwdrivers, magnets or other tools.<strong>Safety</strong> level<strong>The</strong> JSNY8 has double forced disconnection contacts to theactuator key <strong>and</strong> the locking mechanism. <strong>The</strong> actuator key hasa triple coding design. To achieve maximum safety level in theconnection to the machine’s control system, it is recommendedthat the JSNY8 is monitored by an appropriate <strong>ABB</strong> <strong>Jokab</strong> <strong>Safety</strong>safety relay, Pluto safety-PLC or Vital. To obtain the same levelof safety as Eden, two switches per gate are required.JSNY8SJSNY8MRegulations <strong>and</strong> St<strong>and</strong>ards<strong>The</strong> JSNY8 is designed <strong>and</strong> approved in accordance with appropriatedirectives <strong>and</strong> st<strong>and</strong>ards. See technical data.9:12<strong>ABB</strong>
Technical data – JSNY8ManufacturerArticle number/Orderingdata:JSNY8M 24DCJSNY8S 24DCColourEnclosureActuator keyMin. operating radius forhatchActuator holding forceWorking temperatureContactsactuator key insertedlocking mechanism, lockedpositionMechanical service lifeInstallation fixings<strong>ABB</strong> AB/<strong>Jokab</strong> <strong>Safety</strong>, Sweden2TLA020030R00002TLA020030R0100BlackMetal housingSteel & plastic (PA6)400 mm (smaller radius onrequest)1000 N-30°C to +60°C2 NC2 NC1 million switch operations3 x M5Cable entry 2x M20 x 1.5WeightEnclosure classOperating voltageRated insulation voltage550 gIP6724V DC, 230 V AC250VRated operating currentUtilisation categoryShort-circuit protectionPower consumption10AAC 12 250V/10AAC 15 230V/4AFuse 10A slow-acting, 16Aquick-acting5.2 WB 10d JSNY 8M 24 VDC: 2,00×10 6JSNY 8M 230 VAC: 2,00×10 6JSNY 8S 24 VDC: 2,00×10 6JSNY 8S 230 VAC: 2,00×10 6Conformity2006/42/EGEN ISO 12100 1/2, EN 954-1,EN 60204-1, EN ISO 13849-1,EN 1088, GS-ET 19,EN 60947-5-1ø5,5520503012345681Note: Do not use switch as endstop!JSNY8/9N2Rmin: 150 mmFlexible actuator.78910Contact description JSNY8S/M - JSNY8S/M11ContacttravelActuator withdrawnContact openedContact closed12JSNY8SKey actuator insertedNormally locked(E1-E2 unpowered)JSNY8MKey actuator insertedNormally unlocked(E1-E2 unpowered)Actuator insertedF min = 20 N13<strong>ABB</strong> 9:1314
<strong>Safety</strong> Interlock switchJSNY9Approvals:Application:GatesHatchesFeatures:<strong>The</strong> control unit offers eight operatingpositions that provide theactuator with eight different inputoptions.Compact <strong>and</strong> robustUniversal installation2 X (1NO+1NC)Actuator holding force1500 NEight head configurationsLED status indication(optional)Description<strong>The</strong> JSNY9 is used for locking a gate/hatch, to prevent accessto machinery, until hazardous operations have ceased.Applications include:• processes which cannot be interrupted, e.g. welding.• machinery with a long stopping time, e.g. paper machinerywhich requires a long braking operation.• prevention of unauthorised access to a particular area.<strong>The</strong> JSNY9 is equipped with a 2 x (1NO +1 NC) contactconfiguration, the first pair of contacts changeover when thekey is inserted. <strong>The</strong> second pair of contacts changeover whenthe locking mechanism is in the locked position.<strong>The</strong> JSNY9 switch is encased in a robust plastic housing<strong>and</strong> can be mounted either horizontally or vertically. <strong>The</strong>advanced design of the head provides eight possible keyinsertion options, this is achieved by mounting the headeither vertically or horizontally on the base unit, as shown inthe diagram. <strong>The</strong> location for the actuator key is reinforced<strong>and</strong> bevelled to ensure a smooth operation.Two versions<strong>The</strong> JSNY9 switch is available in two basic versions, either witha spring lock or an electro-magnetic locking mechanism.<strong>The</strong> JSNY9S (spring lock) switch operates immediatelywhen the gate/hatch is closed, i.e. when the key actuator isinserted into the locking mechanism. <strong>The</strong> gate/hatch can beopened <strong>and</strong> the actuator key released only by supplying theoperational voltage to the solenoid connections (E1 E2). <strong>The</strong>JSNY9S also has a manual emergency unlocking facility toenable authorised release of the actuator key.In the JSNY9M (magnetic lock) version, the mechanismis only locked when the gate/hatch is closed i.e. the actuatorkey inserted <strong>and</strong> the solenoid (E1 E2) supplied with theoperating voltage. <strong>The</strong> gate/hatch can only be opened whenthis operating voltage is removed.Optional features<strong>The</strong> following optional features are available:• LED display, indicating the status of the actuator key,locking mechanism <strong>and</strong> contacts.• Actuator to operate at smaller radii.• Customer specific applications.Protection from unauthorised access<strong>The</strong> JSNY9 is designed to protect against unauthorisedaccess; screwdrivers, magnets or similar tools cannotoperate the safety switch.<strong>Safety</strong> levelIn order to achieve a high safety level, the JSNY9 switch isequipped with dual sets of contacts operated with a codedactuator key . In order to meet the required installation safetylevel it is recommended that the JSNY9 safety switch ismonitored by an appropriate <strong>ABB</strong> <strong>Jokab</strong> <strong>Safety</strong> safety relay.To obtain the same level of safety as Eden, two switches pergate are required.Regulations <strong>and</strong> St<strong>and</strong>ards<strong>The</strong> JSNY9 is designed <strong>and</strong> approved in accordance with appropriatedirectives <strong>and</strong> st<strong>and</strong>ards. See technical data.9:14<strong>ABB</strong>
Technical data – JSNY9Utilisation categoryAC 15 230V / 4A1Manufacturer<strong>ABB</strong> AB/<strong>Jokab</strong> <strong>Safety</strong>, SwedenShort-circuit protectionFuse 6 A slow actingArticle number/Orderingdata:JSNY9S 24V AC/DCJSNY9M 24V AC/DCColourEnclosure/CoverActuatorMin. key operating radius2TLA020036R44002TLA020036R4500BlackPolyamid PA6Steel & plastic (PA6)400 mm (smaller radiusavailable on request)Power consumptionB 10dConformity1.1 VA (56 VA during 0.2s)JSNY 9M: 2,00E+06JSNY 9S: 2,00E+062006/42/EGEN ISO 12100 1/2, EN 954-1,EN 60204-1, EN ISO 13849-1,EN 1088, GS-ET 19,EN 60947-5-123Actuator holding forceOperating temperatureContactsactuator inLocking mechanism in lockedposition1500 N- 25° C to + 70° C1 NO + 1 NC1 NO + 1 NC (NC are directopening action)4Mechanical life1 million switch operationsInstallation fixing4 x M5Cable entry 3 x M20 x 1.55Weightapprox. 300 gEnclosure ClassOperating voltageIsolation voltageIP6724 V AC/DC250 V6<strong>The</strong>rmal Current2.5 ANB.<strong>The</strong> safety switch must not beused as an end stop!7Rmin: 40022,4ø4,832-3619,59,679,4203 157,8851211537,545ø14950305135170124ø5,33xM20JSNY8/9N1ø5,5520981322 51843042,5JSNY8/9N2Rmin: 150 mm10Contact description - JSNY9 S/M11Actuator travelActuator extractedContact open12Contact closedJSNY9SActuator insertedLocked position(E1-E2 unpowered)JSNY9MActuator insertedUnlocked position(E1-E2 unpowered)JSNY9SLA/MLASee separate data sheetfor switches with LEDindication.Actuator insertedF min = 27 N ± 15%13<strong>ABB</strong> 9:1514
Magnetic lockMagneApproval:TÜV NordApplication:Magne 2Electrical locking of doors<strong>and</strong> hatches to productionapplications that aresensitive to unintentional/unnecessary interruptions.For safety supervision theMagne 2 has an integratedEden.Magne 1Features:Magnetic lock with indicationMagne is a magnetic lock that is designed for industrialapplications <strong>and</strong> that can withst<strong>and</strong> harsh environments.As it is designed with no moving parts, it is durable <strong>and</strong>long lasting. Magne, with its electro-magnet, keeps adoor locked with a holding force up to 1,500 N <strong>and</strong> alsomagnetic material does not attach to the magnetic surfacewhen the power is off.Use of M12 connectors makes it easy to connect severalMagne units <strong>and</strong> Eden sensors in series enabling control<strong>and</strong> monitoring by either a Pluto safety PLC or a Vital safetycontroller. Via the connection cable it is also possible toobtain an indication signal informing if the Magne unit islocked or not.No moving partsStrong Magnetic holdingforce: 1500NCan st<strong>and</strong> <strong>and</strong> operate inharsh environmentsLocked/unlockedindicationPossible toconnect in series with EdensensorsNo current peaks onactivationMagne 2 in combination witha h<strong>and</strong>le profile provides acomplete door solutionAccessories:• Mounting kit for conventional door, with fitting <strong>and</strong>screws for assembly on <strong>ABB</strong> <strong>Jokab</strong> <strong>Safety</strong> Quick-Guardfencing system (5-15 mm door gap)• Plastic h<strong>and</strong>le• H<strong>and</strong>le profile for mounting on a hinged door with<strong>ABB</strong> <strong>Jokab</strong> <strong>Safety</strong>’s Quick-Guard fencing system(5-15 mm door gap).Magne is easy to assemble, adjust <strong>and</strong> dismantlein <strong>and</strong> out of the T-slot of the Quick-Guard fencingsystem.9:16<strong>ABB</strong>
Models <strong>and</strong> accessoris - MagneH<strong>and</strong>le profile that hides Magne completelywhen the door is closed.Magne 1A with installation kit(JSM D21B) <strong>and</strong> h<strong>and</strong>le (incl. screw) fittedon profile.Models <strong>and</strong> ordering dataMagne 1A 2TLA042022R0000 Process lock, Incl. anchorplateMagne 2A 2TLA042022R1000 Process lock with built-inEden, incl. anchor plateMagne 1B2TLA042022R0100 Process lock incl.anchor plate with built-inpermanent magnet (30 N)Magne 2B 2TLA042022R1200 Process lock incl. anchorplate with built-in Eden <strong>and</strong>built-in permanent magnet(30 N)Magne 2Ax2TLA042022R1300 Process lock with builtinEden <strong>and</strong> 5-pin M12connector for Urax, incl.anchor plateMagne 2Bx 2TLA042022R1400 Process lock with builtinEden <strong>and</strong> 5-pin M12connector for Urax, incl.anchor plate with built-inpermanent magnet (30 N)AccessoriesJSM D21B 2TLA042023R0500 Assembly kit for anchorplate2TLA042023R0100H<strong>and</strong>le profile for MagneJSM D23 2TLA042023R0200 Fixture for sliding doorJSM D24 2TLA042023R0300 Assembly kit for Eva2TLA042023R04002TLA042023R1000Anchor plate withpermanent magnetH<strong>and</strong>le for JSM D21B12345678Magne 2A with installation kit(JSM D23) for sliding door fitted on profile.9101112Magne 2A with installation kit(JSM D21B, JSM D24) <strong>and</strong> h<strong>and</strong>le(incl. screw) fitted on profile.13<strong>ABB</strong> 9:1714
Technical data – MagneManufacturer<strong>ABB</strong> AB/<strong>Jokab</strong> <strong>Safety</strong>, Sweden<strong>Safety</strong> levelIEC/EN 61508-1...7EN 62061EN ISO 13849-1SIL3SIL3Kat. 4/PL ePFH D 4,50×10 -9Power supply Magnet: 24 VDC + 15% -20%Eden: 17–27 VDC, ripple max10%Power consumptionOperating temp. rangeProtection classWeightMaterialHolding forceContactsSwitch current maxMechanical lifeConnectorConnectionsMagnet: 7 W (300 mA at24VDC)Eden: 45–55 mA (see data forEden)-20°C to +50°CIP67Magne 1: 610 gMagne 2: 700 gAnchor: 290 gAnchor plate <strong>and</strong> magnet: steelHousing: Aluminium24 VDC: Min 1500 N0 VDC: 0 N (Magne 1A/2A)0 VDC: 30 N (Magne 1B/2B)Reed sensor (not safe)100 mA>10 7 switch operationsM12 5-pole male connector(Magne 1A, 1B, 2Ax, 2Bx)M12 8-pole male connector(Magne 2A, 2B)Magne 1A/B:(1) Brown: Locking, +24 VDC(2) White: Sensor supply(3) Blue: 0 VDC(4) Black: NO-contact(5) Grey: NC-contactMagne 2A/B:(1) White: Dynamic signal input(2) Brown: +24V DC(3) Green: Locking, +24V DC(4) Yellow: Locking, 0V DC(5) Grey: Info closed(max 10 mA)(6) Pink: Dynamic signal output(7) Blue: 0V DC(8) Red: Info locked(max 100 mA)ConformityCertificationsMagne 2Ax/Bx:(1) Brown: +24 VDC(2) White: Dynamic signal input(3) Blue: 0 VDC(4) Black: Dynamic signal output(5) Grey: Locking2006/42/EGEN ISO 12100-1/2:2003,EN ISO 13849-1:2008,EN 62061:2005, EN 1088TÜV Nord9:18<strong>ABB</strong>
Dimensions - Magne123Dimensions Magne 1A/B456Dimensions Magne 2A/B7Dimensions Anchor plate(without permanent magnet)Dimensions - cell rubber148910130100 ±0,203211AM8(2X)A±0,109,105,5012Installation tolerance (general)+0,104,10 0SECTION A-ADimensions Anchor plate(with permanent magnet)<strong>ABB</strong> 9:191314
Holding force - Magne 1 <strong>and</strong> 2 Connection example - Magne 1 <strong>and</strong> 29:20<strong>ABB</strong>
Connection example - Magne 1 in series12233Connection example - Magne 2 in series44556677889910101111121213<strong>ABB</strong> 9:211314
Process lockDaltonUse:Doors <strong>and</strong> hatchesAdvantages:Small <strong>and</strong> robustIntegrated with EdenFlexible installationHigh enclosure classification– IP 67Withst<strong>and</strong>s severeenvironmentsLow current consumptionStatus information with LEDon the lock housing <strong>and</strong> inthe cable connection.Dalton – the intelligent process lockDalton is a locking unit that is intended for use in preventingunnecessary process stoppages, i.e. it is not a safety lock. Itcan be used either as a free-st<strong>and</strong>ing lock or integrated withEden as a safety sensor. In the unlocked state the door isheld closed by a ball catch <strong>and</strong> in locked state the balls aremechanically blocked so the lock tongue can not be pulledout. If necessary, the holding force of the ball catch can beadjusted. <strong>The</strong> device only allows to lock when the ball latchis centred around the lock tongue, <strong>and</strong> when Eva is withAdam (depending on version). When an input is suppliedwith voltage, the ball catch is locked.Dalton is easily connected with an M12 connector. <strong>The</strong>Tina junction block can be used for distribution of both thesafety <strong>and</strong> locking functions. <strong>The</strong> Dalton status is indicatedby LEDs <strong>and</strong> can also be read by a PLC via the informationoutput.InstallationDalton offers many different installation possibilities as thelock tongue may enter the ball catch from three directions.In order to ensure that Dalton works without any problems,the ball catch must be resting, i.e. the balls not pressed in bythe lock tongue when the door is in closed position. Dalton'sbrackets are therefore made to ensure easy adjustment ofthe lock tongue <strong>and</strong> ball latch positions.Dalton has a modular structure<strong>The</strong> Dalton process lock has a modular structure <strong>and</strong> can becombined in different ways depending on position, installation<strong>and</strong> function. You choose the lock housing, lock tongue <strong>and</strong>fixing plate yourself to create a complete Dalton.Dalton is easy to install, adjust <strong>and</strong> dismantle inthe Quick-Guard fence system's T-slots.9:22<strong>ABB</strong>
Modular structure - Dalton1. Choose Dalton lock housing according to your preferences:• Dalton M11/M31 If you only need to be able to lock your door/hatch (8-pin/5-pin M12)• Dalton M12 If you want to lock your door/hatch <strong>and</strong> also have the interlocking switch Edeninstalled with one cable, common for both Dalton <strong>and</strong> Eden.• Dalton L00 If you only need to use Dalton to keep the door fixed <strong>and</strong> closed123Dalton M11with 8-pin male contactDalton M12with 8-pin male contact,5 pin female contact forAdamDalton M31with 5-pin male contact2. Choose a lock tongue depending on how the door/hatch is closed.Dalton L00as ball latch, no electricalfunctions.456Lock tongue ASelected when the doorcloses to the Dalton frontLock tongue BSelected when the door closes to Dalton's upper or lower sideFor Dalton L00 both lock tongues can be used regardless of the operating direction3. Choose a fixing kit that fits your installation.789Fixing kit 1for Dalton <strong>and</strong>lock tongueFixing kit 2for Dalton <strong>and</strong> Adam <strong>and</strong>also for lock tongue <strong>and</strong>EveFixing kit 3for Daltonadapted to<strong>ABB</strong> <strong>Jokab</strong><strong>Safety</strong> fencingsystemRead the manual for further information about correct installation of DaltonFixing kit 4for Dalton <strong>and</strong> Edenadapted to <strong>ABB</strong><strong>Jokab</strong> <strong>Safety</strong> fencingsystemFixing kit 5for Dalton, smallbracket for locktongueFixing kit 6for Dalton <strong>and</strong>Eden, small bracketfor lock tongue1011Accessories - DaltonTina 12A junction blockTina 12A can be used to connect two Daltons with Edenswith one cable to the apparatus enclosure. <strong>The</strong> summedinformation that indicates the states of both the Dalton <strong>and</strong>Eden also goes to the apparatus enclosure.Transfer cablesA transfer cable can be used when the Dalton's 8-pole connectoris to be connected to the 5-pole M12 connector ofTina 4A or Tina 8A. Note that the info-signals from Dalton<strong>and</strong> Adam cannot be used.1213<strong>ABB</strong> 9:2314
Technical data – DaltonManufacturerArtikelnummer/beställningsdata:Dalton L00 – Only ball latch, noelectrical functionsDalton M11 – 8-pin male plugDalton M12 – 8-pin male plug,5-pin female to AdamDalton M31– 5-pin male plugLock tongue A – Lock tonguefor front entryLock tongue B – Lock tonguefor top <strong>and</strong> bottom entryFixing kit 1 – Fixing plates forDalton <strong>and</strong> lock tongueFixing kit 2 – Fixing plates forDalton <strong>and</strong> Adam <strong>and</strong> also forlock tongue <strong>and</strong> EveFixing kit 3 – Fixing plates forDalton adapted to <strong>ABB</strong> <strong>Jokab</strong><strong>Safety</strong> fencing systemFixing kit 4 – Fixing plates forDalton <strong>and</strong> Eden adapted to<strong>ABB</strong> <strong>Jokab</strong> <strong>Safety</strong> fencing systemFixing kit 5 – Fixing plate forDalton, small bracket for locktongueFixing kit 6 – Fixing plate forDalton <strong>and</strong> Eden, small bracketfor lock tongueAccessoriesDA 1 – Spacer 2.5 mm forAdam <strong>and</strong> Eva.M12-CT0214 – Transfer cable0.2 m M12 5-pole male plug<strong>and</strong> 8-pole female plugTina 12A – Distribution blockfor two Dalton Edens with8-pole cables<strong>Safety</strong> levelFor interlocking switch Eden.Not valid for locking function.IEC/EN 61508-1...7EN 62061EN ISO 13849-1PFH DFor interlocking switch Eden.Not valid for locking function.Locking functionColour<strong>ABB</strong> AB/<strong>Jokab</strong> <strong>Safety</strong>, Sweden2TLA020038R30002TLA020038R31002TLA020038R32002TLA020038R33002TLA020039R08002TLA020039R10002TLA020039R00002TLA020039R01002TLA020039R02002TLA020039R03002TLA020039R04002TLA020039R05002TLA020053R00002TLA020060R01002TLA020054R1800SIL3SIL3Kat. 4/PL e4,50×10 -9M - Locked when energisedL - Only ball latchBlackOperating voltage 24 VDC +25/–20%Current consumptionUnlockedLockedLock inputInformation outputEdenOperating temp. rangeEnclosure classificationHolding forceUnlockedLocked40 mA130 mA5 mAMax. 10 mASee the data for Adam M12-10°C to +55°CIP6725-100 N2000 NMaterialBall catch, securing plateEnclosureLock tongue, securing plateChemical resistanceStainless steelAnodised aluminiumConnectionsColour markings (pins)FunctionDynamic input signal, Adam+24 VDCLock signalNot usedInformation AdamDynamic output signal, Adam0 VDCInformation DaltonLED indication – DaltonLED indication=Red =Green =PausInformation functionAlarm:Anodised aluminiumAnodised aluminiumStainless steelGood resistance against mostacids except hydrochloric acid<strong>and</strong> sulphuric acid.Very good resistance againstcorrosion, good resistance tomost acids.Connector to connect Dalton(varies depending on type)8-pole male plug, M125-pole male plug, M12Outlet for externally connectedAdam female plug M12, 5-pole8-pole Colour 5-pole Colour1 (White)2 (Brown) 1 (Brown)3 (Green) 4 (Black)4 (Yellow) 2 (White)5 (Grey)6 (Pink)7 (Blue) 3 (Blue)8 (Red) 5 (Grey)WarningDalton locks mechanically. If the lock is forced, the Dalton can bepermanently damaged.Conformity2006/42/EGEN ISO 12100-1:2003EN ISO 12100-2:2003EN ISO 60204-1EN ISO 954-1EN ISO 13849-1:20081 Locked0 Closed but unlocked0 Open1Hz Lock has not entered theunlocked state1Hz Eden or ball catch not inposition = open1Hz Open, locking not permitted1Hz Lock has not entered thelocked state1Hz Undervoltage - locking notpermitted1Hz Overvoltage1Hz Overtemperature (> 80°C)9:24<strong>ABB</strong>
Dimensions – Dalton1234Bracket 1 with DaltonBracket 2 with Dalton <strong>and</strong> Eden5 678Bracket 3 with DaltonBracket 4 with Dalton <strong>and</strong> Eden910 11 12Bracket 5 with DaltonBracket 6 with Dalton <strong>and</strong> Eden<strong>ABB</strong> 9:251314
Connection example – Dalton M11, M31 <strong>and</strong> M12Connection example – Dalton M12 <strong>and</strong> Vital9:26<strong>ABB</strong>
Connection example – Dalton M12 <strong>and</strong> Eden through Tina 4A1234567Connection example – Dalton M12 <strong>and</strong> Eden through Urax A1 (AS-i)8910111213<strong>ABB</strong> 9:2714
<strong>Safety</strong> <strong>and</strong> process lockKnoxApproval:Application:Safe locking of door to acell/line with long stoppingtime.Prevents unintentionalinterrupts of processesAdvantages:Knox - Double safety lock as specified in PL e/cat. 4Knox is a double lock that complies with the highest safetylevel (two lock cylinders with monitored positions) that canbe used both as a safety <strong>and</strong> process lock. <strong>The</strong> locking functionis electrically controlled <strong>and</strong> is bi-stable, i.e. it retains itsposition (unlocked/locked) in the event of a power failure.Dual signal for unlocking is safe at both short-circuits <strong>and</strong>cable breaks.<strong>The</strong> h<strong>and</strong>les operate as they would on a normal door butthe exterior h<strong>and</strong>le also have a reset function, why a separatereset button is not necessary <strong>and</strong> the interior h<strong>and</strong>le thatcan be used for emergency opening also in locked state.<strong>The</strong> design <strong>and</strong> durability of the lock mean that it is ideal forharsh environments as the sensors are non-contact <strong>and</strong> thelock is manufactured of stainless steel. Knox is available ina number of adaptations such as left-hung door, right-hungdoor, inward <strong>and</strong> outward opening, with manual unlocking<strong>and</strong> for sliding door.Double locking function asspecified in PL e/cat. 4(EN ISO 13849-1)Withst<strong>and</strong>s harshenvironmentsStatus information withLEDs on the lock <strong>and</strong> atcable connection.Controlled to locked <strong>and</strong>unlocked positions - positionremains in the event ofpower failure.Electronic connection onlyon the door frameRobust designKnox is easy to assemble, adjust <strong>and</strong> dismantle in<strong>and</strong> out of the T-slot of the Quick-Guard fencingsystem.9:28<strong>ABB</strong>
Knox in 4 different states1OpenReset,openableEmergency openedOperational modelocked <strong>and</strong> reset(emergency opening only)2345678910111213<strong>ABB</strong> 9:2914
Models <strong>and</strong> ordering dataDoor partKnox 1A-R v22TLA020105R5000Knox 1A-L v22TLA020105R5100Knox 1B-R v22TLA020105R5200Knox 1B-L v22TLA020105R5300Knox 1AX-R v22TLA020105R5800Knox 1AX-L v22TLA020105R5900Knox 1F-R v22TLA020105R6000Knox 1F-L v22TLA020105R6100Knox 1BX-R v22TLA020105R6200Knox 1BX-L v22TLA020105R6300Knox 1FX-R v22TLA020105R6400Knox 1FX-L v22TLA020105R6500Frame partKnox 2A v22TLA020105R2200Knox 2X v22TLA020105R2300AccessoriesPC plate for Knox on meshdoor2TLA020106R0000Escutcheon plate for Knox(without emergency releaseh<strong>and</strong>le)2TLA020106R0600Tina 12A2TLA020054R1800Knox door part for outwardopeningright-hung doorKnox door part for outwardopeningleft-hung doorKnox door part for inwardopeningright-hung doorKnox door part for inwardopeningleft-hung doorKnox door part for outwardopeningright-hung door withthe option for manual unlockingfrom the outsideKnox door part for outwardopeningleft-hung door withthe option for manual unlockingfrom the outsideKnox door part for sliding doorthat opens to the right. Incl.additional fastening fixtures forthe frame.Knox door part for a slidingdoor that opens to the left. Incl.additional fastening fixtures forthe frame.Knox door part for inwardopeningright-hung door withthe option for manual unlockingfrom the outsideKnox door part for inwardopeningleft-hung door withthe option for manual unlockingfrom the outsideKnox door part for sliding doorthat opens to the right with theoption for manual unlockingfrom the outside. Incl. additionalfastening fixtures for the frame.Knox door part for sliding doorthat opens to the left with theoption for manual unlockingfrom the outside. Incl. additionalfastening fixtures for the frame.St<strong>and</strong>ard Knox frame part8-pin M12 contact, suppliedfor right-hung door. Forinstructions for turning, see theKnox manualKnox process lock, noduplicate unlocking signal, with5-pin M12 contactWhen mounting Knox on doorwith mesh the accessory PCplate for Knox is recommended.This is to avoid emergencyopening from the outside.When mounting Knox on alow door it is recommendedto replace emergency releaseh<strong>and</strong>le to prevent opening fromthe outside by reaching over.Distribution block for two KnoxKnox door part 1A-R <strong>and</strong>frame part 2AKnox door part 1A-L <strong>and</strong>frame part 2AKnox door part 1B-R<strong>and</strong> frame part 2AKnox door part 1B-L <strong>and</strong>frame part 2AKnox door part 1F-R<strong>and</strong> frame part 2AKnox door part 1F-L <strong>and</strong>frame part 2ADoor part Knox1 Frame part Knox 29:30<strong>ABB</strong>
Technical data – KnoxMake<strong>Safety</strong> levelEN ISO 13849-1<strong>ABB</strong> AB/<strong>Jokab</strong> <strong>Safety</strong>, SwedenKat. 4/PL ePFH D 4,50×10 -9Lock functionS/M - unlocked <strong>and</strong> locked withvoltage.Operating voltage 24 VDC +/- 15%Power consumptionElectronicsLock/lock inverseTotal maxInformation outputInsulation classHolding strengthUnlockedLockedConnectionConnections Knox 2AFunctionDynamic input signal+24 VDCLockLock inverseInformation LockedDynamic output signal0 VDCInformation resetConnections Knox 2XFunction+24 VDCDynamic signal input0 VDCDynamic signal outputLock70 mA (in locked position)135 mA (when locking/unlocking)150 mAMax. 10 mAIP655000 N(10,000 N ultimate breakingstrength)5000 N(10,000 N ultimate breakingstrength)Male plug M12, 8-pole8-pole Colour1 (White)2 (Brown)3 (Green)4 (Yellow)5 (Grey)6 (Pink)7 (Blue)8 (Red)5-pole Colour1 (Brown)2 (White)3 (Blue)4 (Black)5 (Grey)WarningKnox locks mechanically. Forcing the lock may damage Knox permanently.When mounting Knox on door with mesh the accessory PC platefor Knox is recommended. This is to prevent emergency openingfrom the outside.When mounting Knox on a low door it is recommended to replaceemergency release h<strong>and</strong>le with the accessory Escutcheon plate forKnox to prevent opening from the outside by reaching over.ConformityCertifications2006/42/EGEN ISO 12100-1/2:2003,EN ISO 13849-1:2008,EN 62061:2005, EN 1088LED indicator – KnoxLED indicator=Red =Green =PausLED 1LED 2Alarm LED 2FunctionLocked (<strong>and</strong> reset)Locked, no dynamic signal inUnlockedResetNot resetDirt indicator reset sensorResetNot reset12345678910111213<strong>ABB</strong> 9:3114
Connection example - KnoxConnection example - Knox with other unlocking9:32<strong>ABB</strong>
Connection example - Knox with downtime monitor12345678910111213<strong>ABB</strong> 9:3314
Control devices<strong>ABB</strong>
ContentsPage1Why should control devices be used? ________________________________ 10:2Three-position devices - JSHD4 _____________________________________ 10:4Unique world-wide two-h<strong>and</strong> device - Safeball _______________________ 10:12Two h<strong>and</strong> device - JSTD20 ________________________________________ 10:2023456789101112Descriptions <strong>and</strong> examples in this book show how the products work <strong>and</strong> can be used. This does not mean that they can meet the requirements forall types of machines <strong>and</strong> processes. <strong>The</strong> purchaser/user is responsible for ensuring that the product is installed <strong>and</strong> used in accordance with theapplicable regulations <strong>and</strong> st<strong>and</strong>ards. We reserve the right to make changes in products <strong>and</strong> product sheets without previous notice. For the latestupdates, refer to www.abb.com/lowvoltage. 2011.<strong>ABB</strong>10:11314
Control devicesWhy should Control Devices be used?..for the machine operator to be able to directly start<strong>and</strong> stop dangerous machine movement.Three-position deviceThree-position devices, hold-to-run devices <strong>and</strong> enablingdevices are used during trouble-shooting, programming <strong>and</strong>test running when no other safety components are possibleor suitable. <strong>The</strong> device is held in the h<strong>and</strong> <strong>and</strong> the operatorcan in an emergency situation either press harder or entirelyrelease the device to stop the machine.In an emergency situation the operator can eitherpress harder or release the three-position deviceto stop the machine.Ergonomic three-position device, JSHD4with double three-position button that gives a stop signalwhen released or fully pressed in.10:2<strong>ABB</strong>
12Two-channel all the way out to the h<strong>and</strong>Safeball is an ergonomic two-h<strong>and</strong> control device withfour built-in buttons.3Two-h<strong>and</strong> control deviceA two-h<strong>and</strong> control device is used when it must the guaranteedthat the operator's h<strong>and</strong>s will be kept outside the riskarea. If there is a risk that someone else other than the operatorcan reach into the machine without the operator seeingit, the safety device must be supplemented by somethingmore, e.g. a light beam.To be able to operate the machine with the two-h<strong>and</strong> device,all the buttons on the device have to be operated within0.5 seconds of each other. This is called concurrence. Allthe buttons also have to be returned to their initial positionbefore one can start again. If any button is released duringthe machine movement the machine will be stopped. Usingthe stopping time one can calculate the necessary safetydistance. A safety distance of less than 100 mm must notbe used.<strong>The</strong> highest safety level is assured by connecting thebuttons of the two-h<strong>and</strong> device to a safety relay. <strong>The</strong> safetyrelay checks for concurrence <strong>and</strong> that all the buttons havereturned to their initial position before a new start can bemade. <strong>The</strong> safety relay also gives a stop signal if any of thebuttons are released.<strong>Safety</strong> foot operatedswitch with three-positionfunction.Foot operated switchesA foot operated switch is used when the operator has tohold the material during processing. <strong>The</strong> pedal must have asafety cover to prevent unintentional start. For seated workone must also have a foot support to facilitate the operatorholding his foot in the pedal´s off position.<strong>The</strong> highest safety level is secured by monitoring the pedalwith a safety relay.<strong>The</strong> two-h<strong>and</strong> device protects against "after-grasp";if the operator by reflex tries to enter or reach into amachine during the dangerous machine movement.<strong>The</strong> foot operated switch is used when the operatorhas to hold the material with both h<strong>and</strong>s duringprocessing.45678910111213<strong>ABB</strong>10:314
Three position deviceJSHD4Approvals:Use:TroubleshootingTest runningProgrammingAdvantages:ErgonomicLED informationAdaptableCheat SafeAdapted for AS-i<strong>The</strong> safest solution during trouble shooting, programming <strong>and</strong> testingWhy three-positions?An operator who is under pressure must be able to give astop signal, whether in panic he/she pushes harder on thebutton or just lets go of it.Three-position devices, hold-in <strong>and</strong> acceptance devices canbe used for trouble shooting, programming <strong>and</strong> test runningin situations where no other protection is available or feasible.If the operator has to enter a risk area to trouble shoot or runa test, it is extremely important that he/she is able to stop themachinery without having to rely on someone else to st<strong>and</strong>by a stop button that is further away. In addition, no-one elseshould be able to start the machinery from the outside afterit has been stopped by use of the three-position device.Hold to run device or Acceptance device, what is thedifference?Hold to run device: <strong>The</strong> start signal is given when the buttonis pressed. <strong>The</strong> stop signal is given when the button isreleased or pushed fully in.Acceptance device: <strong>The</strong> start signal for separate startingis given when the button is pressed. <strong>The</strong> stop signal is givenwhen the button is released or pushed fully in. “Separatestart” means, for example, that a program start signal is sentto the robot via a separate button in the acceptance device.<strong>The</strong> three-position device is designed to be ergo-nomic<strong>The</strong> device is ergonomic, both in respect of its shape, fittingto the h<strong>and</strong>, <strong>and</strong> the way the buttons are operated. Itis easy to operate the three-position device using just thefingers, <strong>and</strong> the middle position provides a secure restingposition. <strong>The</strong> device has LED indications that show the operationalstatus, i.e. stop or ready signal. <strong>The</strong> two additionalbuttons can be used, for example, for start/stop, up/downor forward/back. Internally the device is duplicated. <strong>The</strong>three-position function itself is built up of two completelyindependent three-position buttons which are felt by theuser to be one button.Cheat Safe three-position device with h<strong>and</strong> recognition<strong>The</strong> three-position device JSHD4 has sensors which ensurethat it is a human h<strong>and</strong> holding it. By using this, the safetylevel is increased, <strong>and</strong> the risk of manipulation or bypass ofthe safety function is reduced. It is no longer possible toexpose the operator or odder to danger by trying to lock thethree-position device in run mode.Three-position device adapted for AS-i<strong>The</strong> three-position device JSHD4 also comes in a versionadapted for direct attachment to the AS-i bus10:4<strong>ABB</strong>
Highest safety levelwhether the button is pushed or released1234When the three-position button is released you will obtain a dualstop. It is essential that the machine stops when you put aside thethree-position device, for example during adjustment.How does a a three-position device work?<strong>Safety</strong> levelA safe Enabling or Hold to Run device should function asfollows:1. <strong>The</strong> Stop signal in released (top) <strong>and</strong> bottom positionshall have the same safety level.2. Provide a ‘Start’ or ‘Ready’ signal in a distinct middleposition.3. After a ‘Stop’ in the bottom position, a ‘Start’ signal or‘Ready’ signal is not permitted until the three positionpush-buttons have been totally released <strong>and</strong> againpressed to the middle position.This function is achieved mechanically within the threeposition push-buttons in the device.4. A Short or Open circuit in the connection cablesshall not lead to a dangerous function e.g. ‘Start’ or‘Ready’ signal.In order to meet the above conditions, the three-positionswitch must be connected to a suitable safety relay with atwo channel function, e.g. RT6, RT9 or JSBT4, which canmonitor that both three-position buttons are working <strong>and</strong>Three-position devices in different versionsWhen the three position button is pushed all the way in you willobtain a dual stop. It is essential that the machine stops in anemergency situation.Middle positionReleased positionBottom positionthat there is no short or open circuit in the connectioncable or the switch.Regulations <strong>and</strong> st<strong>and</strong>ards<strong>The</strong> JSHD4 is designed <strong>and</strong> approved in accordance withappropriate directives <strong>and</strong> st<strong>and</strong>ards. See technical data.56789101112Three-position device fitted to amachine control unit.Panel assembly of JSHD4H2 on aprogramming unit for robots.13<strong>ABB</strong>10:514
Design a three-position device for your needs1. Choose between five different top unitsJSHD4-12TLA020006R2100JSHD4-22TLA020006R2200• LEDs• Front button• Top buttonJSHD4-32TLA020006R2300• LEDsJSHD4-42TLA020006R2400• LEDs• Front buttonJSHD4-52TLA020006R2500• LEDs• Top button2. Choose a bottom part suitable for your assemblyAA, AH, AJ AB AC, ADAF, AGAEAA – 2TLA020005R1000 with cable gl<strong>and</strong>AB – 2TLA020005R1100 with Cannon connectionAC – 2TLA020005R1200 with M12 connection (5 poles)AD – 2TLA020005R1300 with M12 connection (8 poles)AE – 2TLA020005R1400with M12 connection (8 poles) <strong>and</strong>emergency stopAF – 2TLA020005R1500 with M12 connection (4 poles) <strong>and</strong>2 AS-i nodes (for front <strong>and</strong> top button)AG – 2TLA020005R1600 with M12 connection (4 poles) <strong>and</strong>1 AS-i node (without front <strong>and</strong> top button)AH – 2TLA020005R1700 with cable gl<strong>and</strong> <strong>and</strong> PCB with10 screw connectionsAJ – 2TLA020005R1800 with cable gl<strong>and</strong> <strong>and</strong> PCB with16 screw connections3. Choose h<strong>and</strong> recognition for making your three position device cheat protected (option)Anti-tamper PCB – 2TLA020005R09004. Check the table if your combination is available5. Choose a bottom plate (option)JSM50G, bottom plate for<strong>Safety</strong> Interlock switch JSNY5 –2TLA020205R6300JSM50H, bottom plate fornon-contact sensor Eden (Eva) –2TLA020205R640010:6<strong>ABB</strong>
Available combinations of bottom- <strong>and</strong> top partsJSHD4-1 JSHD4-2 JSHD4-3 JSHD4-4 JSHD4-5AA without Cheat Safe JSHD4-1AA – – – –AA with Cheat Safe – – – – –AB without Cheat Safe – JSHD4-2AB JSHD4-3AB JSHD4-4AB JSHD4-5ABAB with Cheat Safe – JSHD4-2AB-A JSHD4-3AB-A JSHD4-4AB-A JSHD4-5AB-AAC without Cheat Safe JSHD4-1AC – – – –AC with Cheat Safe – – – – –AD without Cheat Safe – JSHD4-2AD JSHD4-3AD JSHD4-4AD JSHD4-5ADAD with Cheat Safe – JSHD4-2AD-A JSHD4-3AD-A JSHD4-4AD-A JSHD4-5AD-AAE without Cheat Safe – – JSHD4-3AE – –AE with Cheat Safe – – – – –AF without Cheat Safe – JSHD4-2AF JSHD4-3AF JSHD4-4AF JSHD4-5AFAF with Cheat Safe – JSHD4-2AF-A JSHD4-3AF-A JSHD4-4AF-A JSHD4-5AF-AAG without Cheat Safe – – JSHD4-3AG – –AG with Cheat Safe – – – – –AH without Cheat Safe – JSHD4-2AH JSHD4-3AH JSHD4-4AH JSHD4-5AHAH with Cheat Safe – JSHD4-2AH-A JSHD4-3AH-A JSHD4-4AH-A JSHD4-5AH-A123456Order your pre-assebled three position device from <strong>ABB</strong> <strong>Jokab</strong> <strong>Safety</strong><strong>ABB</strong>Pre-assembled three position devices2TLA019995R00002TLA019995R01002TLA019995R02002TLA019995R03002TLA019995R04002TLA019995R05002TLA019995R06002TLA019995R07002TLA019995R08002TLA019995R09002TLA019995R12002TLA019995R13002TLA019995R14002TLA019995R15002TLA019995R16002TLA019995R17002TLA019995R18002TLA019995R19002TLA019995R20002TLA019995R21002TLA019995R24002TLA019995R25002TLA019995R26002TLA019995R27002TLA019995R28002TLA019995R29002TLA019995R30002TLA019995R31002TLA019995R34002TLA019995R35002TLA019995R36002TLA019995R37002TLA019995R38002TLA019995R39002TLA019995R40002TLA019995R4100JSHD4-1AAJSHD4-1ACJSHD4-2ABJSHD4-2AB-AJSHD4-2ADJSHD4-2AD-AJSHD4-2AFJSHD4-2AF-AJSHD4-2AHJSHD4-2AH-AJSHD4-3ABJSHD4-3AB-AJSHD4-3ADJSHD4-3AD-AJSHD4-3AEJSHD4-3AFJSHD4-3AF-AJSHD4-3AGJSHD4-3AHJSHD4-3AH-AJSHD4-4ABJSHD4-4AB-AJSHD4-4ADJSHD4-4AD-AJSHD4-4AFJSHD4-4AF-AJSHD4-4AHJSHD4-4AH-AJSHD4-5ABJSHD4-5AB-AJSHD4-5ADJSHD4-5AD-AJSHD4-5AFJSHD4-5AF-AJSHD4-5AHJSHD4-5AH-AAccessories2TLA020055R10002TLA020055R16002TLA020003R03002TLA020057R00002TLA020056R10002TLA020056R14002TLA020057R10002TLA020056R40002TLA020056R41002TLA020003R55002TLA020003R47002TLA020003R48002TLA020003R49002TLA020003R50002TLA020003R51002TLA020003R52002TLA020003R35002TLA020003R36002TLA020003R53002TLA020003R5400Connectors:M12-C01 M12 5-pole female, straightM12-C03 M12 8-pole female, straightJSHK0 12-pole connector for JSHD4Cable with 5 conductors:C5 Cable 5x0,34 cut to lengthM12-C101 10 m cable <strong>and</strong> connectorM12-C201 20 m cable <strong>and</strong> connectorCable with 8 conductors:C8 Cable 8x0,34 cut to lengthM12-C103 10 m cable <strong>and</strong> connectorM12-C203 20 m cable <strong>and</strong> connectorCable with 12 conductors:HKC12 Cable 12x0,25 cut to lengthHK5 Cable 5 m <strong>and</strong> connectorHK10 Cable 10 m <strong>and</strong> connectorHK20 Cable 20 m <strong>and</strong> connectorJSHK16S4 spiral cable 1,6 m <strong>and</strong> connectorJSHK20S4 spiral cable 2,0 m <strong>and</strong> connectorJSHK32S4 spiral cable 3,2 m <strong>and</strong> connectorJSHK40S4 spiral cable 4,0 m <strong>and</strong> connectorJSHK3604 spiral cable 6,0 m <strong>and</strong> connectorJSHK80S4 spiral cable 8,0 m <strong>and</strong> connectorHK-T2 Cable drum <strong>and</strong> connectorBrackets:2TLA040005R0500 JSM55 Wall bracket for three positiondevice2TLA040005R0700 JSM5B Wall bracket for 2 JSNY5(ordered separately)2TLA020200R4600Others:JSHD4 protection coat10:77891011121314
Three-posision devices for different types of montage8,51,41610,313,5ø2,8 (2x)601812222120,714,33,45,117,326,55mm80Three-position push button JSHD2C<strong>The</strong> button is the main component in a safe three-positionsolution. To achieve the highest safety level two buttonsare used in a two-channel system.Panel assembly JSHD4H2A panel assembly suitable for building into programming unitsor similar control boxes. Provides simultanous activation ofboth of the three-position buttons.65M5External assembly JSHD4H2A<strong>The</strong> external assembly is similar to the panel assemblyunit, although it is a ‘h<strong>and</strong>le’ design making it suitable forassembly on the outside of a control box.52mm3439106St<strong>and</strong>ard versions2TLA020002R02002TLA020002R07002TLA020002R31002TLA020001R10002TLA020001R1300JSHD4H2A Three-position device forexternal panel assemblyJSHD4S2 Three-position device, <strong>ABB</strong>upgrading kitJSHD4H2 Three-position device forinternal panel assemblyJSHD2C type E Three-position buttonJSHD2C type K Three-position buttonComplete JSHD4 with st<strong>and</strong>ard options are available to orderseparatelyTechnical data - JSHD4Manufacturer<strong>ABB</strong> AB/<strong>Jokab</strong> <strong>Safety</strong>, Sweden<strong>Safety</strong> levelEN ISO 13849-1Electrical contact ratingsThree-position button:Category 4/PL e30 VDC, max 0.5 A(min. 10 mA, 10V)50 VAC/DC max 0.2 AExtra button:Protection class IP 65Operating temperature -10 to +50° CFunction indicationThree-position buttons readysignal:`Yes´, green LED`No´, red LEDMaterial Polyamide 6.6Insulation resistancemin 20 M OhmOperation forceapprox. 15 NMechanical life1 000 000 cycles to middlepositionConformity AFS 1994:48, EN ISO 12100-1/-2,EN 954-1/EN ISO 13849-1Pin Color STD Color JSHK-SA White WhiteB Brown BrownC Green GreenD Yellow YellowE Grey -F Pink GreyG Blue PinkH Red BlueI Black RedJ Purple -K - -L - -STD: JSHK, JSHK-E, JSHK-TCable, available in differentlengths.Spiral cable, available indifferent lengths.JSHK0 12 poleconnector for JSHD4.JSM5B Wall bracket forinterlock switches <strong>and</strong>three-position device.JSHD4 protection coatJSM55 Wall bracket forthree-position device.Cable drum10:8<strong>ABB</strong>
Connection example - Three-position device JSHD4 to Pluto123456Time-limited entrance/exitAfter lifting the three-position device out of its holder JSM54A, the interlocked gate can be passed for entranceinto the risk area within x sec. <strong>The</strong> time limit is set in the Pluto program. <strong>The</strong> device detects the operators h<strong>and</strong><strong>and</strong> prohibits tampering.Connection examples - Three-position device JSHD4 with various safety controllers78910111213<strong>ABB</strong>10:914
Connection with bottom parts ABConnection with bottom parts ACConnection with bottom parts AD10:10<strong>ABB</strong>
Connection with bottom parts AE1234Connection with bottom parts AH56789Connection with bottom parts AJ10111213<strong>ABB</strong>10:1114
One <strong>and</strong> two h<strong>and</strong> devicesSafeball Approvals:Safeball for:PressesPunchesFixturesShearing machinesFeatures:A two h<strong>and</strong> device which iscomfortable <strong>and</strong> easy to use.ErgonomicLow activation forceFlexible mountingSeveral grip possibilitiesHighest safety levelTwo channel switching ineach h<strong>and</strong>10:12SAFEBALLUnique World Wide Two h<strong>and</strong> deviceSafeball consists of a spherical ball containing two embeddedpushbutton switches, one on each side of the ball. Byusing this pushbutton configuration, the risk of unintentionalactivation is minimised <strong>and</strong> the device is simple <strong>and</strong> ergonomicto use.Safeball can be utilised for either One h<strong>and</strong> (one Safeball)or Two h<strong>and</strong> (two Safeballs) applications. In eitherapplication, <strong>and</strong> in order to meet the required level of safety,the Safeball switches are monitored by specified/certified<strong>ABB</strong> <strong>Jokab</strong> <strong>Safety</strong> <strong>Safety</strong> relays (see electrical connection).In the case where Two h<strong>and</strong> control is used, both Safeballsi.e. all four pushbuttons have to be activated within0.5 seconds. If one or more pushbuttons are released a Stopsignal is given to the machine. In order to provide the highestlevel of safety the Safeball design provides the operatorwith a dual switching function <strong>and</strong> short-circuit supervisionin each h<strong>and</strong>.Each Safeball is ergonomically designed <strong>and</strong> has both itscover <strong>and</strong> actuator made of environmentally-friendly polypropylene.<strong>The</strong> design allows for comfort of use for all h<strong>and</strong> sizes<strong>and</strong> operation from numerous gripping positions. Mountingof the Safeball is also very flexible allowing the device tobe mounted in the most ergonomic position for the operator.When can a Two h<strong>and</strong> or One h<strong>and</strong> control be used ?A Two h<strong>and</strong> control can be used when it is necessary toensure that the operator is outside <strong>and</strong> must be preventedfrom reaching into the hazardous area. If the operator decides,after the start signal has been given to the machine,to make an ‘after-grasp’ i.e. try to adjust the part that hasbeen placed into the machine, then a dual stop signal isgiven to the machine.A one h<strong>and</strong> control device can be used when the operatorcannot reach the hazardous area with his/her free h<strong>and</strong> oron less dangerous machines.Highest <strong>Safety</strong> Level<strong>The</strong> Safeball is certified by Inspecta in Sweden for use asa Two h<strong>and</strong> control device, when used with a JSBR4 <strong>ABB</strong><strong>Jokab</strong> <strong>Safety</strong> <strong>Safety</strong> relay or Pluto <strong>Safety</strong>-PLC, in accordancewith the highest safety level in st<strong>and</strong>ard EN 574 (type IIIc).Two h<strong>and</strong> device adapted for AS-i<strong>The</strong> two h<strong>and</strong> device, Safeball also comes in a versionadapted for direct attachment to the AS-i bus.A top cover is not needed as activation switchesare fitted on each side of the Safeball.<strong>ABB</strong>
Technical data - SafeballManufacturer:<strong>ABB</strong> AB/<strong>Jokab</strong> <strong>Safety</strong>, SwedenArticle number/Ordering data:JSTD1-A Safeball 1 NO + 1NC with 2 m cableJSTD1-B Safeball Safeball 1NO + 1 NC with 0.2 m cableJSTD1-C Safeball 1 NO + 1NC with 10 m cableJSTD1-E Safeball 2 NO 0,2 mcable<strong>ABB</strong>Material:Colour:Size:Weight:<strong>Safety</strong> level:EN ISO 13849-1EN 954-1Temperature:Protection class:Operating force:Actuator travel:Max switching load:Recommended load:Min switching load:Contact resistance:Life, mechanical:Function - Safeball2TLA020007R30002TLA020007R31002TLA020007R32002TLA020007R3400PolypropyleneYellow <strong>and</strong> blackHeight: approx. 71 mm,Diameter, min.: 68 mmDiameter, max.: 72 mmDiameter, base: 42 mm0.2 kg with 2 m cable0.7 kg with 10 m cable0.1 kg with 4x0.2 m wiresUp to category 4/PLeUp to category 40°C to +55°C (operating)-20°C to +70°C (storage)IP67. Not intended for use underwaterApprox. 2 N1.3 +/- 0.6 mm30 V 2A DC, resistive load24 V 10mA DC6V 10mA DC, resistive load100 mohm> 1x10 6 operations at max. 1 HzTwo h<strong>and</strong> control device<strong>The</strong> Two h<strong>and</strong> control device is implemented by usingtwo Safeballs, each having two internal pushbuttons.<strong>The</strong> Safe-balls must be mounted a minimum distancebetween each other (see Mounting description).By utilising two pushbuttons in each device a doublesafety function is provided in each h<strong>and</strong>.<strong>The</strong> highest safety level is achieved by connecting allfour pushbuttons to the <strong>ABB</strong> <strong>Jokab</strong> <strong>Safety</strong> JSBR4 safetyrelay or Pluto <strong>Safety</strong>-PLC. <strong>The</strong> safety relay gives a dual <strong>and</strong>supervised safety function <strong>and</strong> requires input activationwithin 0.5 seconds in order to start the machine. It alsochecks that all four pushbuttons have returned to theirdeactivated positions before a new start is allowed. <strong>The</strong>JSBR4 safety relay also provides a stop signal if one ormore pushbuttons are released.One h<strong>and</strong> control deviceSafeball is also a very practical method of providing a oneh<strong>and</strong> control device as it is very easy to find <strong>and</strong> activateby the machine operator. One h<strong>and</strong> devices should only beused when the operator cannot reach into the hazardousarea with his/her free h<strong>and</strong> or on less dangerous machines.Before fitting the necessary risk assessment must be madeto determine suitability of this type of control. To achievethe highest safety level for One h<strong>and</strong> control the Safeballmust be connected to a <strong>ABB</strong> <strong>Jokab</strong> <strong>Safety</strong> safety relay(See Electrical Connection).Life, electrical:Connection cable:JSTD1-A:JSTD1-B, JSTD1-E:JSTD1-C:23Ø4,5 (4x)726823mm71Dependant upon electrical loadcharacteristics2m PVC-cable, 4 x 0.75mm 24 x 0.75mm 2 wires, approx. 0.2 m10 m PVC-cable, 4x0.75 mm 2Conformity: EN ISO 12100-1:2003,EN ISO 12100-2:2003,EN 574+A1:2008Chemical resistance at 20°CChemicalAlcoholsParaffin oilMilkSilicon oilAcetoneVersionsSafeball is available in several versions to meet differentmounting requirements.• JSTD1-A - <strong>The</strong> st<strong>and</strong>ard version with actuators made ofplastic <strong>and</strong> 2 m of cable.• JSTD1-B - Similar to the st<strong>and</strong>ard version but without acable. Instead it has four wires, each 0.2 m long.• JSTD1-C - Similar to JSTD1-A but with 10 m cable.• JSTD1-E - Similar to JSTD1-B but with 2 NO contacts.Activation of apushbutton.ResistancegoodgoodgoodgoodgoodPlease contact us for more information.Safeball, JSTD1, is certified by DNV Inspecta.Approval number:01-MAL-CM-0101 (Two-h<strong>and</strong> device)01-MAL-CM-0100 (One-h<strong>and</strong> device)10:131234567891011121314
Mounting - Safeball<strong>The</strong> Safeballs can be mounted in many different ways.<strong>The</strong>y can be mounted on a table, a machine, on a supportor wherever suitable for ergonomic reasons. <strong>The</strong> Safeballcan be mounted in a fixed position or on a tilting <strong>and</strong>/orrotating support. This flexibility of mounting permits theSafeball to be fitted in the best ergonomic positionfor the ease of operation by the operator. <strong>The</strong> distancerequirement between two Safeballs or between a Safeball<strong>and</strong> a wall or edge of a table depends on how theSafeball is mounted. Safeball can be mounted withfour M5 screws or ST4.8 self-tapping screws.Note: When Safeballs are mounted in such a way thatthe distance between them can be adjusted to less thanthe specified minimum, the mounting screws must belocked to ensure any changes in the distance betweenthe two balls cannot be made.Alternative mounting methodsMounting on a table.Mounting with ball joint,which can be rotated <strong>and</strong>angled.Example of alternativemounting.Approved Two h<strong>and</strong> deviceTo be an approved Two h<strong>and</strong> device, both Safeballs must be mounted a minimum distance apart in order to preventoperation of both balls with one h<strong>and</strong>. Safeballs must be fitted a minimum distance from the edges of tables ora wall. It is essential that Safeballs are correctly installed in order to prevent unintended activation of the deviceswith part of the body in combination for example with a wall.Mounting distance -<strong>Safety</strong> distance - SafeballMounting distanceTable mounting of two Safeballs.In order to prevent cheating the distancesshown are the minimum allowed.mm120180120<strong>Safety</strong> distance<strong>The</strong> <strong>Safety</strong> distance is the distance between theSafeballs <strong>and</strong> the dangerous machine movement.<strong>The</strong> safety distance requirement can be calculatedusing the following formula for Safeball in accordancewith the approving authority <strong>and</strong> EN ISO 13855:S= KxT+CWhereS= safety distance in mmK= h<strong>and</strong> speed, 1600 mm/sT= total stopping time for the dangerous movement(including the response time of the safety relaysin seconds)C= Constant= 0 mm for Safeball.Note: S must never be less than 100 mm.S<strong>The</strong> safety distance is the distance between theSafeballs <strong>and</strong> the dangerous machine movement.10:14<strong>ABB</strong>
Electrical connection - SafeballTwo h<strong>and</strong> deviceSafeballs are designed to be connected to a <strong>ABB</strong> <strong>Jokab</strong> <strong>Safety</strong> JSBR4 <strong>Safety</strong> relay or <strong>Safety</strong> PLC to achieve the highestsafety requirements for a Two h<strong>and</strong> device.Example of two devices connected to a<strong>ABB</strong> <strong>Jokab</strong> <strong>Safety</strong> JSBR4 safety relay. Response timeon receiving a stop signal from JSTD1 < 15 ms.123redblackgreyblueredblackgreyblue4567One h<strong>and</strong> deviceWhen used as a One h<strong>and</strong> device the Safeball is designed to be connected to a <strong>ABB</strong> <strong>Jokab</strong> <strong>Safety</strong> RT6, RT7 or RT9 <strong>Safety</strong> relayin order to achieve the highest possible safety level for this type of control.Example of a single Safeball connected to a <strong>ABB</strong> <strong>Jokab</strong> <strong>Safety</strong> relay RT9.<strong>The</strong> response time at ‘stop’ is < 20 ms.8910111213<strong>ABB</strong>10:1514
Two h<strong>and</strong> control stationJSTD25 with SafeballWith a JSTD25 two h<strong>and</strong> control station you have a prepared two h<strong>and</strong> unit that is easy to install, while utilising thegood ergonomics of the Safeball. <strong>The</strong>re are several variants to meet differing needs. All versions meet EN 574, EN954-1 <strong>and</strong> EN 13849-1 <strong>and</strong> are supplied with the internal connections made, to simplify installation.JSTD25 for fixed installationJSTD25 A-E: Two Safeballs mounted on a steel housing.Replaces a traditional two h<strong>and</strong> device. Is available withan emergency stop button <strong>and</strong> ball joint fixtures for theSafeballs. Three 22 mm openings are prepared on the topfor buttons or signal lamps. Hatch for wiring routeing in thebase, securing holes for mounting on the rear. <strong>The</strong> Safeballsare connected to terminal blocks, for the user to connectthe external wiring through one of the two inlet alternatives(underneath or at the rear).JSTD25A Article no. 2TLA020007R5000 Two h<strong>and</strong> controlstation with 2 Safeballs.JSTD25D Article no. 2TLA020007R5300 Two h<strong>and</strong> controlstation with 2 Safeballs, JSMC5.10:16JSTD25B Article no. 2TLA020007R5100 Two h<strong>and</strong> controlstation with 2 Safeballs <strong>and</strong> emergency stop button.JSTD25E Article no. 2TLA020007R5400 Two h<strong>and</strong>control station with 2 Safeballs, JSM C5 <strong>and</strong> emergencystop button.<strong>ABB</strong>
For mobile installation12JSTD25F/JSTD25HArticle no. 2TLA020007R6000/2TLA020007R6300 Twoh<strong>and</strong> control unit with 2 Safeballs.Two Safeballs mountedon the ends of an aluminium profile, shielded by over h<strong>and</strong>guards. Replaces a traditional two h<strong>and</strong> device. Installed withthe aid of grooves in the aluminium profile. Connection toan M12 connector underneath, JSTD25F with 5 pole M12connection <strong>and</strong> JSHD25H with 8 pole M12 Connection. Canbe equipped with an external emergency stop (SMILE) <strong>and</strong>an EDEN sensor for position control. Its low weight makesthis particularly suitable for frequent repositioning.For mobile installation with a built-in Eden sensorJSTD25G Article no. 2TLA020007R6200 Similar to JSTD25Fbut the dimensions additional equipment <strong>and</strong> type of connectioncan, to a large extent, be customised before delivery.Can also be equipped with doubled protection plates for usein particularly severe conditions.34567JSTD25P-1 Article no. 2TLA020007R6500 Two h<strong>and</strong>control unit, portable. Two Safeballs mounted on the endsof an aluminium profile, shielded by over h<strong>and</strong> guards. Withbuilt-in Eva sensor for position control. Developed as a portabletwo h<strong>and</strong> device, where the response of the machineAccessories - JSTD25JSTS31Article no. 2TLA020007R4100St<strong>and</strong> with spacer ring for JSTD25 A-E(JSTS30 without spacer ring).to operation can vary at different operating stations, sinceeach station can be connected separately. Connection viaan 8+1 Zylin connector. Accessories are a connector, spiralcable with connector <strong>and</strong> suspension shelf. (article no.2TLA020007R8000).JSM C5Article no. 2TLA020007R0900Angled ball joint for installationof a Safeball on a table or a steelhousing.JSTK40SArticle no. 2TLA020007R67004 m long spiral cable for JSTD25P-1JSTK80SArticle no. 2TLA020007R68008 m long spiral cable for JSTD25P-1891011Height850-1100 mmø431232132323<strong>ABB</strong>10:1714
Connection example - JSTD25/A/B/D/EConnection example - JSTD25FConnection example - JSTD25H10:18<strong>ABB</strong>
Connection example - JSTD25P-11234Dimension sketch - JSTD2554370 ±1220±0.5356 ±2M12, 5-pole male95±212990.5 ±0.5678910111213<strong>ABB</strong>10:1914
Two h<strong>and</strong> deviceJSTD20ApprovalsJSTD20 for:PressesPunching machinesCutting machinesFixturesFeatures:Durable materialWith or without emergencystop pushbuttonFulfils requirements ofEN 574Highest level of safetyConventional Two h<strong>and</strong> device<strong>The</strong> conventional JSTD20 Two h<strong>and</strong> device utilises a weldedsteel housing. Two operating pushbuttons are protected byover h<strong>and</strong> guards. Between these pushbuttons there is spacefor a emergency pushbutton <strong>and</strong> two extra controls or indicationlamps. Below each of the operating pushbuttons is onenormally open <strong>and</strong> one normally closed contact. To start <strong>and</strong>run the machine both pushbuttons must be activated within0.5 seconds. If one or both pushbuttons are released a stopsignal is given to the machine, <strong>and</strong> all contacts must returnto their deactivated positions before a new start is allowed.<strong>The</strong> design is robust <strong>and</strong> can withst<strong>and</strong> harsh environments<strong>and</strong> long use. <strong>The</strong> pushbuttons <strong>and</strong> contact blocks are simpleto assemble for quick <strong>and</strong> easy installation. <strong>The</strong> device can bemounted directly on the machine, on the <strong>ABB</strong> <strong>Jokab</strong> <strong>Safety</strong>fencing system or on the JSTS30 floor mount. For use withportable Two h<strong>and</strong> devices the JSTS31 floor mount, whichis provided with a spacer ring to fulfil the requirements ofEN 574, is recommended. <strong>The</strong> JSTD20 is available with orwithout an emergency stop pushbutton.Highest level of safetyCorrect connection to a <strong>ABB</strong> <strong>Jokab</strong> <strong>Safety</strong> JSBR4 safetyrelay or Pluto <strong>Safety</strong> PLC ensures the highest level of safetywith dual <strong>and</strong> supervised safety function <strong>and</strong> requires inputactivation of both operating pushbuttons within 0.5 seconds(two h<strong>and</strong> device type III C in accordance with EN 574). Ifthe emergency pushbutton is installed it should be providedwith two normally closed contacts <strong>and</strong> be connected to aseparate safety relay, e.g. from the RT series or Pluto.Why use a Two h<strong>and</strong> device?A two h<strong>and</strong> device can be used when it is necessary toensure that the operator is outside <strong>and</strong> must be preventedfrom reaching into the hazardous area. If the operator decides,after the start signal has been given to the machine,to make an ’after grasp’ i.e. try to adjust the part that hasbeen placed inside the machine, then a dual stop signal isgiven to the machine.<strong>The</strong> new JSTD20 is equipped with a new type of largeover h<strong>and</strong> guards in accordance with EN 574. <strong>The</strong>se preventunintended activation by for instance a knee or elbow.A Two h<strong>and</strong> device only protects the operator using it. Largemachines operated by several operators can be equippedwith one control for each operator.To calculate the correct safety distance, which depends onthe machine’s stopping time including the response time ofthe relay, the use of the <strong>ABB</strong> <strong>Jokab</strong> <strong>Safety</strong> Smart Stoppinganalyser is recommended.10:20<strong>ABB</strong>
Technical data - JSTD20Manufacturer<strong>ABB</strong> AB/<strong>Jokab</strong> <strong>Safety</strong>, SwedenArticle number/ordering numberWeightColourTemperature<strong>Safety</strong> levelEN ISO 13849-1EN 954-1MaterialOperating pushbuttonsDiameterOperating forceOperating distanceMechanical lifeEmergency pushbutton(JSTD20B only)DiameterOperating forceMechanical lifeContactsOperating pushbuttonsEmergency pushbuttonsIsolation voltageContact resistance2TLA020007R2000 JSTD20A2TLA020007R2100 JSTD20B2TLA020007R2200 JSTD20CJSTD20: 6.4 KgJSTS30: 20 KgJSTS31: 23 KgBlack housing, Black pushbuttons,Black floor st<strong>and</strong>.-10°C…+70°C (Operating)-20°C to +70°C (storage)Upp till kat. 4/PL eUpp till kat. 4Housing: 3mm SteelGasket: RubberPushbuttons: Plastic60 mmApprox. 9N3.5±1mm10 6 operations40 mm40N3 x 10 5 operationsMechanically separated contactblocks1 NO + 1 NC2 x NC690V rms20 mohmRated currentUtilisation categories10AAC 15 240V 3ADC 13 240V 0.27ACabling screw clamp terminals, 1 or 2wires with max. cross-section2.5 mm 2 .Contact materialsilver alloy on brassProtection class: IP 65Conformity: EN 418, EN 574, EN 954-1,EN ISO 13849, EN 60947-1,EN 60947-5-1, EN 999170mm145490JSTD20A – Two h<strong>and</strong> device, without emergency stopJSTD20B – Two h<strong>and</strong> device, with emergency stopJSTD20C – Only housing, no buttons12345678Connection example - JSTD20<strong>The</strong> Two h<strong>and</strong> device is intended for use with <strong>ABB</strong> <strong>Jokab</strong> <strong>Safety</strong>’s JSBR4 safety relay (or Pluto <strong>Safety</strong> PLC ) to ensurethe highest level of safety. <strong>The</strong> JSBR4 ensures that all contacts have returned to their deactivated positions before anew start is allowed. <strong>The</strong> safety relay also requires that all contacts are activated within 0.5 seconds. <strong>The</strong> JSBR4 givesa stop signal if one or both of the pushbuttons are released.910JSTD20A Two h<strong>and</strong> device withoutemergency stopJSTD20B Two h<strong>and</strong> device withemergency stop111213<strong>ABB</strong>10:2114
Emergency stops<strong>and</strong> safety stops<strong>ABB</strong>
ContentsPage1Why do you need an Emergency stop? ________________________________11:2Emergency stop for enclosure installation – INCA 1 ____________________11:3Emergency stop for enclosure installation – INCA 1 Tina _______________11:4Emergency stop with LED – Smile ____________________________________11:6Emergency stop with LED – Smile Tina ______________________________11:10Emergency stop with LED – Smile AS-i ______________________________11:14Emergency stop Grab Wire <strong>Safety</strong> Switch Stop-Line ___________________11:16<strong>Safety</strong> stop Inca <strong>and</strong> Smile ________________________________________ 11:20Reset button Smile 11R____________________________________________ 11:2123456789101112Descriptions <strong>and</strong> examples in this book show how the products work <strong>and</strong> can be used. This does not mean that they can meet the requirements forall types of machines <strong>and</strong> processes. <strong>The</strong> purchaser/user is responsible for ensuring that the product is installed <strong>and</strong> used in accordance with theapplicable regulations <strong>and</strong> st<strong>and</strong>ards. We reserve the right to make changes in products <strong>and</strong> product sheets without previous notice. For the latestupdates, refer to www.abb.com/lowvoltage. 2011.<strong>ABB</strong>11:11314
Why do you need anEmergency stop?So that anyone shall be able to stop a machineduring a machine break-down or ifsomeone is in danger.How do I recognise an E-stop?E-stop buttons shall according to relevant st<strong>and</strong>ards bered with a yellow background. An emergency stop grabwire shall be red for high visibility. A sign that indicates thelocation of the E-stop shall be green with a white picture<strong>and</strong> possibly with text in the local country's language.How shall an E-stop stop the machine?An E-stop shall stop the machine as quickly as possible. Toobtain a quick stop one either removes the power directlyor one lets a frequency converter 'run down' <strong>and</strong> afterwardsafter a little delay, remove the power. An E-stop shall notcreate other hazards. <strong>The</strong>refore a risk analysis must be madefor the E-stop to be correctly connected.From 2006/42/EC, clause 1.2.4.3...This device must:- have clearly identifiable, clearly visible <strong>and</strong> quicklyaccessible control devices,- stop the hazardous process as quickly as possible,without creating additional risks,- where necessary, trigger or permit the triggeringof certain safeguard movements....Requirements for E-stops are stated in the following st<strong>and</strong>ards <strong>and</strong> regulations2006/42/EC <strong>The</strong> Machinery DirectiveClause 1.2.4.3 in Annex 1 gives requirements for theemergency stop function for new machines). See alsoclause 1.2.2 Control devices. (see chapter “St<strong>and</strong>ard <strong>and</strong>Regulations”)Council Directive 89/655/EEC (with amendments)concerning the minimum safety <strong>and</strong> healthrequirements for the use of work equipment byworkers at workClause 2.4 gives the requirements for the emergency stopfunction for older machines. See also clause 2.1. (seechapter “St<strong>and</strong>ard <strong>and</strong> Regulations”)EN ISO 13850 <strong>Safety</strong> of machinery – Emergencystop — Principles for designA harmonized st<strong>and</strong>ard that gives technical specificationsfor the requirements in the Machinery Directive. Could alsobe used for older machinery.EN 60204-1 <strong>Safety</strong> of Machinery - Electrical equipmentof machines – Part 1: General requirements.Harmonized st<strong>and</strong>ard that gives requirements for the electricalequipment of machinery including the emergency stopactuator/function. Se clauses 9.2.2 <strong>and</strong> 9.2.5.4.2.11:2<strong>ABB</strong>
Emergency stop for enclosureinstallationINCA 1Approval:Application:CE RTI FIED BYEmergency push button forinstallation in cabinetsAdvantages:Terminal blocksEmergency push buttonup to cat. 4/PL e acc. toEN ISO 13849-1Only 53 mm's constructiondepthWith LED info in printPush button IP65,connector IP20Available as safety stop(black push button)1234567INCA 1 is an emergency stop designed for installation in22.5 mm holes on cabinets. ”INCA 1” has potential freecontacts for connection to safety relays. <strong>The</strong> connection ismade in cabinets via a removable terminal which also haveexcellent measuring points. Inca 1 is also available with ablack pushbutton <strong>and</strong> used as a safety stop. See sectionon safety stops.In the emergency stop button there is a LED that displayscurrent status on:• Green = everything ok• Red = this emergency push button has been pressed• Off = a unit earlier in the circuit is affected89PlutoPlutoRT6 INCAINCA1(S)1(S)Yellow front ring <strong>and</strong> emergency stop signs for emergency stop.101112Pluto Vital INCA 1(S) TinaPluto Vital INCA 1(S) Tina<strong>ABB</strong> 11:31314
Emergency stop for enclosureinstallationINCA 1 TinaApproval:CE RTI FIED BYApplication:Emergency push button forinstallation in cabinetsAdvantages:PlutoPlutoPluto INCA 1 Tina is an emergency stop designed for installation in 22.5 mm holes in equipment cabinets. In addition to the INCA 1 version, "INCA 1 Tina" is also available with electronicadjustment of the dynamic safety loop for connection to the Vital <strong>and</strong> Pluto units. <strong>The</strong> connection is made in equipmentcabinets via a removable terminal block which also has marked measuring points. Inca 1 Tina is also available withblack push button <strong>and</strong> is used in this case as a safety stop.See section on safety stops.Pluto Vital INCA 1(S) TinaPluto Pluto Vital Vital INCA INCA 1(S) 1(S) Tina Tina Info PLCINCAINCAINCA 1(S)1(S)1(S)Terminal blocksEmergency push buttonup to cat. 4/PL e acc. toEN ISO 13849-1Only 53 mm's constructiondepthWith LED info in push buttonInfo output (Inca1 Tina)Push button IP65, connectorIP20Available as safety stop(black push button)<strong>The</strong> emergency stop button has a LED that displays the currentstatus:• Green = everything is OK• Red = this emergency stop has been pressed.• Flashing red/green = a protection device earlier in theloop has been actuated.Yellow front ring <strong>and</strong> emergency stop signs for emergency stop.11:4<strong>ABB</strong>
Technical data - INCA 1/INCA 1 TinaManufacturer:Article no./Ordering data:INCA 1INCA 1 TinaImpact resistance(half sinusoidal)Vibration resistance(sinusoidal)Climate resistanceDamp heat, cyclicalDamp heat, sustainedDry heatCoolingSalt mistLevel of safety:Cat. 4/PL eCategory 4SIL 3SIL 3PFH d:INCA 1INCA 1 Tina:Colour:Weight:Size:Material:Temperature:Enclosure classificationInstallation:<strong>ABB</strong> AB/<strong>Jokab</strong> <strong>Safety</strong>, Sweden2TLA030054R01002TLA030054R0000Max. 150m/s², pulse width11 ms, 3-axis, acc. toEN IEC 60068-2-27Max. 50 m/s² at 10 Hz…500 Hz, 10 cycles, 3 axis, acc.to EN IEC 60068-2-696 hours, +25 °C / 97%,+55 °C / 93 % relativehumidity, as perEN IEC 60068-2-3056 days, +40 °C / 93 %relative humidity, as perEN IEC 60068-2-7896 hours, +70 °C, as perEN IEC 60068-2-296 hours, -40 °C, as perEN IEC 60068-2-196 hours, +35 °C in a chemicalsolution with NaCl as perEN IEC 60068-2-11EN ISO 13849-1EN 954-1EN 62061IEC/EN 61508-1...7PFH d: 1,60×10 -10PFH d: 4.66×10 -9Yellow, red <strong>and</strong> blackApprox. 45 gramsSee drawingPolyamide PA66, Macromelt,Polybutylenterephthalate PBTUL 94 V0-10°C to +55°C (operation),-30°C to +70°C (storage)Print: IP 65, Connector: IP2022,5 mmEmergency stop LEDs: INCA 1:Green: <strong>Safety</strong> device OK.Not lit: A unit earlier in thecircuit is affected.Red: This emergency stop hasbeen pressed.INCA 1 Tina:Green: <strong>Safety</strong> device OK, safetycircuit OKFlashing: <strong>Safety</strong> device OK,safety circuit previously broken.Red: This button is pressed in,<strong>and</strong> the safety circuit is broken.Operating voltage (LED):Current consumption (LED):Emergency stop buttonOperating force:Operating movement:Contact material:INCA 1: 24 VDCINCA 1 Tina: 24VDC +15%-25%INCA 1: 15 mAINCA 1 Tina: 47 mA22 ± 4 NApprox. 4 mm to lockedpositionGold-plated silver alloyMinimum current: INCA 1:10 mA, 10 VDC/10 VACINCA 1 Tina: —Maximum current: INCA 1:2 A 24 VDC, 1A 125 VACINCA 1 Tina: —Mechanical life:> 50 000 operationsSt<strong>and</strong>ards: EN 60204, EN 60947-5-1 & -5EN ISO 13850Accessories:Front ring yellow for INCAEmergency stop sign S D F,22,5mmEmergency stop sign E FT,22,5mmConformity:2TLA030054R04002TLA030054R05002TLA030054R06002006/42/EGEN 954-1, EN ISO 13849-1,EN 62061, EN 60204-1,EN 61496-1, IEC 60664-1,EN 61000-6-2,EN 61000-6-4, EN 60947-5-1,EN 108812345678910111213<strong>ABB</strong>11:514
Emergency stop with indicationSmileApprovals;CE RTI FIED BYApplication:To stop a machine or aprocessFeatures:Emergency push buttonup to cat. 4/PL e acc. toEN ISO 13849-1With LED info in push buttonRobustPush button IP 65, housingIP67Available as safety stop(black push button)Smile - small <strong>and</strong> cost effective E-stopIn order to fulfil the need for a small <strong>and</strong> easy to install E-stop,Smile has been developed. <strong>The</strong> size of the device makes it possibleto be installed wherever you want. With M12 connection/s orcable <strong>and</strong> centralised mounting holes Smile is very easy to install,especially on aluminium extrusions. Smile is available for E-stopsin both dynamic <strong>and</strong> static safety circuits i.e. for interfacing toVital/Pluto <strong>and</strong> <strong>Safety</strong> relays. Each version is available with eitherone or two M12 connections or cable. At the top of Smile, a LEDshows the current status as: green = protection OK, red = thisemergency stop has been pressed <strong>and</strong> if the LED is off, an emergencystop earlier in the loop has been actuated. Smile is alsoavailable with black push button <strong>and</strong> is used as a safety stop. Seesection on safety stops.12Smile emergency stop has six different variants:1. Smile 10EA has a 1 m cable connected through the base ofthe unit.2. Smile 10EK has four 1 m short connecting leads through thebase of the unit. No LED.3. Smile 11EA has a five-pole M12 connector on one end of theunit.4. Smile 12EA has two five-pole M12 connectors, one on eachend of the unit.5. Smile 11EAR has one 5-pole M12 connector at one end.6. Smile 12EAR has two 5-pole M12 connectors at each end.35411:6 <strong>ABB</strong>6
Connection examples – SmileSmile 10EA can be connected to either Pluto or asafety relay. Single channel example with LED indication.<strong>Safety</strong> category 1. <strong>The</strong> connection cable exits fromunderneath the unit.PlutosafetyPLC <strong>Safety</strong> relayE.g. RT6,RT9 Smile 10EASmile 11EA can be connected to either Pluto or asafety relay. Single channel example with LED indication.<strong>Safety</strong> category 1. Connection via M12 connector.PlutosafetyPLC <strong>Safety</strong>relayE.g. RT6,RT9 Smile 12EA can be connected to either Pluto or asafety relay. Single channel example with LED indication.<strong>Safety</strong> category 1. Connection via M12 connector+ termination connector. Smile 11EASmile 10EA can be connected to either Pluto or a safetyrelay. Two channel example with LED indication.<strong>Safety</strong> circuit category 4.PlutosafetyPLC <strong>Safety</strong> relayE.g. RT6,RT9 Smile 10EASmile 11EA can be connected to either Pluto or a safetyrelay. Two channel example with LED indication. <strong>Safety</strong>circuit category 4. Connection via M12 connector. PlutosafetyPLC <strong>Safety</strong>relayE.g. RT6,RT9 Smile 12EA can be connected to either Pluto or a safetyrelay. Two channel example with LED indication. <strong>Safety</strong> circuitcategory 4. Connection via M12 connector + terminationconnector. Smile 11EA12345678PlutosafetyPLC<strong>Safety</strong>relayE.g. RT6,RT9Smile 12EAPlutosafetyPLC<strong>Safety</strong>relayE.g. RT6,RT9 Smile 12EA910<strong>ABB</strong>Smile 12EA can be connected to either Pluto or a safety relay. Two channel serial connection example with LEDindication. <strong>Safety</strong> circuit category 3. Connection via M12 connectors. Connection is made here without a terminationdevice for Smile 12EA (C), this unit is reconnected to the Pluto/safety relay via a separate cable. You can also useJST2 as a termination device after Smile12EA (C).PlutosafetyPLC<strong>Safety</strong>relayE.g. RT6,RT9 Smile 12EA Smile 12EA Smile 12EA11:711121314
Connection examples – SmileSmile 12EA <strong>and</strong> 11EA can be connected to either Pluto or safety relay. Two channel example with LED indication.<strong>Safety</strong> circuit category 3. Connection via M12 connectors. Note that there is no termination connector as the Smile11EA (C) completes the circuit without the need for a termination connector (JST2) or return cable. Pluto <strong>Safety</strong> safetyrelayPLC E.g. RT6, RT9E-Stop Button status LED Indication<strong>The</strong> table showsthe LED indication status of the E-StopA B C A B C buttons from the example shown in above example.R R R G G GR R D G G Rd A = Smile 12EAR D R G Rd B B = Smile 12EAR D D G Rd BC = Smile 11EAR = ReleasedD R R Rd B BD = DepressedD R D Rd B BG = Green light from the top of the buttonD D R Rd B BRd = Red light from the top of the buttonD D D Rd B B TerminationB = Blank, no lightdevice JST2Smile 10EA/11EA/12EA are like any other emergency stops when 0V to the LED indication is not connected. This meansthat any suitable <strong>Safety</strong> PLC or safety relay can be used. If the LED indication is used, the voltage between Pin 1(+) <strong>and</strong>Pin 3 (-) should be between 19.2 – 28.8 VDC. <strong>The</strong> following examples show connections to <strong>Safety</strong> PLC <strong>and</strong> <strong>Safety</strong> relay. Smile 12EASmile 12EASmile 11EASingle channel PLC connectionTwo channel <strong>Safety</strong> relay connectionPLC<strong>Safety</strong>RelayBrown White BlueBlack GreySmile 11EASmile 10EABrownWhiteBlackGreySmile 11EASmile 10EK<strong>The</strong> cable is connected to Smile 10EA via the lid at the back.1. Input 12. Input 23. 0 VDC (to be connected only if LED indication is required)4. Output 25. Output 1BrownWhiteBlue BlackGrey Smile 11EA (R)1. Input 12. Input 23. 0 VDC (to be connected only if LEDindication is required)4. Output 25. Output 1Brown White Blue Black Grey <strong>The</strong> leads are connected to Smile 10EK via the lid at the back.No LED connection.Brown Input 1White Input 2Black Output 2Grey Output 1Smile 12EA (R)1. Input 12. Input 23. 0 VDC (to be connected only if LEDindication is required)4. Output 2, feedback5. Output 1, feedbackBrownWhiteBlueBlackGrey1. Output 12. Output 23. 0 VDC4. Input 2, feedback5. Input 1, feedback11:8<strong>ABB</strong>
Technical data – SmileManufacturer:Article number/ordering data:Smile 10EA with 1 m cableSmile 10EK with shortconnecting leads(No LED connection)Smile 11EA with M12 maleconnectorSmile 12EA with male <strong>and</strong>female M12 connectorsSmile 11EARSmile 12EARJST2 termination for Smile 12.Note. <strong>The</strong>re are versions fordynamic technology (with Tina).Impact resistance(half sinusoidal)Vibration resistance(sinusoidal)Climate resistanceDamp heat, cyclicalDamp heat, sustainedDry heatCoolingSalt mistLevel of safety:IEC/EN 61508-1...7 SIL 3PFH d:Colour:Weight:Size:Material:Ambient temperature:<strong>ABB</strong> AB/<strong>Jokab</strong> <strong>Safety</strong>, Sweden2TLA030051R04002TLA030051R06002TLA030051R00002TLA030051R02002TLA030051R01002TLA030051R03002TLA030051R1300max. 150 m/s2, pulse width11 ms, 3-axis, as perEN IEC 60068-2-27max. 50 m/s 2 at 10 Hz,10 cycles, 3-axis, as perEN IEC 60068-2-696 hours, +25 °C / 97%,+55 °C / 93 % relative humidity,as per EN IEC 60068-2-3056 days, +40 °C / 93 % relativehumidity, as perEN IEC 60068-2-7896 hours, +70 °C, as perEN IEC 60068-2-296 hours, -40 °C, as perEN IEC 60068-2-196 hours, +35 °C in a chemicalsolution with NaCl as perEN IEC 60068-2-111,60E-10Protection class: IP 65Yellow, red <strong>and</strong> blackApprox. 65 gramsLength: 84 mm + M12contact(s) (12.5 mm each)Width: 40 mmHeight: 52 mmPolyamide PA66, Macromelt,Polybutylentere phthalate PBT,Polypropylene PP, UL 94 V0-10°C to +55°C (operation),-30°C to +70°C (stock)Mounting:LED on E-Stop:Sign for emergency stopTwo M5 recessed hexagon headscrews, L ≥25 mm.Hole cc: 44 mmGreen: <strong>Safety</strong> device ok, <strong>Safety</strong>circuit closedOff: <strong>Safety</strong> circuit broken(When an E-Stop is depressedall following units in the circuitlose the LED function).Red: <strong>Safety</strong> device actuatordepressed <strong>and</strong> <strong>Safety</strong> circuitbroken.Input voltage (LED): 17-27 VDC ripple ±10%(LED supply voltage)Current consumption (LED):E-Stop buttonActuating force:Actuator travel:Material, contacts:Min current:Max current:Life, mechanical:Accessories:Emergency stop button S D F,32,5mmEmergency stop button E F T,32,5mm15 mA22 ± 4 NApprox. 4 mm to latchSilver alloy gold plated10 mA 10 VDC/ 10 VAC2 A 24 VDC, 1 A 125 VAC> 50 000 operationer2TLA030054R07002TLA030054R0800Conformity: EN ISO 13850, EN 60204,EN 60947-5-1 & -512345678910111213<strong>ABB</strong>11:914
Emergency stop with indicationSmile TinaApprovals:CE RTI FIED BYApplication:To stop a machine or aprocessFeatures:Smile Tina - small <strong>and</strong> cost effective E-stopIn order to fulfil the need for a small <strong>and</strong> easy to install E-stop,Smile has been developed. <strong>The</strong> size of the device makes it possibleto be installed wherever you want. With M12 connections orcable <strong>and</strong> centralised mounting holes Smile is very easy to install,especially on aluminium extrusions. Smile is available for E-stopsin both dynamic <strong>and</strong> static safety circuits i.e. for interfacing to Vitalsystem/Pluto safety PLC <strong>and</strong> <strong>Safety</strong> relays. Each version is availablewith either one or two M12 connections or cable. Two M12connectors are used to enable the connection of E-stops in series,which is often used with dynamic safety circuits fulfilling safetycategory 4. In the top of the Smile Tina E-stop unit, LEDs show theactual status according to the dynamic system:Green = everything is OK, Red = E-stop activated.Flashing Red/Green = Stop activated from another preceding device.Smile is also available with black push button <strong>and</strong> used as asafety stop. See section on safety stops.<strong>The</strong> Smile Tina emergency stop is available in four versions:1. Smile 10EA Tina has a 1 m cable connected via the base ofthe unit.2. Smile 11EA Tina has a five-pole M12 connector on the end ofthe unit for connecting the <strong>ABB</strong> <strong>Jokab</strong> <strong>Safety</strong> cable.3. Smile 12EA Tina has two five-pole M12 connectors, one on eachend of the unit for connecting the <strong>ABB</strong> <strong>Jokab</strong> <strong>Safety</strong> cable.4. Smile 11EAR Tina has one 5-pole M12 connector at one endfor connection of cable from <strong>ABB</strong> <strong>Jokab</strong> <strong>Safety</strong>.Emergency push buttonup to cat. 4/PL e acc. toEN ISO 13849-1Light grids, emergency stop<strong>and</strong> Eden in the same safetyloop together with Vital orPluto gives cat. 4/PL e acc.to EN ISO 13849-1With LED indication on pushbuttonRobustInfo-signal from eachemergency stopPush button IP 65, housingIP67Available as safety stop(black push button)132411:10<strong>ABB</strong>
Connection examples – Smile TinaSmile 10EA Tina can be connected to either a Pluto or Vital system. <strong>Safety</strong> circuit cat-egory 4 with LED indication/information. <strong>The</strong> connection cable exits from underneath theunit. PlutoVitalSmile 10EA Tina123Smile 11EA Tina can be connected to either a Pluto or Vital system. <strong>Safety</strong> circuit category4 with LED indication/information. Connection via M12 connectors. <strong>The</strong> circuit below showsthree Smile 11EA Tina units connected in series via connection terminals in the electricalcabinet. PlutoElectrical cabinetVitalConnection terminationSmile 11EA TinaSmile 11EA TinaSmile 11EA Tina45678Pluto Vital Tina 4ASmile11EA Tina can be connected toeither a Pluto or Vital system. <strong>Safety</strong> circuit category4 with LED indication/information. Connection via M12 connectors. <strong>The</strong> circuit below showsthree Smile 11EA Tina units <strong>and</strong> one Eden connected in series via a Tina 4A connectionblock.Smile 11EA TinaSmile 11EA TinaSmile 11EA Tina9101112Eden = Adam & Eva13<strong>ABB</strong>11:1114
Connection examples – Smile TinaE-Stop Button statusInformation output signalA B C A B CR R R H H HR R D H H LR R R H L HR R D H L LD R R L H HD R D L H LD D R L L HD D D L L L<strong>The</strong> table shows the information output signal status from each of the Smile11EA Tina units in the previous connection examples.In the example showing connection with an Eden sensor, the Eden statusinformation signal acts in the same way as the Smile Tina 11EA units.<strong>The</strong> status information signal can be connected to e.g. PLC input.Note. <strong>The</strong> information signal must not be used as a safety signal. <strong>The</strong> signalshould only be used to indicate the status of connected devices.A = Smile 11 EA TinaB = Smile 11 EA TinaC = Smile 11 EA TinaR = ReleasedD = DepressedH = High (i.e. supply voltage)L = Low (= 0 VDC)Smile 12EA can be connected to either a Pluto or Vital system. <strong>Safety</strong> circuit category 4 withLED indication/information. Connection via M12 connectors. <strong>The</strong> last Smile 12 EA Tina unit feedsthe dynamic signal back to the Pluto/Vital. PlutoVitalSmile 12EA TinaSmile 12EA TinaSmile 12EA TinaE-Stop Button status LED IndicationA B C A B CR R R G G GR R D G G RdR D R G Rd FR D D G Rd RdD R R Rd F FD R D Rd F RdD D R Rd Rd FD D D Rd Rd Rd<strong>The</strong> table shows the LED indication status of the E-Stop buttons in the previousconnection examples, where three Smile 10 EA, Smile 11EA or 12EATina units are connected in series.A = Smile 10/11/12 EA Tina B = Smile 10/11/12EA TinaC = Smile 10/11/12 EA TinaR = ReleasedD = DepressedG = Green light from the top of thebuttonRd = Red light from the top of thebuttonF = Flashes between green <strong>and</strong> redlightSmile 12EA can be connected to either a Pluto or Vital system.<strong>Safety</strong> circuit category 4 with LED indication/information.Connection via M12 connectors. <strong>The</strong> circuit shows two Smile12EA Tina’s, one Eden sensor <strong>and</strong> one Focus Light Curtainconnected in series.PlutoVitalSmile 12EA Tina Smile 12EA TinaEden = Adam & EvaFocusTina 10ABrownWhiteBlueBlackGreySmile 10EA Tina1. Input voltage,17-27 VDC ripple+/- 10%2. Dynamic input signal3. 0 VDC4. Dynamic output signal5. Information output <strong>The</strong> connection cable is connected to the Smile 10EA Tina unit via the back panel.BrownWhiteBlueBlackGreySmile 11EA TinaBrownWhiteBlueBlackGreySmile 12EA TinaBrownWhiteBlueBlackGrey11:121. Input voltage,17-27 VDC ripple+/- 10%2. Dynamic input signal3. 0 VDC4. Dynamic output signal5. Information output1. Input voltage,17-27 VDCripple+/- 10%2. Dynamic input signal3. 0 VDC4. Not used5. Not used1. Output voltage to next unit2. Dynamic output signal (To nextSmile or to Pluto or Vital system)3. 0 VDC4. Not used5. Information output<strong>ABB</strong>
Technical data – Smile TinaManufacturer:Article number/ordering data:Smile 10EA Tina with 1 mconnection cableSmile 11EA Tina with M12 maleconnectorSmile 12EA Tina with male <strong>and</strong>female M12 connectorsSmile 11EAR TinaNote. <strong>The</strong>re are versions foruse with relay technology(without Tina).Impact resistance(half sinusoidal)Vibration resistance(sinusoidal)Climate resistanceDamp heat, cyclicalDamp heat, sustainedDry heatCoolingSalt mistLevel of safety:IEC/EN 61508-1...7 SIL 3PFH d:Colour:Weight:Size:Material:Ambient temperature:<strong>ABB</strong> AB/<strong>Jokab</strong> <strong>Safety</strong>, Sweden2TLA030050R04002TLA030050R00002TLA030050R02002TLA030050R0100max. 150 m/s 2 , pulse width11 ms, 3-axis, as perEN IEC 60068-2-27max. 50 m/s 2 at 10 Hz, 10cycles, 3-axis, as perEN IEC 60068-2-696 hours, +25 °C / 97%,+55 °C / 93 % relative humidity,as per EN IEC 60068-2-3056 days, +40 °C / 93 %relative humidity, as perEN IEC 60068-2-7896 hours, +70 °C, as perEN IEC 60068-2-296 hours, -40 °C, as perEN IEC 60068-2-196 hours, +35 °C in a chemicalsolution with NaCl as perEN IEC 60068-2-114,66E-09Protection class: IP 65Mounting:Yellow, red <strong>and</strong> blackApprox. 65 gramsLength: 84 mm + M12contact(s) (12.5mm each)Width: 40 mm Height: 52 mmPolyamid PA66, Macromelt,Polybutylenterephthalate PBT,Polypropylen PP, UL 94 V0-10°C to +55°C (operation)-30°C to +70°C (stock)Two M5 hexagon socket screws,L ≥25 mm.Hole centres: 44 mmLED on E-Stop:Time delay:Sign for emergency stopGreen: <strong>Safety</strong> device OK, <strong>Safety</strong>circuit OKFlashing: <strong>Safety</strong> device OK,safety circuit broken.Red: Breaks in safety device<strong>and</strong> safety circuit1:1.5 (Two Smile units areequal to three Edens in timedelay)Input voltage: 17-27 VDC ripple ±10%Current consumption:Current from informationoutput:E-Stop button Actuatingforce:Actuator travel:Material, contacts:Life, mechanical:Accessories:Emergency stop sign S D F,32.5mmEmergency stop sign E F T,32.5mm47 mA (57mA with max. currentfrom information output)10 mA max22±4 NApprox. 4 mm to latchSilver alloy gold plated> 50 000 operations2TLA030054R07002TLA030054R0800Conformity: EN ISO 13850, EN 60204,EN 60947-5-1 & -512345678910111213<strong>ABB</strong>11:1314
Emergency stop with indicationSmile AS-iApprovals:CE RTI FIED BYApplication:To stop a machine or aprocessSafe input node in AS-isystemsFeatures:Smile 11EA AS-i is an emergency stop with a built-in dual channelsafe AS-i input node. <strong>The</strong> AS-i bus <strong>and</strong> the safety around it is specifiedby the two organisations “AS-International Association” <strong>and</strong>“AS-Interface <strong>Safety</strong> at Work”, <strong>and</strong> is described in publicationssuch as “AS-Interface <strong>The</strong> Automatic Solution”.Smile 11EA AS-i is supplied with 30 V DC from the AS-i bus.<strong>The</strong> recommended connection to the AS-i bus is made via a flatcable terminal to M12 (see Figure), which makes it possible toquickly <strong>and</strong> easily connect the device to the yellow AS-i cable.Smile AS-i can also be connected directly to the AS-i bus usingonly two conductors (pins 1 <strong>and</strong> 3 on the unit's M12 contact).Smile is also available with black push button <strong>and</strong> is used in thiscase as a safety stop. See section on safety stops.Emergency push buttonup to cat. 4/PL e acc. toEN ISO 13849-1Simple connection to AS-ibusWith LED indication onpush button <strong>and</strong> AS-i statusindicationRobustPush button IP 65, housingIP67Available as safety stop(black push button)11:14<strong>ABB</strong>
Technical data – Smile AS-iManufacturer:Article number/ordering data:Smile 11EA AS-i<strong>ABB</strong> AB/<strong>Jokab</strong> <strong>Safety</strong>, Sweden2TLA030052R0000AS-i dataAS-i profileS-7.B.0AddressingM12-contactNode address on delivery 0Response time across the AS-ibus5 ms (+ response time forsafety monitor)Pin configuration(1) AS-i +(2) Not used(3) AS-i –(4) Not used(5) Not usedVoltage supplyOutput voltageTotal current consumption < 60 mA30 V DC from the AS-i bus.Tolerance 26.5 – 31.6 V DC.GeneralEnclosure protection class IP65Ambient temperature -25…+50°CDimensions52 x 40 x 84 (+12,5 mm M12contact) (H x B x D)ColourBase: YellowEmergency stop button(Smile 11EA AS-i): RedSafe stop button(Smile 11SA AS-i): BlackActuating force22 ±4 NActuating movementCa 4 mm till låsMechanical life > 50 000 operationerPFH d6,95x10 -9<strong>Safety</strong>/Harmonisedst<strong>and</strong>ardsIEC/EN 61508-1..7 SIL3, PFDavr: 2,95x10 -5EN 62061SIL3EN ISO 13849-1 Performance level PL e,Category 4, MTTF d: highEN 60947-5-1 & -5For emergency stop buttons/safety stop buttonsEN ISO 13850:2008For emergency stop buttons/safety stop buttonsCertificationTÜV NordPush button control panelLED in emergency stop buttonLED displays can be individually programmed in the PLCprogram as shown below.LED in pushbuttonIndicatorDescriptionRed ON Output bit 1 ONOFFOutput bit 1 OFF orOutput bit 1 & 2 ONGreen ON Output bit 2 ONOFFOutput bit 2 OFF orOutput bit 1 & 2 ONAS-i LED <strong>and</strong> Fault LED in combinationLED pair at the M12 contact.AS-i (Green)Fault(Red)OFF OFF AS-i voltage missingON OFF Normal operationON ON No data exchange with masterFlash ON No data exchange due to address= 0123456789101112Smile 41xxxx-xwith one AS-i node for fourpushbuttons.Smile 41Exxxx-xwith one AS-i safety node fore-stop <strong>and</strong> one AS-i node forthree pushbuttons.Smile 41EKxxxx-xwith two safety nodes (e-stop<strong>and</strong> mode selector) <strong>and</strong> oneAS-i node for two pushbuttons.13<strong>ABB</strong>11:1514
Emergency stop Grab Wire<strong>Safety</strong> SwitchStop-LineApprovals:BGApplication:Emergency stop GrabWire <strong>Safety</strong> Switch alongmachines or conveyorsFeatures:Duplicate extraction in twodirectionsUp to 75 m lengthRobustIP 67Integrated emergency stopbuttonWarned before the safetycircuit is brokenDuplicated safety in both directionsStop-Line is used for easy reach of an emergency stopalong machines, conveyors <strong>and</strong> processes. Stop-Line iseasier to install than a system of several emergency stopbuttons along a carriage path. Stop-Line indicates operationstatus, reset or triggered mode. <strong>The</strong>re is also indication ofhow taut the wire is.Stop-Line can be used as protection for conveyors withlow risks. <strong>The</strong> wire can, for example, be installed at waistheight in front of the conveyor, which provides an emergencystop if someone falls towards the conveyor.Stop-Line has four contacts. If someone pulls the wire orif the wire is broken, all the contacts are affected. In bothcases, the machine is emergency-stopped. Just before thesafety contacts are broken an indication is given since thewire may accidentally trigger the stop signal as a result oftemperature differences.To reset the Stop-Line the combined emergency- <strong>and</strong>reset button must be pulled out.Forced Disconnected Contacts<strong>The</strong> contacts of the Stop-Line are forced-disconnected.Forced disconnection means that the contacts are mechanicallypulled apart, thus ensuring protection against contactwelding or sticking.<strong>Safety</strong> level<strong>The</strong> forced disconnected contacts provide a high level ofsafety. To achieve a high level of safety in respect to theconnection with the machine control system, it is appropriateto use a safety relay manufactured by <strong>ABB</strong> <strong>Jokab</strong> <strong>Safety</strong>.Stop-Line can be combined with Tina devices for use in asafety circuit containing other safety devices <strong>and</strong> emergencystops according to PL e.Regulations <strong>and</strong> St<strong>and</strong>ards<strong>The</strong> Stop-Line is designed <strong>and</strong> approved in accordancewith relevant st<strong>and</strong>ards. See technical data.Emergency-stop Grab Wire easily accessibleduring normal work operation along a machine11:16<strong>ABB</strong>
Technical data – Stop-LineManufacturer:Article number/Ordering dataStop-Line 75AStop-Line 37AStop-Line 75BStop-Line 37BColourMounting – Stop-Line<strong>The</strong> wire should be mounted at least 20 mm from the underlying surface. If the wire is longer than 25 m it must be supported withlow friction supports. <strong>The</strong> ambient temperature during installation should be the same as during operation. For the Stop-Line typeA.. After installation, pull the wire strongly several times <strong>and</strong> then adjust the tension to compensate for any extensions due to deformationof the thimbles.Stop-Line 37A/75A<strong>ABB</strong> AB/<strong>Jokab</strong> <strong>Safety</strong>, Sweden2TLA020041R00002TLA020042R00002TLA020041R01002TLA020042R0100Black with yellow labelLevel of safety Cat. 4/PL e, EN ISO 13849-1Housing MaterialLid MaterialOperating temperatureSwitching contactsCast aluminiumCast aluminium-30°C to +80°C2 NC + 2 NOProtection class IP 67, EN 60529Mechanical lifeMax. switching frequencyReset method100 000 switching cycles20/minMax. wire length 37,5 m./75 m.MountingTerminalsmushroom-head slam button4 x M5/4 x M6Screw terminal, 8 x M4Cable access 3 x M20 x 1.5WeightMax. voltageInformation outputRated voltageRated current<strong>The</strong>rmal current0,9 kg250 VACUe 10-30 V DCIe 50mA10AUtilisation category AC 15, DC 13Short-circuit protectionMelting Fuse 6A DII type gGConformity EN ISO 13849-1,EN ISO 13850, EN60947-1,EN 60947-5-1, VDE 0113,EN ISO 12100-1, -2 ochVDE 0660 T200.Support(Pulley block or Eye bolt)SupportMax 37m/75m0,15m 2-5m 0,2mPull rope spring12345678910111213<strong>ABB</strong>11:1714
Contact Adjustment Stop-Line<strong>The</strong> tension is adjusted using the built-in set screw until the arrowhead isaligned with the label in the window (see picture below). When the combinedemergency- <strong>and</strong> reset button is then pulled making the status windowshow green, all contact pairs are in operational mode <strong>and</strong> the machine canbe started.Pulling the wire, or if the wire is broken, all the contact pairs shift position<strong>and</strong> the machine is stopped. Before doing so, an electronic warning signalis provided which can be used to alert an operator to compensate for slowvariations of the tension in the Stop-Line wire. This is useful to avoid unnecessarystops caused by e.g. ambient temperature variations.Tolerance: distance ± 0.5 mm, power ± 15%on (closed)off (open)for contacts 11-12SElectrical Connection Stop-LineElectrical connection of Stop-Line, highest level of safety.Connection terminal 1 <strong>and</strong> 3:Connection of supply voltage 10-30V DCConnection terminal 2 <strong>and</strong> 3:Connection to signal circuit or lamp for indicationNote! <strong>The</strong> connection shows the Stop-Line in acorrectly tensioned condition.11:18<strong>ABB</strong>
Ordering data – Stop-Line accessoriesInstallation kit 1Installation kit 2Wire 3mm (sheath 4mm)Wire clamp for 3mmThimbleTurnbuckleEye bolt M8x50Pull wire spring QF 75Pull wire spring QF 37Pulley block, unhingedFastener for pulley blockPulley block, hingedDeflection pulley Ø 75mm2TLA020043R1200Contents:2TLA020034R0500 x 25 Wire2TLA020034R0400 x 6 Wire clamp2TLA020034R0300 x 6 Thimble2TLA020034R0600 x 1 Turnbuckle2TLA020034R0900 x 8 Eye bolt M8x502TLA020043R1300Contents:2TLA020034R0500 x 40 Wire2TLA020043R0100 x 1 Pull wire spring2TLA020043R0300 x 9 Pullay block2TLA020043R0600 x 9 Fastener for pulleyblock2TLA020034R05002TLA020034R04002TLA020034R03002TLA020034R06002TLA020034R09002TLA020043R00002TLA020043R01002TLA020043R03002TLA020043R06002TLA020043R04002TLA020043R020012345678910111213<strong>ABB</strong>11:1914
<strong>Safety</strong> stopInca <strong>and</strong> SmileWhen should I use the safety stop?<strong>Safety</strong> stops are used to stop the operation of a machine in a safe manner. Itmust not be used as an emergency stop, but only as a stop for an individual hazardousmotion. This is indicated by black push button. Likewise, an emergencystop push button with red push button must not be used as a safety stop.Inca for panel mounting<strong>The</strong> Inca series is available with black push button <strong>and</strong> iscalled Inca 1S/Inca 1S Tina. <strong>The</strong> safety stop is identical tothe corresponding emergency stop apart from the black pushbutton. For technical data see the Inca emergency stop.Smile with indication<strong>The</strong> Smile series is available with black push button <strong>and</strong> hasa similar designation apart from an S in the name instead ofE. <strong>The</strong> safety stops are identical to the corresponding emergencystops apart from the black push button. For technicaldata see the Smile emergency stop.Article number2TLA030054R03002TLA030054R0200Ordering dataINCA 1SINCA 1S TinaArticle numberOrdering data2TLA030051R0900 Smile 11 SA2TLA030051R1000 Smile 12 SA2TLA030051R1100 Smile 11 SAR2TLA030050R0500Smile 11 SA Tina2TLA030050R0600Smile 12 SA Tina2TLA030050R0700Smile 11 SAR Tina2TLA030050R0800Smile 12 SAR Tina2TLA030052R0100Smile 11SA AS-i11:20<strong>ABB</strong>
Reset buttonSmile 11RWhen do I need reset push button?Smile 11RA/B are reset Push buttons intended to reset safety circuits.Smile 11RA has a connections for the NO-contact <strong>and</strong> for the LEDin the PB. <strong>The</strong> reset LED is o be turned of after reset of the safety circuit.Smile 11RB is used together with our Pluto <strong>Safety</strong> Plc in order to reducethe numder of terminals, on terminal is used as both input for the resetas well as output for the LED.1234567Technical data – Smile 11RManufacturerArticle number/ordering dataSmile 11RASmile 11RBColourBasePushbuttonMaterialHousingPushbutton contact<strong>ABB</strong> AB/<strong>Jokab</strong> <strong>Safety</strong>, Sweden2TLA030053R00002TLA030053R0100yellowbluePolyprobylene PPAuAmbient temperatureHumidity rangeProtection classConnectorsSizeWeightMechanical lifeSwitching reliability-25...+55°C35 to 85% (with no icing orcondensation)IP655-pole male M12 connector84x40x36 (LxWxH) + 12 mmfor M12 connector (L)aprox. 60 g1.000.000 operations at10 mA/24 VDC10 x 10 -6 at 5 mA/24 VDC8910Power SupplyLED operating voltageLED current consumptionPushbutton operating voltagePushbutton current consumptionPushbutton rated power24 VDC (maximum 33 VDC)20 mA at 24 VDC30 mA at 33 VDCMin: 5 V, max: 35 VMin: 1 MA, max 100 mAMax: 250 mW111213<strong>ABB</strong> 11:2114
Contact rails, Bumpers<strong>and</strong> <strong>Safety</strong> Mats<strong>ABB</strong>
ContentsPage1When shall I use contact rails, bumpers<strong>and</strong> safety mats? __________________________________________________ 12:1Contacts rails <strong>and</strong> bumpers _________________________________________ 12:2<strong>Safety</strong> mats _______________________________________________________ 12:82345Descriptions <strong>and</strong> examples in this book show how the products work <strong>and</strong> can be used. This does not mean that they can meet the requirements forall types of machines <strong>and</strong> processes. <strong>The</strong> purchaser/user is responsible for ensuring that the product is installed <strong>and</strong> used in accordance with theapplicable regulations <strong>and</strong> st<strong>and</strong>ards. We reserve the right to make changes in products <strong>and</strong> product sheets without previous notice. For the latestupdates, refer to www.abb.com/lowvoltage. 2011.When shall I use contact rails, bumpers <strong>and</strong> safety mats?Contact rails <strong>and</strong> bumpersContact rails are used as protection against squeezingaccidents, i.e. on moving machine parts <strong>and</strong> automaticdoors <strong>and</strong> hatches. <strong>The</strong> strips come in customisedlengths <strong>and</strong> various cross sections.Bumpers are used as safety buffers to protect againstremote control transport vehicles <strong>and</strong> other dangerousmoving objects that require long stopping distances.<strong>Safety</strong> mats<strong>Safety</strong> mats are used for protection around hazardousmachinery. <strong>The</strong>y are well suited for monitoring an areaused for loading <strong>and</strong> unloading of material to a machine.§St<strong>and</strong>ard: EN 1760-2 <strong>Safety</strong> of machinery -Pressure sensitive protective devices - Part2: General principles for the design <strong>and</strong>testing of pressure sensitive edges <strong>and</strong>pressure sensitive bars§St<strong>and</strong>ard: EN 1760-1 <strong>Safety</strong> of machinery- Pressure sensitive protective devices -Part 1: General principles for the design<strong>and</strong> testing of pressure sensitive mats <strong>and</strong>pressure sensitive floors678910111213<strong>ABB</strong>12:114
<strong>Safety</strong>Contact edges with contact strips SKS 18<strong>The</strong> contact edge consists of a rubber profile with a safetycontact strip inside. <strong>The</strong> contact edge is fitted on an aluminiumprofile.<strong>The</strong> special design of rubber profiles of EPDM or NBR rubcontactrails& bumpersApprovals:Utilization:Protection againstsqueezing accidents onmoving machine parts <strong>and</strong>automatic doors.Features:Can be connected to asafety relay, Vital or PlutoSupplied in customizedlengthsIP 65Simple assembly on siteLengths up to 25 m.Contact!<strong>Safety</strong> contact rails <strong>and</strong> bumpers as safetydevices for potentially dangerous machines<strong>Safety</strong> contact railsContact edges are used as protection against crushing injuries,for example, moving machine parts, automatic doors.Contact edges with cast-in contact stripsOur new contact edges consist of a rubber profile with acast-in contact strip. <strong>The</strong>y are made up simply using connectionplugs that are glued to the ends together with aterminal cap. <strong>The</strong> rubber profile is fitted on an aluminiumprofile.Available in EPDM design. Supplied in lengths up to 25 m.ber protect the inner contact strip in the best way possibleagainst damage <strong>and</strong> also allow for a contact angle exceeding±45˚. Normally supplied in lengths up to 25 m.BumpersBumpers are employed on automatic production lines tominimise danger to both people <strong>and</strong> machines. <strong>The</strong> largefoam rubber cushions enable long practical braking <strong>and</strong>run-through distances, thus enabling designers to optimiseprotection for both personnel <strong>and</strong> machines.<strong>The</strong> safety contact strips are mounted inside aluminiumprofiles which are, in turn, protected by the large foam cushionsthat are glued to the carrier profile <strong>and</strong> then sprayedwith a thin film of polyurethane which makes the bumperwaterproof <strong>and</strong> helps to minimise wear <strong>and</strong> tear.<strong>The</strong> bumpers are delivered mounted to the carrier profilein ordered lengths (0,2 m – 3 m).Fields of Application12:2<strong>ABB</strong>
<strong>Safety</strong> contact rails GP - General1<strong>The</strong> safety contact strip, SKS 18, the actual contactor, is locatedinside the safety contact rail. <strong>The</strong> safety contact stripconsist of a homogeneous highly insulating outer EPDM material<strong>and</strong> has two internal conducting contact surfaces. <strong>The</strong> conductingelastomer contains two copper wires that provide lowresistancedetection even in lengths exceeding 100 metres.Because of the contact points, the safety contact rail hasapproximate 20 mm of inactive length at each end.To provide protection against damage <strong>and</strong> to enable itsproper use, the safety contact strip is inserted into the switchingchamber of the rubber contactor profile. <strong>The</strong> rubber profiles(EDPM or NBR) are then permanently sealed with a specialelastic adhesive <strong>and</strong> end caps to make them watertight.<strong>The</strong> safety contact rail is then pressed into the aluminiumprofile.<strong>Safety</strong> contact rail,constructionRubber profileSKS 18Aluminium supportprofile, C-profile234<strong>Safety</strong> contact strip SKS 18 for contact edge GPTechnical data - SKS 18Outer material EPDM, electrical insulation >30MohmInner materialConductivityContact resistanceMax. electrical loadEPDM, electrical elastomer withreinforce copper wire60 ohm / 100 metersapprox. 50 ohm24 V / 100 mAMax. applied pressure 6.5 N/cm 2Dimensions18 x 6 mmConstruction - contact edge GE<strong>Safety</strong> contact strip SKS 18Conductivecontact surfaceHighly insulatedouter materialCopper wire567Inside the contact edge there is a cast-in contact strip thatconsists of two conductive alternating surfaces on the inside<strong>and</strong> a highly-effective insulating shell. <strong>The</strong>re are towconductive wires in the contact surfaces that allow for lowohm measurements even when the contact edge has an extendedlength. <strong>The</strong> cast-in contact strip is protected againstdamage by the surrounding chamber. <strong>The</strong> cast end plugsensure a permanent contact from the conductive surfacesin the contact strip. A special flexible adhesive is used tomake the connector ring watertight.Aluminium profileConnection plugTerminalcapRubber profilewith integratedcontact stripTerminal resistor89Technical data - Rubber profilesType GP 25-25 GP 25-4025252540GE 25-25GE 25-45(1) 10-metre lengths of GPedges on request(2) Measured with ( Ø 80 mmtest specimen),10 mm/s(3) Measuring speed 10 mm/s(4) Not including DIN 31006-2(GS - BE - 17)1011Fixing Profile AL 25-14 AL 25-14 Al 25-14 Al 25-14Material EPDM/NBR EPDM/NBR EPDM EPDMLength max (m) (1) 6(10) 6(10) 25 25Weight (g/m) 370 480 510 770Weight incl. C-Profile690 800 820 1080(g/m)Activation force (N) (2) 34/37 39/52 64,1 69,1Actuating distance (mm) (3) 8.0/7.5 9.4/9.7 4,7 6,73Braking distance (mm) (3) 10.2/9.5 7.2/5.9 6,48 20,73Max. Actuating ( º ) (4) 2x 45º 2x 60º 2x20˚ 2x20˚NOTE! Contact us for otherprofile sizes.<strong>ABB</strong> 12:3121314
Common propertiesTechnical data - Contact railsManufacturerArticle number/ordering data:<strong>ABB</strong> AB/<strong>Jokab</strong> <strong>Safety</strong>, SwedenGP2TLA076025R2500 Contact rail GP25/25EPDM.Ordered by length2TLA076125R2500 Contact rail GP25/25 NBR.Ordered by length2TLA076025R4000 Contact rail GP25/40EPDM.Ordered by length2TLA076125R4000 Contact rail GP25/40 NBR.Ordered by length2TLA076009R0100 Ready-made, 2+2 m cable2TLA076009R0500 Ready-made, 5+5 m cable2TLA076009R0800 Ready-made, 7+7 m cable2TLA076009R1000 Ready-made, 10+10 m cableGE2TLA076005R0200 Contact edge GE25-25EPDM per metre.2TLA076005R0400 Contact edge GE25-45EPDM per metre.2TLA076005R4400 Connection plug with 2.5 mcable.2TLA076005R4500 Connection plug with 5mcable2TLA076005R4600 Connection plug with 10mcable2TLA076005R4700 Connection plug with resistor8.2k2TLA076005R6100 Terminal cap for GE25-452TLA076005R6200 Terminal cap for GE25-25Mechanical load max 1Please contact us for more alternatives.500 NActuating angle (DIN) 1 2x 20ºMechanical life 1 10 5Max. operate temp. range 2Max. temperature rangeProtection classification IP 65Max. Electrical loadResistance-20Cº to +55ºC-25ºC to +70ºC24V 100mA0.6 Ohm/mConductors GP: 2x 0.38 mm 2 GE: 2x 0.34 mm 2Conductors insulation material(1) According to DIN 31006-2 (GS - BE - 17)(2) Not including DIN 31006-2 (GS - BE - 17)GP: PVC GE: PUR matt blacktPhysical <strong>and</strong> chemical material propertiesProperties EPDM NBR Resistance EPDM NBR 1 = no effect for lasting contactTensile strength 3 2 Water (distilled) 1-2 1 2 = slight effect non-lasting contactTensile elongation 3 2 Acids (diluted) 1 3 3 = moderate effect moderate contactDurability 3 2 Bases (diluted) 2 2 4 = appreciable effect limited contactTear resistance 3 3 Non-oxidised acids 2 3 5 = strong effect short-term contactCold flexibility 2 3 Oxidised acids 4 5 6 = extreme effect avoid contactHeat resistance 2 2 ASTM oil No. 3 6 1Oxidation resistance 1 3 Vegetable oil 5 1UV-resistance 1 3 Ester solvent 2 5Weather/ ozone 1 3 Ketone solvent 3 5resistanceFlame resistance 6 6 Aliphatic hydrocarb. 5 1Gas permeability 4 2 Aromatic hydrocarb. 6 2-3Halogenic hydrocarb. 6 51= excellent - 6 = poor Alcohols 1 5EPDMNBRASTMKwEsterKetoneAliphaticAromaticGood resistance to ozone <strong>and</strong> weather,especially against chemicalsGood resistance to oil <strong>and</strong> petrolAmerican Society for Testing MaterialAromatic hydrocarbonOrganic solventOxidized solventi.e. petroli.e. benzolNote! <strong>The</strong> information given is based on data obtained fromthe respective material suppliers. Although all efforts have beenmade, unforeseen factors can have a considerable effect on thegenerally applied indications during practical use therefore thisinformation must be used as a general guide only. If there is anydoubt as to the suitability of the materials used for any specificapplication/environment, we will, upon request, supply rubbersamples for your own evaluation or, if given written specificationsof your proposed environmental conditions, test the suitability ofmaterials for your specific application.12:4<strong>ABB</strong>
Mounting <strong>and</strong> electrical connection – <strong>Safety</strong> contact railsMounting<strong>The</strong> selected contact profile should be mounted usinga suitable aluminium C profile (as shown opposite).12345Stage 1 – GP <strong>and</strong> GEPan or round-head screws should not be used to mountthe aluminium C profile. If such screws are used this canresult in the connecting wire in the aluminium profile beingdamaged.Stage 2 – GP <strong>and</strong> GEIn order to feed the connecting wire through the profile,an 8 mm hole must be drilled in a suitable position. Carefullyremove the burr from the hole edges <strong>and</strong> insert thesupplied rubber collar. <strong>The</strong> connecting wires can also beplaced in the aluminium profile.678<strong>ABB</strong>Stage 3 – GPIn order to make fitting of the safety contact rail easier,the aluminium profile <strong>and</strong> the safety contact rail shouldbe sprayed with a water based soap solution. One side ofthe rubber profile must then first be inserted into the profile<strong>and</strong> then the whole profile pressed in. Once the soapsolution has evaporated, the contact strip will be firmlyfitted into the profile. In order to prevent subsequent slippingof the safety contact rail, talcum powder, oils or similarlypermanent lubricating agents must not be used.Note! Pulling or pushing thesafety contact rail into the aluminiumprofile can cause damageto the contact rail <strong>and</strong> shouldbe avoided at all costs.Any other proposed methodsof fixing should only be attemptedafter consultation with<strong>ABB</strong> <strong>Jokab</strong> <strong>Safety</strong>. Other methodsof fixing, unless approved by<strong>ABB</strong> <strong>Jokab</strong> <strong>Safety</strong> may invalidatethe warranty <strong>and</strong> may lead to incorrectdevice operation.Stage 3 – GE<strong>Safety</strong> contact edges with a t-base have to be pushedinto the aluminium profile.12:591011121314
<strong>The</strong> safety bumper principle<strong>The</strong> contact function of the <strong>ABB</strong> <strong>Jokab</strong> <strong>Safety</strong> bumper consistsof the safety contact strip SKS 18 being actuated bya special mechanical construction. This construction, whichis protected by a large foam cushion, is inserted <strong>and</strong> gluedto the carrier profile. <strong>The</strong> foam rubber is covered with apolyurethane skin. <strong>The</strong> safety bumper is also covered withcross-bound polyurethane, which can be provided in arange of colours. By utilising this construction the bumpergives a stop signal when impacted from all directions withsoft sides.<strong>The</strong> <strong>Safety</strong> Bumper must be connected to a suitable twoinput channel <strong>Safety</strong> Relay. e.g. <strong>ABB</strong> <strong>Jokab</strong> <strong>Safety</strong> typeRT6 or RT7 which provides all necessary monitoring of thebumpers activation <strong>and</strong> detection of cable faults.<strong>The</strong> twin cable connection makes it possible to connectseveral bumpers in series.For further information <strong>and</strong> examples of electrical connectionsee Connection examples.Technical data - BumpsArticle number/ordering data:2TLA076200R01002TLA076200R02002TLA076200R03002TLA076200R04002TLA076200R05002TLA076200R06002TLA076200R07002TLA076200R08002TLA076200R09002TLA076200R10002TLA076200R11002TLA076200R12002TLA076200R13002TLA076200R14002TLA076200R15002TLA076200R16002TLA076200R0000DimensionsActuating distanceBraking distanceActuating force [N]Bumper ASB53/100 black100/200 black150/300 black200/400 black53/100 black/yellow100/200 black/yellow150/300 black/yellow200/400 black/yellow60/100 NBR black (63/100)100/200 NBR black150/300 NBR black200/400 NBR black200/200 black150/150 NBR black100/200 NBR black/yellow150/250 NBR black/yellowBumper base pricein accordance with the illustration,or special dimensionsapprox. 20% of heightat least 50% of height150 N at 80 mm around the testspecimenLife greater than 10 5Protection class IP 65Ambient temperature -20º to +60ºChemical resistanceOil, grease10% acid10% alkaline (caustic) solutionsConnection cablegoodresistantresistant2 x 2 m; 2 x 0,34 mm 2 PUcoveredFoam rubber corePolyurethane coverAluminium profile<strong>Safety</strong> contact stripSKS 18Carrier aluminium profileForceKraftUseableAnvändbar braking distancebromssträckaapprox. 50%c:a 50%ContactKontaktatvid c:aapprox. 20% 20%Max.Maxcompression kompressionto approx. till c:a 70%Deformation Deformation(%) [%]12:6<strong>ABB</strong>
St<strong>and</strong>ard shapes1Shape AShape BCustomer-specifiedspecial shape23456Cable exits at the ends of the bumper or according to customer requirements.78Cross-section height910Cross-section width1112DimensionsBumpers are available in four different st<strong>and</strong>ard dimensions. Other dimensions can be supplied on request.Note that in the case of customised orders, the ratio of 2:1 for X:Y must not be exceeded. Bumpers canbe supplied in lengths of up to 3000 mm. <strong>The</strong> minimum cross-section is 53 x 100 mm.13<strong>ABB</strong>12:714
<strong>Safety</strong>MatsApprovals:<strong>Safety</strong> Mats for:Personal protection withinthe dangerous areas aroundpresses, robots, productionlines, machines etc.Features:Certified accordingto EN 1760-1.Can be connected to asafety relay, Vital or PlutoVery durableIP 67A <strong>Safety</strong> mat used as personalprotection within dangerous areas.<strong>The</strong> ASK <strong>Safety</strong> Mat is used as personal protection withinthe dangerous areas around presses, robots, productionlines, machines etc.When connected to a suitable monitoring system steppingon the <strong>Safety</strong> Mat will immediately be detected causingdangerous machine movements to be stopped. This ismade possible by the detection of electrical contacts closingwithin the s<strong>and</strong>wich construction of the Mat. As a loadbearingcomponent the Mat is made with a bottom plateof either synthetic material or metal. <strong>The</strong> <strong>Safety</strong> Mat is providedwith a ribbed surface, which is fixed by adhesive tothe surface of the <strong>Safety</strong> Mat.<strong>The</strong> safety mat <strong>and</strong> its connection cabling can be supervisedby a suitable <strong>ABB</strong> <strong>Jokab</strong> <strong>Safety</strong> safety relay, whichprovides PL d.Mat construction<strong>The</strong> basic Mat construction consists of a ground plate ofeither PVC, Aluminium or Stainless Steel which providesprotection against uneven ground etc. <strong>The</strong> Mat is made upof a s<strong>and</strong>wich construction, the pressure contact switchconsisting of two conducting sheets separated from eachother by a webbed isolating layer. <strong>The</strong> internal switchingsurface is cast into a durable polyurethane to protectagainst moisture, <strong>and</strong> this is then covered with a top layer ofribbed or chequered rubber mat or a thin aluminium plate.Attachment to the floor is by means of a ramped edgetrim or a z-profile made of aluminium. <strong>The</strong> ramp profile hasa channel for connection cables.Custom Mats can be made, i.e. special shape, resistantagainst harsh industrial environments (mineral oil, acid,bleach etc.) or with a non-slip surface or M12-contacts.Ribbed SurfacePolyurethane- Upper SurfaceContact Surface 1Isolating LayerContact Surface 2Contact!12:8<strong>ABB</strong>
Technical Data - <strong>Safety</strong> MatsManufacturerEdge Trim - <strong>Safety</strong> MatsASK-1U4.4-RFFixing profileSurface protection<strong>ABB</strong> AB/<strong>Jokab</strong> <strong>Safety</strong>, SwedenArticle number/ordering data:Production cost cast mat in PUwith RF finish ASK-1U4.4-RF 2TLA076301R0000Production cost cast mat in PUwith RF finish <strong>and</strong> cast-in rampedge trim ASK-1T4.4-RF 2TLA076301R0200ASK-1U4.4-RF. No ramp edgetrim:1000 x 750 mm 2TLA076310R05001000 x 1000 mm 2TLA076310R06001000 x 1500 mm 2TLA076310R0700kvm2TLA076301R0500ASK-1T4.4-RF. Cast-in rampedge trim:1000 x 750 mm 2TLA076310R10001000 x 1000 mm 2TLA076310R11001000 x 1500 mm 2TLA076310R1200kvm2TLA076301R0600<strong>The</strong> above have a PU surfacelayer. Mats are available in anysize <strong>and</strong> in other materials.Connection cabling including1 off M8 male <strong>and</strong> 1 off M8female:2,5 m 2TLA076900R32005 m 2TLA076900R3300Connection cableChannel for connection cableMax. areaHeightInactive AreaSwitching ForceMax. PressureMaterialProtection Class IP 67Ambient Air TemperatureEntire mat = 2350 x 1350 mm10 m 2 (divided mat)Rec. relation max 3:1Min 100x100 mm10mm without ribbed surfacemax 14.5 mm with ribbedsurfaceNominally 10 mm from Matedge150N (Round body 80mm)2000 N over ø 80 mmBlack polyurethane, othercolours on request0°C to +60°CChemical ResistanceOil, greasegood10% acid resistant10% alkaline (caustic) solutions resistantCable 2 x 5 m, 2 x 0,34 mm 2 ,PU sheathedMechanical Life> 1,5x10 6 load shiftingEdge trim RS 14Art nr: 2TLA076300R0500Eliminates vertical edges <strong>and</strong> attaches the<strong>Safety</strong> Mat to the floor. Also provides protection<strong>and</strong> channel for connection cables.Profile BS14Art nr: 2TLA076300R0800Best for use on the side nearest the machine.Permits a shorter distance from, for example, awall.Corner trimArt nr: 2TLA076300R0900Can be used between two RS 14 profiles as analternative to mitre cutting of profiles.12345678910Angle fixing profileBase unitCorner connectionSecured area + 70 mmNon-secured area11ASK-1T4.4-RFCompletely moulded matwith mouldededge profiles in PU.Connection cableNon-secured areaNon-secured area + 70 mm1213<strong>ABB</strong> 12:914
Surface layer - <strong>Safety</strong> mats<strong>Safety</strong> mats are normally supplied with a ribbed polyurethane non-slip surfacelayer that withst<strong>and</strong>s tough conditions very well (oil, acid or causticsubstances) <strong>and</strong> has anti-slip properties. If required, other patterns can besupplied, or for special requirements even other materials, such as NBRrubber or chequer plating in aluminium or stainless steel. <strong>Safety</strong> mats canalso be supplied without a surface layer, to have a full coverage rubber sheetglued on during installation. Please contact us for more information aboutthese alternatives.<strong>Safety</strong> distance - safety mat as per EN ISO 13855If a safety mat is used as entry protection, the smallestpermitted safety distance between the hazardous area<strong>and</strong> the outer edge of the mat (seen from the hazard) iscalculated using the formula from EN ISO 13855.S = (K * T) + CwhereMounting - <strong>Safety</strong> MatsS = smallest permitted safety distance in mmK = body speed (velocity of propagation 1600 mm/s)C = additional distance in mm based on the intrusion ofthe body into the risk zone before the protection deviceis actuated (1200 mm)i.e.S = (1600 * T) + 1200<strong>The</strong> ground on which the mats are to be laid must be level, clean <strong>and</strong> dry. <strong>The</strong> matsshould not be glued to the ground.Place mat in required position with groundplate downwards.If more than one mat is to be installed be sure to place the mats edge to edge (withoutspace).If the mats are delivered without the ribbed surface premounted, the selected surfaceshould be placed in position over the mats <strong>and</strong> fixed by means of a suitable adhesive.In the case of safety mats with cast-in rubber edge trim, the mat is secured to the floorby screws straight through the edge trim. In the case of safety mats with an aluminiumedge trim, see below.Place the selected edge trim to the mat. Edge trims are usually mitred (at 45 degrees)to provide complete protection around the corners of the mat.Mark the cable routes on the edge trim <strong>and</strong> cut out slots to allow cable access into thecable channel as indicated. Connect the cables as shown under Electrical Connection.Mark the locations of the securing screws along the scribed line on the edge trim. It isrecommended that fixing screws should be located at 60 cm spacing.Secure the edge trim to the ground with 6 mm plugs <strong>and</strong> suitable screws. Plug the holesabove the screws in the edge trim with the cover plugs provided.NOTE!<strong>Safety</strong> mats must not be rolled/twisted or modified in any way. It is also essential thatmats are not cut into any shape or shortened following delivery.12:10<strong>ABB</strong>
Electrical connection - <strong>Safety</strong> contact rails, bumpers <strong>and</strong> safety matsContact edge, bumper or safety mat must be connectedto a suitable monitoring unit (e.g. <strong>ABB</strong> <strong>Jokab</strong> <strong>Safety</strong> safetyrelays RT6, RT7A/B, RT9, RT10, Vital with Tina 6A orPluto safety-PLC).<strong>The</strong> monitoring unit monitors the functionality of the contactprotection <strong>and</strong> detects any breaks or short-circuits inthe lines. Several crush protection units can be connectedin series while still retaining the same level of safety.When pressure is applied, the active surface of the contactarea in the contact protection is closed <strong>and</strong> the safetyoutput on the monitoring unit trips. A stop signal willbe sent to the machine's safety circuits preventing anydangerous movements.12345Note! If alternative units are used rather than the recommended <strong>ABB</strong> <strong>Jokab</strong> <strong>Safety</strong> relays, it is essential that the user checkstheir suitability with <strong>ABB</strong> <strong>Jokab</strong> <strong>Safety</strong> before use. Failure to do so may result in incorrect operation <strong>and</strong>/or damage to the safetybumpers <strong>and</strong> invalidate warranty.67HK7601A – Connection contact protection for safety relay RT68910111213<strong>ABB</strong> 12:1114
HK3310A – Connection contact protection for safety controller Vital 1HK0001A – Connection contact protection for safety PLC Pluto12:12 <strong>ABB</strong>
12345678910111213<strong>ABB</strong> 12:1314
Fencing systemQuick-Guard ® <strong>and</strong> <strong>Safety</strong> Roller Door<strong>ABB</strong>
ContentsPage1Guick-Guard ® fencing system _______________________________________ 13:2Quick-Guard ® is supplied in three posibilities _________________________ 13:5Quick-Guard ® E __________________________________________________ 13:6Quick-Guard ® E - can be ordered in sections _________________________ 13:7Quick-Guard ® st<strong>and</strong>ard <strong>and</strong> SafeCAD ® _____________________________ 13:10Assembly using NL2 <strong>and</strong> NL3 Net-locks on welded mesh _____________ 13:12Dimensions for aluminium profile lengths <strong>and</strong> panels _________________ 13:13Components• Aluminium profiles ___________________________________________________13:14• Fittings __________________________________________________________ 13:18• Door Components _________________________________________________ 13:21• Fittings for Switches ________________________________________________ 13:31• Terminal Caps <strong>and</strong> Strips _____________________________________________ 13:34• Accessories ______________________________________________________ 13:35• Surfaces ________________________________________________________ 13:36<strong>Safety</strong> Roller Door ________________________________________________ 13:3823456789101112Descriptions <strong>and</strong> examples in this book show how the products work <strong>and</strong> can be used. This does not mean that they can meet the requirements forall types of machines <strong>and</strong> processes. <strong>The</strong> purchaser/user is responsible for ensuring that the product is installed <strong>and</strong> used in accordance with theapplicable regulations <strong>and</strong> st<strong>and</strong>ards. We reserve the right to make changes in products <strong>and</strong> product sheets without previous notice. For the latestupdates, refer to www.abb.com/lowvoltage. 2011.<strong>ABB</strong>13:11314
Quick-Guard ® - fencing systemQuick-Guard St<strong>and</strong>ard assembled withmesh.Quick-Guard St<strong>and</strong>ard with black <strong>and</strong>transparent Polycarbonate in-fill panelsas used for medical applications.Quick-Guard E with fewcomponents <strong>and</strong> easy to angle at upto 45°.Adaption <strong>and</strong> ModificationQuick-Guard is a very flexible fencing system consisting ofa minimum of different components, e.g. aluminium profiles,patented brackets, net-locks, mesh, solid or noise reductionpanels. Using these components there are almost nolimitations as to what can be built. Quick-Guard fencingcosts little to assemble <strong>and</strong> modify.AssemblyDue to our patented screw-lock system, we can supply allbrackets pre-mounted with fixing screws <strong>and</strong> nuts. No holesneed to be drilled in the profiles <strong>and</strong> all cutting is straight.This makes assembly <strong>and</strong> modification very easy.Our policy - To create systems that areenvironmentally friendly <strong>and</strong> provide ergonomicworking conditionsQuick-Guard is environmentally friendly. All componentsin the Fencing System can easily be disassembled <strong>and</strong>reused. All materials in the Fencing System are 100%recyclable. Quick-Guard can also provide a pleasingergonomic working environment.Two versions of Quick-Guard<strong>The</strong> Quick-Guard fencing system is available in two versions,Quick-Guard (St<strong>and</strong>ard) <strong>and</strong> Quick-Guard E which also canbe combined. <strong>The</strong> fencing systems are also easy to adjustwhen production equipment is modified <strong>and</strong>/or moved.Proposal <strong>and</strong> orderingBy utilising our AutoCAD-based SafeCAD program we areable to make system designs in 3-D very quickly. Drawings,cutting lists, etc. are generated from SafeCAD <strong>and</strong> thedrawings can also be used for installation purposes.13:2<strong>ABB</strong>
A flexible <strong>and</strong> stable fencing system which is easy to installFixings with pre-mounted screws <strong>and</strong>nuts mean easy assembly123Width, length <strong>and</strong> height adapted <strong>and</strong> easilychanged according to needs4567Välj mellan ett stort antal automatiskaoch manuella luckor och dörrar8Mesh Plastic Glass PlateSoundabsorbing910111213<strong>ABB</strong>13:314
Patented assembly function<strong>The</strong> <strong>ABB</strong> <strong>Jokab</strong> <strong>Safety</strong> patented guide <strong>and</strong> locking methodmakes it simple to assemble <strong>and</strong> dismantle the fencing system.<strong>The</strong> nut has several advantages, it can easily be locatedinto the profile <strong>and</strong> automatically positions itself when thescrew is turned 90 degrees clockwise. When in this po si-tion the bracket being fixed can be adjusted as required <strong>and</strong>locked by turning the screw further clockwise. To removethe bracket the fixing screw is turned anti-clockwise untilthe nut is in line with the profile slot.Lockingperpendicularto profile slotCentralising <strong>and</strong>turning limitationspatentedCentring washerMount the fixtures by first slackening the screw 3/4 turnanti-clockwise. <strong>The</strong>n tighten the screw clockwise in theusual way. <strong>The</strong> nut will then automatically mechanically lockthe fixture into the profile.All fittings are supplied Pre-assembled. Fittings that donot have a cast-in tab can be provided with a centringwasher.Easy to adjustthe positionof fittings<strong>The</strong> T-slot <strong>and</strong> patented nutmakes it easy to attach fittingsto the fencing profilesWhat does the st<strong>and</strong>ard say?EN ISO 13857 applies as safety distance for the riskzones. <strong>The</strong> st<strong>and</strong>ard includes the dimensions that applyfor safety distances in various risk situations. <strong>The</strong> adjacentfigure shows examples of dimensions for safety distancesfor two different fence heights where the risk of injury isrelatively small when you reach in.With respect to mesh, you specify a minimum distance of200 mm (for people 14 <strong>and</strong> above) for mask size 40 x 40mm. For shorter distances <strong>and</strong> for noise reduction we usefully fitting panels. When the fence is to protect a robot cell,for example, the fence protection should be placed at a minimumdistance of 500 mm between the fence protection <strong>and</strong>the moving machine part that reaches furthest out (as perEN 349). When test running or programming there must bea space between the fencing <strong>and</strong> any moving parts to ensurethe operator does not become wedged between them.For protection that needs to be mounted <strong>and</strong> removedagain, for example for maintenance, the Machinery Directiverequires that fasteners remain in place on the protection.We normally deal with this using interlocked doors/gates for faster <strong>and</strong> safer access.mm250016000 200 500 900 mm 0 35025002000<strong>Safety</strong> distance for 1600 mmguarding with st<strong>and</strong>ard mesh.<strong>Safety</strong> distance for 2000 mmguarding with solid screens(e.g. polycarbonate sheet).<strong>Safety</strong> distance for1600 mm guarding withst<strong>and</strong>ard mesh. <strong>Safety</strong> distancefor 2000 mm guardingwith solid screens(e.g. polycarbonate sheet).13:4<strong>ABB</strong>
Quick-Guard ® is supplied in three ways1. To be designed on siteYou only order sections consisting of a few components.<strong>The</strong>n the fencing system is built on site. A manual meshclipping tool, for easy cutting of the mesh, is providedwith the delivery if needed. <strong>The</strong> profiles are easily cutwith a crosscut saw. <strong>The</strong> advantage of using aluminiumis that it is not flammable when cut. Compared to ironwhich require a fire-watcher in many industries.123452. Cut to size accordingto drawingYou give us a simple sketch or a AutoCAD® file ofhow you want the fencing system to look. We input thisinformation into SafeCAD <strong>and</strong> design the fence in 3D.From this drawing, cutting <strong>and</strong> component lists <strong>and</strong> aquotation are generated automatically.67893. Pre-mounted or assembled on siteWe can deliver full/partially preassembledfencing systems or wecan assemble them on site.10111213<strong>ABB</strong>13:514
Quick-Guard ® E - design directly on siteQuick-Guard E is installed quickly <strong>and</strong> cost effectivelybecause it only consists of patented net-locks, weldedmesh, panels of polycarbonate, u-profiles <strong>and</strong> fence posts(profiles with floor-brackets). All parts for Quick-Guard<strong>and</strong> pre-assembled doors are delivered immediately fromstock. <strong>The</strong> few components of the fencing system make iteasy for you to custom build <strong>and</strong> install the fencing systemyourselves.<strong>The</strong> strength of the fencing system originates from thefact that the welded mesh <strong>and</strong>/or panels of polycarbonateare ‘locked’ into the profile. <strong>The</strong> outer wire of the meshis locked by uniquely designed ‘netlocks’ into the profilemaking the fixing virtually as strong as being welded. <strong>The</strong>polycarbonate panels are locked in with specially designedinfill-locks which, according to our tests, have been asstrong as the mesh netlock system. If you want more stablefencing posts, you can choose a sturdier profile measuring44 x 88 mm instead of the st<strong>and</strong>ard 44 x 44 mm profile.It is always easy to combine Quick-Guard E with Quick-Guard st<strong>and</strong>ard to achieve a complete system. It is also easyto adjust <strong>and</strong> modify the guarding system when productionequipment is modified <strong>and</strong>/or moved.Quick-Guard E is easy to assemble<strong>and</strong> to angle 45°.Assembly of Quick-Guard E1. 2.U-profileSpacer screwJSM 37Net-lock NL2Premount floor fixtures on vertical posts. Mount fixtures byfirst slackening the screw anti-clockwise. <strong>The</strong>n tighten thescrew clockwise in the usual way, the nut will then automaticallylocate into the correct position <strong>and</strong> mechanicallylock the fixture into the profile. Make sure that the nut hasturned correctly.1. Insert spacer screw into the post profiles.2. Place the lower u-profile on the mesh.3. Push the mesh into the profile <strong>and</strong> fix the mesh withNL2 netlocks.4. Fix top u-profile in place either before or after insertingthe mesh.3. 4.Assemble the next section. <strong>The</strong> distance between theposts can be adjusted some mm after the mesh is lockedin with the Net-locks. <strong>The</strong> mesh can be angled up to 45°without using hinges (JSM 35-K).Lock the top of the mesh using NL3 netlocks; this waythe mesh is secured, stabilised <strong>and</strong> electrically grounded.Grounding is needed when electrical devices or cables areassembled on the mesh.13:6<strong>ABB</strong>
Quick-Guard ® E- can be ordered in sectionsQuick-Guard Express can be ordered in differentsections consisting of a few components.By adding the different sections, one can easily build aguard fencing system.1234<strong>The</strong> same fencing sections can be erected in several ways.• 4 pcs 1500 sections• 5 pcs 1100 sections• 1 pc doorOne can easily assemble the Express sections. It is alsopossible to angle these sections (45°). <strong>The</strong> mesh can easilybe cut to the desired size with a simple clipping tool.Measure the number of metres of fencing that are required<strong>and</strong> determine the number of doors. Our two st<strong>and</strong>ard sectionshave a cc width of 1100 mm <strong>and</strong> 1500 mm. <strong>The</strong> cc forthe door is 1100 mm <strong>and</strong> fits anywhere the cc is 1100 mmbetween the posts.If dimensions other than the st<strong>and</strong>ard dimensions areneeded, just cut the mesh to the correct size with a boltcutter.5678910111213<strong>ABB</strong> 13:714
Designation explanation.JSM E11-N/PC20H8H, X, Y, Z, G, S <strong>and</strong>X = Section typeExpress11 = c-c 1100 mm15 = c-c 1500 mmN = MeshPC = polycarbonate20 = Height 2000 mm22 = Height 2200 mm8 = 44x88 mm Profile4 = 44x44 mm ProfileOne can easily assemble the Express sections. It is also possible to angle these sections (45°). <strong>The</strong> mesh can easily becut to the desired size with a simple clipping tool.IMAGE DESIGNATION ART.NO. DESCRIPTIONSection XJSM E11-N14X4JSM E11-N20X8JSM E11-N22X8JSM E11-N/PC20X8JSM E11-N/PC22X8JSM E11-PC20X8JSM E11-PC22X8JSM E15-N14X4JSM E15-N20X8JSM E15-N22X82TLA040106R02002TLA040101R03002TLA040102R03002TLA040104R01002TLA040105R01002TLA040101R53002TLA040102R53002TLA040106R10002TLA040101R09002TLA040102R0800Components for an additional section withonly one post. <strong>The</strong> height can be varied between2000 mm or 2200 mm. <strong>The</strong> sectionis supplied unassembled.Included parts: Floorbracket, netlocks/panellocks, support screws, edge protection,Aluminum profile <strong>and</strong> welded steel mesh/panel sheet.13:8<strong>ABB</strong>
IMAGE DESIGNATION ART.NO. DESCRIPTIONSection YJSM E11-14Y4JSM E11-20Y8JSM E11-22Y82TLA040106R80002TLA040103R21002TLA040103R4100Components for a complete post with floorbracket to finalize the additional sections.<strong>The</strong> height can be varied between 2000mm or 2200 mm. <strong>The</strong> section is suppliedunassembled.Included parts: Floorbracket, supportscrew, <strong>and</strong> Aluminum profile.123Section ZJSM E11-N14ZJSM E11-N20ZJSM E11-N22ZJSM E11-N/PC20ZJSM E11-N/PC22ZJSM E11-PC14ZJSM E11-PC20ZJSM E11-PC22ZJSM E15-N14ZJSM E15-N20ZJSM E15-N22Z2TLA040106R04002TLA040101R04002TLA040102R04002TLA040104R02002TLA040105R02002TLA040106R54002TLA040101R54002TLA040102R54002TLA040106R08002TLA040101R10002TLA040102R0900Components for a complete sectionwithout fence posts <strong>and</strong> floor brackets.<strong>The</strong> height can be varied between 2000mm or 2200 mm. <strong>The</strong> section is suppliedunassembled.Included parts: Netlocks/panel locks, edgeprotection <strong>and</strong> welded steel mesh/panelsheet.456Section GJSM E11-N20G*JSM E11-N22G*JSM E11-N/PC20GJSM E11-N/PC22GJSM E11-PC14GJSM E11-PC20GJSM E11-PC22G* <strong>The</strong> door leaf issupplied pre-mounted.2TLA040101R05002TLA040102R05002TLA040104R03002TLA040105R03002TLA040106R55002TLA040101R55002TLA040102R5500Components for complete conventionaldoor with outer profile 44x88 mm. <strong>The</strong>height can be varied between 2000 mmor 2200 mm. <strong>The</strong> section is supplied unassembled.<strong>The</strong> size of the door can easilybe adjusted on site.Included parts: L-brackets, floorbrackets,netlocks/panel locks, h<strong>and</strong>le, hinges, doorstop, crossbar, aluminum profiles <strong>and</strong> weldedsteel mesh/panel sheet.789Section SJSM E11-N20SJSM E11-N22SJSM E11-N/PC20SJSM E11-N/PC22SJSM E11-PC20SJSM E11-PC22S2TLA040101R06002TLA040102R06002TLA040104R04002TLA040105R04002TLA040101R57002TLA040102R5600Components for a complete sliding doorwith outer profile 44x88 mm. <strong>The</strong> heightcan be varied between 2000 mm or 2200mm. <strong>The</strong> section is supplied unassembled.<strong>The</strong> size of the door can easily be adjustedon location.1011JSM E15-N20SJSM E15-N22S2TLA040101R11002TLA040102R1000Included parts: L-brackets, T-brackets,floorbrackets, netlocks/panel locks, h<strong>and</strong>le,suspension wheels, guiding components,door stop, crossbar, endcaps, aluminumprofiles <strong>and</strong> welded steelmesh/panel sheet.1213<strong>ABB</strong>13:914
Quick-Guard ® St<strong>and</strong>ard <strong>and</strong> SafeCAD ®Quick-Guard consists of a minimum of different components,such as aluminum profiles, patented assembly parts, netlocks,mesh, solid or noise reduction panels. Furthermorethe cost for assembly <strong>and</strong> modification of the system is low.Thanks to our patented screw-lock system, we can supplyall brackets pre-mounted with fixing screws <strong>and</strong> nuts. Noholes need to be drilled in the profiles <strong>and</strong> all cuts are madestraight. Assembly <strong>and</strong> modification is therefore very easy.To be able to quickly <strong>and</strong> easily custom design practicalsafety solutions, we have developed a computer programme,SafeCAD. This is a ‘plug-in’ program for AutoCAD ® . Asimple sketch of the guarding system that is required isused as the program input. <strong>The</strong> positions of doors <strong>and</strong>hatches, choice of mesh, polycarbonate, aluminum/steelsheet or noise reduction panels are typed in. <strong>The</strong> programautomatically generates 3D drawings along with component<strong>and</strong> cutting lists. <strong>The</strong>se drawings are also used as the basisfor assembly/ installation.It is always easy to combine Quick-Guard E with Quick-Guard to achieve a complete system. It is also easy to adjust<strong>and</strong> modify when the production equipment is modified <strong>and</strong>/or moved.Brackets are deliveredPre-assembled withscrews <strong>and</strong> nuts.Using SafeCAD ® it is easy for both us <strong>and</strong> yourself tocustomize the safety solution for your needsExample of component <strong>and</strong> cutting list print-outs from SafeCad.QuoteArticle no Description Qty Unit40-030-06 JSM 30B-K Floorbracket 26,00 pcs40-030-07 JSM 32B-K L-bracket 72,00 pcs40-030-08 JSM 33B-K T-bracket 18,00 pcs40-030-10Cutlist PolycarbonateJSM 36-K2 Floorbracket in steel 2,00 pcs40-033-31Article noJSMDescription37 Suport screw for EconomyQty6,00Length WidthpcsSum m 240-037-2840-039-10JSMJSMA12YPC5A1Edge protectionPc sheetprofile5mm uncolouredfor welded mesh2020x864 11,06864 2020m1,7540-039-12 JSM YPC5A9 Pc sheet 5mm uncoloured, cut to size 1 532 1020 0,5440-039-12 JSM YPC5A9 Pc sheet 5mm uncoloured, cut to size 1 756 504 0,3840-039-12 JSM YPC5A9 Pc sheet 5mm uncoloured, cut to sizeCutlist Welded Mesh1 810 804 0,65Article no Description Qty Length Width Sum m 240-040-13 JSM YN40W1 Welded steelmesh 40x40x3,5 black, 2020x864 1 864 2020 1,7540-040-14 JSM YN40W2 Welded steelmesh 40x40x3,5 black, 1074x1816 2 1820 1074 3,9140-040-16 JSM YN40W9 Welded steelmesh 40x40x3,5 black, cut to size 2 864 354 0,6140-040-16 JSM YN40W9 Welded steelmesh 40x40x3,5 black, cut to size 1 864 804 0,6940-040-16 JSM YN40W9 Welded steelmesh 40x40x3,5 black, cut to size 1 864 920 0,7940-040-16 JSM YN40W9 Welded steelmesh 40x40x3,5 black, cut to size 2 864 932 1,6113:10<strong>ABB</strong>
Quick-Guard ® Assembly, st<strong>and</strong>ard version123Assembly of the Quick-Guard ® system is very easy. All componentsare very light in weight <strong>and</strong> ergonomic in design.This enables, in most cases, one man to be able to assembleboth simple <strong>and</strong> complex structures with ease using veryfew different types of fixing components. All fixtures canbe mounted easily from “outside” by using the specially1. 2.Premount floor fixtures by first slackening the screw anticlockwise.<strong>The</strong>n tighten the screw clockwise in the usualway. <strong>The</strong> nut will then automatically locate into the correctposition <strong>and</strong> mechanically lock the fixture into the profile.3. 4.designed ”locking nut” which can be located anywhere inthe extrusion channel. <strong>The</strong> fixture components, by means ofintegral locating keys, ensure that correct angles are achieved<strong>and</strong> enable the number of bolts/nuts to be reduced to halfthe number that would otherwise be required.Attach lower horizontal extrusion between vertical posts.Use a a spacing block to ensure the correct distance fromthe floor.45678910Insert infill panel <strong>and</strong> fix middle horizontal profile. <strong>The</strong> distancebetween the profiles is the width of the infill minus20 mm.5. 6.Insert top infill panel. Fix top profile with fittings on thetop on both sides.1112Fix the poles to the floor.Secure infill sheet with plastic strip or Net-lock fixings.Easy, fast <strong>and</strong> quick. See more under Assembly of netlocks.If there is a risk of the robot striking the polycarbonate, JSMPL3 panel locks must be used.<strong>ABB</strong> 13:111314
Assembly using NL2 <strong>and</strong> NL3 Net-locks on welded meshNL2 Net-lock<strong>The</strong> outer meshwire is locked intothe profile.NL3 Net-lockMesh with outer wire.Mesh without outer wire.max 2 mmWhen assembling the Net-lock NL2 it is first put intothe profile as the drawing shows. <strong>The</strong>n the Net-lock isturned 90°. When cutting the welded mesh the wireends should not be longer than two (2) mm.Number of Net-locksNumber of Net-locks Quick-Guardst<strong>and</strong>ard versionOn Quick-Guard st<strong>and</strong>ard version NL3 is recommendedas it can h<strong>and</strong>le mesh with <strong>and</strong> without an outer wire.about 400 mmmax 2 mm<strong>The</strong> outer mesh wire islocked into the profile.min 15 mm<strong>The</strong> Net-lock locksthe mesh againstthe profile.When assembling the Net-lock NL3 it is first put intothe profile with the tabs on each side of the mesh wire.<strong>The</strong> screw is then tightened. When cutting the weldedmesh the wire ends should be at least 15 mm to fitinto the profile. NL3 must be used to lock the meshinto the slot.Number of Net-locks Quick-Guard EOn Quick-Guard E both Net-lock NL2 <strong>and</strong> NL3 can beused. For mesh edges without outer wire NL3 must beused instead of NL2.NL3 is used in order90 mmto mechanically lockthe mesh <strong>and</strong> toelectrically groundthe mesh.approx. 350 mmNote!On welded mesh withoutan outer wire NL3must be used.90 mmNL2 or NL3NL2 or NL3NL2 or NL3NL2 or NL3NOTE! On both Quick-Guard St<strong>and</strong>ard <strong>and</strong> Quick-Guard E at least two NL3 should be used in order tomechanically lock the mesh <strong>and</strong> to electrically ground the mesh. NL3 should only be used on doors.Fixing posts to the floor when mesh is required to be fitted at a later date.RightWrongTemporarily mount at least two middle profiles beforedrilling <strong>and</strong> fixing posts to the floor. This method is usedwhen infill mesh or panels are to be fitted at a later date.Note! Never attempt to fix the posts to the floor withoutfirst connecting at least two middle profiles to ensure theposts are parallel to each other <strong>and</strong> vertical.13:12<strong>ABB</strong>
Dimensions for aluminum profile lengths <strong>and</strong> panels.12345678910Material Width HeightPolycarbonate X+20 mm Y+20 mmWelded mesh X+20 mm Y+20 mmSteel panel X+20 mm Y+20 mmSound-absorbing panel 25mm X-37 mm Y-37 mmSound-absorbing 50 mm X-37 mm Y-37 mmLaminated glass X+15 mm Y+15mmDouble Pc 2 pcs. X-7 2 pcs. Y-7Sound absorbent panel profile JSM AS1 2 pcs. L=X2 pcs. L=Y-73Sound-absorbing profile JSM AS3 2 pcs. L=X (mitred 2 x 45 degrees) 2 pcs. L=Y (mitred 2 x 45 degrees)Double Pc profile JSM AS2 2 pcs. L=X 2 pcs. L=Y-33111213<strong>ABB</strong> 13:1314
ALUMINUM PROFILESA wide range of aluminium profiles are available <strong>and</strong> include, fencing profile, guide rails, <strong>and</strong> cable ducting. <strong>The</strong> cableducting is available in three sizes, <strong>and</strong> can be delivered with or without mounting holes. <strong>The</strong> cable ducting is easy toopen <strong>and</strong> can be provided with end caps. Cover strips of plastic are also available, including fencing profiles makingthe entire groove cross section utilisable as ‘installation conduit’ for cables. <strong>The</strong> Aluminium profiles have integral "V"grooves to aid in centring any drilling that may be necessary.Alloy: 6063 <strong>and</strong> 6060F22. Natural anodized aluminium 10μmFencing ProfileDesignation: JSM A4416Article numbers: 2TLA040037R7000 (cut to length)2TLA040037R7400 (L=6000)Material: Naturally anodized aluminiumDimensions: 16,5x44 mm11,53,34420,251116,532Ø 5,6 (2x)Designation: JSM A4426Article numbers: 2TLA040037R8000 (cut to sizes)2TLA040037R8100 (L=6000)Material: Naturally anodized aluminiumDimensions: 44x26 mmDesignation: JSM A44AArticle numbers: 2TLA040037R3500 (cut to sizes)2TLA040037R3600 (L=1100)2TLA040037R9800 (L=1400)2TLA040037R3700 (L=2000)2TLA040037R3800 (L=2000)2TLA040037R3900 (L=2400)2TLA040037R4000 (L=2500)2TLA040037R4100 (L=6000)11,5v44vvv1120,25Material:Dimensions:Order Unit:Natural anodized aluminium44x44 mm10 pcs/box3,3Designation: JSM A4488AArticle numbers: 2TLA040037R4200(cut to sizes)2TLA040037R4300 (L=2000)2TLA040037R4400 (L=2200)2TLA040037R4500 (L=6000)Material: Natural anodizedaluminiumDimensions: 44x88 mmOrder Unit: 5 pcs/box11,53,3v88vvvv vv44v1120,254413:14<strong>ABB</strong>
Designation: JSM A8888Article numbers: 2TLA040037R7500 (cut to length)2TLA040037R7900 (L=6000)Material: Natural anodized aluminiumDimensions: 88x88Ø 5,6 (4x)v11,53,3vv88vvv v4455,875,4vvv1120,2588Ø 8 (4x)123Technical data – fencing profileAngular momentFlexural resistanceTyp Vikt (kg/m) l x(mm 4 x10 4 ) l y(mm 4 x10 4 ) W x(mm 3 x10 3 ) W y(mm 3 x10 3 )JSM A4416 1.040 1.1 7.6 1.19 3.43JSM A4426 1,023 3,2 7,4 2,47 3,36JSM A44A 1.504 12.4 12.4 5.64 5.64JSM A4488A 2.379 79.6 21.6 18.1 9.8JSM A8888 3.632 143.0 143.0 32.5 32.5456Fencing U-ProfileDesignation:Article numbers:Material:Weight:JSM A122TLA040037R2800(cut to sizes, max 2.0 m)2TLA040037R2700 (L=1076)2TLA040037R4600 (L=1476)2TLA040037R4700 (L=2000)Natural anodized aluminium0.230 kg/m2310,478H-profileDesignation:Article numbers:Material:Weight:JSM A132TLA040037R5000(JSM A13 cut to sizes)2TLA040037R5100 (L=1076)2TLA040037R5200 (L=1476)2TLA040037R5300 (L=2020)Natural anodized aluminium0.452 kg/m44310,46,791011Guide RailsDesignation:Article number:Material:Holes:St<strong>and</strong>ard Length:Weight:JSM A3130B2TLA040037R2600Natural anodized aluminiumc-c = 275 mm, ø = 6 mm4,0 m (max)0.530 kg/m34331213<strong>ABB</strong> 13:1514
Designation:Article number:Delivered with:Material:Holes:St<strong>and</strong>ard Length:Weight:JSM A562TLA040037R4900(Cut to sizes incl. screws)2TLA040037R0800(Length 2.0 m, incl. screws)2TLA040037R4800(Length 6.0 m, incl. screws)Screw JSM S8ENut JSM M8BNatural anodized aluminiumc-c = 450 mm, ø = 8.5 mm2.0; 6.0 m1.585 kg/m56v1779Cable DuctingDesignation:Article numbers:A25B)Material:Dimensions:St<strong>and</strong>ard Length:JSM A25A:JSM A25B:Order Unit:Weight:JSM A25_2TLA040037R1300 (JSM A25A)2TLA040037R1400 (JSMNatural anodized aluminium44x25 mm2.0 mwith holes c-c = 500 mmø= 5 mmwithout holes10 pcs/box0.545 kg/m JSMA25A0.567 kg/m JSMA25B25v44vvvDesignation:Article numbers:A60A)A60B)Material:Dimensions:St<strong>and</strong>ard Length:JSM A60A:JSM A60B:Order Unit:Weight:JSM A60_2TLA040037R1500 (JSM2TLA040037R1600 (JSMNatural anodized aluminium44x60 mm2.0 mwith holes c-c = 500 mmø = 5 mmwithout holes10 pcs/box0.923 kg/m JSMA60A0.950 kg/m JSMA60B60vv44vvvvDesignation:Article number:Material:Dimensions:St<strong>and</strong>ard Length:Weight:JSM A882TLA040037R3300Natural anodized aluminium88x68 mm2.0 m1,844 kg/m68v v88vvvvv13:16<strong>ABB</strong>
Cable tieDesignation: JSM X1Article number: 2TLA040033R4300Pre-assembled with: Screws <strong>and</strong> NutsOrder Unit: 10 pcs/boxMaterial:Nylon 6/6 blackProfiles for installation of acoustic dampingProfile for 25 mm sound-absorbing panel, JSM YLA25A_Designation:Article numbers:Material:Dimensions:Weight:JSM AS12TLA040037R9500(cut to length)2TLA040037R0900 (L=2000)Naturally anodized aluminium29x43 mm0,545 kg/mProfile for 50 mm sound-absorbing panel, JSM YLA50A2023,729,136,543,412345Designation:Article numbers:Material:Dimensions:Weight:JSM AS32TLA042021R8000(cut to length)2TLA042021R8100 (L=6000)Naturally anodized aluminium43x560,694 kg/mProfile for double 5mm Polycarbonate panel, JSM YPC5_205122445536,543,367Designation:Article numbers:Material:Dimensions:Weight:JSM AS22TLA040037R9600(cut to length)2TLA040037R1000 (L=2000)Naturally anodized aluminium40x23 mm0,510 kg/m16,34,94023,28910111213<strong>ABB</strong> 13:1714
FITTINGS<strong>ABB</strong> <strong>Jokab</strong> <strong>Safety</strong>’s fencing system is put together with various types of fitting. Uprights are anchored to the floor withfloor angle fittings. With a small angle fitting it is possible to hang an electrical enclosure <strong>and</strong> strengthen the cornersof free-st<strong>and</strong>ing walls. Corners <strong>and</strong> joints are constructed with the aid of T, L <strong>and</strong> I fittings. If angles different to 90°between the fence sections are required, a JSM 35-K angle fitting can be used. This hinge has a distance betweencentres of 47 mm, which means that the gap between uprights will always be less than 20 mm. According to EN ISO13857, the minimum permitted protection distance is 120 mm for a gap narrower than 20 mm.Floor/Angle fittingDesignation: JSM 39-KArticle numbers: 2TLA040030R1400Pre-assembled with: Screw JSM S8C (x 2)Washer 9 x 18 x 1,5 (x 2)Nuts JSM M8B (x 2)Material:AluminiumQuantity:10 pcs/boxDesignation: JSM 30B-KArticle number: 2TLA040030R0600Pre-assembled with: Screw JSM S8C (x 2)Washer 9 x 18 1,5 (x 2)Nut JSM M8B (x2)Material:AluminiumOrder Unit: 10 pcs/boxDesignation: JSM 30B-K1Article numbers: 2TLA040030R1100Pre-assembled with: Screws JSM S8C (x 4)Washers 9 x 18 x 1,5 (x 4)Nuts JSM M8B (x 4)Washers JSM B8B (x 2)Material:AluminiumQuantity:10 pcs/boxDesignation: JSM 36-K1Article number: 2TLA040030R0900Pre-assembled with: Screw JSM S8D (x 3)Nut JSM M8B (x 3)Article number: 2TLA040030R1000Designation: JSM 36-K2Pre-assembled with: Screw JSM S8D (x 3)Nut JSM M8B (x 3)Material:Zinc-plated steelOrder Unit: 10 pcs/boxJSM 36-K1JSM 36-K213:18<strong>ABB</strong>
Small Angle fitting, e.g. Electrical cabinet fitting1Designation: JSM 31B-KTwo counter sunk holesJSM31A1-KOne counter sunk holeArticle number: 2TLA040030R1300 (JSM 31B-K)2TLA040030R0400 (JSM 31A1-K)Pre-assembled with: Screw JSM S8CNut JSM M8BMaterial:AluminiumOrder unit: 10 pcs/box23L-bracketDesignation: JSM 32B-KArticle number: 2TLA040030R0700Pre-assembled with: Screw JSM S8ANut JSM M8BMaterial:AluminiumOrder Unit: 10 pcs/box105105645416T-bracketDesignation: JSM 33B-KArticle number: 2TLA040030R0800Pre-assembled with: Screw JSM S8ANut JSM M8BMaterial:AluminiumOrder Unit: 10 pcs/box105169678I-bracket, joint419Designation: JSM 34B-KArticle number: 2TLA040030R1500Pre-assembled with: Screw JSM S8ANut JSM M8BMaterial:AluminiumOrder Unit: 10 pcs/box68541104411Distance screwDesignation: JSM 37Article number: 2TLA040033R3100Material:Zinc-plated steelOrder unit: 100 pcs/box1213<strong>ABB</strong> 13:1914
80Angle bracketDesignation: JSM D1C HingeArticle number: 2TLA040033R4800Pre-assembled with: JSM M8BJSM B8CJSM S8AMaterial:Polyamide, glass fibre reinforcedColor:BlackOrder unit: 2pcs/bag, 10pcs/box45807,5Designation: JSM 35-KArticle number: 2TLA040033R1400Pre-assembled with: Screw JSM S6ANut JSM M6BMaterial:Zinc-plated steelHole:c-c =47 mmOrder unit: 2 pcs/box102Note! <strong>The</strong> JSM 35-K must only be used formaking fence angles.3477513:20<strong>ABB</strong>
DOOR COMPONENTSTo mount conventional doors a hinge is available which permits an opening angle of 180°. For mounting a slidingdoor, guide rails <strong>and</strong> suspension wheels are utilised. Other sliding elements make it possible to build different typesof hatches. Guide rollers, for wide <strong>and</strong> heavy doors, door closers, fittings for sensors/switches etc are also available.Conventional DoorSliding Door123HatchFolding HatchDouble HatchSliding Hatch45678910111213<strong>ABB</strong> 13:2114
80Hinge kitDesignation: JSM D1C HingeArticle number: 2TLA040033R4800Pre-assembled with: JSM M8BJSM B8CJSM S8AMaterial:Polyamide, glass fibre reinforcedColor:BlackOrder unit: 2pcs/bag, 10pcs/box45807,5Designation: JSM D1A HingeArticle number: 2TLA040033R1500Pre-assembled with: Screw JSM S6ANut JSM M6BMaterial:Zinc-plated steelFixing Holes : c-c = 62 mmOrder Unit: 2 pcs/box102Note! JSM D1A must not be used as a fencing anglefitting because its gap can exceed 20 mm.36295Designation: JSM D1B Spring hingeArticle numbers: 2TLA042020R4700Pre-assembled with: Spacer plate, screws & nutsMaterial:Zinc-plated steelNOTE! <strong>The</strong> door gap will be 28 mm when installed.282211576H<strong>and</strong>leDesignation: JSM D2 H<strong>and</strong>leArticle number: 2TLA040033R0100Pre-assembled with: Screw JSM S8DNut JSM M8BMaterial:<strong>The</strong>rmoplastic, black261504413:22<strong>ABB</strong>
Designation: JSM D18 H<strong>and</strong>leArticle number: 2TLA042020R5000MaterialH<strong>and</strong>le:<strong>The</strong>rmoplastic, blackFittings:AluminumPre-assembled with: Screws <strong>and</strong> Nuts150402212Suitable for sliding door on the inside of the fence.701195263Door closerDesignation: JSM D3(conventional door)Material:Door closer - steelBracket - AluminumArticle number: 2TLA040033R0200Pre-assembled with: Screws <strong>and</strong> NutsDesignation: JSM D19 (sliding door)Article number: 2TLA042020R5600Material:Zinc-plated steelPre-assembled with: Screws <strong>and</strong> Nuts456Gas springDesignation: Gas spring including mountArticle numbers: 2TLA042024R1000Stroke length: 300 mmMaterial:SteelPre-assembled with: Screws <strong>and</strong> NutsDesignation: JSM D22A Gas spring includingmountArticle numbers: 2TLA042024R1100Stroke length: 350 mmMaterial:SteelPre-assembled with: Screws <strong>and</strong> Nuts789Fixing details included:Side fastener (2TLA042021R2700)U fitting (2TLA042021R2800)Specify the required force when ordering10Securing plate for padlockDesignation: JSM D17 Bracket for PadlockhaspArticle number: 2TLA040020R2200Material:Zinc-plated steelNote! Two pieces are required for one complete unit.133562350111213<strong>ABB</strong> 13:2314
Ball CatchDesignation: JSM D11B (conventional door)Article number: 2TLA040033R4100Pre-assembled with: Screws <strong>and</strong> NutsMaterialBrackets:AluminiumBall Catch: Nickel-plated brass40407055020Designation: JSM D11C (sliding door)Article number: 2TLA040033R4200Pre-assembled with: Screws <strong>and</strong> NutsMaterialBrackets:AluminiumBall Catch: Nickel-plated brass7054040501020Designation: JSM D11D (folding door)Article number: 2TLA042020R5200Pre-assembled with: Screws <strong>and</strong> NutsMaterialBrackets:AluminiumBall Catch: Nickel-plated brass68586080553522257013:24<strong>ABB</strong>
Upper Door bolt1Upper Door boltDesignation: JSM D10AArticle number: 2TLA040033R2100Pre-assembled with: Screws <strong>and</strong> NutsMaterialBrackets:Zinc-plated steelRod:Stainless steel90305806065 35 40115231044040511305356Lower Door boltDesignation: JSM D10Article number: 2TLA040033R2000Pre-assembled with: Screws <strong>and</strong> NutsMaterialBrackets:Zinc-plated steelRod:Stainless steel130407891081055280118318251213<strong>ABB</strong> 13:2514
Lower Door boltLower Door boltDesignation: JSM D10BArticle number: 2TLA040033R3800Pre-assembled with: Screws <strong>and</strong> NutsMaterialBrackets:Zinc-plated steelRod:Stainless steel4010064099530390425101801825Cam lockCam lockDesignation: JSM D15Article number: 2TLA040033R3900Pre-assembled with: Screws <strong>and</strong> NutsMaterialBrackets:AluminiumLockunit:Polyamide black706032202235Delivered without key.6Key to cam lockDesignation:Article number:Material:JSM D16 for cam lock JSM D152TLA040033R4400Zinc, black13:26<strong>ABB</strong>
Sliding bolt for Eden1Designation: JSM D20 (for hinged door)Article numbers: 2TLA020302R1000Material:Steel, painted yellowSupplied without an Eden110110130722For installation on hinged doors.18014603Magne 1A mountDesignation: JSM D21Article numbers: 2TLA042023R0000Material:Anodised aluminiumSupplied without Magne 1A Magnetic lockFor installation on hinged doors4045678Door stopDesignation: JSM D13AArticle number: 2TLA040033R2600Pre-assembled with: Screws <strong>and</strong> NutsMaterial:Natural anodized aluminium340960102511Designation: JSM D13Article number: 2TLA040033R2500Pre-assembled with: Screws, Nuts <strong>and</strong>vibration damperMaterial:Zinc-plated steel6012For mounting on vertical profiles.6056013<strong>ABB</strong>13:2714
Designation: JSM D13BArticle number: 2TLA040033R2700Pre-assembled with: Screws, Nuts <strong>and</strong>vibration damperMaterial:Zinc-plated steel4060For mounting on horizontal profiles.575Suspension wheelsDesignation:Article number:JSM D52TLA040033R0400For aluminium profile guide rails JSM A3130B <strong>and</strong>JSM A56Sliding elementsSliding element, (rectangular)Designation: JSM D6Article number: 2TLA040033R0500Pre-assembled with: Screw <strong>and</strong> NutMaterial:Polyamid40198Sliding element, (round)Designation: JSM D7Article number: 2TLA040033R0600Pre-assembled with: Screw <strong>and</strong> NutMaterial:Polyamid40198Sliding element, (guide)Designation: JSM D8Article number: 2TLA040033R0700Pre-assembled with: Screw <strong>and</strong> NutMaterial:Polyamid401989,613:28<strong>ABB</strong>
Guide Components for Sliding Door1Guide Bracket for Sliding DoorDesignation: JSM D12Article number: 2TLA040033R2200Pre-assembled with: Screws <strong>and</strong> NutsMaterial:Aluminium <strong>and</strong> PA6-63052For mounting on vertical profiles.65503Guide Bracket for Sliding DoorDesignation: JSM D12AArticle number: 2TLA040033R2300Pre-assembled with: Screws <strong>and</strong> NutsMaterial:Aluminium <strong>and</strong> PA6-66054For mounting on horizontal profiles.40505Bracket for Guide PinDesignation: JSM D12BArticle number: 2TLA040033R2400Pre-assembled with: Screws <strong>and</strong> NutsMaterial:Aluminium12040675Guide rollerGuide roller for conventional door withlocking mechanismDesignation: JSM D9JSM D9-K - Pre-assembled withangle bracketArticle numbers: 2TLA040033R0800 (JSM D9)2TLA040033R1100 (JSM D9-K)Diameter: 75 mmMax. load: 60 kgJSM D9-K891097JSM D9111213<strong>ABB</strong> 13:2914
Guide roller for sliding doorDesignation: JSM D9AJSM D9A-K - Pre-assembledwith angle bracketArticle numbers: 2TLA040033R1200 (JSM D9A)2TLA040033R1300 (JSM D9A-K)Diameter: 75 mmMax. load: 70 kgJSM D9A-K95JSM D9ADiagonal bar for doorDesignation: JSM D14Article numbers: 2TLA040033R2800Length:1160 mmPre-assembled with: Screws <strong>and</strong> NutsMaterial:Naturally anodized aluminium20Designation: JSM D14AArticle numbers: 2TLA042021R7300Length:400 mmPre-assembled with: Screws <strong>and</strong> NutsMaterial:Naturally anodized aluminium400/1160513:30<strong>ABB</strong>
FITTINGS FOR SWITCHES1Eden fittingsFittings for Eden, adapted for sliding <strong>and</strong>conventional doorsDesignation: JSM D4HArticle number 2TLA040033R3600Pre-assembled with: Screws <strong>and</strong> NutsMaterial:AluminiumNote!Two fittings are needed for a complete Eden.100423440Eden Fitting for sliding door (flush with fence)Designation: JSM D4JArticle number 2TLA042020R4000Pre-assembled with: Screws <strong>and</strong> NutsMaterial:Aluminium4608056Note! One JSM D4H <strong>and</strong> one JSM D4J are neededfor a complete unit.Fittings for JSNY5 Interlock Switches67517Conventional opening door InterlockSwitch Fittings.Designation: JSM D4AArticle number: 2TLA040033R0900Pre-assembled with: Screws <strong>and</strong> NutsMaterial:Zinc-plated steel450502089551012Conventional opening door Interlock SwitchFittings.Designation: JSM D4AAArticle number: 2TLA040033R3400Pre-assembled with: Screws <strong>and</strong> NutsMaterial:Zinc-plated steel405070550 511124013<strong>ABB</strong> 13:3114
Sliding Door Interlock Switch FittingsDesignation: JSM D4BArticle number: 2TLA040033R1000Pre-assembled with: Screws <strong>and</strong> NutsMaterial:Zinc-plated steel12745605 6540605Fittings for Magnet Switches JSNY7Hinged door Magnet Switch FittingsDesignation: JSM D4EArticle number: 2TLA040033R1800Pre-assembled with: Screws <strong>and</strong> NutsMaterial:AluminiumNote! Two fittings are needed for a complete JSNY7.90335Sliding Door Magnet Switch FittingsDesignation: JSM D4GArticle number: 2TLA040033R3300Pre-assembled with: Screws <strong>and</strong> NutsMaterial:Aluminium905890404013:32<strong>ABB</strong>
Fittings for Interlock Switches JSNY8 <strong>and</strong> JSNY91Sliding Door Interlock Switchfor JSNY8 Fittings.Designation: JSM D4DArticle numbers: 2TLA040033R1700Pre-assembled with: Screws <strong>and</strong> NutsMaterial:Zinc-plated steel13890404502354Conventional opening door InterlockSwitch Fittings for JSNY9 <strong>and</strong> JSNY8Designation: JSM D4CArticle number: 2TLA040033R1600Pre-assembled with: Screws <strong>and</strong> NutsMaterial:Zinc-plated steel6035 4241549440555657Sliding door Interlock Switch Fittingsfor JSNY9Designation: JSM D4FArticle number: 2TLA040033R3000Pre-assembled with: Screws <strong>and</strong> NutsMaterial:Zinc-plated steel134965540404060896010111213<strong>ABB</strong> 13:3314
TERMINAL CAPS AND STRIPSTerminal caps are available to cover profile ends, thus eliminating sharp edges. Strips are also available, both narrow<strong>and</strong> wide, to cover the side of the fencing profile.Terminal CapsTerminal Cap for JSM A44ADesignation: JSM L1A (yellow)JSM L1B (grey)Article numbers: 2TLA040034R0000 (JSM L1A)2TLA040034R0300 (JSM L1B)Material:PolyamideDimensions: 44x44 mm54444Terminal Cap for JSM A4488ADesignation: JSM L4A (yellow)JSM L4B (grey)Article numbers: 2TLA040034R0400 (JSM L4A )2TLA040034R0500 (JSM L4B)Material:PolyamideDimensions: 44x88 mm58844Terminal Cap for JSM A25Designation: JSM L2Article number: 2TLA040034R0100Material:Polyamide, greyDimensions: 44x25 mmTerminal Cap for JSM A60Designation: JSM L3Article number: 2TLA040034R0200Material:Polyamide, greyDimensions: 44x60 mm256044445Cover Strip5Narrow Cover Strip, for JSM A44A, JSM A44A,JSM A4488A <strong>and</strong> JSM A8888Designation: JSM T3: Yellow*JSMT3B: Grey*Article numbers: 2TLA040037R3100 (JSM T3A)2TLA040037R3200 (JSM T3B)Material:ABSDimensions: 16 mmOrder Unit: 2 mWide Cover Strip, for JSM A44A, JSM A44A,JSM A4488A <strong>and</strong> JSM A8888Designation: JSM T2AArticle number: 2TLA040037R1900Material:PVC, yellow*, soft materialDimensions: 40 mmOrder Unit: 25 m/coil* Other colours available upon request.16402,52,513:34<strong>ABB</strong>
ACCESSORIESAll fittings <strong>and</strong> door components are delivered complete with screws, washers <strong>and</strong> nuts pre-mounted.For cable ducting the screws, S5B, <strong>and</strong> nuts, M5B, have to be ordered separately (4 pcs/2m).Designation Article number Description Dimension Material Order UnitJSM S5B 2TLA041039R0100 Screw to cableductingJSM S6A 2TLA041039R0200 Screw for hingecross-slotted Z(pozidrive)JSM S8A 2TLA041019R0000 Fixing screwcountersunk.JSM S8C 2TLA041014R0200 Fixing screw forfloor fitting <strong>and</strong> smallangleM5x12M6x12M8x16M8x20Zinc PlatedSteelZinc PlatedSteelZinc Plated,DacrolitZinc PlatedSteelJSM S8D 2TLA041014R0100 Fixing screw M8x16 Zinc PlatedSteel100 pcs/box100 pcs/box100 pcs/box100 pcs/box100 pcs/box12345JSM S8E 2TLA041019R0100 Fixing screw forGuide rail JSM A56M8x12Zinc PlatedSteelJSM M4B 2TLA040035R0700 Locking nut M4 Zinc PlatedSteelJSM M5B 2TLA040035R0400 Locking nut M5 Zinc PlatedSteelJSM M6B 2TLA040035R0500 Locking nut M6 Zinc PlatedSteelJSM M8B 2TLA040035R0600 Locking nut M8 Zinc PlatedSteelJSM X1 2TLA040033R4300 Cable tie 2,5–7,8 mm Nylon blackUV-resistantJSM X2 2TLA041900R4300 Expansion-shell bolt M10x68 Zinc PlatedSteelJSM X3 2TLA041910R0000 Window cleaning fluid (Antistatic) forpolycarbonate sheets. Actuator head 0.5 L.100 pcs/box100 pcs/box100 pcs/box100 pcs/box100 pcs/box10 pcs/box50 pcs/boxper can678910JSM X4 2TLA041911R0100 Mesh clipping tool L=300 eachJSM B4C 2TLA040035R5000 Centring washersteelØ4,2 Zinc PlatedSteel100 pcs/box11JSM B5C 2TLA040035R5100 Centring washersteelØ5,2 Zinc PlatedSteel100 pcs/box12JSM B6C 2TLA040035R5200 Centring washersteelJSM B8C 2TLA040035R5300 Centring washersteelØ6,2 Zinc PlatedSteelØ8,2 Zinc PlatedSteel100 pcs/box100 pcs/box13<strong>ABB</strong> 13:3514
SURFACES<strong>The</strong> choice of net <strong>and</strong> surfaces depends, among other things, on the protection distance. In the case of netting, aminimum distance of 200 mm (for anyone aged 14 or older) with a mesh size of 40x40 mm in accordance with ENISO 13857. For closer protection distances <strong>and</strong> for noise reduction, solid panels are used. Panels are available indifferent materials. For protection of welding cells, polycarbonate welding transparencies are used.Welded netDesignation:Stitch:Thread:JSM YN40W_/WE _40x40 mm3,5 mmArticle no. Name Material Dimensions Type2TLA040040R1300 JSM YN40W1 Steel, black powder coated 2020 x 864 mm Welded2TLA040040R1400 JSM YN40W2 Steel, black powder coated 1074 x 1816 mm Welded2TLA040040R1500 JSM YN40W3 Steel, black powder coated 1074 x 2016 mm Welded2TLA040040R2000 JSM YN40W4 Steel, black powder coated 1474 x 2016 mm Welded2TLA040040R2100 JSM YN40W5 Steel, black powder coated 1474 x 1816 mm Welded2TLA040040R2600 JSM YN40W6 Steel, black powder coated 2020 x 754 mm Welded2TLA040040R2700 JSM YN40W7 Steel, black powder coated 2020 x 1174 mm Welded2TLA040040R1600 JSM YN40W9 Steel, black powder coated Cut to size Welded2TLA040040R2800 JSM YN40W10 Steel, black powder coated 1474 x 1216 mm Welded2TLA040040R2900 JSM YN40W11 Steel, black powder coated 1074 x 1216 mm Welded2TLA040040R2500 JSM YN40WE1 Stainless steel, SS 2333 2020 x 864 mm Welded2TLA040040R1800 JSM YN40WE2 Stainless steel, SS 2333 1074 x 1816 mm Welded2TLA040040R1900 JSM YN40WE9 Stainless steel, SS 2333 Cut to size WeldedOther colours, hot-dip galvanized mesh or woven wire mesh netting supplied on request.Net locking for welded netting with outer wireDesignation:Article numbers:Material:Quantity:JSM NL22TLA040031R0600PA/ABS100 pcs/boxNet locking for welded <strong>and</strong> woven wire mesh netting, with or without outer wiresDesignation:Article numbers:Pre-assembled with:Material:Quantity:JSM NL32TLA040031R0800ScrewsZinc100 pcs/boxShockproof panellingPlastic panelsname: JSM Y_Other materials can be supplied on request.Plastic panel name: JSM Y_Article no. Name Material Dimensions Type2TLA040039R1000 JSM YPC5A1 Polycarbonate, uncoloured 5 mm 2020 x 8642TLA040039R1100 JSM YPC5A2 Polycarbonate, uncoloured 5 mm 2020 x 11742TLA040039R1200 JSM YPC5A9 Polycarbonate, uncoloured 5 mm Cut to size2TLA040039R2400 JSM YPC3AC9 Polycarbonate, dark tint, weld-protected 3 mm Cut to size2TLA040039R2500 JSM YPC3AC1 Polycarbonate, dark tint, weld-protected 3 mm 2050x30002TLA042150R0600 JSM YG6A9 Laminated glass 6,4 mm Cut to size13:36<strong>ABB</strong>
18-12SteelplateCross-bent sheet metal panelOther materials are available on request.Article no. Name Material Thickness Dimensions2TLA040039R0700 JSM YGP1A9 Galvanised sheet metal, x-cracked 1 mm Cut to size2TLA040039R0900 JSM YGP2A9 Galvanised sheet metal, x-cracked 1,5 mm Cut to sizePainted sheet metal can be supplied on request.23Panel fixingsDesignation:Material:JSM PL1:JSM PL2:Quantity:JSM PL1 (for 5 mm panels)JSM PL2 (for 4 mm panels)PVC, blackPVC, black50 pcs/packageArticle no. Name Length2TLA040038R0100 JSM PL1A 842 mm2TLA040038R0200 JSM PL1B 1152 mm2TLA040038R0300 JSM PL1C 2000 mm2TLA040038R0400 JSM PL1D 732 mm2TLA040038R0700 JSM PL2A 842 mm2TLA040038R0800 JSM PL2B 1152 mm2TLA040038R0900 JSM PL2C 2000 mm2TLA040038R1000 JSM PL2D 732 mm456For metal panel fixingsDesignation: JSM G2Article numbers: 2TLA040038R0600Material:Cell rubber, self-adhesiveDimension:5 x 20 mmSt<strong>and</strong>ard package: 10m/roll7Sheet securing glassDesignation: JSM G3Article numbers: 2TLA041930R0600Material:EPDMSt<strong>and</strong>ard package: 50m/rollPanel lockingsDesignation:Article numbers:Pre-assembled with:Material:JSM PL3 (for 5 mm panels)2TLA040038R1100ScrewsZinc8910SoundabsorbingArticle no. Name Material Thickness Dimensions Kg/m 22TLA040037R1100 JSM YLA25A9 outside – painted sheet metal 25 mm Cut to size 13,8inside - galvanised preformed sheetmetal core – steel wool2TLA040039R2600 JSM YLA25A1 check out art.nr2TLA040037R1100 above 25 mm 1963x1200 13,82TLA042150R2300 JSM YLA50A9 check out art.nr2TLA040037R1100 above 50 mm Cut to size 21,0Cut to size – max dimension 2000 x 1200NOTE!Mounting profile JSM AS1 used for JSM YLA25A_ <strong>and</strong> mounting profileJSM AS3 used for JSM YLA50A_<strong>ABB</strong> 13:3711121314
<strong>Safety</strong>Roller DoorApprovals:Applications:Allowing access to riskareasProtection from ejected particles,e.g chips <strong>and</strong> weldingsplashFeatures:Highest safety level accordingto EN ISO 13849-1Prevents unintentional startWithst<strong>and</strong>s harsh environmentsQuick operationHigh reliabilityNoise absorbingRoller door for short safety distances<strong>and</strong> narrow spaces<strong>Safety</strong> Roller Doors make it possible to have a short safetydistance to the machine. <strong>The</strong> noise absorbing roller door iscompact <strong>and</strong> it can therefore be placed in narrow spaces.It is easy <strong>and</strong> quick to access the machine or gain accessfor servicing with the <strong>Safety</strong> Roller Door.It dem<strong>and</strong>s a minimum of maintenance <strong>and</strong> offers reliableoperation. To be able to start the machine/plant the door hasto be completely closed. <strong>The</strong> closed position is monitoredby the Eden non-contact sensor from <strong>ABB</strong> <strong>Jokab</strong> <strong>Safety</strong>.As soon as the door begins to open the Eden sends asignal to the machine/plant via the Pluto <strong>Safety</strong>-PLC from<strong>ABB</strong> <strong>Jokab</strong> <strong>Safety</strong>. <strong>The</strong> roller door fulfills safety category4 together with Eden <strong>and</strong> Pluto.Protects against welding splash<strong>The</strong> roller door protects against ejected particles, suchas chips <strong>and</strong> welding splash. <strong>The</strong> roller door fabric is alsoresistant towards a great number of chemicals, whichpermits it to be installed in harsh environments.Simple assembly<strong>The</strong> <strong>Safety</strong> Roller Door is simple to assemble becauseit consists of few components <strong>and</strong> it is supplied partlypre-assembled. It can be integrated into the Quick-Guardfencing system from <strong>ABB</strong> <strong>Jokab</strong> <strong>Safety</strong> as well as in othertypes of fencing systems. It can also be installed on themachine or other permanent construction.Customized roller doorThis door design is easy to customize. <strong>The</strong> largest possibleopening width is 4000 mm <strong>and</strong> the largest possibleopening height is 3500 mm. <strong>The</strong> maximum size of the doorfabric is 10 m 2 . If a larger door fabric is desired, contact<strong>ABB</strong> <strong>Jokab</strong> <strong>Safety</strong>. <strong>The</strong> door is supplied as st<strong>and</strong>ard with alight-grey door fabric. Other colours can also be supplied.<strong>The</strong> roller door can be supplied with a viewing window infull width <strong>and</strong> at an optional height. <strong>The</strong> viewing windowcan also be made in a special material that protects againstwelding splash.13:38<strong>ABB</strong>
FunctionHighest protection in accordancewith EN ISO 13849-1<strong>The</strong> monitoring of the door´s position by two Eden sensorstogether with with a Pluto monitoring unit fulfills kat. 4/PL eenligt EN ISO 13849-1. <strong>The</strong>se units are certified by TÜV.Functions<strong>The</strong> door protects against access to moving parts in themachine/plant. <strong>The</strong> production process can begin whenthe door is fully closed. <strong>The</strong> closed position is monitoredby an Eden sensor on both sides of the door. Because thedoor is monitored by Eden sensors at both sides of the doorit is impossible to lift one side of the door <strong>and</strong> reach intothe risk area without the machine/plant stopping. Whenthe door has moved a maximum of 10 mm upwards a stopsignal is sent to the protected machine/plant. <strong>The</strong> Edensensors are monitored by a Pluto <strong>Safety</strong>-PLC which hasfailsafe outputs for stopping the machine/plant in the riskarea <strong>and</strong> to control the door.<strong>The</strong> door also protects from particles ejected by the productionprocess, e.g. chips <strong>and</strong> welding splash. It has agood sound absorbing ability. Because the door operatesquickly, at 0.8-1.0 m/s, the operator has a good accessto the machine area. <strong>The</strong> door is equipped with a safety<strong>Safety</strong> distances & st<strong>and</strong>ardsMinimum safety distanceFor the roller door to be able to provide good protection ithas to be installed a sufficient distance away from movingmachine parts.Useful st<strong>and</strong>ardsEN ISO 13857 <strong>Safety</strong> of machinery - <strong>Safety</strong> distances toprevent hazard zones being reached by upper <strong>and</strong> lowerlimbs.contact strip in the bottom preventing it from causing personalinjury on any person. When the safety contact stripis affected the door is is compressed, the door movementreverses to move upwards. <strong>The</strong> opening <strong>and</strong> closing of thedoor can be controlled via the buttons or via the signalsfrom the control system of the machine.Prevents an unintentional startWhen the door is located in front of the machine/plant,where the operator can enter the area with his entire body,safe interlocking of the door´s downward movement isneeded. This is to prevent the machine from being startedfrom the outside when somebody is inside the roller door.One way to solve this is to use a horizontal light curtainwhich covers the area which the operator can occupy withinthe risk area. Another solution is to place double light beamsin the opening, combined with a reset facility. Yet anothersolution is to use time-reset. A time-reset button is placedinside the risk area <strong>and</strong> a button is placed outside the riskarea. First, the button in the risk area should be pressed <strong>and</strong>thereafter (within a certain amount of time, e.g. 5 seconds)the button outside should be pressed. After this the doorcan be manoeuvred downwards.EN ISO 13855 <strong>Safety</strong> of machinery – Positioning of safeguardswith respect to the approach speeds of parts ofthe human body.Note. <strong>The</strong> roller door has good protection against weldingsplash <strong>and</strong> smaller ejected particles from the the productionarea. <strong>The</strong> roller door is not intended to act as collision protection.<strong>The</strong> installer of the roller door has the responsibilityof ensuring that sufficient safety distance against movingmachine parts is provided.12345678910111213<strong>ABB</strong> 13:3914
Technical data – <strong>Safety</strong> Roller DoorManufacturerColourOrdering data<strong>ABB</strong> AB/<strong>Jokab</strong> <strong>Safety</strong>, SwedenFrame - aluminium, door cloth- greyOther colours available on request.<strong>Safety</strong> Roller door + viewingwindow. Viewing window withweld splash protection.Daylight height & Daylight width.Maximum size, door cloth 10 m²If a larger size is needed,contact <strong>ABB</strong> <strong>Jokab</strong> <strong>Safety</strong> AB.Maximum widthMaximum heightDriving unitSpeed, roller doorMax. number of cycles/minuteDoor fabric materialDoor fabric colourMaterial framesMaterial upper bracketSound absorption4000 mm3500 mmThree-phase motor200-415 VAC 50-60 Hz0.8 – 1.0 m/s up/down3 (during continous operation24 hours a day)Multi-layer polyester fabriccloth with PVC, 2 mm thick ortransparent PVC. <strong>The</strong> viewingwindow can also be suppliedwith protection against weldingflash light. (Removes 99% of theUV-transmision from the weldingprocess)Grey (RAL 7038), can be suppliedwith recessed window (onlyin full width). Other colours areavailable.Aluminum extrusion4 mm steel painted blackapprox. 10 dBAmbient temperature 0˚C to +55˚When operating in temperaturesbelow -5˚C, the oil in the gearboxshould be replaced with anoil suitable to withst<strong>and</strong> coldtemperatures.<strong>Safety</strong> levelDurability towards chemicalsControl monitoring unit forroller doorOutputsMonitoring of position of theroller doorContact stripCategory 4/PL e, in accordancewith EN ISO 13849-1Ammoniac, sodium hydrate,phosphoric acid, tartaric acid,oxalic acid, hydrochloric acid,citric acid, acetic acid, oil, detergent,calcium chloride (contact<strong>ABB</strong> <strong>Jokab</strong> <strong>Safety</strong> for morespecifications)<strong>ABB</strong> <strong>Jokab</strong> <strong>Safety</strong>´s <strong>Safety</strong>-PLC,Pluto4 safe outputs for connection tomachine/plant.2 Eden sensorsone on each side of the door.Mounted on the bottom frame ofthe door fabric.<strong>The</strong> door motion is reversed ifthe contact strip is compressed.A 260B 270C 400D 200E 120F 80P OptionalR OptionalDBDHF 80G 250H 320I 150J 100K 500L 500M 45013:40<strong>ABB</strong>
ContentsPage1Declaration of conformity - <strong>Safety</strong> relays_______________________________14:2Declaration of conformity - JSBR4_____________________________________14:3Declaration of conformity - Vital 1_____________________________________14:4Declaration of conformity - Eden, Tina, FMC-Tina <strong>and</strong> Magne____________14:5Declaration of conformity - Smile, INCA1, Stop Line <strong>and</strong> JSNY10__________14:6Declaration of conformity - Knox______________________________________14:7Declaration of conformity - Pluto______________________________________14:823456789101112Descriptions <strong>and</strong> examples in this book show how the products work <strong>and</strong> can be used. This does not mean that they can meet the requirements forall types of machines <strong>and</strong> processes. <strong>The</strong> purchaser/user is responsible for ensuring that the product is installed <strong>and</strong> used in accordance with theapplicable regulations <strong>and</strong> st<strong>and</strong>ards. We reserve the right to make changes in products <strong>and</strong> product sheets without previous notice. For the latestupdates, refer to www.jokabsafety.com. 2011.<strong>ABB</strong>1314
Declaration of conformity - <strong>Safety</strong> relaysOther language versions may be obtained on request.EC Declaration of conformity(according to 2006/42/EC, Annex 2A)We <strong>ABB</strong> ABdeclare that the safety components of <strong>ABB</strong> AB make with type designations <strong>and</strong> safetyJOKAB <strong>Safety</strong>functions as listed below, is in conformity with the DirectivesVarlabergsvägen 11 2006/42/ECSE-434 39 Kungsbacka 2006/95/ECSweden2004/108/ECPerson authorised to compilethe technical fileLars-Magnus Felth<strong>ABB</strong> ABJOKAB <strong>Safety</strong>Varlabergsvägen 11SE-434 39 KungsbackaSwedenProduct EC type-examination certificate Serialnumber<strong>Safety</strong> relay for general useJSBT4 44 205 09 372091-002 [000 – 000 ... 999-999]BT50(T), BT51(T) 44 205 09 372091-003 [000 – 000 ... 999-999]JSBT5(T) 44 205 09 372091-006 [000 – 000 ... 999-999]JSBRT11 44 205 09 372091-010 [000 – 000 ... 999-999]RT9 44 205 09 372091-011 [000 – 000 ... 999-999]RT6 44 205 09 372091-012 [000 – 000 ... 999-999]RT7 44 205 09 372091-013 [000 – 000 ... 999-999]JSBR3 44 205 09 372091-014 [000 – 000 ... 999-999]JSBT3 44 205 09 372091-015 [000 – 000 ... 999-999]Expansion relaysE1T 44 205 09 372091-005 [000 – 000 ... 999-999]JSR1T 44 205 09 372091-007 [000 – 000 ... 999-999]JSR2A 44 205 09 372091-008 [000 – 000 ... 999-999]JSR3T 44 205 09 372091-009 [000 – 000 ... 999-999]<strong>Safety</strong> timer-relayJSHT1A/B, JSHT2A/B/C 44 205 09 372091-004 [000 – 000 ... 999-999]EC type-examinationTÜV NORD CERT GmbHLangemarckstrasse 20,45141 EssenGermanyNotified body No. 0044Used harmonized st<strong>and</strong>ardsEN ISO 12100-1:2003+A1:2009, EN ISO 12100-2:2003+A1:2009,EN 954-1:1996/EN ISO 13849-1:2008, EN 62061:2005, EN 60204-1:2006+A1:2009,EN 60664-1:2007, EN 61000-6-1:2007, EN 61000-6-3:2007,EN 60947-5-1:2003+A1:2009Mats LingerPRU ManagerKungsbacka 2010-11-26www.abb.comwww.jokabsafety.comOriginal14:2<strong>ABB</strong>
Declaration of conformity - JSBR4Other language versions may be obtained on request.12EC Declaration of conformity(according to 2006/42/EC, Annex 2A)We<strong>ABB</strong> ABJOKAB <strong>Safety</strong>Varlabergsvägen 11SE-434 39 KungsbackaSwedendeclare that the safety components of <strong>ABB</strong> AB make with type designations <strong>and</strong>safety functions as listed below, are in conformity with the Directives2006/42/EC2006/95/EC2004/108/EC3Person authorised to compilethe technical fileLars-Magnus Felth<strong>ABB</strong> ABJOKAB <strong>Safety</strong>Varlabergsvägen 11SE-434 39 KungsbackaSwedenProduct EC type-examination certificate Serialnumber<strong>Safety</strong> relay for two-h<strong>and</strong>applications <strong>and</strong> other safetydevicesJSBR4 44 205 09 372091-001 [000 – 000 ... 999-999]45EC Type-ExaminationTÜV NORD CERT GmbHLangemarckstrasse 20,45141 EssenGermanyNotified body No. 00446Used harmonized st<strong>and</strong>ardsMats LingerPRU ManagerKungsbacka 2010-11-26www.abb.comwww.jokabsafety.comOriginalEN ISO 12100-1:2003+A1:2009, EN ISO 12100-2:2003+A1:2009,EN 574:1996+A1:2008 Type IIIc, EN 954-1:1996/EN ISO 13849-1:2008,EN 62061:2005, EN 60204-1:2006+A1:2009, EN 60664-1:2007, EN 61000-6-1:2007,EN 61000-6-3:2007, EN 60947-5-1:2003+A1:200978910111213<strong>ABB</strong> 14:314
Declaration of conformity- Vital 1Other language versions may be obtained on request.EC Declaration of conformity(according to 2006/42/EC, Annex2A)We<strong>ABB</strong> ABJOKAB <strong>Safety</strong>Varlabergsvägen 11SE-434 39 KungsbackaSwedendeclare that the safety components of <strong>ABB</strong> make with type designations<strong>and</strong> safety functions as listed below, is in conformity with the Directives2006/42/EC2006/95/EC2004/108/ECPerson authorised to compilethe technical fileLars-Magnus Felth<strong>ABB</strong> ABJOKAB <strong>Safety</strong>Varlabergsvägen 11SE-434 39 KungsbackaSwedenProduct EC type-examination certificate Serialnumber<strong>Safety</strong> module Vital1 44 205 09 372092-001 [000 – 000 ... 999-999]EC type-examinationUsed harmonized st<strong>and</strong>ardsTÜV NORD CERT GmbHLangemarckstrasse 2045141 EssenGermanyNotified body No. 0044EN ISO 12100-1:2003+A1:2009, EN ISO 12100-2:2003+A1:2009,EN 954-1:1996/EN ISO 13849-1:2008, EN 62061:2005,EN 60204-1:2006+A1:2009, IEC 60664-1:2007, EN 61000-6-2:2005,EN 61000-6-4:2007Mats LingerPRU ManagerKungsbacka 2010-11-26www.abb.comwww.jokabsafety.comOriginal14:4<strong>ABB</strong>
Declaration of conformity - Eden, Tina, FMC-Tina <strong>and</strong> MagneOther language versions may be obtained on request.We <strong>ABB</strong> ABJOKAB SAFETYVarlabergsvägen 11SE-434 39 KungsbackaSwedenPerson authorised to compilethe technical fileEC Declaration of conformity(according to 2006/42/EC, Annex 2A)declare that the safety components of <strong>ABB</strong> AB make with type designations <strong>and</strong> safetyfunctions as listed below, is in conformity with the Directives2006/42/EC2006/95/EC2004/108/ECLars-Magnus Felth<strong>ABB</strong> ABJOKAB SAFETYVarlabergsvägen 11SE-434 39 KungsbackaSwedenProduct Certificate SerialnumberNon-contact safety sensor 44 207 10 372092-001 [000 – 000 ... 999-999]Eden (Adam , Eva) E/C/ECAdapter unit44 207 10 372092-001 [000 – 000 ... 999-999]Tina 1-8, Tina 10-12Muting unit44 207 10 372092-001 [000 – 000 ... 999-999]FMC-TinaNon-contact safety sensorincluding locking functionMagne 2A, 2B, 2AX, 2BX44 207 10 372092-001 [000 – 000 ... 999-999]Notified bodyUsed harmonized st<strong>and</strong>ardsMats LingerPRU ManagerKungsbacka 2011-03-02www.abb.comwww.jokabsafety.comOriginalTÜV NORD CERT GmbHLangemarckstrasse 2045141 EssenGermanyNotified body No. 0044EN ISO 12100-1:2003+A1:2009, EN ISO 12100-2:2003+A1:2009,EN 954-1:1996/EN ISO 13849-1:2008, EN 62061:2005,EN 60204-1:2006+A1:2009, EN 60664-1:2007, EN 61000-6-2:2005,EN 61000-6-4:2007, EN 60947-5-1:2004, EN 1088+A2:200812345678910111213<strong>ABB</strong> 14:514
Declaration of conformity - Smile, INCA1, Stop Line <strong>and</strong> JSNY10Other language versions may be obtained on request.We<strong>ABB</strong> ABJOKAB SAFETYVarlabergsgatan 11SE-434 39 KungsbackaSwedenEC Declaration of conformity(according to 2006/42/EC, Annex2A)declare that the safety components of <strong>ABB</strong> AB make with type designations <strong>and</strong>safety functions as listed below, is in conformity with the Directives2006/42/EC2006/95/ECPerson authorised to compile thetechnical fileProductEmergency stop device Smile,versions 10EA, 10EAK, 11EA, 12EA,11EAREmergency stop device INCA 1Emergency stop wire Stop LineEmergency stop wire JSNY10Notified BodyUsed harmonized st<strong>and</strong>ardsLars-Magnus Felth<strong>ABB</strong> ABJOKAB <strong>Safety</strong>Varlabergsgatan 11SE-434 39 KungsbackaSwedenCertificate11-SKM-CM-010311-SKM-CM-0103Inspecta Sweden <strong>ABB</strong>ox 30100SE-104 25 StockholmSwedenNotified Body No. 0409EN ISO 12100:2010, EN 954-1:1996, EN ISO 13849-1:2008/AC:2009,EN 60204-1:2007+A1, EN ISO 13850:2008Mats LingerPRU ManagerKungsbacka 2011-03-04www.abb.comwww.jokabsafety.comOriginal14:6<strong>ABB</strong>
Declaration of conformity- KnoxOther language versions may be obtained on request.EC Declaration of conformity(according to 2006/42/EC, Annex 2A)12We<strong>ABB</strong> ABJOKAB <strong>Safety</strong>Varlabergsgatan 11SE-434 39 KungsbackaSwedenPerson authorised to compilethe technical fileProductNon-contact safety sensorincluding locking functionKnoxNotified bodyUsed harmonized st<strong>and</strong>ardsMats LingerPRU ManagerKungsbacka 2010-11-26www.abb.comwww.jokabsafety.comOriginaldeclare that the safety components of <strong>ABB</strong> AB manufacture with typedesignations <strong>and</strong> safety functions as listed below, is in conformity withthe Directives2006/42/EC2006/95/EC2004/108/ECLars-Magnus Felth<strong>ABB</strong> ABJOKAB <strong>Safety</strong>Varlabergsgatan 11SE-434 39 KungsbackaSwedenCertificate815 933INTERTEK SEMKO <strong>ABB</strong>ox 1103SE-164 22 KISTASwedenNotified body no 0413EN ISO 12100-1:2003+A1:2009, EN ISO 12100-2:2003+A1:2009,EN 954-1:1996/EN ISO 13849-1:2008, EN 1088+A2:2008,EN 60204-1:2006+A1:2009, EN 61000-6-2:2005, EN 61000-6-4:2007345678910111213<strong>ABB</strong> 14:714
Declaration of conformity - PlutoOther language versions may be obtained on request.We<strong>ABB</strong> ABJOKAB <strong>Safety</strong>Varlabergsvägen 11SE-434 39 KungsbackaSwedenPerson authorised to compile thetechnical fileEC declaration of conformity(according to 2006/42/EC, Annex 2A)declare that the safety components of <strong>ABB</strong> manufacture,with type designations <strong>and</strong> safety functions as listed below,are in conformity with the Directives2006/42/EC2004/108/EC2006/95/ECGöran Svensson<strong>ABB</strong> AB<strong>Jokab</strong> <strong>Safety</strong>Kanalvägen 17SE-183 30 TäbySwedenProgrammable electronic safety system (<strong>Safety</strong> PLC system) Pluto versionA20, B20, B16, S19, S20, B46, S46, AS-i, B42 AS-iUsed harmonizedst<strong>and</strong>ardsEN ISO 13849-1:2006/EN 954-1EN ISO 13849-1:2008EN 62061EN 61496-1EN 574EN 692EN 60204-1EN 50178EN 61000-6-2EN 61000-6-4EN 61000-4-1…6(Directive 2006/42/EC)(Directive 2006/42/EC)(Directive 2006/42/EC)(Directive 2006/42/EC)(Directive 2006/42/EC)(Directive 2006/42/EC)(Directive 2006/95/EC)(Directive 2006/95/EC)(Directive 2004/108/EC)(Directive 2004/108/EC)(Directive 2004/108/EC)Other used st<strong>and</strong>ards<strong>and</strong> documentsEC Type-ExaminationIEC/EN 61508DIN V VDE 0801:1990 with amendment A1:1994TÜV-Rheinl<strong>and</strong>Am Grauen SteinD-51105 KölnGermanyNotified body No. 0035Certificate no 01/205/5066/10Mats LingerPRU ManagerKungsbacka 2011-01-01www.abb.comwww.jokabsafety.comOriginal14:8<strong>ABB</strong>
Notes<strong>ABB</strong> 14:9
Notes14:10<strong>ABB</strong>
Notes<strong>ABB</strong> 14:11
Contact us<strong>ABB</strong> AB<strong>Jokab</strong> <strong>Safety</strong>Tel. +46 300-67 59 00www.abb.com/lowvoltage