

Griffon 2000TDX Hovercraft - HovercraftModels.com
Griffon 2000TDX Hovercraft - HovercraftModels.com
Griffon 2000TDX Hovercraft - HovercraftModels.com

You also want an ePaper? Increase the reach of your titles
YUMPU automatically turns print PDFs into web optimized ePapers that Google loves.
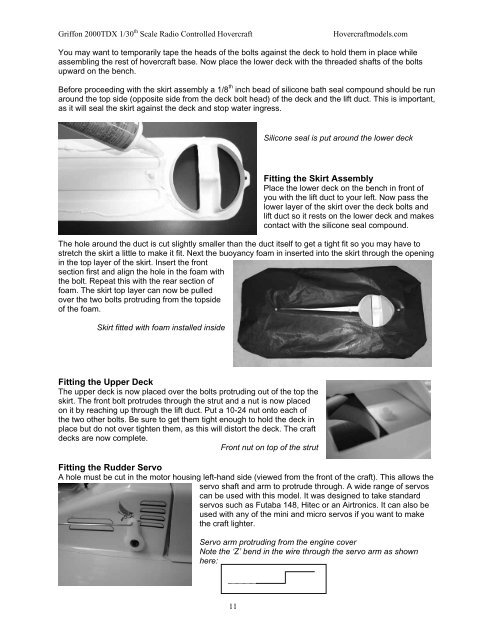
<strong>Griffon</strong> <strong>2000TDX</strong> 1/30 th Scale Radio Controlled <strong>Hovercraft</strong><strong>Hovercraft</strong>models.<strong>com</strong>You may want to temporarily tape the heads of the bolts against the deck to hold them in place whileassembling the rest of hovercraft base. Now place the lower deck with the threaded shafts of the boltsupward on the bench.Before proceeding with the skirt assembly a 1/8 th inch bead of silicone bath seal <strong>com</strong>pound should be runaround the top side (opposite side from the deck bolt head) of the deck and the lift duct. This is important,as it will seal the skirt against the deck and stop water ingress.Silicone seal is put around the lower deckFitting the Skirt AssemblyPlace the lower deck on the bench in front ofyou with the lift duct to your left. Now pass thelower layer of the skirt over the deck bolts andlift duct so it rests on the lower deck and makescontact with the silicone seal <strong>com</strong>pound.The hole around the duct is cut slightly smaller than the duct itself to get a tight fit so you may have tostretch the skirt a little to make it fit. Next the buoyancy foam in inserted into the skirt through the openingin the top layer of the skirt. Insert the frontsection first and align the hole in the foam withthe bolt. Repeat this with the rear section offoam. The skirt top layer can now be pulledover the two bolts protruding from the topsideof the foam.Skirt fitted with foam installed insideFitting the Upper DeckThe upper deck is now placed over the bolts protruding out of the top theskirt. The front bolt protrudes through the strut and a nut is now placedon it by reaching up through the lift duct. Put a 10-24 nut onto each ofthe two other bolts. Be sure to get them tight enough to hold the deck inplace but do not over tighten them, as this will distort the deck. The craftdecks are now <strong>com</strong>plete.Front nut on top of the strutFitting the Rudder ServoA hole must be cut in the motor housing left-hand side (viewed from the front of the craft). This allows theservo shaft and arm to protrude through. A wide range of servoscan be used with this model. It was designed to take standardservos such as Futaba 148, Hitec or an Airtronics. It can also beused with any of the mini and micro servos if you want to makethe craft lighter.Servo arm protruding from the engine coverNote the ‘Z’ bend in the wire through the servo arm as shownhere:11