SolarEdge Installation Guide for Three Phase Inverters - Solco Solar ...
SolarEdge Installation Guide for Three Phase Inverters - Solco Solar ...
SolarEdge Installation Guide for Three Phase Inverters - Solco Solar ...
- No tags were found...

You also want an ePaper? Increase the reach of your titles
YUMPU automatically turns print PDFs into web optimized ePapers that Google loves.
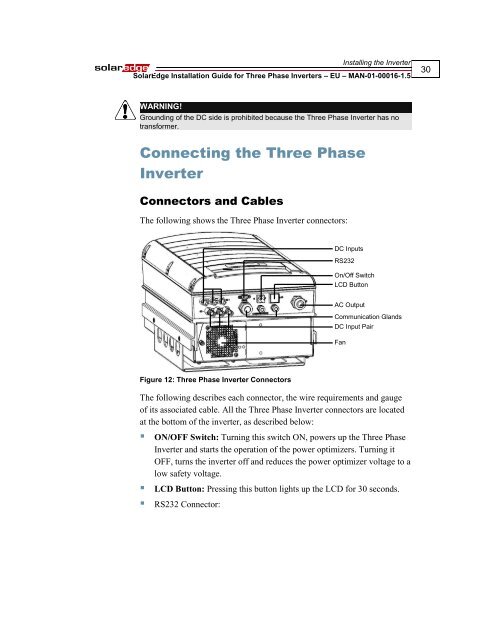
Installing the Inverter<strong><strong>Solar</strong>Edge</strong> <strong>Installation</strong> <strong>Guide</strong> <strong>for</strong> <strong>Three</strong> <strong>Phase</strong> <strong>Inverters</strong> – EU – MAN-01-00016-1.530WARNING!Grounding of the DC side is prohibited because the <strong>Three</strong> <strong>Phase</strong> Inverter has notrans<strong>for</strong>mer.Connecting the <strong>Three</strong> <strong>Phase</strong>InverterConnectors and CablesThe following shows the <strong>Three</strong> <strong>Phase</strong> Inverter connectors:DC InputsRS232On/Off SwitchLCD ButtonAC OutputCommunication GlandsDC Input PairFanFigure 12: <strong>Three</strong> <strong>Phase</strong> Inverter ConnectorsThe following describes each connector, the wire requirements and gaugeof its associated cable. All the <strong>Three</strong> <strong>Phase</strong> Inverter connectors are locatedat the bottom of the inverter, as described below:• ON/OFF Switch: Turning this switch ON, powers up the <strong>Three</strong> <strong>Phase</strong>Inverter and starts the operation of the power optimizers. Turning itOFF, turns the inverter off and reduces the power optimizer voltage to alow safety voltage.• LCD Button: Pressing this button lights up the LCD <strong>for</strong> 30 seconds.• RS232 Connector: