CCIS MLe Guide - National Crime Records Bureau
CCIS MLe Guide - National Crime Records Bureau
CCIS MLe Guide - National Crime Records Bureau

You also want an ePaper? Increase the reach of your titles
YUMPU automatically turns print PDFs into web optimized ePapers that Google loves.
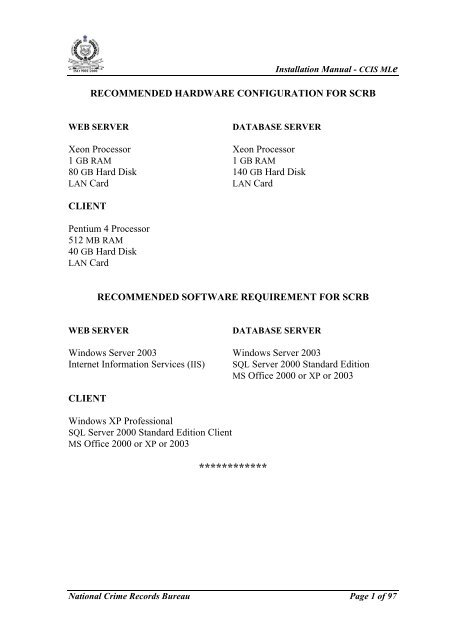
ISO 9001:2000Installation Manual - <strong>CCIS</strong> <strong>MLe</strong>RECOMMENDED HARDWARE CONFIGURATION FOR SCRBWEB SERVERDATABASE SERVERXeon ProcessorXeon Processor1 GB RAM 1 GB RAM80 GB Hard Disk 140 GB Hard DiskLAN CardLAN CardCLIENTPentium 4 Processor512 MB RAM40 GB Hard DiskLAN CardRECOMMENDED SOFTWARE REQUIREMENT FOR SCRBWEB SERVERDATABASE SERVERWindows Server 2003 Windows Server 2003Internet Information Services (IIS) SQL Server 2000 Standard EditionMS Office 2000 or XP or 2003CLIENTWindows XP ProfessionalSQL Server 2000 Standard Edition ClientMS Office 2000 or XP or 2003************<strong>National</strong> <strong>Crime</strong> <strong>Records</strong> <strong>Bureau</strong> Page 1 of 97
ISO 9001:2000Installation Manual - <strong>CCIS</strong> <strong>MLe</strong>RECOMMENDED HARDWARE CONFIGURATION FOR DCRBSERVERXeon Processor1 GB RAM140 GB Hard DiskLAN CardCLIENTPentium 4 Processor512 MB RAM40 GB Hard DiskLAN CardRECOMMENDED SOFTWARE REQUIREMENT FOR DCRBSERVERWindows Server 2003Internet Information Services (IIS)SQL Server 2000 Standard EditionMS Office 2000 or XP or 2003CLIENTWindows XP ProfessionalSQL Server 2000 Standard Edition ClientMS Office 2000 or XP or 2003************<strong>National</strong> <strong>Crime</strong> <strong>Records</strong> <strong>Bureau</strong> Page 2 of 97
ISO 9001:2000Installation Manual - <strong>CCIS</strong> <strong>MLe</strong>Installation Sequence of <strong>CCIS</strong> <strong>MLe</strong> at SCRB whereDatabase Server and Web Server Setup on same Machine(<strong>CCIS</strong> ML01 is already operational)1. Take the backup of <strong>CCIS</strong> ML01 <strong>CCIS</strong>UNICODE database.2. Install Windows Server 2003 as per procedure at page no. 31 to 33.3. Install and configure Internet Information Services (IIS) as per procedure atpage no. 34 to 35.4. Create secondary partition (D:) as per procedure at page no. 36.5. Install SQL Server 2000 as per procedure at page no. 37 to 38.6. Install SQL Server 2000 Analysis Services as per procedure at page no. 39.7. Install SQL Server 2000 Service Pack as per procedure at page no. 40.8. Install SQL Server 2000 Analysis Services Service Pack as per procedure atpage no. 41.9. Install MS-Office XP as per procedure at page no. 42.10. Restore <strong>CCIS</strong> ML01 <strong>CCIS</strong>UNICODE database backup.11. Upgrade <strong>CCIS</strong> ML01 <strong>CCIS</strong>UNICODE database to <strong>CCIS</strong> <strong>MLe</strong> status as perprocedure at page no. 49 to 50.12. Install <strong>CCIS</strong> <strong>MLe</strong> Application as per procedure at page no. 53.13. Install Web Reports as per procedure at page no. 54.14. Install <strong>CCIS</strong> <strong>MLe</strong> Admin Utility as per procedure at page no. 55.************<strong>National</strong> <strong>Crime</strong> <strong>Records</strong> <strong>Bureau</strong> Page 3 of 97
ISO 9001:2000Installation Manual - <strong>CCIS</strong> <strong>MLe</strong>Installation Sequence of <strong>CCIS</strong> <strong>MLe</strong> at SCRB whereDatabase Server and Web Server Setup on separate Machines(<strong>CCIS</strong> ML01 is already operational)Database Server Setup1. Take the backup of <strong>CCIS</strong> ML01 <strong>CCIS</strong>UNICODE database.2. Install Windows Server 2003 as per procedure at page no. 31 to 33.3. Create secondary partition (D:) as per procedure at page no. 36.4. Install SQL Server 2000 as per procedure at page no. 37 to 38.5. Install SQL Server 2000 Analysis Services as per procedure at page no. 39.6. Install SQL Server 2000 Service Pack as per procedure at page no. 40.7. Install SQL Server 2000 Analysis Services Service Pack as per procedure atpage no. 41.8. Install MS-Office XP as per procedure at page no. 42.9. Restore <strong>CCIS</strong> ML01 <strong>CCIS</strong>UNICODE database backup.10. Upgrade <strong>CCIS</strong> ML01 <strong>CCIS</strong>UNICODE database to <strong>CCIS</strong> <strong>MLe</strong> status as perprocedure at page no. 49 to 50.11. Install <strong>CCIS</strong> <strong>MLe</strong> Application as per procedure at page no. 53.12. Install <strong>CCIS</strong> <strong>MLe</strong> Admin Utility as per procedure at page no. 55.Web Server Setup1. Install Windows Server 2003 as per procedure at page no. 31 to 33.2. Install and configure Internet Information Services (IIS) as per procedure atpage no. 34 to 353. Create secondary partition (D:) as per procedure at page no. 36.4. Install Web Reports as per procedure at page no. 54.<strong>National</strong> <strong>Crime</strong> <strong>Records</strong> <strong>Bureau</strong> Page 4 of 97
ISO 9001:2000Installation Manual - <strong>CCIS</strong> <strong>MLe</strong>The following configuration is required to connect with Database Server.• Browse to C:\Inetpub\wwwroot\WebReports folder.• Right click on Web.config file and Click on Edit.Web.config file will be opened in Notepad.• Scroll down to the last line and type the Database Server Name atServer= location.• Save the file and close all open windows.************<strong>National</strong> <strong>Crime</strong> <strong>Records</strong> <strong>Bureau</strong> Page 5 of 97
ISO 9001:2000Installation Manual - <strong>CCIS</strong> <strong>MLe</strong>Installation Sequence of <strong>CCIS</strong> <strong>MLe</strong> at SCRB whereDatabase Server and Web Server Setup on same Machine(New Site)1. Install Windows Server 2003 as per procedure at page no. 31 to 33.2. Install and configure Internet Information Services (IIS) as per procedure atpage no. 34 to 35.3. Create secondary partition (D:) as per procedure at page no. 36.4. Install SQL Server 2000 as per procedure at page no. 37 to 38.5. Install SQL Server 2000 Analysis Services as per procedure at page no. 39.6. Install SQL Server 2000 Service Pack as per procedure at page no. 40.7. Install SQL Server 2000 Analysis Services Service Pack as per procedure atpage no. 41.8. Install MS-Office XP as per procedure at page no. 42.9. Create blank <strong>CCIS</strong> <strong>MLe</strong> database as per procedure at page no. 48 or Restore<strong>CCIS</strong> ML01 database backup and upgrade it to <strong>CCIS</strong> <strong>MLe</strong> status as perprocedure at page no. 49 to 50 or Restore <strong>CCIS</strong> <strong>MLe</strong> database backup.10. Install <strong>CCIS</strong> <strong>MLe</strong> Application as per procedure at page no. 53.11. Install Web Reports as per procedure at page no. 54.12. Install <strong>CCIS</strong> <strong>MLe</strong> Admin Utility as per procedure at page no. 55.************<strong>National</strong> <strong>Crime</strong> <strong>Records</strong> <strong>Bureau</strong> Page 6 of 97
ISO 9001:2000Installation Manual - <strong>CCIS</strong> <strong>MLe</strong>Installation Sequence of <strong>CCIS</strong> <strong>MLe</strong> at SCRB whereDatabase Server and Web Server Setup on separate Machines(New Site)Database Server Setup1. Install Windows Server 2003 as per procedure at page no. 31 to 33.2. Create secondary partition (D:) as per procedure at page no. 36.3. Install SQL Server 2000 as per procedure at page no. 37 to 38.4. Install SQL Server 2000 Analysis Services as per procedure at page no. 39.5. Install SQL Server 2000 Service Pack as per procedure at page no. 40.6. Install SQL Server 2000 Analysis Services Service Pack as per procedure atpage no. 41.7. Install MS-Office XP as per procedure at page no. 42.8. Create blank <strong>CCIS</strong> <strong>MLe</strong> database as per procedure at page no. 48 or Restore<strong>CCIS</strong> ML01 database backup and upgrade it to <strong>CCIS</strong> <strong>MLe</strong> status as perprocedure at page no. 49 to 50 or Restore <strong>CCIS</strong> <strong>MLe</strong> database backup.9. Install <strong>CCIS</strong> <strong>MLe</strong> Application as per procedure at page no. 53.10. Install <strong>CCIS</strong> <strong>MLe</strong> Admin Utility as per procedure at page no. 55.Web Server Setup1. Install Windows Server 2003 as per procedure at page no. 31 to 33.2. Install and configure Internet Information Services (IIS) as per procedure atpage no. 34 to 35.3. Create secondary partition (D:) as per procedure at page no. 36.4. Install Web Reports as per procedure at page no. 54.<strong>National</strong> <strong>Crime</strong> <strong>Records</strong> <strong>Bureau</strong> Page 7 of 97
ISO 9001:2000Installation Manual - <strong>CCIS</strong> <strong>MLe</strong>The following configuration is required to connect with Database Server.• Browse to C:\Inetpub\wwwroot\WebReports folder.• Right click on Web.config file and Click on Edit.Web.config file will be opened in Notepad.• Scroll down to the last line and type the Database Server Name atServer= location.• Save the file and close all open windows.************<strong>National</strong> <strong>Crime</strong> <strong>Records</strong> <strong>Bureau</strong> Page 8 of 97
ISO 9001:2000Installation Manual - <strong>CCIS</strong> <strong>MLe</strong>Installation Sequence of <strong>CCIS</strong> <strong>MLe</strong> at DCRB(<strong>CCIS</strong> ML01 is already operational)A. SERVER1. Take the backup of <strong>CCIS</strong> ML01 <strong>CCIS</strong>UNICODE database.2. Install Windows Server 2003 as per procedure at page no. 31 to 33.3. Install and configure Internet Information Services (IIS) as per procedure atpage no. 34 to 35.4. Create secondary partition (D:) as per procedure at page no. 36.5. Install SQL Server 2000 as per procedure at page no. 37 to 38.6. Install SQL Server 2000 Analysis Services as per procedure at page no. 39.7. Install SQL Server 2000 Service Pack as per procedure at page no. 40.8. Install SQL Server 2000 Analysis Services Service Pack as per procedure atpage no. 41.9. Install MS-Office XP as per procedure at page no. 42.10. Restore <strong>CCIS</strong> ML01 <strong>CCIS</strong>UNICODE database backup.11. Upgrade <strong>CCIS</strong> ML01 <strong>CCIS</strong>UNICODE database to <strong>CCIS</strong> <strong>MLe</strong> status as perprocedure at page no. 49 to 50.12. Install <strong>CCIS</strong> <strong>MLe</strong> Application as per procedure at page no. 53.13. Install Web Reports as per procedure at page no. 54.14. Install <strong>CCIS</strong> <strong>MLe</strong> Admin Utility as per procedure at page no. 55.<strong>National</strong> <strong>Crime</strong> <strong>Records</strong> <strong>Bureau</strong> Page 9 of 97
ISO 9001:2000Installation Manual - <strong>CCIS</strong> <strong>MLe</strong>B. CLIENT1. Uninstall existing <strong>CCIS</strong> ML01 Application.2. Install Windows XP Service Pack-2 as per procedure at page no. 49.3. Install SQL 2000 Server Client as per procedure at page no. 47.4. Install MS-Office XP as per procedure at page no. 42.5. Install <strong>CCIS</strong> <strong>MLe</strong> Application as per procedure at page no. 53.************<strong>National</strong> <strong>Crime</strong> <strong>Records</strong> <strong>Bureau</strong> Page 10 of 97
ISO 9001:2000Installation Manual - <strong>CCIS</strong> <strong>MLe</strong>A. SERVERInstallation Sequence of <strong>CCIS</strong> <strong>MLe</strong> at DCRB(New Site)1. Install Windows Server 2003 as per procedure at page no. 31 to 33.2. Install and configure Internet Information Services (IIS) as per procedure atpage no. 34 to 35.3. Create secondary partition (D:) as per procedure at page no. 36.4. Install SQL Server 2000 as per procedure at page no. 37 to 38.5. Install SQL Server 2000 Analysis Services as per procedure at page no. 39.6. Install SQL Server 2000 Service Pack as per procedure at page no. 40.7. Install SQL Server 2000 Analysis Services Service Pack as per procedure atpage no. 41.8. Install MS-Office XP as per procedure at page no. 42.9. Create Blank <strong>CCIS</strong> <strong>MLe</strong> database as per procedure at page no. 48.10. Install <strong>CCIS</strong> <strong>MLe</strong> Application as per procedure at page no. 53.11. Install Web Reports as per procedure at page no. 54.12. Install <strong>CCIS</strong> <strong>MLe</strong> Admin Utility as per procedure at page no. 55.B. CLIENT1. Install Windows XP Professional as per procedure at page no. 43 to 45.2. Install Windows XP Service Pack-2 as per procedure at page no. 46.3. Install SQL 2000 Server Client as per procedure at page no. 47.4. Install MS-Office XP as per procedure at page no. 42.5. Install <strong>CCIS</strong> <strong>MLe</strong> Application as per procedure at page no. 53.************<strong>National</strong> <strong>Crime</strong> <strong>Records</strong> <strong>Bureau</strong> Page 11 of 97
ISO 9001:2000Installation Manual - <strong>CCIS</strong> <strong>MLe</strong>Data Warehouse at District / P.S Level with Fir No. drilldownProcedure to Install Data Warehouse Utility1. Insert <strong>CCIS</strong> <strong>MLe</strong> CD into CD drive.2. <strong>CCIS</strong> <strong>MLe</strong> Setup Page will run automatically. (If the Setup Page not runautomatically, explore CD contents and double click on <strong>CCIS</strong>.exe file)3. Select Warehouse Screen Setup (PS/Distt Level) (With FIRNo) radiobutton and Click on Run Setup button, adjacent to the option selection.4. Click on OK button on Warehouse Screen Setup window.5. Click on Begin Setup icon.6. Click on Continue button.7. Click on OK button.************<strong>National</strong> <strong>Crime</strong> <strong>Records</strong> <strong>Bureau</strong> Page 12 of 97
ISO 9001:2000Installation Manual - <strong>CCIS</strong> <strong>MLe</strong>Procedure to Restore <strong>CCIS</strong>DW.CAB file at District/P.S Level1. Click on Start Programs Microsoft SQL Server AnalysisServices Analysis Manager.2. Click on + sign to expand Analysis Servers.3. Click on + sign to expand Server Name.4. Right click on Server Name, Click on Restore Database…5. Open <strong>CCIS</strong>DW.CAB file available on DWScreenSetup\PSD folder of <strong>CCIS</strong><strong>MLe</strong> CD.<strong>National</strong> <strong>Crime</strong> <strong>Records</strong> <strong>Bureau</strong> Page 13 of 97
ISO 9001:2000Installation Manual - <strong>CCIS</strong> <strong>MLe</strong>6. Click on Restore button.7. After restoration is over, Click on Close button.************<strong>National</strong> <strong>Crime</strong> <strong>Records</strong> <strong>Bureau</strong> Page 14 of 97
ISO 9001:2000Installation Manual - <strong>CCIS</strong> <strong>MLe</strong>Procedure to Create, Update / Data Transfer ofData Warehouse on <strong>CCIS</strong> <strong>MLe</strong> Database1. Click on Start Programs Data Warehouse Data WarehouseScreen.2. The following screen will appear.3. To create a blank Data Warehouse, Select Blank Data WarehouseCreation radio button and Click on Run Setup button.This is one time activity.4. To Update the Data Warehouse, Select Update/Data Transfer toWarehouse radio button and Click on Run Setup button.5. Select Full option to transfer all data. Select Incremental option and Yearto transfer incremental data.6. After updating Data Warehouse, process 01 to 06 should be done byselecting radio button and Click on Run Setup button.************<strong>National</strong> <strong>Crime</strong> <strong>Records</strong> <strong>Bureau</strong> Page 15 of 97
ISO 9001:2000Installation Manual - <strong>CCIS</strong> <strong>MLe</strong>Data Warehouse at State / <strong>National</strong> Level without Fir No. drilldownProcedure to Install Data Warehouse Utility at State / <strong>National</strong> Level1. Insert <strong>CCIS</strong> <strong>MLe</strong> CD into CD drive.2. <strong>CCIS</strong> <strong>MLe</strong> Setup Page will run automatically. (If the Setup Page not runautomatically, explore CD contents and double click on <strong>CCIS</strong>.exe file)3. Select Warehouse Screen Setup (<strong>National</strong>/State Level) (Without FIRNo)radio button and Click on Run Setup button, adjacent to the optionselection.4. Click OK button on Warehouse Screen Setup window.5. Click on Begin Setup icon.6. Click on Continue button.7. Click on OK button.************<strong>National</strong> <strong>Crime</strong> <strong>Records</strong> <strong>Bureau</strong> Page 16 of 97
ISO 9001:2000Installation Manual - <strong>CCIS</strong> <strong>MLe</strong>Procedure to Restore <strong>CCIS</strong>DW.CAB file at State / <strong>National</strong> Level1. Click on Start Programs Microsoft SQL Server AnalysisServices Analysis Manager.2. Click on + sign to expand Analysis Servers.3. Click on + sign to expand Server Name.4. Right click on Server Name, Click on Restore Database…5. Open <strong>CCIS</strong>DW.CAB file available on DWScreenSetup\StateN folder of<strong>CCIS</strong> <strong>MLe</strong> CD.<strong>National</strong> <strong>Crime</strong> <strong>Records</strong> <strong>Bureau</strong> Page 17 of 97
ISO 9001:2000Installation Manual - <strong>CCIS</strong> <strong>MLe</strong>6. Click on Restore button.7. After restoration is over, Click on Close button.************<strong>National</strong> <strong>Crime</strong> <strong>Records</strong> <strong>Bureau</strong> Page 18 of 97
ISO 9001:2000Installation Manual - <strong>CCIS</strong> <strong>MLe</strong>Procedure to Create, Update / Data Transfer of Data Warehouse on<strong>CCIS</strong> <strong>MLe</strong> Database1. Click on Start Programs Data Warehouse Data WarehouseScreen.2. The following screen will appear.3. To create a blank Data Warehouse, Select Blank Data WarehouseCreation radio button and Click on Run Setup button.This is one time activity.4. To Update the Data Warehouse, Select Update/Data Transfer toWarehouse radio button and Click on Run Setup button.5. Select Full option to transfer all data. Select Incremental option and Yearto transfer incremental data.6. After updating Data Warehouse, process 01 to 06 should be done byselecting radio button and Click on Run Setup button.************<strong>National</strong> <strong>Crime</strong> <strong>Records</strong> <strong>Bureau</strong> Page 19 of 97
ISO 9001:2000Installation Manual - <strong>CCIS</strong> <strong>MLe</strong>Wide Area Network / POLNETProcedure to assign IP address1. Click on Start Setting Network Connections2. Right click on Local Area Connection and Click on Properties.3. Double click on Internet protocol (TCP/IP).4. Select Use the following IP address: and type the IP address, Subnet mask,and Default gateway. For example, the additional machine at Meerut mayhave the following IP configuration.5. Click on OK button to save the settings.POLNET network can be checked by using the PING command with timegap of 4000 milli seconds at the command prompt.<strong>National</strong> <strong>Crime</strong> <strong>Records</strong> <strong>Bureau</strong> Page 20 of 97
ISO 9001:2000Installation Manual - <strong>CCIS</strong> <strong>MLe</strong>1. Click on Start Run2. Type cmd and press Enter. Control will go to DOS (Command) prompt.3. Type PING 100.40.3.5 –t –w 4000where 100.40.3.5 is the IP address of the destination machine.Note:1. IP address of POLNET computer at NCRB is 100.40.3.4IP addresses of the new computers will start from 100.40.3.52. IP addresses of DCRB/SCRB are being finalized by DCPW and thesame will be communicated to States/Districts.Procedure to connect two ServersTo connect with remote <strong>CCIS</strong> server in POLNET, the following steps are required:1. Search the remote server by giving its IP address instead of its name. Typethe IP address in the computer name box. To search the computer, rightclick on My Network Places icon on the desktop and click on Search forComputers…2. After searching the remote server, double click on the searched computer.3.* Give username and password.4. After successful log on to the remote server, the sharable folders will bedisplayed.5. Now the user can paste the files to be sent in respective shared folder inremote machine with the help of copy/paste command.6. Now if user wants to access the <strong>CCIS</strong> Application, click the icon made for<strong>CCIS</strong> application on the screen. The login screen will appear.a. ** Provide username and password as for accessing <strong>CCIS</strong>.b. Click advance button.c. Provide the IP address of the remote server machine in the column ofserver name.d. Provide the database name as <strong>CCIS</strong>UNICODE. Click on OK button.e. After successful log on to the remote server, the <strong>CCIS</strong> main screenwill be displayed.f. Now, the queries and reports of <strong>CCIS</strong> may be executed.After entering all the details as mentioned above, the server of user will beconnected to remote <strong>CCIS</strong> server with whom user wants to communicate.<strong>National</strong> <strong>Crime</strong> <strong>Records</strong> <strong>Bureau</strong> Page 21 of 97
ISO 9001:2000Installation Manual - <strong>CCIS</strong> <strong>MLe</strong>* Username and password as assigned by the administrator for access of itscomputer from remote machine.** Username and password as assigned by administrator or SM branch for accessingthe <strong>CCIS</strong> from remote machine.Procedure to Create OSCOM user1. Right click on My Computer icon and click on Manage2. Expand Local Users and Groups option on Computer Managementwindow.3. Right click on Users folder and click on New User…4. Enter OSCOM in User name text box and set Password as oscom on NewUser window.5. Deselect User must change password at next logon check box.6. Select User cannot change password and Password never expires checkboxes and Click on Create button.7. Click on Close button. Control will return to Computer Managementwindow.8. Click on Users folder under Local Users and Groups on ComputerManagement window.9. Double click on OSCOM user.10. Click on Dial-in tab on OSCOM Properties window.11. Select Allow access option and Click on OK button.12. Close Computer Management window.Setting SQL Server Privileges to OSCOM user1. Click on Start Programs Microsoft SQL Server EnterpriseManager2. Expand the following icons.<strong>National</strong> <strong>Crime</strong> <strong>Records</strong> <strong>Bureau</strong> Page 22 of 97
ISO 9001:2000Installation Manual - <strong>CCIS</strong> <strong>MLe</strong>a).b).c).d).Microsoft SQL ServersSQL Server GroupServer Name (Windows NT)Security.3. Right click on Logins icon under Security and click on New Login...4. Enter OSCOM in Name text box on New Login window.5. Click on Domain list box and select the Server Name. The name text boxwill be updated as Server Name\OSCOM6. Click on Database list box and select <strong>CCIS</strong>UNICODE as default database.7. Click on Database Access tab and select <strong>CCIS</strong>UNICODE database.OSCOM will appear under User column.8. public option will be selected by default under Database roles for<strong>CCIS</strong>UNICODE9. Select db_owner and db_denydatawriter options and click on OK button.10. Close SQL Server Enterprise Manager.Procedure to Create Shared Folder for District/State/NCRB1. Double click on My Computer icon on the desktop and double click on D:drive2. Right click on empty space New click on Folder3. Type the Folder name (e.g. PS FOLDERS)4. Right click on the newly created folder and click on Sharing andSecurity…5. Select Share this folder and click on Permissions… button.6. Select Full Control under Allow and click on OK button.7. Click OK button.In the above-created folder (i.e. PS FOLDERS) users should create different subfolders(i.e. NEW DELHI) in the name of their respective PS.Note:-1. If District server wants to export the data to SCRB Server the abovementioned Folder should be created and shared in SCRB Server.<strong>National</strong> <strong>Crime</strong> <strong>Records</strong> <strong>Bureau</strong> Page 23 of 97
ISO 9001:2000Installation Manual - <strong>CCIS</strong> <strong>MLe</strong>2. If SCRB server wants to export the data to NCRB Server the abovementioned Folder should be created and shared in NCRB Server.Procedure to send console message to other computers1. Click on Start Programs Administrative Tools ComputerManagement2. Right click on computer management (Local) icon3. Click all tasks send console message….4. Type message in message box.5. Click add button.6. Type the IP address of the remote computer in the recipient box. Click OKbutton.7. Similarly, multiple IP addresses may be added to recipient list.8. Click Send button to send the message.************<strong>National</strong> <strong>Crime</strong> <strong>Records</strong> <strong>Bureau</strong> Page 24 of 97
ISO 9001:2000Installation Manual - <strong>CCIS</strong> <strong>MLe</strong>Procedure to Create OSCOM userDIAL-UP Connectivity13. Right click on My Computer icon and click on Manage14. Expand Local Users and Groups option on Computer Managementwindow.15. Right click on Users folder and click on New User…16. Enter OSCOM in User name text box and set Password as oscom on NewUser window.17. Deselect User must change password at next logon check box.18. Select User cannot change password and Password never expires checkboxes and Click on Create button.19. Click on Close button. Control will return to Computer Managementwindow.20. Click on Users folder under Local Users and Groups on ComputerManagement window.21. Double click on OSCOM user.22. Click on Dial-in tab on OSCOM Properties window.23. Select Allow access option and Click on OK button.24. Close Computer Management window.Setting SQL Server Privileges to OSCOM user11. Click on Start Programs Microsoft SQL Server EnterpriseManager12. Expand the following icons.a).b).Microsoft SQL ServersSQL Server Group<strong>National</strong> <strong>Crime</strong> <strong>Records</strong> <strong>Bureau</strong> Page 25 of 97
ISO 9001:2000Installation Manual - <strong>CCIS</strong> <strong>MLe</strong>c).d).Server Name (Windows NT)Security.13. Right click on Logins icon under Security and click on New Login...14. Enter OSCOM in Name text box on New Login window.15. Click on Domain list box and select the Server Name. The name text boxwill be updated as Server Name\OSCOM16. Click on Database list box and select <strong>CCIS</strong>UNICODE as default database.17. Click on Database Access tab and select <strong>CCIS</strong>UNICODE database.OSCOM will appear under User column.18. public option will be selected by default under Database roles for<strong>CCIS</strong>UNICODE19. Select db_owner and db_denydatawriter options and click on OK button.20. Close SQL Server Enterprise Manager.Procedure to Configure Modem1. Click on Start Settings Control Panel2. Double click on Phone and Modem Options icon.3. Select country/region as India, enter your area code, and click on OKbutton on Location Information window, if appears.4. Click on Modems tab, then click on Add… button.5. Select Don’t detect my modem; I will select it from a list option and clickon Next button on Install New Modem window.6. Select the Manufacturer Name from the Manufacturer column and ModelName of the modem from the Model column of the window if it is availablein the list otherwise click on Have Disk button if the driver of the modem isprovided on Floppy or CD. (For Example, if you are using DLink Modem,then select Standard Modem Types as Manufacturer, and Standard 56000bps Modem as Model)7. Click on Next button.8. Select Selected ports option, then select COM1 or COM2 port where theModem is connected, and Click on Next button.<strong>National</strong> <strong>Crime</strong> <strong>Records</strong> <strong>Bureau</strong> Page 26 of 97
ISO 9001:2000Installation Manual - <strong>CCIS</strong> <strong>MLe</strong>9. Click on Finish button when Your modem has been setup successfullymessage appears.10. Click on OK button on Phone and Modem Options window and close allopen windows.Procedure to Configure Dial-Up Connection1. Click on Start Settings Network Connections2. Click on Crate a new connection3. Click on Next button on New Connection Wizard.4. Select Connect to the network at my workplace and click on Next button.5. Select Dial-up connection click on Next button.6. Type the Connection name (example Dial-up to SCRB) and click on Nextbutton on Connection name window.7. Type the Phone number on the Phone Number to Dial window and clickon Next button.8. Select Anyone’s use on Connection Availability window and click on Nextbutton.9. Select Add a shortcut to this connection to my desktop and click onFinish button.10. Click on Cancel button on Connect Dial-up to SCRB window.Procedure to Configure Incoming Connection1. Click on Start Settings double click on Network Connections2. Click on Crate a new connection3. Click on Next button on New Connection Wizard.4. Select Setup an advanced connection and click on Next button.<strong>National</strong> <strong>Crime</strong> <strong>Records</strong> <strong>Bureau</strong> Page 27 of 97
ISO 9001:2000Installation Manual - <strong>CCIS</strong> <strong>MLe</strong>5. Select Accept incoming connections and click on Next button.6. Select Modem as Connection device and click on Next button.7. Select Do not allow virtual private connections and click on Next button.8. Click on OK button, if any message appears.9. Select the OSCOM user under Users allowed to connect and click on Nextbutton.10. Select Internet Protocol (TCP/IP) and click on Properties button.11. Select Specify IP addresses and specify the IP addresses range of the clientmachines. For example, from 192.100.100.1 to 192.100.100.9912. Click OK button.13. Click on Next button.14. Click Finish button.Procedure to Create Shared Folder for District/State/NCRB8. Double click on My Computer icon on the desktop and double click on D:drive9. Right click on empty space New click on Folder10. Type the Folder name (e.g. PS FOLDERS)11. Right click on the newly created folder and click on Sharing andSecurity…12. Select Share this folder and click on Permissions… button.13. Select Full Control under Allow and click on OK button.14. Click OK button.In the above-created folder (i.e. PS FOLDERS) users should create different subfolders(i.e. NEW DELHI) in the name of their respective PS.<strong>National</strong> <strong>Crime</strong> <strong>Records</strong> <strong>Bureau</strong> Page 28 of 97
ISO 9001:2000Installation Manual - <strong>CCIS</strong> <strong>MLe</strong>Note:-1. If District server wants to export the data to SCRB Server the abovementioned Folder should be created and shared in SCRB Server.2. If SCRB server wants to export the data to NCRB Server the abovementioned Folder should be created and shared in NCRB Server.Procedure to Connect two Remote Servers/ClientsModem has been provided to all the districts with an objective that the server ofone district may be connected to PS server or server of other districts to view thedatabase for investigation and thresholding purpose. We can connect the server ofa district to the server of Police Station or server of other district using modem.Below given procedure may be followed.PRE-REQUISITES1. Availability of the telephone connection2. Modem should be configured in both the servers.3. Dial-up and Incoming connections should be configured in both the servers.PROCEDURE1. Click on Start Settings Network Connections2. Click on Dial-Up connection name, which is already created in the machine.3. Connect Dial-up Connection window will appear.4. Type OSCOM in the User name text box, give Password as oscom, and typethe phone number of the remote server.5. Click on Dial button. (When you are dialing a new Phone No., a message‘Make the Phone No. Change Permanent’ will appear, then click on‘Yes’ button).6. When the connection is established, an icon showing “NetworkConnection” will be displayed in the right bottom corner of the screen ontaskbar.Now you are logged on to the Remote server as the user OSCOM<strong>National</strong> <strong>Crime</strong> <strong>Records</strong> <strong>Bureau</strong> Page 29 of 97
ISO 9001:2000Installation Manual - <strong>CCIS</strong> <strong>MLe</strong>Procedure to Transfer Thresholded Data Using Dial-Up ConnectivityThis is an example of DISTRICT to SCRB Thresholded file transfer. From DistrictServer, data is exported and the files are copied onto the SCRB Server.1. Logon to <strong>CCIS</strong> <strong>MLe</strong> application and Export data using the ThresholdingExport option under Utilities menu to a folder on District Server.2. Make all the Exported files as a ZIP file using WinZip.3. Establish Dial-Up connection with SCRB Server.4. Copy the Zip file by right click and select Copy.5. Click on Start Run and type IP address of remote server.(e.g. \\192.100.100.1)• IP address will be identified by click on Start Settings NetworkConnections Connection name (e.g. Dial-up to SCRB)• Click on Details tab and note down the Server IP address.6. Shared folders of SCRB Server will appear.7. Double click on the relevant District folder and paste the Zip file by rightclick and Paste. The Zip file will be copied on to SCRB Server.Import District Data at SCRB Server1. Unzip the Zip file.2. Import the data using the Thresholding Import option under Utilities menuin <strong>CCIS</strong> <strong>MLe</strong> application.************<strong>National</strong> <strong>Crime</strong> <strong>Records</strong> <strong>Bureau</strong> Page 30 of 97
ISO 9001:2000Installation Manual - <strong>CCIS</strong> <strong>MLe</strong>Procedure to InstallWindows Server 2003 Enterprise Edition1. Switch on the computer and insert Windows Server 2003 CD into CD drive.2. Press any key when the message Press any key to boot from CD.… appears.3. Wait for Welcome to Setup screen.4. Press Enter to Continue.5. Press F8 on Windows Licensing Agreement screen.6. Press Esc to Continue.7. Delete the existing partitions (C: and D:)To Delete D:Select D: using arrow keys press D key press L key to confirmTo Delete C:Select C: using arrow keys press D key press Enter press L key to confirm8. Create primary partition (C:)Press C key type size as 3660 (assuming hard disk size is 9 GB)and leave the remaining space as Unpartitioned space andpress Enter to Create.9. Press Enter to Install.10. Select Format the partition using the NTFS file system option and pressEnter to Continue.11. After formatting is over, Setup will start copying files.12. The computer will restart after file copy is over.Note:- Don’t press any key when the message Press any key to boot fromCD.… appears.<strong>National</strong> <strong>Crime</strong> <strong>Records</strong> <strong>Bureau</strong> Page 31 of 97
ISO 9001:2000Installation Manual - <strong>CCIS</strong> <strong>MLe</strong>13. Setup will continue.14. Click on Customize… button on Regional and Language Optionswindow.15. Click on Languages tab.16. Select Install files for complex script and right-to-left languages(including Thai) check box.17. Click on OK button on Install Supplemental Language Support messagebox.18. Click on OK button.19. Click on Next button.20. Type Name and Organization and click on Next button on PersonalizeYour Software window.21. Type the 25 digit product key provided with Windows Server 2003Enterprise Edition CD and click on Next button on Your Product Keywindow.22. Click on Next button on Licensing Modes window.23. Type the Computer name and Administrator password and Click on Nextbutton on Computer Name and Administrator Password window.Note:- Computer name must be as per the list provided by NCRB.24. Select Time Zone as (GMT +05:30) Chennai, Kolkata, Mumbai, NewDelhi and click on Next button on Date and Time Settings window.25. Setup will continue.26. Select Custom settings option and click on Next button on NetworkingSettings window.27. Select Internet Protocol (TCP/IP) option and click on Properties button onNetworking Components window.28. Select Use the following IP address option and type the relevant IP addressand Subnet mask on Internet Protocol (TCP/IP) Properties window.<strong>National</strong> <strong>Crime</strong> <strong>Records</strong> <strong>Bureau</strong> Page 32 of 97
ISO 9001:2000Installation Manual - <strong>CCIS</strong> <strong>MLe</strong>29. Click on OK button.30. Click on Next button.31. Accept the default workgroup name WORKGROUP and click on Nextbutton on Workgroup or Computer Domain window.32. Setup will continue. After successful installation, computer will restart.Remove Windows Server 2003 CD from CD drive.33. When the computer boots for the first time, Manage Your Server windowappears. Select Don’t display this page at logon and Close the window.34. Right click on task bar Click on Properties Click on Start Menu tab Select Classic Start menu Click on OK button.************<strong>National</strong> <strong>Crime</strong> <strong>Records</strong> <strong>Bureau</strong> Page 33 of 97
ISO 9001:2000Installation Manual - <strong>CCIS</strong> <strong>MLe</strong>Procedure to Install and ConfigureInternet Information Services (IIS)Before installing IIS, Regional Options should be set to English (United Kingdom) asgiven below:-• Click on Start Settings Control Panel• Double click on Regional and Language Options.• Select Regional Options as English (United Kingdom) andClick on OK button.******1. Insert Windows Server 2003 CD into CD drive.2. Click on Install optional Windows components.3. Wait till Windows Components Wizard appears.4. Select Application Server check box.5. Click on Details button.6. Select Application Server Console, ASP.NET, Enable network COM+access, Enable network DTC access, Internet Information Services(IIS), and Message Queuing check boxes on Application Server window.7. Click on OK button on Application Server window.8. Click on Next button on Windows Components Wizard window.9. Wait till installation completes.10. Click on Finish button.11. Close all open Windows.<strong>National</strong> <strong>Crime</strong> <strong>Records</strong> <strong>Bureau</strong> Page 34 of 97
ISO 9001:2000Installation Manual - <strong>CCIS</strong> <strong>MLe</strong>Configure IIS for <strong>CCIS</strong> Web Report as given below:-• Click on Start Programs Administrative Tools InternetInformation Services (IIS) Manager.• Click on the + sign to expand the tree named (local computer).• Click on Web Service Extensions on the left pane, the right pane shows thelist of Web Service Extensions.• Select Active Server Pages on the right pane, Click on Allow button, if it isshown as Prohibited.• Right click on Web Sites on the left pane, Click on Properties.• Set Connection timeout to 90000 seconds on Web Site tab.• Click on Home Directory tab, Click on Configuration… button.• Click on Options tab on Application Configuration window.• Set Session timeout as 120 minutes.• Click on OK button on Application Configuration window.• Click on OK button on Web Sites Properties window.• Close all open Windows.************<strong>National</strong> <strong>Crime</strong> <strong>Records</strong> <strong>Bureau</strong> Page 35 of 97
ISO 9001:2000Installation Manual - <strong>CCIS</strong> <strong>MLe</strong>Procedure to Create Secondary Partition (D:)1. Right click on My Computer icon click on Manage.2. Click on Disk Management on Computer Management window.3. Right click on CD-ROM (D:) base. Click on Change drive letter andPaths...4. Click on Change… button.5. Select E from the combo box and click on OK button on Change Driveletter or Path window.6. Click on Yes button to Confirm.7. Right click on Unallocated box and Click on New partition...8. Click on Next button on New Partition Wizard.9. Select Extended Partition radio button and Click on Next button.10. Click on Next button on Specify Partition Size window. System willallocate the maximum available space.11. Click on Finish button.12. Right Click on Free Space Click on New Logical Drive…13. Click on Next button on New Partition Wizard window.14. Click on Next button on Select Partition Type window.15. Click on Next button on Specify Partition Size window.16. Click on Next button on Assign Drive Letter or Path window.17. Click on Next button on Format Partition window.18. Click on Finish button on Completing the New Partition Wizard window.Wait till formatting is over. Close all open windows.************<strong>National</strong> <strong>Crime</strong> <strong>Records</strong> <strong>Bureau</strong> Page 36 of 97
ISO 9001:2000Installation Manual - <strong>CCIS</strong> <strong>MLe</strong>Procedure to Install SQL Server 20001. Insert SQL Server 2000 CD into CD drive.2. Microsoft SQL Server 2000 window appears.3. Click on SQL Server 2000 Components.4. Click on Install Database Server.5. Select Don’t display this message again check box and click on Continuebutton on SQL Server 2000 SP2 and below message box. This messagedisplays only in Windows Server 2003 Operating System.6. Click on Next button on Welcome window.7. Click on Next button on Computer Name window.8. Click on Next button on Installation Selection window.9. Click on Next button on User Information window.10. Click on Yes button on Software License Agreement window.11. Type the 25 digit product key provided with SQL Server 2000 CD and clickon Next button.12. Select Server and Client Tools option (default option) and click on Nextbutton on Installation Definition window.13. Click on Next button on Instance Name window.14. Select Custom option on Setup Type window.15. Click on Browse… button to specify the path for Program Files. Type thepath as D:\SQL2000 and click on OK button on Choose Folder window.16. Click on Browse… button to specify the path for Data Files. Type the pathas D:\SQL2000 and click on OK button on Choose Folder window.17. Click on Next button.<strong>National</strong> <strong>Crime</strong> <strong>Records</strong> <strong>Bureau</strong> Page 37 of 97
ISO 9001:2000Installation Manual - <strong>CCIS</strong> <strong>MLe</strong>18. Click on Next button on Select Components window.19. Select Use the Local System account option under Service Settings andclick on Next button on Services Accounts window.20. Select Mixed Mode (Windows Authentication and SQL ServerAuthentication) radio button and Blank Password (not recommended)check box and Click on Next button on Authentication Mode window.21. Click on Next button on Collation Settings window.22. Click on Next button on Network Libraries window.23. Click on Next button on Start Copying Files window.24. Select Per Seat for option, type 10 in the text box, and click on Continuebutton on Choose Licensing Mode window. This option displays only inServer Operating Systems.25. Wait till installation completes. Click on Finish button on Setup Completewindow.26. Restart the computer.************<strong>National</strong> <strong>Crime</strong> <strong>Records</strong> <strong>Bureau</strong> Page 38 of 97
ISO 9001:2000Installation Manual - <strong>CCIS</strong> <strong>MLe</strong>Procedure to InstallSQL Server 2000 Analysis Services1. Insert SQL Server 2000 CD into CD drive.2. Microsoft SQL Server 2000 window appears.3. Click on SQL Server 2000 Components.4. Click on Install Analysis Services.5. Select Don’t display this message again check box and click on Continuebutton on SQL Server 2000 Analysis Services SP2 and below message box.This message displays only in Windows Server 2003 Operating System.6. Click on Next button on Welcome window.7. Click on Yes button on Software License Agreement window.8. Click on Browse button to specify the path on Select Components window.9. Type D:\AnalysisServices in the path text box on Choose folder windowand Click on OK button.10. Click on Yes button to create the folder.11. Click on Next button.12. Click on Next button.13. Click on Next button.14. Wait till installation completes. Click on Finish button on Setup Completewindow.************<strong>National</strong> <strong>Crime</strong> <strong>Records</strong> <strong>Bureau</strong> Page 39 of 97
ISO 9001:2000Installation Manual - <strong>CCIS</strong> <strong>MLe</strong>Procedure to InstallSQL Server 2000 Service Pack-31. Double click on SQL2000-SP3 folder available on Service Pack CD.2. Double click on setup.bat file.3. Click on Next button on Welcome window.4. Click on Yes button on Software License Agreement window.5. Click on Next button on Instance Name window.6. Click on Next button on Connect to Server window.7. Select Ignore the security threat warning, leave the password blank radiobutton and click on OK button on SA Password Warning window.8. Select Upgrade Microsoft Search and apply SQL Server 2003 SP3(required) check box and Click on Continue button on SQL Server 2000Service Pack 3 Setup window.9. Click on OK button on Error reporting window.10. Click on Next button on Start Copying Files window.11. Wait till setup completes.12. Click on OK button.13. Click on Finish button on Setup Complete window.************<strong>National</strong> <strong>Crime</strong> <strong>Records</strong> <strong>Bureau</strong> Page 40 of 97
ISO 9001:2000Installation Manual - <strong>CCIS</strong> <strong>MLe</strong>Procedure to Install SQL Server 2000Analysis Services Service Pack-31. Double click on SQL2000-ANALYSIS-SP3 folder available on Service PackCD.2. Double click on setup.exe file.3. Click on Next button on Welcome window.4. Click on Yes button on Software License Agreement window.5. Click on OK button on Error reporting window.6. Wait till setup completes.7. Click on Finish button on Setup Complete window.*************<strong>National</strong> <strong>Crime</strong> <strong>Records</strong> <strong>Bureau</strong> Page 41 of 97
ISO 9001:2000Installation Manual - <strong>CCIS</strong> <strong>MLe</strong>Procedure to Install Microsoft Office XP Professional1. Insert Microsoft Office XP CD into CD drive.2. Type the 25 digit product key provided with Microsoft Office XPProfessional CD and Click on Next button on Microsoft Office XP Setupwindow.3. Select I accept the terms in the License Agreement check box and Clickon Next button on End-User License Agreement window.4. Select Complete radio button and change the Install to: path asD:\Program Files\Microsoft Office\ and Click on Next button on Choosethe type of Installation you need window.5. Click on Install button on Begin installation window.6. Wait till installation completes.7. Click on OK button on Microsoft Office XP Professional Setup hascompleted successfully message.************<strong>National</strong> <strong>Crime</strong> <strong>Records</strong> <strong>Bureau</strong> Page 42 of 97
ISO 9001:2000Installation Manual - <strong>CCIS</strong> <strong>MLe</strong>Procedure to Install Windows XP Professional1. Switch on the computer and immediately insert Windows XP CD into CDdrive.2. Press any key immediately when the message Press any key to boot fromCD.… appears.3. Wait for Welcome to Setup screen.4. Press Enter to Continue.5. Press F8 on Windows XP Licensing Agreement screen.6. Press Esc.7. Select C: partition and press Enter.8. Press C key to Continue setup.9. Select Format the partition using the FAT file system and press Enter toContinue.10. Press F key to Format the drive.11. Press Enter to Continue.12. After formatting is over, Setup will start copying files.13. The computer will restart after file copy is over.Note:- Don’t press any key when the message Press any key to boot fromCD.… appears.14. Setup will continue.15. Click on Customize… button on Regional and Language Optionswindow.16. Click on Languages tab.17. Select Install files for complex script and right-to-left languages(including Thai) check box.<strong>National</strong> <strong>Crime</strong> <strong>Records</strong> <strong>Bureau</strong> Page 43 of 97
ISO 9001:2000Installation Manual - <strong>CCIS</strong> <strong>MLe</strong>18. Click on OK button on Install Supplemental Language Support messagebox.19. Click on OK button.20. Click on Next button.21. Type Name and Organization and click on Next button on PersonalizeYour Software window.22. Type the 25 digit product key provided with Windows XP ProfessionalEdition CD and click on Next button on Your Product Key window.23. Type the Computer name and Administrator password and Click on Nextbutton on Computer Name and Administrator Password window.24. Select Time Zone as (GMT +05:30) Chennai, Kolkata, Mumbai, NewDelhi and click on Next button on Date and Time Settings window.25. Setup will continue.26. Select Custom settings option and click on Next button on NetworkingSettings window.27. Select Internet Protocol (TCP/IP) option and click on Properties button onNetworking Components window.28. Select Use the following IP address option and type the relevant IP addressand Subnet mask on Internet Protocol (TCP/IP) Properties window.29. Click on OK button.30. Click on Next button.31. Accept the default workgroup name WORKGROUP and click on Nextbutton on Workgroup or Computer Domain window.32. Setup will continue. After successful installation, computer will restart.Remove Windows XP CD from CD drive.<strong>National</strong> <strong>Crime</strong> <strong>Records</strong> <strong>Bureau</strong> Page 44 of 97
ISO 9001:2000Installation Manual - <strong>CCIS</strong> <strong>MLe</strong>33. When system restarts, Welcome to Microsoft Windows screen appears.Click on Next button continue.34. Click on Skip button on Connect to the Internet screen.35. Select No, not at this time option and click on Next button.36. Enter any name and click Next button on Who will use this computer?screen.37. Click on Finish button on Thank you screen.************<strong>National</strong> <strong>Crime</strong> <strong>Records</strong> <strong>Bureau</strong> Page 45 of 97
ISO 9001:2000Installation Manual - <strong>CCIS</strong> <strong>MLe</strong>Procedure to Install Windows XP Service Pack-2Close all open programs or applications before installing Service Pack-21. Double click on WINDOWS-XP-SP-2 folder available on Service Pack CD.2. Double click on WindowsXP-KB835935-SP2-ENU executable file. Wait tillExtracting Files completes.3. Click on Next button on Windows XP Service Pack 2 Setup Wizard.4. Select I Agree option and Click on Next button on License Agreementwindow.5. Click on Next button on Select Options window.Wait till Service Pack-2 installation completes. Installation will take 30 to60 minutes depending on computer configuration.6. Click on Finish button. Computer will restart.7. Select Not right now option and Click on Next button on Help protectyour PC screen.8. Log on to Windows XP. Close Windows Security Centre window ifappears.************<strong>National</strong> <strong>Crime</strong> <strong>Records</strong> <strong>Bureau</strong> Page 46 of 97
ISO 9001:2000Installation Manual - <strong>CCIS</strong> <strong>MLe</strong>Procedure to InstallSQL Server 2000 Standard Edition Clienton Client Machine1. Insert SQL Server 2000 Standard Edition CD into CD drive.2. Microsoft SQL Server 2000 Standard Edition window appears.3. Click on SQL Server 2000 Components.4. Click on Install Database Server.5. Click on OK button on Warning Message Box. (Microsoft SQL Server2000 Standard Edition server component is not supported on this operatingsystem. Only client components will be available for installation)6. Click on Next button on Welcome window.7. Click on Next button on Computer Name window.8. Click on Next button on Installation Selection window.9. Click on Next button on User Information window.10. Click on Yes button on Software License Agreement window.11. Type the 25 digit product key provided with SQL Server 2000 StandardEdition CD and click on Next button.12. Click on Next button on Installation Definition window.13. Click on Next button on Select Components window.14. Click on Next button on Start Copying Files window.15. Wait till installation completes. Click on Finish button on Setup completewindow.************<strong>National</strong> <strong>Crime</strong> <strong>Records</strong> <strong>Bureau</strong> Page 47 of 97
ISO 9001:2000Installation Manual - <strong>CCIS</strong> <strong>MLe</strong>Procedure to CreateBlank <strong>CCIS</strong> <strong>MLe</strong> Database1. Insert <strong>CCIS</strong> <strong>MLe</strong> CD into CD drive.2. <strong>CCIS</strong> <strong>MLe</strong> Setup Page will run automatically. (If the Setup Page not runautomatically, explore CD contents and double click on <strong>CCIS</strong>.exe file)3. Select Blank Database Creation radio button and Click on Run Setupbutton adjacent to the option selection.4. After successful creation new data base, BLANK <strong>CCIS</strong>UNICODE DATABASECREATED AND MASTER DATA IMPORTED SUCCESSFULLY message boxwill appear.Click on OK button.************<strong>National</strong> <strong>Crime</strong> <strong>Records</strong> <strong>Bureau</strong> Page 48 of 97
ISO 9001:2000Installation Manual - <strong>CCIS</strong> <strong>MLe</strong>Procedure to Upgrade and Clean <strong>CCIS</strong> ML01 Databaseinto <strong>CCIS</strong> <strong>MLe</strong> Status1. Insert <strong>CCIS</strong> <strong>MLe</strong> CD into CD drive.2. <strong>CCIS</strong> <strong>MLe</strong> Setup Page will run automatically. (If the Setup Page not runautomatically, explore CD contents and double click on <strong>CCIS</strong>.exe file)3. Select Upgrade <strong>CCIS</strong> ML01 Database to <strong>CCIS</strong> <strong>MLe</strong> radio button andClick on Run Setup button adjacent to the option selection.4. After successful upgradation of data base, <strong>CCIS</strong>UNICODE DATABASEUPDATED SUCCESSFULLY message box will appear.Click on OK button.************Note:-It is observed that in <strong>CCIS</strong> database some of the fields have either null value(blank) or inconsistent data. This inconsistency and null values are the main cause fornon-functioning of DTS (Data Transfer Services) and creation of data warehouse for<strong>Crime</strong> Analysis.To overcome the above problem a (data cleaning) script is provided to take care ofabove anomalies in the backlog data at the time of database upgradation.Following values are replaced in the database as indicated against each item. Whileupgrading database, some text files will be created in the C:\DBSCRIPT\CleanupLogfolder. These text files will contain FIR numbers in which the changes areincorporated. Users are requested to verify these changes and if required to takecorrective measures based on manual records.<strong>National</strong> <strong>Crime</strong> <strong>Records</strong> <strong>Bureau</strong> Page 49 of 97
ISO 9001:2000Installation Manual - <strong>CCIS</strong> <strong>MLe</strong>Form Name Field Name Replaced with Value<strong>Crime</strong> DetailsFormPropertySeizure FormArrestSurrenderFormFinal ReportCourtDisposalFormResult ofAppeal FormDate of Visit toscene of <strong>Crime</strong>Seized Date andTimeDate of ArrestFinal Report TimeBailer DetailFinal Report DateCharge sheetNumberCharge sheet Date,Judgment Date,Date of framingcharges in courtCharge sheet Date,Judgment Date,Appeal Date1. If this field is Null in existing records, thenit is replaced with FIR date.2. If year of this date is greater than systemyear, then year is replaced with the year ofdate of FIR.1. If this field is Null in existing records, thenDate is replaced with FIR date and Timewith 11:00 Hrs.2. If year of this date is greater than systemyear, then year is replaced with the year ofdate of FIR/GD.If year of this date is greater than system yearand crime details form is filled, then year isreplaced with the year of Date of Visit to sceneof <strong>Crime</strong> otherwise it is replaced with the year ofdate of FIR.1. Final Report Time for all existing recordsmay be replaced with 11:00 Hrs.2. If Bailer Name is blank then other detail ofBailer if any, will be deleted.3. If year of this date is greater than systemyear, then year of date is replaced withfollowing given priorities:-Year of FR date Year of Arrest Date.Year of FR date Year of Date of Visit toscene of <strong>Crime</strong>Year of FR date Year of Date of FIR4. If this field is Null in existing records, thenCharge sheet No. of Final Report is replacedwith Charge sheet no. available in CourtDisposal form, if Court Disposal form ifalready filled otherwise it may left as it is.If year of any of these dates is greater thansystem year, then year of these respective datesis replaced by Year of FR dateIf year of any of these dates is greater thansystem year, then year of these respective datesis replaced by Year of Judgment date of CourtDisposal form.************<strong>National</strong> <strong>Crime</strong> <strong>Records</strong> <strong>Bureau</strong> Page 50 of 97
ISO 9001:2000Installation Manual - <strong>CCIS</strong> <strong>MLe</strong>Procedure to Install .Net Framework on Windows XP or 20001. Insert <strong>CCIS</strong> <strong>MLe</strong> CD into CD drive.2. <strong>CCIS</strong> <strong>MLe</strong> Setup Page will run automatically. (If the Setup Page not runautomatically, explore CD contents and double click on <strong>CCIS</strong>.exe file)3. Select Framework Setup radio button and Click on Run Setup buttonadjacent to the option selection.4. Click on Yes button when the following screen appears.<strong>National</strong> <strong>Crime</strong> <strong>Records</strong> <strong>Bureau</strong> Page 51 of 97
ISO 9001:2000Installation Manual - <strong>CCIS</strong> <strong>MLe</strong>5. Select I agree option and click on Install button when the following screenappears.6. Wait till installation completes. Click on OK button when the followingscreen appears.************<strong>National</strong> <strong>Crime</strong> <strong>Records</strong> <strong>Bureau</strong> Page 52 of 97
ISO 9001:2000Installation Manual - <strong>CCIS</strong> <strong>MLe</strong>Procedure to Install <strong>CCIS</strong> <strong>MLe</strong> Application1. Insert <strong>CCIS</strong> <strong>MLe</strong> CD into CD drive.2. <strong>CCIS</strong> <strong>MLe</strong> Setup Page will run automatically. (If the Setup Page not runautomatically, explore CD contents and double click on <strong>CCIS</strong>.exe file)3. Select Application Setup radio button and Click on Run Setup buttonadjacent to the option selection.4. If a message showing Setup cannot continue because some system filesare out of date ………….. appears, click on OK button, then Yes button torestart the computer. Repeat steps 1 to 3 after computer is restarted.5. Click on OK button on <strong>CCIS</strong> <strong>MLe</strong> Setup window.6. Click on Begin Setup icon on <strong>CCIS</strong> <strong>MLe</strong> Setup window.7. Click on Continue button on <strong>CCIS</strong> <strong>MLe</strong>–Choose Program Group window.8. Click on No to All button if Version Conflict window appears.9. Click on Ignore or Yes button if some warning messages appear.10. Click on OK button on <strong>CCIS</strong> <strong>MLe</strong> Setup was completed successfullymessage.***********<strong>National</strong> <strong>Crime</strong> <strong>Records</strong> <strong>Bureau</strong> Page 53 of 97
ISO 9001:2000Installation Manual - <strong>CCIS</strong> <strong>MLe</strong>Procedure to Install Web ReportsLocal Area Connection (LAN) must be enabled and cable must beplugged into LAN card before installing Web Reports.1. Insert <strong>CCIS</strong> <strong>MLe</strong> CD into CD drive.2. <strong>CCIS</strong> <strong>MLe</strong> Setup Page will run automatically. (If the Setup Page not runautomatically, explore CD contents and double click on <strong>CCIS</strong>.exe file)3. Select Web Reports Setup radio button and Click on Run Setup buttonadjacent to the option selection.4. Click on Next button on Welcome to the WebReportsNew Setup Wizardwindow.5. Type WebReports in Virtual directory text box and Click on Next buttonon Select Installation Address window.6. Click on Next button on Confirm Installation window.7. Click on Close button on Installation Complete window.************<strong>National</strong> <strong>Crime</strong> <strong>Records</strong> <strong>Bureau</strong> Page 54 of 97
ISO 9001:2000Installation Manual - <strong>CCIS</strong> <strong>MLe</strong>Procedure to Install <strong>CCIS</strong> <strong>MLe</strong> Admin Utility1. Insert <strong>CCIS</strong> <strong>MLe</strong> CD into CD drive.2. <strong>CCIS</strong> <strong>MLe</strong> Setup Page will run automatically. (If the Setup Page not runautomatically, explore CD contents and double click on <strong>CCIS</strong>.exe file)3. Select Admin. Utility Setup radio button and Click on Run Setup buttonadjacent to the option selection.4. Click on OK button on <strong>CCIS</strong> <strong>MLe</strong> Admin Utilities Setup window.5. Click on Begin Setup icon on <strong>CCIS</strong> <strong>MLe</strong> Admin Utilities Setup window.6. Click on Continue button.7. Click on Ignore or Yes button if some warning messages appear.8. Click on OK button on <strong>CCIS</strong> <strong>MLe</strong> Admin Utilities Setup was completedsuccessfully message.************<strong>National</strong> <strong>Crime</strong> <strong>Records</strong> <strong>Bureau</strong> Page 55 of 97
ISO 9001:2000Installation Manual - <strong>CCIS</strong> <strong>MLe</strong>Navigation into <strong>CCIS</strong> <strong>MLe</strong> Application(Server or Client)1. Click on Start Programs <strong>CCIS</strong><strong>MLe</strong> <strong>CCIS</strong><strong>MLe</strong>2. Logon to <strong>CCIS</strong> System screen appears. Click on Advanced
ISO 9001:2000Installation Manual - <strong>CCIS</strong> <strong>MLe</strong>Navigation into Web ReportsA. SERVER1. Logon to <strong>CCIS</strong> <strong>MLe</strong> application and Click on Reports/Enquiries menu.B. CLIENT or any Machine on Internet to SERVER1. Open Internet Explorer.Type the Address as http://ServerName/webreports/login.aspx(ServerName is the name of the Server machine)Login screen will appear as shown below.2. Select State, District, and Language and enter Username and Password.Click on Proceed button to logon.3. Click on AGREE button on Disclaimer and Restriction of Use window.Main Menu of Web Reports will be displayed.<strong>National</strong> <strong>Crime</strong> <strong>Records</strong> <strong>Bureau</strong> Page 57 of 97
ISO 9001:2000Installation Manual - <strong>CCIS</strong> <strong>MLe</strong>C. Using Dial-up or POLNET1. Establish connectivity using Dial-up or POLNET.2. Open Internet Explorer.Type the Address as http://Server IP address/webreports/login.aspx(Server IP Address is the IP address of the Server machine)Login screen will appear as shown below.3. Select State, District, and Language and enter Username and Password.Click on Proceed button to logon.4. Click on AGREE button on Disclaimer and Restriction of Use window.Main Menu of Web Reports will be displayed.************<strong>National</strong> <strong>Crime</strong> <strong>Records</strong> <strong>Bureau</strong> Page 58 of 97
ISO 9001:2000Installation Manual - <strong>CCIS</strong> <strong>MLe</strong>Unique I.O Code ReplacementThis is one time activity to be done at District and State Server.A. DISTRICT SERVER1. Logon to <strong>CCIS</strong> <strong>MLe</strong> Application and configure as District Server.2. Select IO Replacement option on Utilities menu. Click on OK button on IOReplacement window.<strong>National</strong> <strong>Crime</strong> <strong>Records</strong> <strong>Bureau</strong> Page 59 of 97
ISO 9001:2000Installation Manual - <strong>CCIS</strong> <strong>MLe</strong>3. Existing I.O details will be displayed.4. Type new I.O code for all I.Os in a single operation and Click on OKbutton.Old IO Codes Replaced Successfully message appears. Click on OK button.<strong>National</strong> <strong>Crime</strong> <strong>Records</strong> <strong>Bureau</strong> Page 60 of 97
ISO 9001:2000Installation Manual - <strong>CCIS</strong> <strong>MLe</strong>5. A text file named NewIO.txt will be created in <strong>CCIS</strong> <strong>MLe</strong> program folder.(default folder name is C:\Program Files\<strong>CCIS</strong><strong>MLe</strong>)6. Copy NewIO.txt file onto CD or DAT and send it to SCRB.B. STATE SERVER1. Copy NewIO.txt file of each district (one district at a time) into <strong>CCIS</strong> <strong>MLe</strong>program folder of SCRB Server. (default folder name is C:\ProgramFiles\<strong>CCIS</strong><strong>MLe</strong>)2. Logon to <strong>CCIS</strong> <strong>MLe</strong> Application and configure as State Server.3. Select Restore IO Codes option on Administration menu.4. Click on OK button when IO Codes Replaced Successfully messageappears.************<strong>National</strong> <strong>Crime</strong> <strong>Records</strong> <strong>Bureau</strong> Page 61 of 97
ISO 9001:2000Installation Manual - <strong>CCIS</strong> <strong>MLe</strong>On-line Data Transfer1. Logon to <strong>CCIS</strong> <strong>MLe</strong> Application and configure location for Thresholding.2. Select Thresholding Export option on Utilities menu.3. Configure the parameters for Thresholding and Click on Online DataTransfer button on Thresholding - Export window.<strong>National</strong> <strong>Crime</strong> <strong>Records</strong> <strong>Bureau</strong> Page 62 of 97
ISO 9001:2000Installation Manual - <strong>CCIS</strong> <strong>MLe</strong>4. Type the destination Server name or IP address in <strong>CCIS</strong> Server Name textbox and click on Test Connection button on Configure window toestablish connectivity.5. After establishing connectivity, Click on Export Now button on Configurewindow to transfer data.************<strong>National</strong> <strong>Crime</strong> <strong>Records</strong> <strong>Bureau</strong> Page 63 of 97
ISO 9001:2000Installation Manual - <strong>CCIS</strong> <strong>MLe</strong>Procedure to Bifurcate Police Station Data1. Copy BIFUR<strong>MLe</strong> folder from floppy or CD into D: drive of Server.2. Click on Start Run3. Type cmd and press Enter. Control will go to DOS (Command) prompt.4. Type D: and press Enter.5. Type cd BIFUR<strong>MLe</strong> and press Enter.6. Type psdataout and press Enter.[pslocation means State Code + District Code + PS Code. For Exampleif you want to extract data of PS Chanakyapuri you have to give PSLocation Key “0816507” where 08 is code for State ‘Delhi’, 165 is code fordistrict ‘ New Delhi’ and 07 is code for Police Station ‘Chanakyapuri’]7. It will generate text files in D:\BIFUR<strong>MLe</strong> folder having the data of PoliceStation.8. Copy complete folder D:\BIFUR<strong>MLe</strong> from your machine onto DAT.9. Copy folder D:\BIFUR<strong>MLe</strong> from DAT into D: drive of Police StationMachine.10. Run D:\BIFUR<strong>MLe</strong>\bifurdatain11. It will append extracted data into existing database.************<strong>National</strong> <strong>Crime</strong> <strong>Records</strong> <strong>Bureau</strong> Page 64 of 97
ISO 9001:2000Installation Manual - <strong>CCIS</strong> <strong>MLe</strong>Procedure to Bifurcate District Data1. Copy BIFUR<strong>MLe</strong> folder from floppy or CD into D: drive of Server.2. Click on Start Run3. Type cmd and press Enter. Control will go to DOS (Command) prompt.4. Type D: and press Enter.5. Type cd BIFUR<strong>MLe</strong> and press Enter.6. Type districtdataout and Press Enter.[distlocation means State Code + District Code For Example if you wantto extract data of District New Delhi you have to give Dist Location Key“08165” where 08 is code for state ‘Delhi’, 165 is code for district ‘ NewDelhi’]7. It will generate text files in D:\BIFUR<strong>MLe</strong> folder having the data ofDistrict.8. Copy complete folder D:\BIFUR<strong>MLe</strong> from your machine onto DAT.9. Copy folder BIFUR<strong>MLe</strong> from DAT into D: drive of District Machine.10. Run D:\BIFUR<strong>MLe</strong>\bifurdatain11. It will append extracted data into existing database.************<strong>National</strong> <strong>Crime</strong> <strong>Records</strong> <strong>Bureau</strong> Page 65 of 97
ISO 9001:2000Installation Manual - <strong>CCIS</strong> <strong>MLe</strong>Procedure to Update <strong>CCIS</strong> <strong>MLe</strong> Master DataTake the backup of existing <strong>CCIS</strong>Unicode database1. Insert <strong>CCIS</strong> <strong>MLe</strong> Master Data CD into CD drive of Server.2. Double click on My Computer icon.3. Double click on CD-ROM icon.4. Double click on <strong>MLe</strong>MasterData.exe file.5. Click on OK button on WinZip Self-Extractor window.6. Type D:\<strong>MLe</strong>MasterData in the Unzip to folder text box.7. Click on Unzip button.8. After extracting files, close the WinZip window.9. Click on Back button on the My Computer window.10. Double click on D: icon.11. Double click on <strong>MLe</strong>MasterData folder.12. Double click on MasterDataUpdate.bat file.13. Wait …… after updating files, system will come back to <strong>MLe</strong>MasterDatawindow.14. Close the window.15. Run <strong>CCIS</strong> <strong>MLe</strong> Application and check the master data.************<strong>National</strong> <strong>Crime</strong> <strong>Records</strong> <strong>Bureau</strong> Page 66 of 97
ISO 9001:2000Installation Manual - <strong>CCIS</strong> <strong>MLe</strong>Procedure for Backup and Restore<strong>CCIS</strong>Unicode Database Backup through <strong>CCIS</strong> <strong>MLe</strong> Admin Utilityon Hard DiskCreate Folderi) Double Click on My Computer Iconii)iii)iv)Double Click on D:\ DriveRight Click on white area Shortcut Menu will appearClick on NEW optionv) Click on FOLDERvi)vii)Give appropriate name (StateName+Backup (Example UP+Backup= UPBackup)) for new folder.Close all open windowsFollow the steps given below• Click on Start Programs <strong>CCIS</strong> <strong>MLe</strong> Admin Utility Backup RestoreUtility. It will open ‘Logon to <strong>CCIS</strong> System’ window on screen.• Click on User Name Text Box type user name as ‘sa’• Click on ‘OK’ button it will open ‘<strong>CCIS</strong> Administration Utility’ window• Click on ‘Utility’ menu• Click on ‘Database BackUP/Restore’ menu option it will open ‘<strong>CCIS</strong> Backup /Restore Window’ as figure shown below<strong>National</strong> <strong>Crime</strong> <strong>Records</strong> <strong>Bureau</strong> Page 67 of 97
ISO 9001:2000Installation Manual - <strong>CCIS</strong> <strong>MLe</strong>• Click on ‘Backup’ button it will open ‘SQL Server Backup – <strong>CCIS</strong>Unicode’window.• Click on ‘Remove’ button• Click on ‘Add’ button it will open ‘Select Backup Destination’ window<strong>National</strong> <strong>Crime</strong> <strong>Records</strong> <strong>Bureau</strong> Page 68 of 97
ISO 9001:2000Installation Manual - <strong>CCIS</strong> <strong>MLe</strong>• Click on ‘…’ (Eclipse) button it will open ‘Backup Device Location’ window• Select D: Drive, Then Select Created Folder after that type appropriate backupfile name (example: UPBAk09042003) at File Name text box• Click on ‘OK’ button• Again click on ‘OK’ button• Again click on ‘OK’ button and wait for some time• “The Backup Operation has been completed Successfully” message windowwill appear Click on ‘OK’ button• Click on ‘Close’ button<strong>National</strong> <strong>Crime</strong> <strong>Records</strong> <strong>Bureau</strong> Page 69 of 97
ISO 9001:2000Installation Manual - <strong>CCIS</strong> <strong>MLe</strong><strong>CCIS</strong>Unicode Database Restore through Admin Utility (from Hard Disk)• Click on Start Programs <strong>CCIS</strong> <strong>MLe</strong> Admin Utility Backup RestoreUtility. It will open ‘Logon to <strong>CCIS</strong> System’ window on screen.• Click on User Name Text Box type user name as ‘sa’ and Click on ‘OK’ button• Click on ‘Utility’ menu• Click on ‘Database BackUP/Restore’ menu option it will open ‘<strong>CCIS</strong> Backup /Restore Window’ as figure shown below• Click on ‘Restore’ button it will open ‘Restore Database’ window.<strong>National</strong> <strong>Crime</strong> <strong>Records</strong> <strong>Bureau</strong> Page 70 of 97
ISO 9001:2000Installation Manual - <strong>CCIS</strong> <strong>MLe</strong>• Select ‘From Device’ radio button• Click on ‘Select Devices’ button it will open ‘Choose Restore Devices’window• Click on ‘Add’ button it will open ‘Choose Restore Destination’ window• Click on ‘…’ (Eclipse) button it will open ‘Backup Device Location’ window• Select D: Drive, Then Select Backup File Folder after that select backup file(backup file name display in file name text box)<strong>National</strong> <strong>Crime</strong> <strong>Records</strong> <strong>Bureau</strong> Page 71 of 97
ISO 9001:2000Installation Manual - <strong>CCIS</strong> <strong>MLe</strong>• Click on ‘OK’ button• Again click on ‘OK’ button• Again click on ‘OK’ button• Click on ‘Options’ Tab• Select ‘Force Restore Over Exiting Database’ Option• Click ‘OK’ button and wait for some time• “Restore of Database ‘<strong>CCIS</strong>Unicode’ Completed Successfully” message willappear Click ‘OK’ button• Click on ‘Close’ button<strong>National</strong> <strong>Crime</strong> <strong>Records</strong> <strong>Bureau</strong> Page 72 of 97
ISO 9001:2000Installation Manual - <strong>CCIS</strong> <strong>MLe</strong><strong>CCIS</strong>Unicode Database Backup through Admin Utility (On DAT)• Insert DAT into DAT Drive• Click on Start Programs <strong>CCIS</strong> <strong>MLe</strong> Admin Utility Backup RestoreUtility. It will open ‘Logon to <strong>CCIS</strong> System’ window on screen.• Click on User Name Text Box type user name as ‘sa’• Click on ‘OK’ button it will open ‘<strong>CCIS</strong> Administration Utility’ window• Click on ‘Utility’ menu• Click on ‘Database BackUP/Restore’ menu option it will open ‘<strong>CCIS</strong> Backup /Restore Window’ as figure shown below• Click on ‘Backup’ button it will open ‘SQL Server Backup – <strong>CCIS</strong>Unicode’window.<strong>National</strong> <strong>Crime</strong> <strong>Records</strong> <strong>Bureau</strong> Page 73 of 97
ISO 9001:2000Installation Manual - <strong>CCIS</strong> <strong>MLe</strong>• Click on ‘Tape’ Radio button it will open ‘Select Backup Destination’ window• Click on ‘OK’ button and wait for some timeNote: Select ‘Append to Media’ Radio Button for appending the Backup to theexisting data available in the DAT or Select ‘Overwrite existing media’Radio Button for overwriting the existing data on DAT• “The Backup Operation has been completed successfully” message will appearClick ‘OK’• Close all open windows and remove DAT from DAT Drive<strong>National</strong> <strong>Crime</strong> <strong>Records</strong> <strong>Bureau</strong> Page 74 of 97
ISO 9001:2000Installation Manual - <strong>CCIS</strong> <strong>MLe</strong><strong>CCIS</strong>Unicode Database Restore through Admin Utility (from DAT)• Click on Start Programs <strong>CCIS</strong> <strong>MLe</strong> Admin Utility Backup RestoreUtility. It will open ‘Logon to <strong>CCIS</strong> System’ window on screen.• Click on User Name Text Box type user name as ‘sa’ and Click on ‘OK’ button• Click on ‘Utility’ menu• Click on ‘Database BackUP/Restore’ menu option it will open ‘<strong>CCIS</strong> Backup /Restore Window’ as figure shown below• Click on ‘Restore’ button it will open ‘Restore Database’ window.<strong>National</strong> <strong>Crime</strong> <strong>Records</strong> <strong>Bureau</strong> Page 75 of 97
ISO 9001:2000Installation Manual - <strong>CCIS</strong> <strong>MLe</strong>• Select ‘From Device’ radio button• Click on ‘Select Devices’ button it will open ‘Choose Restore Devices’window• Click on ‘Tape’ Radio button• Click on ‘Add’ button it will open ‘Choose Restore Destination’ window• Click on ‘OK’ button• Again click on ‘OK’ button• Click on ‘Options’ Tab<strong>National</strong> <strong>Crime</strong> <strong>Records</strong> <strong>Bureau</strong> Page 76 of 97
ISO 9001:2000Installation Manual - <strong>CCIS</strong> <strong>MLe</strong>• Click on ‘Read from Media’ after some time Logical and Physical File Namewill automatically appear• Select ‘Force Restore Over Exiting Database’ Option• Click ‘OK’ button and wait for some time• “Restore of Database ‘<strong>CCIS</strong>Unicode’ Completed Successfully” message willappear Click ‘OK’ button• Close all Open Windows and remove DAT from DAT Drive<strong>CCIS</strong>Unicode Database Backup through Enterprise Manager (On Hard Disk)Create Folderi) Double Click on My Computer Iconii)iii)iv)Double Click on D:\ DriveRight Click on white area Shortcut Menu will appearClick on NEW optionv) Click on FOLDERvi)vii)Give appropriate name (StateName+Backup (Example UP+Backup= UPBackup)) for new folderClose all open windows<strong>National</strong> <strong>Crime</strong> <strong>Records</strong> <strong>Bureau</strong> Page 77 of 97
ISO 9001:2000Installation Manual - <strong>CCIS</strong> <strong>MLe</strong>Follow the given below procedure• Open Enterprise Manager as. Click on Start Programs Microsoft SQLServer Enterprise Manager. (This will open Enterprise Manager window)• Expand Microsoft SQL Servers• Expand SQL Server Group• Expand server name• Expand Databases Icon• Right Click on <strong>CCIS</strong>Unicode DATABASE icon• Click on ALL TASKS, Click on Backup Databases below given figure willappear<strong>National</strong> <strong>Crime</strong> <strong>Records</strong> <strong>Bureau</strong> Page 78 of 97
ISO 9001:2000Installation Manual - <strong>CCIS</strong> <strong>MLe</strong>• Click on ‘Remove’ button• Click on ‘Add’ button it will open ‘Select Backup Destination’ window• Click on ‘…’ (Eclipse) button it will open ‘Backup Device Location’ window• Select D: Drive, Then Select Created Folder after that type appropriate backupfile name (example: UPBAk09042003) at File Name text box• Click on ‘OK’ button• Again click on ‘OK’ button<strong>National</strong> <strong>Crime</strong> <strong>Records</strong> <strong>Bureau</strong> Page 79 of 97
ISO 9001:2000Installation Manual - <strong>CCIS</strong> <strong>MLe</strong>• Again click on ‘OK’ button and wait for some time• “The Backup Operation has been completed Successfully” message windowwill appear Click on ‘OK’ button• Close all open windows<strong>CCIS</strong>Unicode Database Restore through Enterprise Manager (from Disk)• Open Enterprise Manager as. Click on Start Programs Microsoft SQLServer Enterprise Manager. (This will open Enterprise Manager window)• Expand Microsoft SQL Servers• Expand SQL Server Group• Expand server name• Expand Databases Icon• Right Click on <strong>CCIS</strong>Unicode DATABASE icon• Click on ALL TASKS, Click on Restore Databases below given figure willappear<strong>National</strong> <strong>Crime</strong> <strong>Records</strong> <strong>Bureau</strong> Page 80 of 97
ISO 9001:2000Installation Manual - <strong>CCIS</strong> <strong>MLe</strong>• Select ‘From Device’ radio button• Click on ‘Select Devices’ button it will open ‘Choose Restore Devices’window• Click on ‘Add’ button it will open ‘Choose Restore Destination’ window<strong>National</strong> <strong>Crime</strong> <strong>Records</strong> <strong>Bureau</strong> Page 81 of 97
ISO 9001:2000Installation Manual - <strong>CCIS</strong> <strong>MLe</strong>• Click on ‘…’ (Eclipse) button it will open ‘Backup Device Location’ window• Select D: Drive, Then Select Backup File Folder after that select backup file(backup file name display in file name text box)• Click on ‘OK’ button• Again click on ‘OK’ button• Again click on ‘OK’ button• Click on ‘Options’ Tab<strong>National</strong> <strong>Crime</strong> <strong>Records</strong> <strong>Bureau</strong> Page 82 of 97
ISO 9001:2000Installation Manual - <strong>CCIS</strong> <strong>MLe</strong>• Select ‘Force Restore Over Exiting Database’ Option• Again click on ‘OK’ button and wait for some time• “Restore of Database ‘<strong>CCIS</strong>Unicode’ Completed Successfully” message willappear Click ‘OK’ button• Close all open windowsDatabase Backup through Enterprise Manager <strong>CCIS</strong>Unicode (On DAT)• Open Enterprise Manager as. Click on Start Programs Microsoft SQLServer Enterprise Manager. (This will open Enterprise Manager window)• Expand Microsoft SQL Servers• Expand SQL Server Group• Expand server name• Expand Databases Icon• Right Click on <strong>CCIS</strong>Unicode DATABASE icon• Click on ALL TASKS, Click on Backup Databases below given figure willappear<strong>National</strong> <strong>Crime</strong> <strong>Records</strong> <strong>Bureau</strong> Page 83 of 97
ISO 9001:2000Installation Manual - <strong>CCIS</strong> <strong>MLe</strong>• Click on ‘Tape’ Radio button it will open ‘Select Backup Destination’ window• Again click on ‘OK’ button and wait for some timeNote: Select ‘Append to Media’ Radio Button for appending the Backup to theexiting data available in the DAT or Select ‘Overwrite existing media’Radio Button for overwriting the existing data on DAT• “The Backup Operation has been completed successfully” message will appearClick ‘OK’• Close all open windows and remove DAT from DAT Drive<strong>National</strong> <strong>Crime</strong> <strong>Records</strong> <strong>Bureau</strong> Page 84 of 97
ISO 9001:2000Installation Manual - <strong>CCIS</strong> <strong>MLe</strong><strong>CCIS</strong>Unicode Database Restore through Enterprise Manager (from DAT)• Open Enterprise Manager as. Click on Start Programs Microsoft SQLServer Enterprise Manager. (This will open Enterprise Manager window)• Expand Microsoft SQL Servers• Expand SQL Server Group• Expand server name• Expand Databases Icon• Right Click on <strong>CCIS</strong>Unicode DATABASE icon• Click on ALL TASKS, Click on Restore Databases below given figure willappear<strong>National</strong> <strong>Crime</strong> <strong>Records</strong> <strong>Bureau</strong> Page 85 of 97
ISO 9001:2000Installation Manual - <strong>CCIS</strong> <strong>MLe</strong>• Select ‘From Device’ radio button• Click on ‘Select Devices’ button it will open ‘Choose Restore Devices’window• Click on ‘Tape’ Radio button• Click on ‘Add’ button it will open ‘Choose Restore Destination’ window<strong>National</strong> <strong>Crime</strong> <strong>Records</strong> <strong>Bureau</strong> Page 86 of 97
ISO 9001:2000Installation Manual - <strong>CCIS</strong> <strong>MLe</strong>• Click on ‘OK’ button• Again click on ‘OK’ button• Click on ‘Options’ Tab• Click on ‘Read from Media’ after some time Logical and Physical File Namewill automatically appear• Select ‘Force Restore Over Exiting Database’ Option• Again click on ‘OK’ button and wait for some time<strong>National</strong> <strong>Crime</strong> <strong>Records</strong> <strong>Bureau</strong> Page 87 of 97
ISO 9001:2000Installation Manual - <strong>CCIS</strong> <strong>MLe</strong>• “Restore of Database ‘<strong>CCIS</strong>Unicode’ Completed Successfully” message willappear Click ‘OK’ button• Close all Open Windows and remove DAT from DAT DriveBackup through Windows Server 2003 Utility• Click on Start Programs Accessories System Tools Backup• Click on Advanced Mode.<strong>National</strong> <strong>Crime</strong> <strong>Records</strong> <strong>Bureau</strong> Page 88 of 97
ISO 9001:2000Installation Manual - <strong>CCIS</strong> <strong>MLe</strong>• Click on Backup tab and Select the folders or files to take backup.• Click on Start Backup button.• Click on Start Backup button on Backup job Information window.• Click on Yes button when the following message appears.<strong>National</strong> <strong>Crime</strong> <strong>Records</strong> <strong>Bureau</strong> Page 89 of 97
ISO 9001:2000Installation Manual - <strong>CCIS</strong> <strong>MLe</strong>• Click on Yes button to replace the existing data on DAT with new data.Click on No button to append data.• Click on Yes button to append data.• After backup operation is complete, Click on Close button• Close all open windows.Restore through Windows 2003 Utility• Click on Start Programs Accessories System Tools Backup<strong>National</strong> <strong>Crime</strong> <strong>Records</strong> <strong>Bureau</strong> Page 90 of 97
ISO 9001:2000Installation Manual - <strong>CCIS</strong> <strong>MLe</strong>• Click on Advanced Mode.• Click on Restore and Manage Media tab.<strong>National</strong> <strong>Crime</strong> <strong>Records</strong> <strong>Bureau</strong> Page 91 of 97
ISO 9001:2000Installation Manual - <strong>CCIS</strong> <strong>MLe</strong>• Double click on DAT icon to expand.• Double click on Media Created icon to expand.• Double click on Drive letter to expand.• Select the files or folders.• Click on Start Restore button.<strong>National</strong> <strong>Crime</strong> <strong>Records</strong> <strong>Bureau</strong> Page 92 of 97
ISO 9001:2000Installation Manual - <strong>CCIS</strong> <strong>MLe</strong>• Click on OK button on Confirm Restore window appear to start restore.• After Restore is complete, Click on Close button.• Close all open windows and remove DAT from DAT drive.************<strong>National</strong> <strong>Crime</strong> <strong>Records</strong> <strong>Bureau</strong> Page 93 of 97
ISO 9001:2000Installation Manual - <strong>CCIS</strong> <strong>MLe</strong>Troubleshooting1. If the following warning appears during <strong>CCIS</strong> <strong>MLe</strong> Application installation,click on No to All button.2. If the following warning appears during <strong>CCIS</strong> <strong>MLe</strong> Application installation,click on Ignore button.3. If the following warning appears during <strong>CCIS</strong> <strong>MLe</strong> Application installation,click on Yes button.<strong>National</strong> <strong>Crime</strong> <strong>Records</strong> <strong>Bureau</strong> Page 94 of 97
ISO 9001:2000Installation Manual - <strong>CCIS</strong> <strong>MLe</strong>4. If the following warning appears during <strong>CCIS</strong> <strong>MLe</strong> Application installation,click on Ignore button.5. If the following error appears during Web Reports installation, Enable andConfigure Local Area Connection (LAN), and Plug-in a cable into LANcard.6. If the following warning appears during <strong>CCIS</strong> <strong>MLe</strong> Admin Utilityinstallation, click on Ignore button.7. If the following error appears during logon to <strong>CCIS</strong> <strong>MLe</strong> Application, checkthe User name or Password.<strong>National</strong> <strong>Crime</strong> <strong>Records</strong> <strong>Bureau</strong> Page 95 of 97
ISO 9001:2000Installation Manual - <strong>CCIS</strong> <strong>MLe</strong>8. If the following error appears during logon to <strong>CCIS</strong> <strong>MLe</strong> Application, checkthe Database name or Server name.9. If the following error appears during logon to <strong>CCIS</strong> <strong>MLe</strong> Application, enterPassword.-------------------------------------------------------------------------------------------User name Password Database name-------------------------------------------------------------------------------------------ccis ccis <strong>CCIS</strong>UNICODEAdministrator SCRDCR2 <strong>CCIS</strong>UNICODE-------------------------------------------------------------------------------------------10. If the following error appears during Web Reports installation, InstallInternet Information Services (IIS).<strong>National</strong> <strong>Crime</strong> <strong>Records</strong> <strong>Bureau</strong> Page 96 of 97
ISO 9001:2000Installation Manual - <strong>CCIS</strong> <strong>MLe</strong>11. If the following error appears during Web Reports installation, Click on Nobutton and Install .Net Framework.12. If run time error 429 appears, follow the steps given below:-a. Uninstall <strong>CCIS</strong> <strong>MLe</strong> application.b. Search ML.dll file using Start Search For Files or Folders…c. Delete ML.dll, if found.d. Reinstall <strong>CCIS</strong> <strong>MLe</strong> application.13. If run time error 91 object variable or with block variable appear. It meansthat the database of <strong>CCIS</strong> ML01 is not upgraded to <strong>CCIS</strong> <strong>MLe</strong> status. Tosolve this problem, follow the steps given below:-• Restore the <strong>CCIS</strong> ML01 database backup.• Upgrade the <strong>CCIS</strong> ML01 database to <strong>CCIS</strong> <strong>MLe</strong> status.************<strong>National</strong> <strong>Crime</strong> <strong>Records</strong> <strong>Bureau</strong> Page 97 of 97