

1961-64 Ford Pickup Truck - Classic Auto Air
1961-64 Ford Pickup Truck - Classic Auto Air
1961-64 Ford Pickup Truck - Classic Auto Air

You also want an ePaper? Increase the reach of your titles
YUMPU automatically turns print PDFs into web optimized ePapers that Google loves.
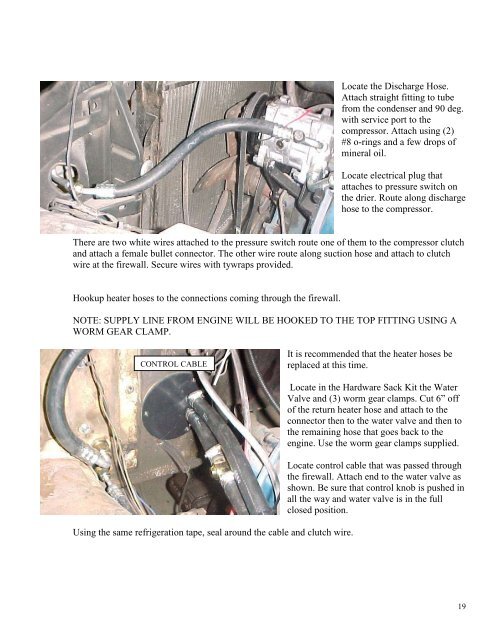
Locate the Discharge Hose.Attach straight fitting to tubefrom the condenser and 90 deg.with service port to thecompressor. Attach using (2)#8 o-rings and a few drops ofmineral oil.Locate electrical plug thatattaches to pressure switch onthe drier. Route along dischargehose to the compressor.There are two white wires attached to the pressure switch route one of them to the compressor clutchand attach a female bullet connector. The other wire route along suction hose and attach to clutchwire at the firewall. Secure wires with tywraps provided.Hookup heater hoses to the connections coming through the firewall.NOTE: SUPPLY LINE FROM ENGINE WILL BE HOOKED TO THE TOP FITTING USING AWORM GEAR CLAMP.CONTROL CABLEIt is recommended that the heater hoses bereplaced at this time.Using the same refrigeration tape, seal around the cable and clutch wire.Locate in the Hardware Sack Kit the WaterValve and (3) worm gear clamps. Cut 6” offof the return heater hose and attach to theconnector then to the water valve and then tothe remaining hose that goes back to theengine. Use the worm gear clamps supplied.Locate control cable that was passed throughthe firewall. Attach end to the water valve asshown. Be sure that control knob is pushed inall the way and water valve is in the fullclosed position.19


