Instruction Manual GP 3500 - Minelab
Instruction Manual GP 3500 - Minelab
Instruction Manual GP 3500 - Minelab

Create successful ePaper yourself
Turn your PDF publications into a flip-book with our unique Google optimized e-Paper software.
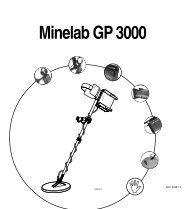
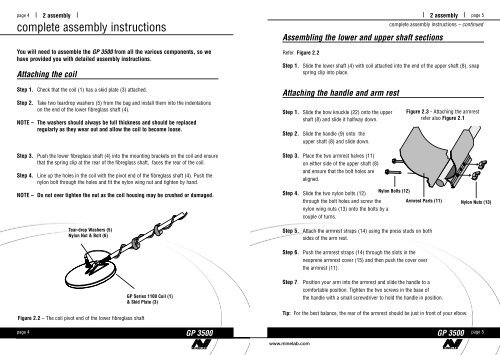
page 4 l 2 assembly lcomplete assembly instructionsYou will need to assemble the <strong>GP</strong> <strong>3500</strong> from all the various components, so wehave provided you with detailed assembly instructions.Attaching the coilcomplete assembly instructions – continuedAssembling the lower and upper shaft sectionsRefer Figure 2.2l 2 assembly l page 5Step 1. Slide the lower shaft (4) with coil attached into the end of the upper shaft (8), snapspring clip into place.Step 1. Check that the coil (1) has a skid plate (3) attached.Step 2. Take two teardrop washers (5) from the bag and install them into the indentationson the end of the lower fibreglass shaft (4).NOTE – The washers should always be full thickness and should be replacedregularly as they wear out and allow the coil to become loose.Attaching the handle and arm restStep 1. Slide the bow knuckle (22) onto the uppershaft (8) and slide it halfway down.Step 2. Slide the handle (9) onto theupper shaft (8) and slide down.Figure 2.3 - Attaching the armrestrefer also Figure 2.1Step 3. Push the lower fibreglass shaft (4) into the mounting brackets on the coil and ensurethat the spring clip at the rear of the fibreglass shaft, faces the rear of the coil.Step 4. Line up the holes in the coil with the pivot end of the fibreglass shaft (4). Push thenylon bolt through the holes and fit the nylon wing nut and tighten by hand.NOTE – Do not over tighten the nut as the coil housing may be crushed or damaged.Tear-drop Washers (5)Nylon Nut & Bolt (6)Step 3. Place the two armrest halves (11)on either side of the upper shaft (8)and ensure that the bolt holes arealigned.Step 4. Slide the two nylon bolts (12)Nylon Bolts (12)through the bolt holes and screw thenylon wing nuts (13) onto the bolts by acouple of turns.Armrest Parts (11) Nylon Nuts (13)Step 5. Attach the armrest straps (14) using the press studs on bothsides of the arm rest.Step 6. Push the armrest straps (14) through the slots in theneoprene armrest cover (15) and then push the cover overthe armrest (11).<strong>GP</strong> Series 1100 Coil (1)& Skid Plate (3)Step 7.Position your arm into the armrest and slide the handle to acomfortable position. Tighten the two screws in the base ofthe handle with a small screwdriver to hold the handle in position.Figure 2.2 – The coil pivot end of the lower fibreglass shaftTip: For the best balance, the rear of the armrest should be just in front of your elbow.page 4<strong>GP</strong> <strong>3500</strong><strong>GP</strong> <strong>3500</strong>page<strong>GP</strong>5<strong>3500</strong>www.minelab.com