Instruction Manual GP 3500 - Minelab
Instruction Manual GP 3500 - Minelab
Instruction Manual GP 3500 - Minelab

Create successful ePaper yourself
Turn your PDF publications into a flip-book with our unique Google optimized e-Paper software.
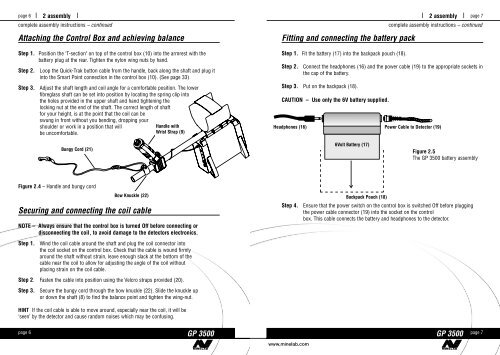
page 6 l 2 assembly lcomplete assembly instructions – continuedAttaching the Control Box and achieving balanceStep 1. Position the ‘T-section" on top of the control box (10) into the armrest with thebattery plug at the rear. Tighten the nylon wing nuts by hand.Step 2.Step 3.Loop the Quick-Trak button cable from the handle, back along the shaft and plug itinto the Smart Point connection in the control box (10). (See page 33)Adjust the shaft length and coil angle for a comfortable position. The lowerfibreglass shaft can be set into position by locating the spring clip intothe holes provided in the upper shaft and hand tightening thelocking nut at the end of the shaft. The correct length of shaftfor your height, is at the point that the coil can beswung in front without you bending, dropping yourshoulder or work in a position that willbe uncomfortable.Handle withWrist Strap (9)Fitting and connecting the battery packStep 1. Fit the battery (17) into the backpack pouch (18).Step 2.l 2 assembly l page 7complete assembly instructions – continuedConnect the headphones (16) and the power cable (19) to the appropriate sockets inthe cap of the battery.Step 3. Put on the backpack (18).CAUTION – Use only the 6V battery supplied.Headphones (16) Power Cable to Detector (19)Bungy Cord (21)6Volt Battery (17)Figure 2.5The <strong>GP</strong> <strong>3500</strong> battery assemblyFigure 2.4 – Handle and bungy cordSecuring and connecting the coil cableNOTE – Always ensure that the control box is turned Off before connecting ordisconnecting the coil, to avoid damage to the detectors electronics.Step 1.Bow Knuckle (22)Wind the coil cable around the shaft and plug the coil connector intothe coil socket on the control box. Check that the cable is wound firmlyaround the shaft without strain, leave enough slack at the bottom of thecable near the coil to allow for adjusting the angle of the coil withoutplacing strain on the coil cable.Step 2. Fasten the cable into position using the Velcro straps provided (20).Step 4.Backpack Pouch (18)Ensure that the power switch on the control box is switched Off before pluggingthe power cable connector (19) into the socket on the controlbox. This cable connects the battery and headphones to the detector.Step 3.Secure the bungy cord through the bow knuckle (22). Slide the knuckle upor down the shaft (8) to find the balance point and tighten the wing-nut.HINT If the coil cable is able to move around, especially near the coil, it will be‘seen’ by the detector and cause random noises which may be confusing.page 6<strong>GP</strong> <strong>3500</strong><strong>GP</strong> <strong>3500</strong>page<strong>GP</strong>7<strong>3500</strong>www.minelab.com