Eaton Axle and Brake Service Manual. 2-Speed and Double ...
Eaton Axle and Brake Service Manual. 2-Speed and Double ...
Eaton Axle and Brake Service Manual. 2-Speed and Double ...

Create successful ePaper yourself
Turn your PDF publications into a flip-book with our unique Google optimized e-Paper software.
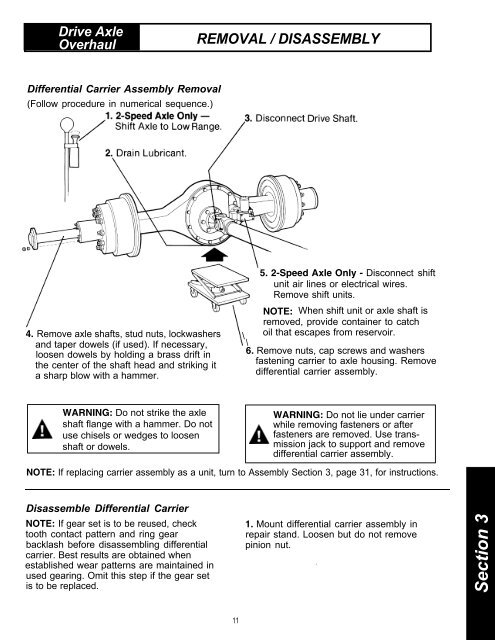
Drive <strong>Axle</strong>OverhaulREMOVAL / DISASSEMBLYDifferential Carrier Assembly Removal(Follow procedure in numerical sequence.)5. 2-<strong>Speed</strong> <strong>Axle</strong> Only - Disconnect shiftunit air lines or electrical wires.Remove shift units.NOTE: When shift unit or axle shaft isremoved, provide container to catch4. Remove axle shafts, stud nuts, lockwashers \ oil that escapes from reservoir.<strong>and</strong> taper dowels (if used). If necessary, \loosen dowels by holding a brass drift in6. Remove nuts, cap screws <strong>and</strong> washersthe center of the shaft head <strong>and</strong> striking itfastening carrier to axle housing. Removea sharp blow with a hammer.differential carrier assembly.WARNING: Do not strike the axleshaft flange with a hammer. Do notuse chisels or wedges to loosenshaft or dowels.WARNING: Do not lie under carrierwhile removing fasteners or afterfasteners are removed. Use transmissionjack to support <strong>and</strong> removedifferential carrier assembly.NOTE: If replacing carrier assembly as a unit, turn to Assembly Section 3, page 31, for instructions.Disassemble Differential CarrierNOTE: If gear set is to be reused, checktooth contact pattern <strong>and</strong> ring gearbacklash before disassembling differentialcarrier. Best results are obtained whenestablished wear patterns are maintained inused gearing. Omit this step if the gear setis to be replaced.1. Mount differential carrier assembly inrepair st<strong>and</strong>. Loosen but do not removepinion nut..Section 311