

Double Insulated 10" Bench Top Table Saw Instruction Manual
Double Insulated 10" Bench Top Table Saw Instruction Manual
Double Insulated 10" Bench Top Table Saw Instruction Manual
- No tags were found...

You also want an ePaper? Increase the reach of your titles
YUMPU automatically turns print PDFs into web optimized ePapers that Google loves.
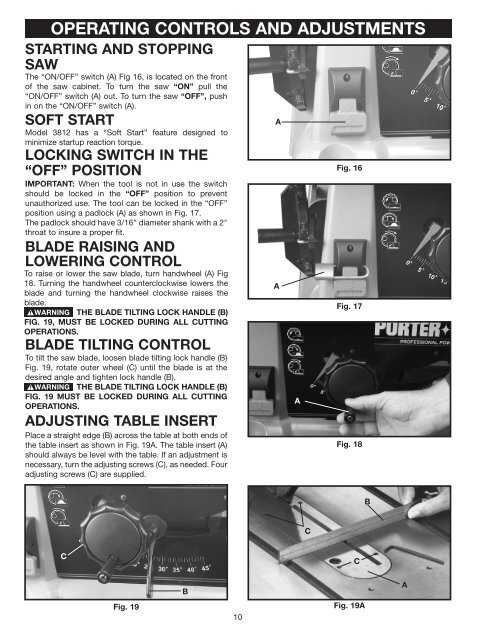
OPERATING CONTROLS AND ADJUSTMENTSSTARTING AND STOPPINGSAWThe “ON/OFF” switch (A) Fig 16, is located on the frontof the saw cabinet. To turn the saw “ON” pull the“ON/OFF” switch (A) out. To turn the saw “OFF”, pushin on the “ON/OFF” switch (A).SOFT STARTModel 3812 has a “Soft Start” feature designed tominimize startup reaction torque.LOCKING SWITCH IN THE“OFF” POSITIONIMPORTANT: When the tool is not in use the switchshould be locked in the “OFF” position to preventunauthorized use. The tool can be locked in the “OFF”position using a padlock (A) as shown in Fig. 17.The padlock should have 3/16" diameter shank with a 2"throat to insure a proper fit.BLADE RAISING ANDLOWERING CONTROLTo raise or lower the saw blade, turn handwheel (A) Fig18. Turning the handwheel counterclockwise lowers theblade and turning the handwheel clockwise raises theblade.THE BLADE TILTING LOCK HANDLE (B)FIG. 19, MUST BE LOCKED DURING ALL CUTTINGOPERATIONS.BLADE TILTING CONTROLTo tilt the saw blade, loosen blade tilting lock handle (B)Fig. 19, rotate outer wheel (C) until the blade is at thedesired angle and tighten lock handle (B).THE BLADE TILTING LOCK HANDLE (B)FIG. 19 MUST BE LOCKED DURING ALL CUTTINGOPERATIONS.ADJUSTING TABLE INSERTPlace a straight edge (B) across the table at both ends ofthe table insert as shown in Fig. 19A. The table insert (A)should always be level with the table. If an adjustment isnecessary, turn the adjusting screws (C), as needed. Fouradjusting screws (C) are supplied.AAAFig. 16Fig. 17Fig. 18BCCCFig. 19B10Fig. 19AA


