

Double Insulated 10" Bench Top Table Saw Instruction Manual
Double Insulated 10" Bench Top Table Saw Instruction Manual
Double Insulated 10" Bench Top Table Saw Instruction Manual
- No tags were found...

You also want an ePaper? Increase the reach of your titles
YUMPU automatically turns print PDFs into web optimized ePapers that Google loves.
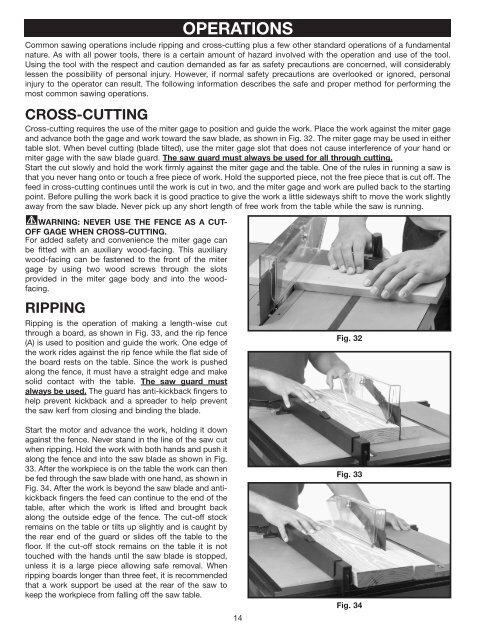
OPERATIONSCommon sawing operations include ripping and cross-cutting plus a few other standard operations of a fundamentalnature. As with all power tools, there is a certain amount of hazard involved with the operation and use of the tool.Using the tool with the respect and caution demanded as far as safety precautions are concerned, will considerablylessen the possibility of personal injury. However, if normal safety precautions are overlooked or ignored, personalinjury to the operator can result. The following information describes the safe and proper method for performing themost common sawing operations.CROSS-CUTTINGCross-cutting requires the use of the miter gage to position and guide the work. Place the work against the miter gageand advance both the gage and work toward the saw blade, as shown in Fig. 32. The miter gage may be used in eithertable slot. When bevel cutting (blade tilted), use the miter gage slot that does not cause interference of your hand ormiter gage with the saw blade guard. The saw guard must always be used for all through cutting.Start the cut slowly and hold the work firmly against the miter gage and the table. One of the rules in running a saw isthat you never hang onto or touch a free piece of work. Hold the supported piece, not the free piece that is cut off. Thefeed in cross-cutting continues until the work is cut in two, and the miter gage and work are pulled back to the startingpoint. Before pulling the work back it is good practice to give the work a little sideways shift to move the work slightlyaway from the saw blade. Never pick up any short length of free work from the table while the saw is running.WARNING: NEVER USE THE FENCE AS A CUT-OFF GAGE WHEN CROSS-CUTTING.For added safety and convenience the miter gage canbe fitted with an auxiliary wood-facing. This auxiliarywood-facing can be fastened to the front of the mitergage by using two wood screws through the slotsprovided in the miter gage body and into the woodfacing.RIPPINGRipping is the operation of making a length-wise cutthrough a board, as shown in Fig. 33, and the rip fence(A) is used to position and guide the work. One edge ofthe work rides against the rip fence while the flat side ofthe board rests on the table. Since the work is pushedalong the fence, it must have a straight edge and makesolid contact with the table. The saw guard mustalways be used. The guard has anti-kickback fingers tohelp prevent kickback and a spreader to help preventthe saw kerf from closing and binding the blade.Start the motor and advance the work, holding it downagainst the fence. Never stand in the line of the saw cutwhen ripping. Hold the work with both hands and push italong the fence and into the saw blade as shown in Fig.33. After the workpiece is on the table the work can thenbe fed through the saw blade with one hand, as shown inFig. 34. After the work is beyond the saw blade and antikickbackfingers the feed can continue to the end of thetable, after which the work is lifted and brought backalong the outside edge of the fence. The cut-off stockremains on the table or tilts up slightly and is caught bythe rear end of the guard or slides off the table to thefloor. If the cut-off stock remains on the table it is nottouched with the hands until the saw blade is stopped,unless it is a large piece allowing safe removal. Whenripping boards longer than three feet, it is recommendedthat a work support be used at the rear of the saw tokeep the workpiece from falling off the saw table.14Fig. 32Fig. 33Fig. 34


