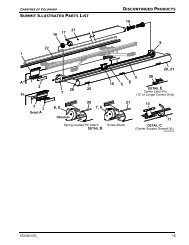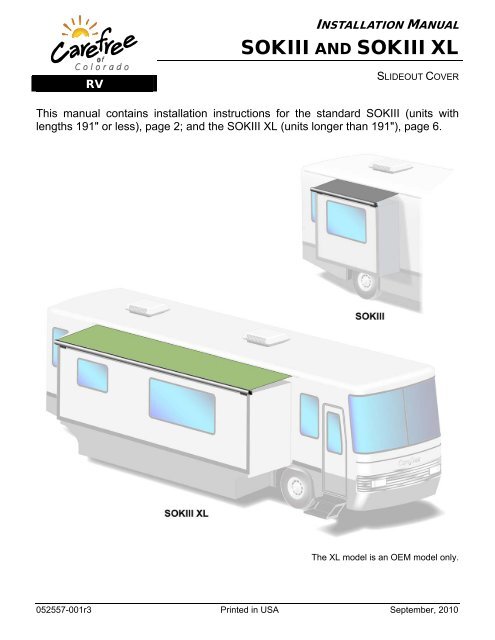
SOKIII Installation - Carefree of Colorado
SOKIII Installation - Carefree of Colorado
SOKIII Installation - Carefree of Colorado

Create successful ePaper yourself
Turn your PDF publications into a flip-book with our unique Google optimized e-Paper software.
<strong>Carefree</strong> <strong>of</strong> <strong>Colorado</strong>NOTES:<strong>SOKIII</strong>6 052557-001r3
<strong>Carefree</strong> <strong>of</strong> <strong>Colorado</strong>SETTING THE DEFLECTOR MOUNTING BRACKETS<strong>SOKIII</strong>1“ min, 12” max(typ)3/8” MaxDetail A8”-9”7”max. 1”min.Optional Spacer#12 x 1 Self Drilling ScrewEvenly SpaceEvenly SpaceDo Not Use Slot forMounting ScrewsDetail BBracket CoverDeflectorMounting Bracket(qty: 3 for units 282” or less5 for units 283” or Longer)SOKiii007Figure 12. Setting the Deflector Brackets.NOTE: If the thickness <strong>of</strong> the room flange exceeds the 3/8" maximum as shown in detail A, a 1/4"spacer is available. Spacer is ordered separately.4. Vertically position the bottom <strong>of</strong> deflector brackets on the room face 8"-9" below the centerline <strong>of</strong> the awningrail. Horizontally position the brackets as shown above.NOTE: The bottom <strong>of</strong> the brackets must not be positioned more than 7" below the top <strong>of</strong> theflange or less than 1" from the top <strong>of</strong> the room5. Horizontally position the brackets as shown above. The center bracket must be positioned so that the centersplice <strong>of</strong> the defector will rest near the center <strong>of</strong> the bracket. For units with 5 brackets; the middle bracketsmay be adjusted ± 12" to avoid vents or other projections.6. Attach the brackets. Using a quality silicone sealant, coat the mounting surface <strong>of</strong> the bracket with particular attentionaround the mounting holes. Use #12 x 1 self-drilling screws. (5 per bracket).7. Snap the bracket cover on to the bracket to cover the screw heads. The tab on the back <strong>of</strong> the cover goesinto the slotted hole <strong>of</strong> the bracket.NOTE: If it is necessary to remove the cover after installation, slidea small pin (e.g. paper clip) in the end under the cover. Liftthe locking tab and gently pull out the end <strong>of</strong> the cover.Repeat for other side <strong>of</strong> the cover.PinLockingTabSOK3013Figure 13. Removing theCover.8 052557-001r3
<strong>Carefree</strong> <strong>of</strong> <strong>Colorado</strong>INSTALLING THE ROLL BAR ASSEMBLY<strong>SOKIII</strong>NOTE: Because <strong>of</strong> the length and weight <strong>of</strong> the rollbar and fabric, it will be necessary to have 3 people toinstall the rollbar; one person at each end, with the third person to support the center.3/16 Pop Rivet(qty: 4)FabricRoll Bar SpliceRight Side(With Sprockets)SpringLocking PinBlackPolycordLeft Side(With Threaded Insert)Detail AARoll Bar Assy#6 x 3/8 ScrewThru Polyrod IntoRoll Bar (2 plcs)1/4-20 x 3/4ScrewDetail BDetail CSOK3033bFigure 15. Installing the Roll Bar Assembly.9. Close the room if open.10. (Detail A) Slide the two roll bar halves together. The splice is a tension fit. It may be necessary to tap oneend <strong>of</strong> the roll bar to press the two halves together. Align the predrilled rivet holes in the roll bar and splice.CAUTIONUSE CARE TO NOT BEND OR DISTORT THE ROLLBAR. IF IT IS NECESSARY TO TAP THE END OF THE ROLL BAR, USECARE TO NOT DAMAGE THE ENDCAP.11. Attach the roll bar half to the splice using four (4) 3/16" pop rivets.NOTE: If the rivets holes are slightly misaligned, use a #10 drill bit and ream the holes to allowthe pop rivet to be pushed in.12. Unfold the fabric and slide the edge <strong>of</strong> the fabric (edge with black polycord) into the rollbar. The fabriccan only be inserted from the left side <strong>of</strong> the rollbar.13. (Detail B) Center the fabric on the roll bar and secure using two (2) #6 x 3/8 phillips head screwsthrough the polycord and rollbar. Do not put the screws through the fabric.14. Roll the fabric onto the rollbar. The fabric must be oriented around the roll bar as shown.15. (Detail C) Slide the white polyrod and fabric into the awning rail. Center the fabric over the room.16. Roll up the slack material onto the roll bar.17. Slide the right end <strong>of</strong> the roll bar into the right end cap then set the left end <strong>of</strong> the roll bar into the leftend cap. Attach with one (1) 1/4-20 x 3/4 socket head screw through the left end cap.18. Remove the spring locking pin from the roll bar. This is locatedon the right end <strong>of</strong> the roll bar.19. Open and close the room to ensure that the fabric is rolling upstraight on the rollbar.20. Secure the fabric to the awning rail using two #6 x 3/8 screwsthrough the adaptor and fabric.Awning RailFabric1"Polyrod#6 x 3/8ScrewSOK3034aFigure 16. Securing the Fabric.10 052557-001r3
<strong>Carefree</strong> <strong>of</strong> <strong>Colorado</strong>ATTACHING THE FRONT COVER<strong>SOKIII</strong>Mounting HolesLatch LeverCenter Latch PinDetail BCover Retaining Screw(4 plcs)BASpring-LoadedAttach PinsCotter PinDetail ACenter CoverMountSOK3025fFigure 17. Attaching the Front Cover.5. Insert the center cover mount into the deflector splice and around the rolled fabric. Secure with the cotter pinremoved earlier.6. Examine the two cover halves. One half has spring loaded attachment pins on one end, the secondhas none. Lift the first cover half with the pins and insert the pins through the mounting holes <strong>of</strong> thecenter cover support.7. Align the cover with the end cap and screw the cover retaining 1/4-20 x 1 1/2 socket head screwsthrough the end cap and into the cover. Hand-tighten only.NOTE: The bottom screw holes in the end caps are threaded at the factory. It will benecessary to force-thread the top holes in the end cap using the supplied screws.8. Lift the second cover half up and slide the inside end onto the protruding attach pins <strong>of</strong> the first cover.9. Align the second cover with the end cap and screw the cover retaining screws through the end cap andinto the cover. Hand-tighten only.10. Locate the latch lever at the center <strong>of</strong> the covers. Using a screw driver or similar tool, push the lever tothe left and hold; pres the cover into position then release the latch lever. The latching pin is springloaded and will slide into the locking channel.Cover BumpersThe <strong>SOKIII</strong> cover is shipped with bumpers to prevent rattling. Quantities are three (3) for units under 14'and five (5) for units 14' and longer.To replace missing or damaged bumpers:3. In the positions shown, fully press the first round section into the inner slot. This is the same slot thatthe latch springs are mounted in. Please note the orientation <strong>of</strong> the bumper.Tip: Press one end <strong>of</strong> the bumper into the slot. While holding the bumper in place, gently stretch thebumper. This will temporarily make the diameter smaller and easier to press into the slot.4. Stretch the bumper around and press the second round section into the outer slot.BumperOuter SlotInner SlotIntermediate Bumpers Used On14’ Lengths and Longer0” - 3/4”1/4 Deflector Length(typ)4”(typ)(Cover Shown in Raised Position)SOK3039a11 052557-001r3
<strong>Carefree</strong> <strong>of</strong> <strong>Colorado</strong><strong>SOKIII</strong>INSTALLER'S NOTE: WHEN COMPLETED WITH THE INSTALLATION, CUT OFF THE LAST SHEET OF THISMANUAL AND PLACE WITH THE COACH OWNER INFORMATION.12 052557-001r3
OWNER INFORMATION<strong>SOKIII</strong>RVSLIDEOUT COVER‣ Automatically opens and closes with the room.‣ Shades the top <strong>of</strong> the room to help cool the interior.‣ The positive slope protects the room from water, dirtand debris when the room is extended.‣ No anti-billow or locking devices required.MAINTENANCEMaintaining the <strong>Carefree</strong> Ascent is easy. Just follow these basic steps: Periodically check that the fasteners are tight. Tighten if necessary. Keep the awning fabric clean.FABRIC CARECAUTIONDO NOT USE OIL BASED CLEANERS OR ANY CAUSTIC, GRANULATED, OR ABRASIVE TYPE CLEANERS ON YOURCAREFREE PRODUCT.1. One <strong>of</strong> the best ways to keep the fabric looking good and to delay the need for deep or vigorouscleanings is to hose fabrics <strong>of</strong>f on a monthly basis with clear water. This practice will help prevent dirtfrom becoming deeply imbedded in the fabric. In most environments, a thorough cleaning is onlyrequired every two to three years.2. When it’s time for a thorough cleaning, the fabric can be cleaned while still on the coach. For Vinyl Fabric – Use a s<strong>of</strong>t brush and warm water with soap. For Acrylic Fabric – Use a stiff brush and warm water with soap.3. When cleaning the fabric, it is important to observe the following: Always use a natural soap, never detergent. Water should be cold to lukewarm, never more than 100F. Air-dry only. Never apply heat to the fabric. Always allow the fabric to dry thoroughly before rolling up the awning.MildewMildew is a fungus growth that looks like dirt. Vinyl coated polyester fabrics are mildew resistant because<strong>of</strong> a chemical biocide in the vinyl coating. Under ordinary conditions, mildew will not appear. However, inareas where high temperature and humidity are common, mildew can be a problem and required thematerial to be cleaned more frequently. Thoroughly rinse the fabric with clean water and allow to air drycompletely before rolling up the fabric.052557-001r3 A
<strong>Carefree</strong> <strong>of</strong> <strong>Colorado</strong> Owner Information <strong>SOKIII</strong>CAREFREE MAJOR PRODUCT LIMITED WARRANTY<strong>Carefree</strong> <strong>of</strong> <strong>Colorado</strong> (hereafter referred to as <strong>Carefree</strong>) warrants to the first retail Purchaser that the<strong>Carefree</strong> Product is free <strong>of</strong> defects in material and workmanship within the terms and conditions as set forthin the warranty statement available online at www.carefree<strong>of</strong>colorado.com. <strong>Carefree</strong>’s obligation under thiswarranty is limited to the repair or replacement, at <strong>Carefree</strong>’s option, <strong>of</strong> any defective component with newor factory refurbished components.OWNER MUST RETAIN THE ORIGINAL PROOF OF PURCHASE AND/OR HAVE THE PRODUCT WARRANTYREGISTRATION ON FILE AT CAREFREE FOR WARRANTY CLAIMS.THIS WARRANTY IS NOT TRANSFERABLE.For- Warranty Duration;- Warranty Coverage and Exclusions;- Warranty Terms <strong>of</strong> Coverage; and,- Warranty Claim ProceduresRefer to publication052580-111 "<strong>Carefree</strong> Major Product Limited Warranty"available online atwww.carefree<strong>of</strong>colorado.comRegister your <strong>Carefree</strong> products on-line at www.carefree<strong>of</strong>colorado.comIMPORTANT NOTICE: It is strongly recommended that adjustments and repairs be performed bytrained technicians at your Authorized <strong>Carefree</strong> Dealer. Work performed by non-authorizedpersons or businesses may void warranty.<strong>Carefree</strong> <strong>of</strong> <strong>Colorado</strong> 2145 W. 6 th Avenue Broomfield, CO 80020a Scott Fetzer companywww.carefree<strong>of</strong>colorado.com052557-001r2 B September, 2010