Patio Awning Service Manual - Carefree of Colorado
Patio Awning Service Manual - Carefree of Colorado
Patio Awning Service Manual - Carefree of Colorado
- No tags were found...

You also want an ePaper? Increase the reach of your titles
YUMPU automatically turns print PDFs into web optimized ePapers that Google loves.
MANUAL PATIO AWNINGS <strong>Service</strong> <strong>Manual</strong> <strong>Carefree</strong> <strong>of</strong> <strong>Colorado</strong>CANOPY REPLACEMENTWARNINGTHIS PROCEDURE REQUIRES WORKING WITH THE ROLLER SPRINGS. OBSERVE ALL CAUTIONS. FAILURE TOFOLLOW THE INSTRUCTIONS CAN RESULT IN PERSONAL INJURY AND PROPERTY DAMAGE.FabricRetaining ScrewTrim Polycord1” From FabricSubtractWindsAddEndPlugViceGripsUpper MountingBracketFabric Retaining ScrewFeeder1-Piece FabricTrim Polycord1” From FabricStandardRoll BarUtilityRoll BarFigure 1. Canopy Replacement.2-Piece FabricFeederSF015REMOVING THE OLD CANOPY1. Remove the fabric retaining screws located in the rollbar and the awning rail (4 in total). Set screws aside.2. Extend the awning out completely.3. On the right side, lift and lock the upper brace in position. As a precaution, tape the roller lock in theopen position.4. On the left side <strong>of</strong> the awning, remove the upper mounting bracket from the coach wall. Allow the braceto pivot out <strong>of</strong> the way.5. On the left arm, grasp the end plug firmly with vice grips. Pad the grip teeth to prevent damage ormarring on the end plug.CAUTIONWHEN REMOVED FROM THE ARM, THE SPRING IS UNDER EXTREME TENSION AND WILL UNWIND QUICKLY. KEEPHANDS AND CLOTHING CLEAR WHILE FIRMLY HOLDING THE VICE GRIPS! DO NOT TRY TO HOLD BY HAND.6. Remove the attaching screw and remove the end plug from the arm while firmly holding onto the vice grips. It will be necessary to hold onto the arm and move it out <strong>of</strong> the way when the end plug is removed. It will be necessary to support the roll bar.7. Carefully count the number <strong>of</strong> turns while unwinding the spring. To unwind, rotate the end plug over thetop and towards the coach.8. Remove the screws attaching the end cap to the roll bar.9. Remove the spring from the roll bar and set aside.10. Mark the slots that the canopy is mounted in then slide the old canopy out from the roll bar and awning rail.2 052876-301r1
<strong>Carefree</strong> <strong>of</strong> <strong>Colorado</strong> <strong>Service</strong> <strong>Manual</strong> MANUAL PATIO AWNINGSINSTALLING THE NEW CANOPY1. Clean and deburr the roll bar slots and awning rail as required. If not previously done, spread open theawning rail track to facilitate inserting the new fabric.Tip: Lightly spraying the slots with a dry silicone lubricant will help the fabric slide into the slot withoutstaining the material.2. Position the fabric feeders on the roll bar. Be sure to use the same slots as the old canopy.3. Slide the new canopy into the awning rail and roll bar simultaneously. Center on the roll bar. For a one piece canopy it will be necessary to slide the canopy and valance at the same time. For two piece replacements, slide the canopy in first then slide the valance into the second slot.4. Remove the feeders.5. Slide the spring into the roll bar. Align the end cap on the roll bar then press onto the roll barcompletely. The roll bar should bottom out inside the cap.6. Attach the end cap to the roll bar with the screws removed previously.7. Grasp the end plug with vice grips and turn the spring to add winds. To wind, rotate the end plug overthe top and away from the coach. The number <strong>of</strong> turns must equal the same as the number removedpreviously.CAUTIONTHE SPRING IS UNDER EXTREME TENSION; WHEN THE END PLUG IS NOT ATTACHED TO THE ARM CHANNEL THESPRING WILL UNWIND QUICKLY. KEEP HANDS AND CLOTHING CLEAR WHILE FIRMLY HOLDING THE VICE GRIPS!DO NOT TRY TO HOLD THE END PLUG BY HAND.8. Place the end plug over the arm channel and attach using the screw removed previously. Remove thevice grips.9. Loosely attach the upper mounting bracket to the coach.10. Inspect the awning. Adjust the canopy position to remove wrinkles with the canopy square to the rollbar.11. Release the upper brace on the right side <strong>of</strong> the awning and remove the tape from the locking lever.12. SLOWLY roll up the awning while watching the left arm and brace. Use the slots in the upper mountingbracket to adjust the brace position so that the brace and arm nestle together properly.13. Tighten the upper mounting bracket screws.14. Extend and retract the awning several times to confirm that the canopy is rolling up straight. Thensecure the fabric using the fabric retaining screws removed previously.The upper screws go through the awning rail, fabric and polycord approximately 1" in from the edge<strong>of</strong> the fabric.The roll bar screws go into the slot and through the polycord on the outside edge <strong>of</strong> the fabric.052876-301r1 3
MANUAL PATIO AWNINGS <strong>Service</strong> <strong>Manual</strong> <strong>Carefree</strong> <strong>of</strong> <strong>Colorado</strong>SPRING REPLACEMENTWARNINGTHESE PROCEDURES REQUIRE WORKING WITH THE ROLLER SPRINGS. OBSERVE ALL CAUTIONS. FAILURE TOFOLLOW THE INSTRUCTIONS CAN RESULT IN PERSONAL INJURY AND PROPERTY DAMAGE.REPLACING THE LEFT SPRING ASSEMBLY1. Extend the awning out completely.2. On the right side, lift and lock the upper brace in position. Tape the roller lock in the OPEN position.3. On the left arm, grasp the end plug firmly with vice grips. Pad the grip teeth to prevent damage ormarring on the end plug.CAUTIONWHEN REMOVED FROM THE ARM, THE SPRING IS UNDER EXTREME TENSION AND WILL UNWIND QUICKLY. KEEPHANDS AND CLOTHING CLEAR WHILE FIRMLY HOLDING THE VICE GRIPS! DO NOT TRY TO HOLD BY HAND.4. Remove the attaching screw and remove the end plug from the armwhile firmly holding onto the vice grips. It will be necessary to hold onto the arm and move it out <strong>of</strong>the way when the end plug is removed.ViceGripsSubtract It will be necessary to support or hold the roll bar during the Windsrest <strong>of</strong> the procedures.5. Unwind the spring. To unwind, rotate the end plug over the topand towards the coach.CAUTIONA BROKEN SPRING CAN STILL RETAIN WINDS UNDER TENSION.6. Remove the screws attaching the end cap to the roll bar. Setscrews aside.7. Remove the spring from the roll bar and set aside.8. Slide the new spring into the roll bar. Align the end cap on theroll bar then press onto the roll bar completely. The roll barshould bottom out inside the cap.9. Attach the end cap to the roll bar with the screws removedpreviously.10. Grasp the end plug with vice grips and turn the spring to addwinds. To wind, rotate the end plug over the top and away fromthe coach. One complete turn equals one wind. Use the springwind chart on page 6 for the correct number <strong>of</strong> winds.CAUTIONWHILE THE END PLUG IS NOT ATTACHED TO THE ARM CHANNEL, THE WOUND SPRING IS UNDER EXTREME TENSIONAND WILL UNWIND QUICKLY. KEEP HANDS AND CLOTHING CLEAR WHILE FIRMLY HOLDING THE VICE GRIPS!DO NOT TRY TO HOLD THE END PLUG BY HAND.11. Temporarily insert a cotter pin through the cap and spring (refer to Detail B).AddEndPlugDetail ASpringLock PinDetail BFigure 2. LH Spring.12. Slide the end plug over arm channel. Align the holes and secure using one (1) 1/4-20 x 7/16 QuadrexDrive screw.13. Remove the cotter pin and tape from the roller lock then release the upper brace.14. Slowly roll up the awning and observe that the braces and arms nestle together correctly. If necessary,loosen the screws holding the upper mounting bracket then use the slots in the bracket to adjust thebrace position so that the brace and arm nestle together properly.SF0174 052876-301r1
<strong>Carefree</strong> <strong>of</strong> <strong>Colorado</strong> <strong>Service</strong> <strong>Manual</strong> MANUAL PATIO AWNINGSREPLACING THE RIGHT SPRING ASSEMBLY1. Extend the awning out completely.2. On the left side, lift and lock the upper brace in position. Insert a cotter pin through the cap and spring (refer toDetail A).3. On the right arm, grasp the end plug firmly with vice grips. Pad the grip teeth to prevent damage ormarring on the end plug.CAUTIONWHEN REMOVED FROM THE ARM, THE SPRING IS UNDER EXTREME TENSION AND WILL UNWIND QUICKLY. KEEPHANDS AND CLOTHING CLEAR WHILE FIRMLY HOLDING THE VICE GRIPS! DO NOT TRY TO HOLDTHE END PLUG BYHAND.4. Remove the attaching screw and remove the end plug fromthe arm while firmly holding onto the vice grips. It will be necessary to hold onto the arm and move itout <strong>of</strong> the way when the end plug is removed. It will be necessary to support or hold the roll barduring the rest <strong>of</strong> the procedures.5. Place the roller lock in the CLOSE position then unwindthe spring. To unwind, rotate the end plug over the topand towards the coach.CAUTIONA BROKEN SPRING CAN STILL RETAIN WINDS UNDER TENSION.6. Remove the screws attaching the end cap to the rollbar. Set screws aside.7. Remove the spring from the roll bar and set aside.8. Slide the new spring into the roll bar. Align the end capon the roll bar then press onto the roll bar completely.The roll bar should bottom out inside the cap.9. Attach the end cap to the roll bar with the screws removedpreviously.SpringLock PinDetail AWindsAddSubtract10. Place the roller lock in the OPEN position then grasp the end plug with vice grips and turn the spring to addwinds. To wind, rotate the end plug over the top and away from the coach. One complete turn equals onewind. Use the chart on page 6 for the correct number <strong>of</strong> winds.CAUTIONWHILE THE END PLUG IS NOT ATTACHED TO THE ARM CHANNEL, THE WOUND SPRING IS UNDER EXTREME TENSIONAND WILL UNWIND QUICKLY. KEEP HANDS AND CLOTHING CLEAR WHILE FIRMLY HOLDING THE VICE GRIPS! DONOT TRY TO HOLD THE END PLUG BY HAND.1. For Simplicity Slide the end plug over arm channel. Align the holes and secure using one (1) 1/4-20 x7/16 Quadrex Drive screw.2. For Spirit and Fiesta: Hook the remote lock over the brake lever while sliding the end plug over the arm. Alignthe holes in the arm and end plug and secure using one (1) 1/4-20 x 7/16 Quadrex Drive screw.Tip: Slide the remote lock up until it protrudes over the arm. Hook the remote over the brake lever.Allow the remote lock to slide back into the channel while sliding the end plug over the arm channel.EndPlugDetail BFigure 3. RH Spring.ViceGripsRemote Lock(Spirit & Fiesta Only)11. Slowly roll up the awning and observe that the braces and arms nestle together correctly. If necessary,loosen the screws holding the upper mounting bracket then use the slots in the bracket to adjust thebrace position so that the brace and arm nestle together properly.SF018052876-301r1 5
MANUAL PATIO AWNINGS <strong>Service</strong> <strong>Manual</strong> <strong>Carefree</strong> <strong>of</strong> <strong>Colorado</strong>SPRING WIND CHARTLength <strong>of</strong> <strong>Awning</strong> Winds w/ <strong>Awning</strong> Closed Winds w/ <strong>Awning</strong> Open7' 11" or less 6 148' – 12' 5 1312' 1" – 18' 7 1518' 1" and longer 8 16 To wind, rotate the end plug over the top and away from the coach. To unwind, rotate the end plug over the top and towards the coach.REMOTE LOCK REPLACEMENT (SPIRIT AND FIESTA ONLY)1. Open the awning. On the left arm, raise and lock the upper brace in position. Do not forget to tightenthe black lock knob.NOTE: As an additional safety, align the cotter pin holes in the LH cap and spring and temporarilyinsert a lock pin through the hole (reference Detail A in Figure 3 on page 5). This willprevent the awning from closing if the upper brace is not adequately tightened.2. On the right side, tape the roller lock lever in the OPEN position.CAUTIONTHE ROLLER LOCK MUST STAY IN THE OPEN POSITION. IF THE LEVER IS PUSHED TO THE CLOSE POSITION WHILETHE END PLUG IS NOT ATTACHED TO THE ARM CHANNEL, THE WOUND SPRING WILL UNWIND QUICKLY WITHSIGNIFICANT FORCE. PERSONAL INJURY AND/OR PROPERTY DAMAGE COULD OCCUR.3. (Detail A) Detach the end plug and lift <strong>of</strong>f <strong>of</strong> thearm channel. Unhook the old remote lock stirrupfrom the lock lever while lifting the roll bar. It will be necessary to hold onto the armwhen the end plug is removed. It will be necessary to support or hold theroll bar during the next two steps.4. Slide the old remote lock out <strong>of</strong> the roundgroove <strong>of</strong> the right arm.5. Clean the groove then slide the new remotelock in. Allow the lock to protrude over thearm channel.Roller LockLeverDETAIL ARight Arm Assy6. Lift the roll bar over the arm channel and hook the remote lock stirrup over the lever. Slide the remotelock into the channel while sliding the end plug onto the arm.7. Align the holes and secure the end plug with the screw removed previously.8. Remove cotter pin (if installed) and the tape used to hold the lock lever in place.DETAIL BRemote LockFigure 4. Remote Lock Installation.Remote LockRound GrooveSF0206 052876-301r1
<strong>Carefree</strong> <strong>of</strong> <strong>Colorado</strong> <strong>Service</strong> <strong>Manual</strong> MANUAL PATIO AWNINGSSTANDARD MAINTENANCEMaintaining the <strong>Carefree</strong> <strong>Manual</strong> <strong>Patio</strong> <strong>Awning</strong> is easy. Just follow these basic steps: Always operate the awning according to the instructions. Periodically check that the fasteners are tight. Tighten if necessary. Keep the awning fabric and arms clean.FABRIC CARECAUTION DO NOT USE OIL BASED CLEANERS OR ANY CAUSTIC, GRANULATED, OR ABRASIVE TYPECLEANERS ON YOUR CAREFREE PRODUCT.1. One <strong>of</strong> the best ways to keep the fabric looking good and to delay the need for deep or vigorouscleanings is to hose fabrics <strong>of</strong>f on a monthly basis with clear water. This practice will help prevent dirtfrom becoming deeply imbedded in the fabric. In most environments, a thorough cleaning will beneeded every two to three years.2. When it’s time for a thorough cleaning, the fabric can be cleaned while still on an awning frame. For Vinyl Fabric – Use a s<strong>of</strong>t brush and warm water with soap. For Acrylic Fabric – Use a stiff brush and warm water with soap.3. When cleaning the fabric, it is important to observe the following: Always use a natural soap, never detergent. Water should be cold to lukewarm, never more than 100F. Air-dry only. Never apply heat to the fabric. Always allow the fabric to dry thoroughly before rolling up the awning.MildewMildew is a fungus growth that looks like dirt. Vinyl coated polyester fabrics are mildew resistant because<strong>of</strong> a chemical biocide in the vinyl coating. Under ordinary conditions, mildew will not appear. However, inareas where high temperature and humidity are common, mildew can be a problem and required thematerial to be washed more frequently. Thoroughly rinse the fabric with clean water and allow to air drycompletely before rolling up the awning.PoolingWhen water collects on the top <strong>of</strong> the fabric, this is known as "pooling". This can occur during inclementweather or if a running air conditioner discharges over the awning. The water is dumped when the awningis retracted. It is recommended that if water accumulates on the top, briefly retract the awning to dump thewater. This will help prevent the fabric from stretching or distorting.LeakingOn vinyl canopies, side hems and poly cords are stitched in with a sewing machine. On occasion, this stitching mayallow water to seep or leak through the stitches. This is normal and not a defect covered by warranty. Treat theseams with a quality seam sealer.ARM CAREThe best method <strong>of</strong> keeping the arms and braces operating smoothly is to clean them. Dirt and debris cancause the channels not to slide easily.Periodically wash out the channels with running water (i.e. a hose) to keep them clean. If the channels stilldo not slide easily, lightly spray the inside <strong>of</strong> the channels with a dry silicone lubricant, after the arms havebeen cleaned and dried thoroughly.Hardware Maintenance Replace any parts that become damaged. Periodically check all mounting hardware, screws, lags, etc., and re-tighten when necessary. Locking knobs should be periodically loosened and removed then sprayed with a dry lubricant toprevent binding and locking.052876-301r1 7
MANUAL PATIO AWNINGS <strong>Service</strong> <strong>Manual</strong> <strong>Carefree</strong> <strong>of</strong> <strong>Colorado</strong>PART NUMBER LISTINGSPIRIT FX & FIESTA PART NUMBER CONFIGURATIONExample: Part Number: 2 5 1 8 7 9 7 9STYLE CODE SIZE CANOPY COLOR FABRIC WRAP TYPE/COLOR25 18 79 79SPIRIT FX Vinyl w/ Black Castings 18’ Length Ocean Blue Vinyl Ocean Blue/Cream WeatherguardSPIRIT FX25 = Vinyl or Polyweavew/ Black CastingsDV = Vinyl or Polyweavew/ White Castings26 = Acrylic w/ Alumaguard Ltdw/ Black CastingsDW = Acrylic w/ Alumaguard Ltdw/ White CastingsFIESTA86 = Vinyl or Polyweavew/ Black Castings Up To 21’EP = Vinyl or Polyweavew/ Black Castings Over 21’EA = Vinyl or Polyweavew/ White Castings Up To 21’ER = Vinyl or Polyweave w/White Castings Over 21’SA = Vinyl or Polyweavew/ Alumaguardw/ Black Castings Up To 21’SB = Vinyl or Polyweavew/ Alumaguardw/ Black Castings Over 21’SE = Vinyl or Polyweavew/ Alumaguardw/ White Castings Up To 21’SF = Vinyl or Polyweave. WithAlumaguard/White Castings Over 21’AB = Acrylic w/ Alumaguard LtdW /Black Castings Up To 21’ET = Acrylic w/ Alumaguard Ltdw/ Black Castings Over 21’EB = Acrylic w/ Alumaguard Ltdw/ White Castings Up To 21’EU = Acrylic w/ Alumaguard Ltdw/ White Castings Over 21’8’9’10’11’12’13’14’15’16’17’18’19’20’21’22’23’24’25’VINYLRefer to Sales and OrderInformation for Color Availabilityand Color CodesCUSTOM GRAPHICSRefer to Sales and OrderInformation for Color Availabilityand Color CodesACRYLICRefer to Sales and OrderInformation for Color Availabilityand Color CodesAVAILABLE IN HORIZONTALOR VERTICAL STRIPE ORSOLID.CUSTOM ACRYLIC140 custom colors are availableRefer to Sales and OrderInformation for Color Availabilityand Color CodesVINYLRefer to Sales and Order Information for ColorAvailability and Color CodesALUMAGUARDRefer to Sales and Order Information for ColorAvailability and Color Codes8 052876-301r1
<strong>Carefree</strong> <strong>of</strong> <strong>Colorado</strong> <strong>Service</strong> <strong>Manual</strong> MANUAL PATIO AWNINGSSIMPLICITY PART NUMBER CONFIGURATIONExample: Part Number: 77217900STYLE CODE SIZE CANOPY COLOR FABRIC WRAP TYPE/COLOR77 21 79 00Simplicity <strong>Awning</strong> 21' Length Ocean Blue White Weatherguard77 =VINYLSimplicity <strong>Awning</strong> - All8’9’10’11’12’13’14’15’16’17’18’19’20’21’VINYLRefer to Sales and OrderInformation for specific coloravailability and color codes00 = WHITE(xx) = MATCHING COLORPART NUMBER/SERIAL NUMBER LOCATIONLeft ArmRight ArmSF014The arm part numbers/serial numbers are located on the inside <strong>of</strong> the lower arm channel.• The roll bar part numbers/serial numbers are located on the roller tube and the valance care label.052876-301r1 9
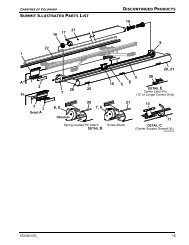
MANUAL PATIO AWNINGS <strong>Service</strong> <strong>Manual</strong> <strong>Carefree</strong> <strong>of</strong> <strong>Colorado</strong>SPIRIT FX AND FIESTA ILLUSTRATED PARTS LIST22a22b18192423StandardRoll BarUtilityRoll Bar21191842011892515 161722378“L”14131052691215161726561SF501sm10 052876-301r1
MANUAL PATIO AWNINGS <strong>Service</strong> <strong>Manual</strong> <strong>Carefree</strong> <strong>of</strong> <strong>Colorado</strong>SIMPLICITY ILLUSTRATED PARTS LIST15162018161531796721193812 1311146422257141012513141SF502sm12 052876-301r1
<strong>Carefree</strong> <strong>of</strong> <strong>Colorado</strong> <strong>Service</strong> <strong>Manual</strong> MANUAL PATIO AWNINGSItem Part Number Description Notes1 R00415-402-XX Arm Assy, 1/2 Set – Universal Right 12 R00416-402-XX Arm Assy, 1/2 Set – Universal Left 13 R00410-401-XX Upper Main Arm 14 R00412-401-XX Lower Main Arm (includes Item 6) 15 249104UP Carport Foot Unpainted6 R00532 Travel Strap7 901015W Handle, White901015 Handle, Black8 R00414-401-XX Lower Brace9 R00413-401-XX Upper Brace10 R00405 Brace Slider11 901022 Locking Knob12 R00935 Bottom Bracket13 R00716 Bottom Bracket, Shim pkg <strong>of</strong> 214 169037 Bottom Bracket Stand-Off Airstream15 249162UP Top Bracket16 249153 Top Bracket Stand-Off17 R00926MIL Spring Assy, RH 7' 11" or less 1,2R00925MIL Spring Assy, RH 8’-18’ 1R00926MIL Spring Assy, RH 18' 1" and longer18 R00923MIL Spring Assy, LH 8'-18' Width 1,2R00924MIL Spring Assy, LH 18' 1" and longer 1,219 19xx00 Roller Tube, 3-Slot 3 1/2" Dia20 Canopy Only Refer to Canopy Order Form21 901011 Pull Strap22 901035 Pull Wand 43"901035XL Pull Wand 61"The following items are not shownR012804-002 Hardware PackNotes: 1. XXX = Color -00 = Satin w/ unpainted Castings -50 = White w/ unpainted Castings-20 = Cameo w/ unpainted Castings2. <strong>Awning</strong>s 7'11" and shorter use only one RH spring, no left hand spring.052876-301r1 13
MANUAL PATIO AWNINGS <strong>Service</strong> <strong>Manual</strong> <strong>Carefree</strong> <strong>of</strong> <strong>Colorado</strong>NOTES:14 052876-301r1