ONE-Touch Retro-Fit Upgrade Instructions - Carefree of Colorado
ONE-Touch Retro-Fit Upgrade Instructions - Carefree of Colorado
ONE-Touch Retro-Fit Upgrade Instructions - Carefree of Colorado

You also want an ePaper? Increase the reach of your titles
YUMPU automatically turns print PDFs into web optimized ePapers that Google loves.
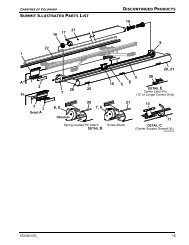
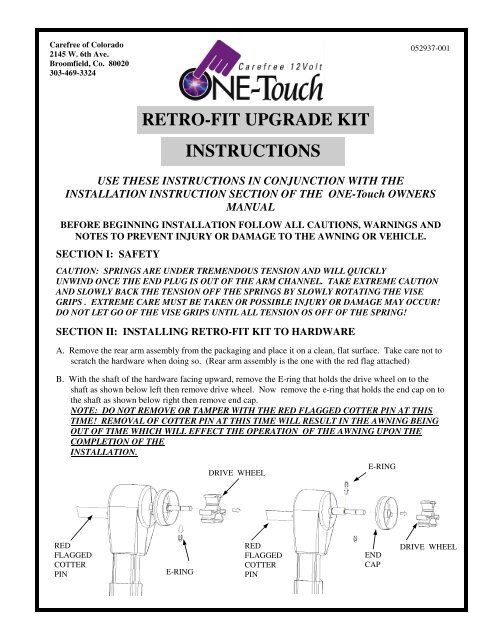
<strong>Carefree</strong> <strong>of</strong> <strong>Colorado</strong>2145 W. 6th Ave.Broomfield, Co. 80020303-469-3324052937-001RETRO-FIT UPGRADE KITINSTRUCTIONSUSE THESE INSTRUCTIONS IN CONJUNCTION WITH THEINSTALLATION INSTRUCTION SECTION OF THE <strong>ONE</strong>-<strong>Touch</strong> OWNERSMANUALBEFORE BEGINNING INSTALLATION FOLLOW ALL CAUTIONS, WARNINGS ANDNOTES TO PREVENT INJURY OR DAMAGE TO THE AWNING OR VEHICLE.SECTION I: SAFETYCAUTION: SPRINGS ARE UNDER TREMENDOUS TENSION AND WILL QUICKLYUNWIND ONCE THE END PLUG IS OUT OF THE ARM CHANNEL. TAKE EXTREME CAUTIONAND SLOWLY BACK THE TENSION OFF THE SPRINGS BY SLOWLY ROTATING THE VISEGRIPS . EXTREME CARE MUST BE TAKEN OR POSSIBLE INJURY OR DAMAGE MAY OCCUR!DO NOT LET GO OF THE VISE GRIPS UNTIL ALL TENSION OS OFF OF THE SPRING!SECTION II: INSTALLING RETRO-FIT KIT TO HARDWAREA. Remove the rear arm assembly from the packaging and place it on a clean, flat surface. Take care not toscratch the hardware when doing so. (Rear arm assembly is the one with the red flag attached)B. With the shaft <strong>of</strong> the hardware facing upward, remove the E-ring that holds the drive wheel on to theshaft as shown below left then remove drive wheel. Now remove the e-ring that holds the end cap on tothe shaft as shown below right then remove end cap.NOTE: DO NOT REMOVE OR TAMPER WITH THE RED FLAGGED COTTER PIN AT THISTIME! REMOVAL OF COTTER PIN AT THIS TIME WILL RESULT IN THE AWNING BEINGOUT OF TIME WHICH WILL EFFECT THE OPERATION OF THE AWNING UPON THECOMPLETION OF THEINSTALLATION.DRIVE WHEELE-RINGREDFLAGGEDCOTTERPINE-RINGREDFLAGGEDCOTTERPINENDCAPDRIVE WHEEL
<strong>ONE</strong>-<strong>Touch</strong> RETRO-FIT UPGRADE INSTRUCTIONS (cont.)D. Slide new end cap over shaft as shown below left. Secure end cap to shaft with previously removed e-ring.E. Slide new drive wheel over shaft as shown. Secure drive wheel to shaft with previously removed e-ring.F. Repeat the above steps Section III A through E with the front arm assembly.DRIVE WHEELE-RINGREDFLAGGEDCOTTERPINENDCAPREDFLAGGEDCOTTERPINENDCAPE-RINGSECTION III: REMOVING EXISTING HARDWARE AND SPRINGS:INSTALLING NEW <strong>ONE</strong>-TOUCH HARDWARE:A. Unroll existing awning one revolution.B. Remove the lower arms from the existing bottom brackets and extend lower arms to the ground.C. Remove bottom brackets and replace with the <strong>Carefree</strong> <strong>ONE</strong>-<strong>Touch</strong> bottom brackets.D. Remove rear top bracket screws.E. Attach vise grips to the rear spring assembly end plug. (End plug is the portion <strong>of</strong> the spring assembly thatsets down into the top <strong>of</strong> the arm channel.)F. Remove bolt or screw that attaches the spring assembly end plug to the arm channel.G. Grasp vise grips and carefully lift the end plug out <strong>of</strong> arm channel and slowly allow tension to unwind.CAUTION: SPRINGS ARE UNDER TREMENDOUS TENSION AND WILL QUICKLYUNWIND ONCE THE END PLUG IS OUT OF THE ARM CHANNEL. TAKE EXTREME CAUTION ANDSLOWLY BACK THE TENSION OFF THE SPRINGS BY SLOWLY ROTATING THE VISE GRIPS .EXTREME CARE MUST BE TAKEN OR POSSIBLE INJURY OR DAMAGE MAY OCCUR! DO NOT LETGO OF THE VISE GRIPS UNTIL ALL TENSION OS OFF OF THE SPRING!H. Remove screws or rivets that are attaching the end caps to the roller tube and remove spring from tube.I. Install rear <strong>ONE</strong>-<strong>Touch</strong> hardware to roller tube per the <strong>ONE</strong>-<strong>Touch</strong> Owners Manual. (see note at bottom <strong>of</strong> thispage) Attach foot <strong>of</strong> lower arm to the previously installed bottom bracket.J. Repeat steps D through I with front arm / spring assembly.K. Continue the remainder <strong>of</strong> the installation by referring to the <strong>ONE</strong>-<strong>Touch</strong> Owners Manual.NOTE: THE INSTALLATION OF THE <strong>ONE</strong> –<strong>Touch</strong> RETRO-FIT UPGRADE KIT IS NOW COMPLETE.NOW FOLLOW THE INSTALLATION STEPS IN THE <strong>ONE</strong>-<strong>Touch</strong> OWNERS MANUAL FOR THECOMPLETE <strong>ONE</strong>-<strong>Touch</strong> AWNING INSTALLATION! DURING INSTALLATION OF THE RETRO KIT TOAN EXISTING ROLLER TUBE, IT IS POSSIBLE THAT THE ROLLER TUBE END MAY HAVE GOTTENSLIGHTLY DEFORMED WHICH MAY REQUIRE SQUEEZING OR TAPPING THE ROLLER TUBE ENDBACK TO COMPLETE ROUND PRIOR TO INSTALLING END CAP.<strong>Carefree</strong> <strong>of</strong> <strong>Colorado</strong> 2145 West 6th Ave. Broomfield, Co. 80020 303-469-3324 052937-001