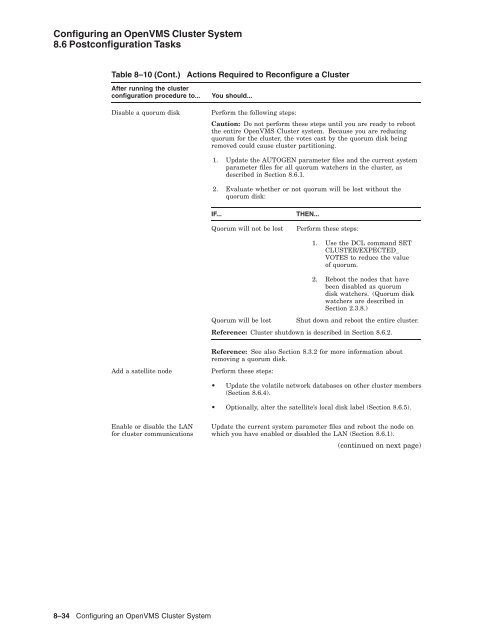
- Page 1 and 2:
OpenVMS Cluster Systems Order Numbe
- Page 3 and 4:
Contents Preface ..................
- Page 5 and 6:
4 The OpenVMS Cluster Operating Env
- Page 7 and 8:
6.5.4 Disk Rebuild Operation ......
- Page 9 and 10:
10 Maintaining an OpenVMS Cluster S
- Page 11 and 12:
D Sample Programs for LAN Control D
- Page 13 and 14:
G NISCA Transport Protocol Channel
- Page 15 and 16:
Tables 7-3 Clusterwide Generic Prin
- Page 17:
F-6 Channel Formation .............
- Page 20 and 21:
Appendix C provides troubleshooting
- Page 22 and 23:
xxii bold text This typeface repres
- Page 24 and 25:
Introduction to OpenVMS Cluster Sys
- Page 26 and 27:
Introduction to OpenVMS Cluster Sys
- Page 28 and 29:
Introduction to OpenVMS Cluster Sys
- Page 30 and 31:
Introduction to OpenVMS Cluster Sys
- Page 32 and 33:
Introduction to OpenVMS Cluster Sys
- Page 34 and 35:
Introduction to OpenVMS Cluster Sys
- Page 36 and 37:
OpenVMS Cluster Concepts 2.1 OpenVM
- Page 38 and 39:
OpenVMS Cluster Concepts 2.1 OpenVM
- Page 40 and 41:
OpenVMS Cluster Concepts 2.3 Ensuri
- Page 42 and 43:
OpenVMS Cluster Concepts 2.3 Ensuri
- Page 44 and 45:
OpenVMS Cluster Concepts 2.4 State
- Page 46 and 47:
OpenVMS Cluster Concepts 2.5 OpenVM
- Page 48 and 49:
OpenVMS Cluster Concepts 2.6 Synchr
- Page 50 and 51:
OpenVMS Cluster Concepts 2.8 Disk A
- Page 53 and 54:
3 OpenVMS Cluster Interconnect Conf
- Page 55 and 56:
OpenVMS Cluster Interconnect Config
- Page 57 and 58:
OpenVMS Cluster Interconnect Config
- Page 59 and 60:
OpenVMS Cluster Interconnect Config
- Page 61 and 62:
OpenVMS Cluster Interconnect Config
- Page 63 and 64:
OpenVMS Cluster Interconnect Config
- Page 65 and 66:
OpenVMS Cluster Interconnect Config
- Page 67 and 68:
4 The OpenVMS Cluster Operating Env
- Page 69 and 70:
Table 4-1 Information Required to P
- Page 71 and 72:
Table 4-1 (Cont.) Information Requi
- Page 73 and 74:
Table 4-2 Installing Layered Produc
- Page 75 and 76:
The OpenVMS Cluster Operating Envir
- Page 77 and 78:
The OpenVMS Cluster Operating Envir
- Page 79 and 80:
The OpenVMS Cluster Operating Envir
- Page 81 and 82:
The OpenVMS Cluster Operating Envir
- Page 83 and 84:
5 Preparing a Shared Environment In
- Page 85 and 86:
Preparing a Shared Environment 5.2
- Page 87 and 88:
Preparing a Shared Environment 5.3
- Page 89 and 90:
Preparing a Shared Environment 5.4
- Page 91 and 92:
Table 5-2 Alias Collisions and Outc
- Page 93 and 94:
Preparing a Shared Environment 5.4
- Page 95 and 96:
Preparing a Shared Environment 5.5
- Page 97 and 98:
Preparing a Shared Environment 5.6
- Page 99 and 100:
Preparing a Shared Environment 5.7
- Page 101 and 102:
Table 5-3 (Cont.) Security Files Fi
- Page 103 and 104:
Table 5-3 (Cont.) Security Files Fi
- Page 105 and 106:
Preparing a Shared Environment 5.10
- Page 107 and 108:
6 Cluster Storage Devices One of th
- Page 109 and 110:
Figure 6-1 Dual-Ported Disks Networ
- Page 111 and 112:
Figure 6-3 Configuration with Clust
- Page 113 and 114:
Cluster Storage Devices 6.2 Naming
- Page 115 and 116:
Cluster Storage Devices 6.2 Naming
- Page 117 and 118:
Cluster Storage Devices 6.2 Naming
- Page 119 and 120:
Cluster Storage Devices 6.2 Naming
- Page 121 and 122:
Cluster Storage Devices 6.2 Naming
- Page 123 and 124:
Cluster Storage Devices 6.2 Naming
- Page 125 and 126:
Cluster Storage Devices 6.2 Naming
- Page 127 and 128:
Cluster Storage Devices 6.3 MSCP an
- Page 129 and 130:
Cluster Storage Devices 6.4 MSCP I/
- Page 131 and 132:
Cluster Storage Devices 6.5 Managin
- Page 133 and 134:
Cluster Storage Devices 6.5 Managin
- Page 135 and 136:
Cluster Storage Devices 6.6 Shadowi
- Page 137 and 138: 7.1 Introduction 7 Setting Up and M
- Page 139 and 140: Setting Up and Managing Cluster Que
- Page 141 and 142: Figure 7-1 Sample Printer Configura
- Page 143 and 144: Figure 7-2 Print Queue Configuratio
- Page 145 and 146: Setting Up and Managing Cluster Que
- Page 147 and 148: Setting Up and Managing Cluster Que
- Page 149 and 150: Setting Up and Managing Cluster Que
- Page 151 and 152: Setting Up and Managing Cluster Que
- Page 153: Setting Up and Managing Cluster Que
- Page 156 and 157: Configuring an OpenVMS Cluster Syst
- Page 158 and 159: Configuring an OpenVMS Cluster Syst
- Page 160 and 161: Configuring an OpenVMS Cluster Syst
- Page 162 and 163: Configuring an OpenVMS Cluster Syst
- Page 164 and 165: Configuring an OpenVMS Cluster Syst
- Page 166 and 167: Configuring an OpenVMS Cluster Syst
- Page 168 and 169: Configuring an OpenVMS Cluster Syst
- Page 170 and 171: Configuring an OpenVMS Cluster Syst
- Page 172 and 173: Configuring an OpenVMS Cluster Syst
- Page 174 and 175: Configuring an OpenVMS Cluster Syst
- Page 176 and 177: Configuring an OpenVMS Cluster Syst
- Page 178 and 179: Configuring an OpenVMS Cluster Syst
- Page 180 and 181: Configuring an OpenVMS Cluster Syst
- Page 182 and 183: Configuring an OpenVMS Cluster Syst
- Page 184 and 185: Configuring an OpenVMS Cluster Syst
- Page 186 and 187: Configuring an OpenVMS Cluster Syst
- Page 190 and 191: Configuring an OpenVMS Cluster Syst
- Page 192 and 193: Configuring an OpenVMS Cluster Syst
- Page 194 and 195: Configuring an OpenVMS Cluster Syst
- Page 196 and 197: Configuring an OpenVMS Cluster Syst
- Page 199 and 200: 9 Building Large OpenVMS Cluster Sy
- Page 201 and 202: Building Large OpenVMS Cluster Syst
- Page 203 and 204: Table 9-3 (Cont.) Checklist for Sat
- Page 205 and 206: Building Large OpenVMS Cluster Syst
- Page 207 and 208: Building Large OpenVMS Cluster Syst
- Page 209 and 210: Table 9-8 (Cont.) Controlling Satel
- Page 211 and 212: Table 9-8 (Cont.) Controlling Satel
- Page 213 and 214: Potential Hot Files Methods to Help
- Page 215 and 216: Building Large OpenVMS Cluster Syst
- Page 217 and 218: Building Large OpenVMS Cluster Syst
- Page 219 and 220: 10 Maintaining an OpenVMS Cluster S
- Page 221 and 222: Maintaining an OpenVMS Cluster Syst
- Page 223 and 224: Example 10-1 Sample NETNODE_UPDATE.
- Page 225 and 226: Maintaining an OpenVMS Cluster Syst
- Page 227 and 228: Maintaining an OpenVMS Cluster Syst
- Page 229 and 230: • CLUSTER_SHUTDOWN • REBOOT_CHE
- Page 231 and 232: Maintaining an OpenVMS Cluster Syst
- Page 233 and 234: Maintaining an OpenVMS Cluster Syst
- Page 235 and 236: Maintaining an OpenVMS Cluster Syst
- Page 237 and 238: 10.12 Restoring Cluster Quorum Main
- Page 239 and 240:
Command Purpose Maintaining an Open
- Page 241:
Maintaining an OpenVMS Cluster Syst
- Page 244 and 245:
Cluster System Parameters A.1 Value
- Page 246 and 247:
Cluster System Parameters A.1 Value
- Page 248 and 249:
Cluster System Parameters A.1 Value
- Page 250 and 251:
Cluster System Parameters A.1 Value
- Page 252 and 253:
Cluster System Parameters A.1 Value
- Page 254 and 255:
Cluster System Parameters A.1 Value
- Page 256 and 257:
Cluster System Parameters A.1 Value
- Page 258 and 259:
Building Common Files B.1 Building
- Page 261 and 262:
C.1 Diagnosing Computer Failures C
- Page 263 and 264:
Table C-1 (Cont.) Sequence of Booti
- Page 265 and 266:
Step Action Cluster Troubleshooting
- Page 267 and 268:
Step Action Cluster Troubleshooting
- Page 269 and 270:
Cluster Troubleshooting C.3 Satelli
- Page 271 and 272:
Step Action Cluster Troubleshooting
- Page 273 and 274:
Table C-2 (Cont.) Alpha Booting Mes
- Page 275 and 276:
IF... THEN... The startup procedure
- Page 277 and 278:
Possible Bugcheck Causes Recommenda
- Page 279 and 280:
Cluster Troubleshooting C.10 Diagno
- Page 281 and 282:
Cluster Troubleshooting C.10 Diagno
- Page 283 and 284:
Cluster Troubleshooting C.10 Diagno
- Page 285 and 286:
Table C-5 Informational and Other E
- Page 287 and 288:
Entry Description Cluster Troublesh
- Page 289 and 290:
Entry Description Cluster Troublesh
- Page 291 and 292:
Entry Description Cluster Troublesh
- Page 293 and 294:
Table C-6 (Cont.) Port Messages for
- Page 295 and 296:
Table C-6 (Cont.) Port Messages for
- Page 297 and 298:
Table C-7 (Cont.) Port Messages for
- Page 299 and 300:
Table C-8 (Cont.) OPA0 Messages Har
- Page 301 and 302:
D Sample Programs for LAN Control S
- Page 303 and 304:
Sample Programs for LAN Control D.3
- Page 305 and 306:
Sample Programs for LAN Control D.5
- Page 307 and 308:
Sample Programs for LAN Control D.5
- Page 309 and 310:
Location Action Sample Programs for
- Page 311:
Sample Programs for LAN Control D.5
- Page 314 and 315:
Subroutines for LAN Control E.2 Sta
- Page 316 and 317:
Subroutines for LAN Control E.3 Sto
- Page 318 and 319:
Subroutines for LAN Control E.4 Cre
- Page 320 and 321:
Subroutines for LAN Control E.5 Cre
- Page 322 and 323:
Subroutines for LAN Control E.7 Sto
- Page 324 and 325:
Troubleshooting the NISCA Protocol
- Page 326 and 327:
Troubleshooting the NISCA Protocol
- Page 328 and 329:
Troubleshooting the NISCA Protocol
- Page 330 and 331:
Troubleshooting the NISCA Protocol
- Page 332 and 333:
Troubleshooting the NISCA Protocol
- Page 334 and 335:
Troubleshooting the NISCA Protocol
- Page 336 and 337:
Troubleshooting the NISCA Protocol
- Page 338 and 339:
Troubleshooting the NISCA Protocol
- Page 340 and 341:
Troubleshooting the NISCA Protocol
- Page 342 and 343:
Troubleshooting the NISCA Protocol
- Page 344 and 345:
Troubleshooting the NISCA Protocol
- Page 346 and 347:
Troubleshooting the NISCA Protocol
- Page 348 and 349:
Troubleshooting the NISCA Protocol
- Page 350 and 351:
Troubleshooting the NISCA Protocol
- Page 352 and 353:
Troubleshooting the NISCA Protocol
- Page 354 and 355:
Troubleshooting the NISCA Protocol
- Page 356 and 357:
Troubleshooting the NISCA Protocol
- Page 359 and 360:
G NISCA Transport Protocol Channel
- Page 361 and 362:
NISCA Transport Protocol Channel Se
- Page 363 and 364:
NISCA Transport Protocol Channel Se
- Page 365 and 366:
A Access control lists See ACLs ACL
- Page 367 and 368:
CLUSTER_AUTHORIZE.DAT files (cont
- Page 369 and 370:
Disks system (cont’d) creating du
- Page 371 and 372:
HSZ subsystems, 1-4 I Installation
- Page 373 and 374:
MODPARAMS.DAT file (cont’d) examp
- Page 375 and 376:
Packets capturing data, F-26 maximu
- Page 377 and 378:
SAVE_FEEDBACK option, 10-10 SCA (Sy
- Page 379 and 380:
System parameters (cont’d) MPDEV_
- Page 381:
Voting members, 2-6 adding, 8-10, 8


