to download the Shinko ACS-13A manual in PDF format
to download the Shinko ACS-13A manual in PDF format
to download the Shinko ACS-13A manual in PDF format
You also want an ePaper? Increase the reach of your titles
YUMPU automatically turns print PDFs into web optimized ePapers that Google loves.
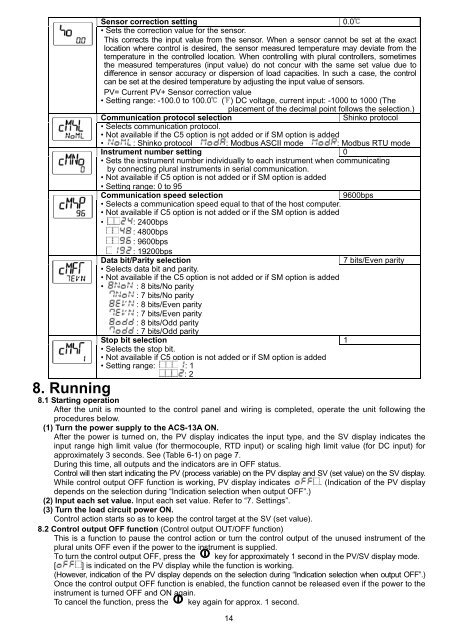
Sensor correction sett<strong>in</strong>g 0.0• Sets <strong>the</strong> correction value for <strong>the</strong> sensor.This corrects <strong>the</strong> <strong>in</strong>put value from <strong>the</strong> sensor. When a sensor cannot be set at <strong>the</strong> exactlocation where control is desired, <strong>the</strong> sensor measured temperature may deviate from <strong>the</strong>temperature <strong>in</strong> <strong>the</strong> controlled location. When controll<strong>in</strong>g with plural controllers, sometimes<strong>the</strong> measured temperatures (<strong>in</strong>put value) do not concur with <strong>the</strong> same set value due <strong>to</strong>difference <strong>in</strong> sensor accuracy or dispersion of load capacities. In such a case, <strong>the</strong> controlcan be set at <strong>the</strong> desired temperature by adjust<strong>in</strong>g <strong>the</strong> <strong>in</strong>put value of sensors.PV= Current PV+ Sensor correction value• Sett<strong>in</strong>g range: -100.0 <strong>to</strong> 100.0 ( ) DC voltage, current <strong>in</strong>put: -1000 <strong>to</strong> 1000 (Theplacement of <strong>the</strong> decimal po<strong>in</strong>t follows <strong>the</strong> selection.)Communication pro<strong>to</strong>col selection<strong>Sh<strong>in</strong>ko</strong> pro<strong>to</strong>col• Selects communication pro<strong>to</strong>col.• Not available if <strong>the</strong> C5 option is not added or if SM option is added• : <strong>Sh<strong>in</strong>ko</strong> pro<strong>to</strong>col : Modbus ASCII mode : Modbus RTU modeInstrument number sett<strong>in</strong>g 0• Sets <strong>the</strong> <strong>in</strong>strument number <strong>in</strong>dividually <strong>to</strong> each <strong>in</strong>strument when communicat<strong>in</strong>gby connect<strong>in</strong>g plural <strong>in</strong>struments <strong>in</strong> serial communication.• Not available if C5 option is not added or if SM option is added• Sett<strong>in</strong>g range: 0 <strong>to</strong> 95Communication speed selection9600bps• Selects a communication speed equal <strong>to</strong> that of <strong>the</strong> host computer.• Not available if C5 option is not added or if <strong>the</strong> SM option is added• : 2400bps: 4800bps: 9600bps: 19200bpsData bit/Parity selection7 bits/Even parity• Selects data bit and parity.• Not available if <strong>the</strong> C5 option is not added or if SM option is added• : 8 bits/No parity: 7 bits/No parity: 8 bits/Even parity: 7 bits/Even parity: 8 bits/Odd parity: 7 bits/Odd parityS<strong>to</strong>p bit selection 1• Selects <strong>the</strong> s<strong>to</strong>p bit.• Not available if C5 option is not added or if SM option is added• Sett<strong>in</strong>g range: : 1: 28. Runn<strong>in</strong>g8.1 Start<strong>in</strong>g operationAfter <strong>the</strong> unit is mounted <strong>to</strong> <strong>the</strong> control panel and wir<strong>in</strong>g is completed, operate <strong>the</strong> unit follow<strong>in</strong>g <strong>the</strong>procedures below.(1) Turn <strong>the</strong> power supply <strong>to</strong> <strong>the</strong> <strong>ACS</strong>-<strong>13A</strong> ON.After <strong>the</strong> power is turned on, <strong>the</strong> PV display <strong>in</strong>dicates <strong>the</strong> <strong>in</strong>put type, and <strong>the</strong> SV display <strong>in</strong>dicates <strong>the</strong><strong>in</strong>put range high limit value (for <strong>the</strong>rmocouple, RTD <strong>in</strong>put) or scal<strong>in</strong>g high limit value (for DC <strong>in</strong>put) forapproximately 3 seconds. See (Table 6-1) on page 7.Dur<strong>in</strong>g this time, all outputs and <strong>the</strong> <strong>in</strong>dica<strong>to</strong>rs are <strong>in</strong> OFF status.Control will <strong>the</strong>n start <strong>in</strong>dicat<strong>in</strong>g <strong>the</strong> PV (process variable) on <strong>the</strong> PV display and SV (set value) on <strong>the</strong> SV display.While control output OFF function is work<strong>in</strong>g, PV display <strong>in</strong>dicates . (Indication of <strong>the</strong> PV displaydepends on <strong>the</strong> selection dur<strong>in</strong>g “Indication selection when output OFF”.)(2) Input each set value. Input each set value. Refer <strong>to</strong> “7. Sett<strong>in</strong>gs”.(3) Turn <strong>the</strong> load circuit power ON.Control action starts so as <strong>to</strong> keep <strong>the</strong> control target at <strong>the</strong> SV (set value).8.2 Control output OFF function (Control output OUT/OFF function)This is a function <strong>to</strong> pause <strong>the</strong> control action or turn <strong>the</strong> control output of <strong>the</strong> unused <strong>in</strong>strument of <strong>the</strong>plural units OFF even if <strong>the</strong> power <strong>to</strong> <strong>the</strong> <strong>in</strong>strument is supplied.To turn <strong>the</strong> control output OFF, press <strong>the</strong> key for approximately 1 second <strong>in</strong> <strong>the</strong> PV/SV display mode.[ ] is <strong>in</strong>dicated on <strong>the</strong> PV display while <strong>the</strong> function is work<strong>in</strong>g.(However, <strong>in</strong>dication of <strong>the</strong> PV display depends on <strong>the</strong> selection dur<strong>in</strong>g “Indication selection when output OFF”.)Once <strong>the</strong> control output OFF function is enabled, <strong>the</strong> function cannot be released even if <strong>the</strong> power <strong>to</strong> <strong>the</strong><strong>in</strong>strument is turned OFF and ON aga<strong>in</strong>.To cancel <strong>the</strong> function, press <strong>the</strong> key aga<strong>in</strong> for approx. 1 second.14


