to download the Shinko ACS-13A manual in PDF format
to download the Shinko ACS-13A manual in PDF format
to download the Shinko ACS-13A manual in PDF format

Create successful ePaper yourself
Turn your PDF publications into a flip-book with our unique Google optimized e-Paper software.
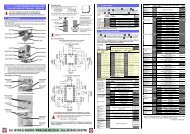
[Indication range and Control range]Thermocouple <strong>in</strong>put: [Input range low limit value – 50 (100 )] <strong>to</strong> [Input range high limit value + 50 (100 )]RTD <strong>in</strong>put: [Input range low limit value -Input span x 1%] <strong>to</strong> [Input range high limit value + 50 (100 )]DC current, voltage <strong>in</strong>put:[Scal<strong>in</strong>g low limit value -Scal<strong>in</strong>g span x 1%] <strong>to</strong> [Scal<strong>in</strong>g high limit value +Scal<strong>in</strong>g span x 10%)[Warm-up <strong>in</strong>dication]After <strong>the</strong> power supply <strong>to</strong> <strong>the</strong> <strong>in</strong>strument is turned on, <strong>the</strong> PV display <strong>in</strong>dicates <strong>the</strong> sensor <strong>in</strong>put type,and SV display <strong>in</strong>dicates <strong>in</strong>put range high limit value (for <strong>the</strong>rmocouple, RTD) or Scal<strong>in</strong>g high limitvalue (for DC <strong>in</strong>put) for approximately 3 seconds.[Au<strong>to</strong>/Manual control switch<strong>in</strong>g]Select “Au<strong>to</strong>/Manual control” dur<strong>in</strong>g OUT/OFF key function selection <strong>in</strong> <strong>the</strong> Setup mode, <strong>the</strong>n press<strong>the</strong> key <strong>in</strong> <strong>the</strong> PV/SV display mode. Au<strong>to</strong>/<strong>manual</strong> control can be switched.[Console communication]By connect<strong>in</strong>g <strong>the</strong> USB communication cable (Model CMA) <strong>to</strong> <strong>the</strong> Console connec<strong>to</strong>r of <strong>the</strong> <strong>ACS</strong>-<strong>13A</strong>, <strong>the</strong>follow<strong>in</strong>g operations can be conducted from <strong>the</strong> external computer us<strong>in</strong>g <strong>the</strong> Console software SWS-<strong>ACS</strong>01M.(1) Read<strong>in</strong>g and sett<strong>in</strong>g of SV, PID and various set values, (2) Read<strong>in</strong>g of PV and action status, (3) Function changeConsole communication and Serial communication (C5 option) cannot be used <strong>to</strong>ge<strong>the</strong>r.Communication <strong>in</strong>terface: C-MOS levelAccessories <strong>in</strong>cluded:Mount<strong>in</strong>g frame 1 piece, Gasket (Front mounted <strong>to</strong> <strong>the</strong> <strong>ACS</strong>-<strong>13A</strong>) 1 pieceInstruction <strong>manual</strong> (A3 unfolded, English/Japanese) 1 copyCT (Current transformer):CTL-6S: 1 piece [W (20A) option] CTL-12-S36-10L1: 1 piece [W (50A) option]CTL-6S: 2 pieces [W3 (20A) option] CTL-12-S36-10L1: 2 pieces [W3 (50A) option]Accessories sold separately: Term<strong>in</strong>al cover, 50 Shunt resis<strong>to</strong>r (for DC current <strong>in</strong>put)USB communication cable (CMA)12.2 Optional specificationsAlarm 2 output (Option code: A2)If this option is added, Heat<strong>in</strong>g/Cool<strong>in</strong>g control (D option) cannot be added.Alarm 2 and Heater burnout alarm (W, W3 option) utilize common output term<strong>in</strong>als.Action : ON/OFF actionHysteresis: 0.1 <strong>to</strong> 100.0 ( ) (Default:1.0 )DC voltage, current <strong>in</strong>put: 1 <strong>to</strong> 1000 (The placement of <strong>the</strong> decimal po<strong>in</strong>t follows <strong>the</strong> selection.)Output : Relay contact, 1a Control capacity, 3A 250V AC (Resistive load) Electric life, 100,000 timesHeater burnout alarm (<strong>in</strong>clud<strong>in</strong>g sensor burnout alarm) [Option code: W(20A), W(50A), W3(20A), W3(50A)]Moni<strong>to</strong>rs heater current with CT (current transformer), and detects burnout.This alarm is also activated when <strong>in</strong>dication is overscale and underscale.This option cannot be applied <strong>to</strong> DC current output type.If this alarm is added, Heat<strong>in</strong>g/Cool<strong>in</strong>g control (D option) cannot be added.Heater burnout alarm and Alarm 2 (A2) option utilize common output term<strong>in</strong>als.Rat<strong>in</strong>g : S<strong>in</strong>gle phase 20A [W(20A)], S<strong>in</strong>gle phase 50A [W(50A)],3-phase 20A [W3(20A)], 3-phase 50A [W3(50A)] (Must be specified)Sett<strong>in</strong>g range : 20A [W(20A)], [W3(20A)]: 0.0 <strong>to</strong> 20.0A (Off when set <strong>to</strong> 0.0)50A [W(50A)], [W3(50A)]: 0.0 <strong>to</strong> 50.0A (Off when set <strong>to</strong> 0.0)Sett<strong>in</strong>g accuracy : With<strong>in</strong> 5% of <strong>the</strong> rated valueAction : ON/OFF actionOutput : Relay contact, 1a Control capacity, 3A 250V AC (resistive load), Electric life, 100,000 timesHeat<strong>in</strong>g/Cool<strong>in</strong>g control (Option code: D )If this alarm is added, Alarm 2 (A2) option and Heater burnout alarm [W(20A), W(50A), W3(20A),W3(50A) option] cannot be added.The specifications of Heat<strong>in</strong>g side is <strong>the</strong> same as those of OUT1.OUT2 proportional band : 0.0 <strong>to</strong> 10.0 times OUT1 proportional band (ON/OFF action when set <strong>to</strong> 0.0)OUT2 <strong>in</strong>tegral time : The same as that of OUT1.OUT2 derivative time : The same as that of OUT1.OUT2 proportional cycle : 1 <strong>to</strong> 120 seconds [Default: 30sec for Relay contact (DR), 3sec for Non-contact voltage (DS)]Overlap/Dead band sett<strong>in</strong>g range:Thermocouple, RTD <strong>in</strong>put : -100.0 <strong>to</strong> 100.0 ( )DC current, voltage <strong>in</strong>put : -1000 <strong>to</strong> 1000 (The placement of <strong>the</strong> decimal po<strong>in</strong>t follows <strong>the</strong> selection)OUT2 ON/OFF action hysteresisThermocouple, RTD <strong>in</strong>put : 0.1 <strong>to</strong> 100.0 ( ) (Default: 1.0 )DC current, voltage <strong>in</strong>put : 1 <strong>to</strong> 1000 (The placement of <strong>the</strong> decimal po<strong>in</strong>t follows <strong>the</strong> selection)OUT2 high limit : 0 <strong>to</strong> 100% (Default: 100%)OUT2 low limit : 0 <strong>to</strong> 100% (Default: 0%)OUT2 action mode selection:One cool<strong>in</strong>g action can be selected from Air cool<strong>in</strong>g (l<strong>in</strong>ear characteristic), Oil cool<strong>in</strong>g (1.5th power of<strong>the</strong> l<strong>in</strong>ear characteristic) and Water cool<strong>in</strong>g (2nd power of <strong>the</strong> l<strong>in</strong>ear characteristic) by keypad operation.Cool<strong>in</strong>g output (OUT2): DR Relay contact, 1a Control capacity: 3A 250V AC(resistive load) Electric life, 100,000 timesDS Non-contact voltage (for SSR) 12V DC 15%, Max. 40mA (short circuit protected)22