Myson Lo-Line Fan Convector Installation Guide.pdf - BHL.co.uk
Myson Lo-Line Fan Convector Installation Guide.pdf - BHL.co.uk
Myson Lo-Line Fan Convector Installation Guide.pdf - BHL.co.uk

You also want an ePaper? Increase the reach of your titles
YUMPU automatically turns print PDFs into web optimized ePapers that Google loves.
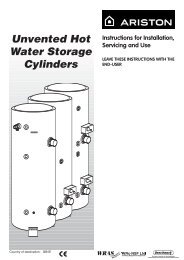
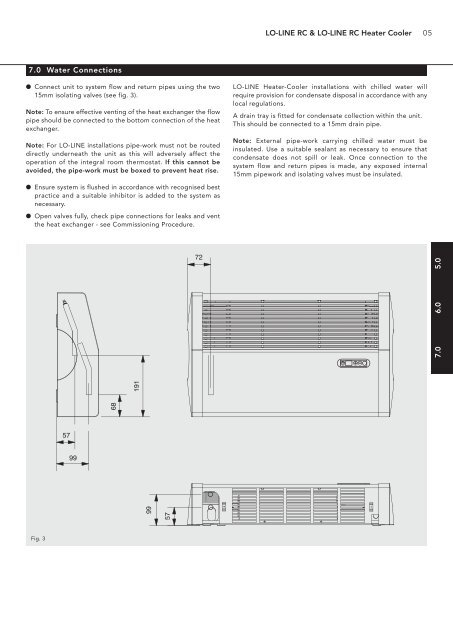
LO-LINE RC & LO-LINE RC Heater Cooler057.0 Water Connections● Connect unit to system flow and return pipes using the two15mm isolating valves (see fig. 3).Note: To ensure effective venting of the heat exchanger the flowpipe should be <strong>co</strong>nnected to the bottom <strong>co</strong>nnection of the heatexchanger.Note: For LO-LINE installations pipe-work must not be routeddirectly underneath the unit as this will adversely affect theoperation of the integral room thermostat. If this cannot beavoided, the pipe-work must be boxed to prevent heat rise.LO-LINE Heater-Cooler installations with chilled water willrequire provision for <strong>co</strong>ndensate disposal in ac<strong>co</strong>rdance with anylocal regulations.A drain tray is fitted for <strong>co</strong>ndensate <strong>co</strong>llection within the unit.This should be <strong>co</strong>nnected to a 15mm drain pipe.Note: External pipe-work carrying chilled water must beinsulated. Use a suitable sealant as necessary to ensure that<strong>co</strong>ndensate does not spill or leak. Once <strong>co</strong>nnection to thesystem flow and return pipes is made, any exposed internal15mm pipework and isolating valves must be insulated.● Ensure system is flushed in ac<strong>co</strong>rdance with re<strong>co</strong>gnised bestpractice and a suitable inhibitor is added to the system asnecessary.● Open valves fully, check pipe <strong>co</strong>nnections for leaks and ventthe heat exchanger - see Commissioning Procedure.7268191579999577.06.05.0Fig. 3