FR-A701 catalog - Mitsubishi Electric Australia
FR-A701 catalog - Mitsubishi Electric Australia
FR-A701 catalog - Mitsubishi Electric Australia
Create successful ePaper yourself
Turn your PDF publications into a flip-book with our unique Google optimized e-Paper software.
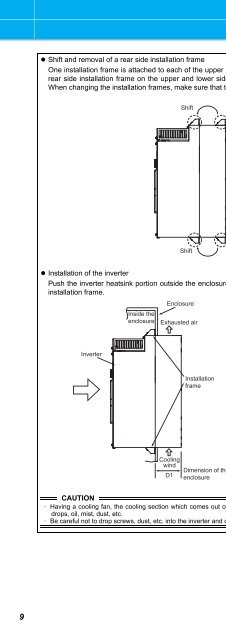
• Shift and removal of a rear side installation frameOne installation frame is attached to each of the upper and lower parts of the inverter. Change the position of therear side installation frame on the upper and lower sides of the inverter to the front side as shown on the right.When changing the installation frames, make sure that the installation orientation is correct.ShiftUpperinstallationframeShiftLower installation frame• Installation of the inverterPush the inverter heatsink portion outside the enclosure and fix the enclosure and inverter with upper and lowerinstallation frame.EnclosureInside theenclosureExhausted airInverter Type<strong>FR</strong>-A721-5.5K, 7.5K<strong>FR</strong>-A741-5.5K, 7.5KD1100Inverter<strong>FR</strong>-A721-11K, 15K<strong>FR</strong>-A741-11K, 15K<strong>FR</strong>-A721-18.5K, 22K<strong>FR</strong>-A741-18.5K, 22K125130Installationframe<strong>FR</strong>-A721-30K<strong>FR</strong>-A741-30K145<strong>FR</strong>-A721-37K, 45K<strong>FR</strong>-A741-37K, 45K163<strong>FR</strong>-A721-55K<strong>FR</strong>-A741-55K190CoolingwindD1Dimension of the outside of theenclosureCAUTION· Having a cooling fan, the cooling section which comes out of the enclosure can not be used in the environment of waterdrops, oil, mist, dust, etc.· Be careful not to drop screws, dust, etc. into the inverter and cooling fan section.9


