Pro Bike Case Instructions: ! CAUTION - Nashbar
Pro Bike Case Instructions: ! CAUTION - Nashbar
Pro Bike Case Instructions: ! CAUTION - Nashbar

Create successful ePaper yourself
Turn your PDF publications into a flip-book with our unique Google optimized e-Paper software.
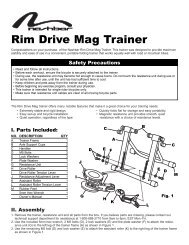
3. Pivot the front fork and secure it to the fork mount at the front end of the stabilizer frame using your bike'sfront quick release skewer.4. The position of the front fork mount can be adjusted by loosening the two fixing bolts and sliding the mountforward or back or pivoting it up or down.5. Once the frame is securely attached to the stabilizer frame, lay the frame in the <strong>Pro</strong> <strong>Bike</strong> <strong>Case</strong> on top of onefoam sheet to test the fit.6. Depending on the size of your frame and the shape/size of your handlebar, you may need to remove thehandlebar from the stem. If your stem has a removable faceplate, remove the handlebar from the stem. Ifyour stem does not have a removable faceplate, you may need to remove the handlebar and stem (as oneunit) from the frame. Pack/wrap the bar/stem with padding or bubble wrap and secure it with tape or zip-tiesIt often works well to secure one end of the bar to the bicycle frame top tube and the other end to one ofthe fork legs.7. Once the stabilizer frame and bike frame are positioned in the case, take note of the rear derailleur locationIf the rear derailleur is contacting or very close to contacting the inside of the case, there is a risk that animpact to the outside of the case at that location could bend the derailleur hanger. In this situation, it isadvisable to remove the rear derailleur, pack/wrap it with padding or bubble wrap and secure it to the framewith tape or zip-ties.8. Use tape or zip-ties to secure the padded/wrapped pedals and saddle/seatpost to the bicycle frame orstabilizer frame.9. Pack the wheels in the included wheel bags and position them on the opposite side of the case, with a foamsheet behind them. Secure the wheels using the integrated nylon webbing straps.10. If you’re packing other items in the case (shoes, helmet, etc.) make sure they are similarly padded/wrappedand secured so they won’t rattle around loose in the case.11. Close the case and secure the two non-locking butterfly latches on the sides of the case and the three lockinglatches on top of the case (two keys are included with the case).12. Once the case is closed, push lightly at different points on the outside of the case. If you find an area thatdoes not give slightly, the bike or wheels may be contacting the inside of the case at that location. If possible,adjust the position of the bike and other contents to prevent direct contact with the inside of the case.13. Since bicycles come in all shapes and sizes, a perfect fit within the case may take time to achieve throughcareful disassembly and packing. Take your time to ensure your bike is safely packed and well protectedfrom any other items in the case.14. Before transporting your case, be sure to include a name and address tag in the external strap address tagpocket. As a precaution against loss, theft or damage, we recommend that you fully insure your bicycle andcase with the airline or shipping courier of choice.Ride safely and enjoy your travels!Made in China 40-5079 0511_2