Spacecraft Structures pdf - ER - NASA
Spacecraft Structures pdf - ER - NASA
Spacecraft Structures pdf - ER - NASA
- No tags were found...

You also want an ePaper? Increase the reach of your titles
YUMPU automatically turns print PDFs into web optimized ePapers that Google loves.
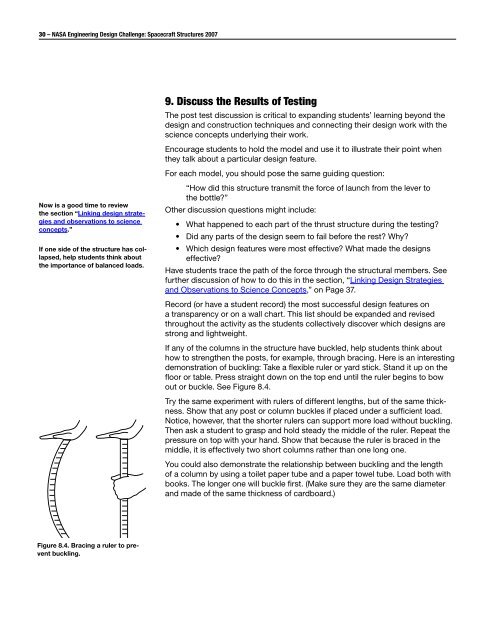
30 – <strong>NASA</strong> Engineering Design Challenge: <strong>Spacecraft</strong> <strong>Structures</strong> 20079. Discuss the Results of TestingThe post test discussion is critical to expanding students’ learning beyond thedesign and construction techniques and connecting their design work with thescience concepts underlying their work.Encourage students to hold the model and use it to illustrate their point whenthey talk about a particular design feature.For each model, you should pose the same guiding question:Now is a good time to reviewthe section “Linking design strategiesand observations to scienceconcepts.”If one side of the structure has collapsed,help students think aboutthe importance of balanced loads.“How did this structure transmit the force of launch from the lever tothe bottle?”Other discussion questions might include:• What happened to each part of the thrust structure during the testing?• Did any parts of the design seem to fail before the rest? Why?• Which design features were most effective? What made the designseffective?Have students trace the path of the force through the structural members. Seefurther discussion of how to do this in the section, “Linking Design Strategiesand Observations to Science Concepts,” on Page 37.Record (or have a student record) the most successful design features ona transparency or on a wall chart. This list should be expanded and revisedthroughout the activity as the students collectively discover which designs arestrong and lightweight.If any of the columns in the structure have buckled, help students think abouthow to strengthen the posts, for example, through bracing. Here is an interestingdemonstration of buckling: Take a flexible ruler or yard stick. Stand it up on thefloor or table. Press straight down on the top end until the ruler begins to bowout or buckle. See Figure 8.4.Try the same experiment with rulers of different lengths, but of the same thickness.Show that any post or column buckles if placed under a sufficient load.Notice, however, that the shorter rulers can support more load without buckling.Then ask a student to grasp and hold steady the middle of the ruler. Repeat thepressure on top with your hand. Show that because the ruler is braced in themiddle, it is effectively two short columns rather than one long one.You could also demonstrate the relationship between buckling and the lengthof a column by using a toilet paper tube and a paper towel tube. Load both withbooks. The longer one will buckle first. (Make sure they are the same diameterand made of the same thickness of cardboard.)Figure 8.4. Bracing a ruler to preventbuckling.