C22 - Pendant Interface - Micro-Machine-Shop.com
C22 - Pendant Interface - Micro-Machine-Shop.com
C22 - Pendant Interface - Micro-Machine-Shop.com
- No tags were found...

You also want an ePaper? Increase the reach of your titles
YUMPU automatically turns print PDFs into web optimized ePapers that Google loves.
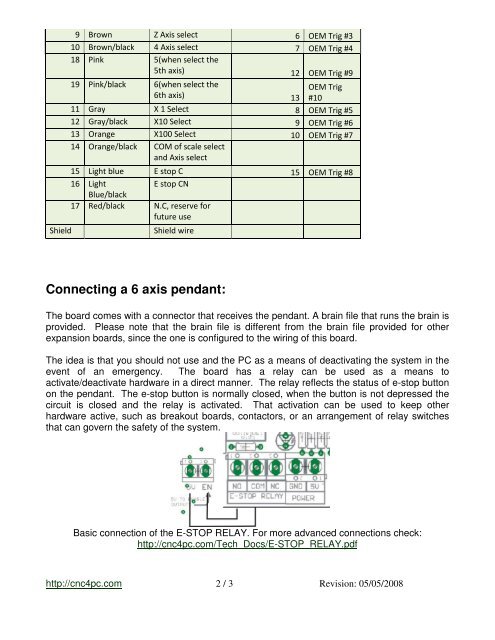
Shield9 Brown Z Axis select 6 OEM Trig #310 Brown/black 4 Axis select 7 OEM Trig #418 Pink 5(when select the5th axis) 12 OEM Trig #919 Pink/black 6(when select the6th axis) 13OEM Trig#1011 Gray X 1 Select 8 OEM Trig #512 Gray/black X10 Select 9 OEM Trig #613 Orange X100 Select 10 OEM Trig #714 Orange/black COM of scale selectand Axis select15 Light blue E stop C 15 OEM Trig #816 LightE stop CNBlue/black17 Red/black N.C, reserve forfuture useShield wireConnecting a 6 axis pendant:The board <strong>com</strong>es with a connector that receives the pendant. A brain file that runs the brain isprovided. Please note that the brain file is different from the brain file provided for otherexpansion boards, since the one is configured to the wiring of this board.The idea is that you should not use and the PC as a means of deactivating the system in theevent of an emergency. The board has a relay can be used as a means toactivate/deactivate hardware in a direct manner. The relay reflects the status of e-stop buttonon the pendant. The e-stop button is normally closed, when the button is not depressed thecircuit is closed and the relay is activated. That activation can be used to keep otherhardware active, such as breakout boards, contactors, or an arrangement of relay switchesthat can govern the safety of the system.Basic connection of the E-STOP RELAY. For more advanced connections check:http://cnc4pc.<strong>com</strong>/Tech_Docs/E-STOP_RELAY.pdfhttp://cnc4pc.<strong>com</strong> 2 / 3 Revision: 05/05/2008