Installation Manual - GTO/Pro
Installation Manual - GTO/Pro
Installation Manual - GTO/Pro

You also want an ePaper? Increase the reach of your titles
YUMPU automatically turns print PDFs into web optimized ePapers that Google loves.
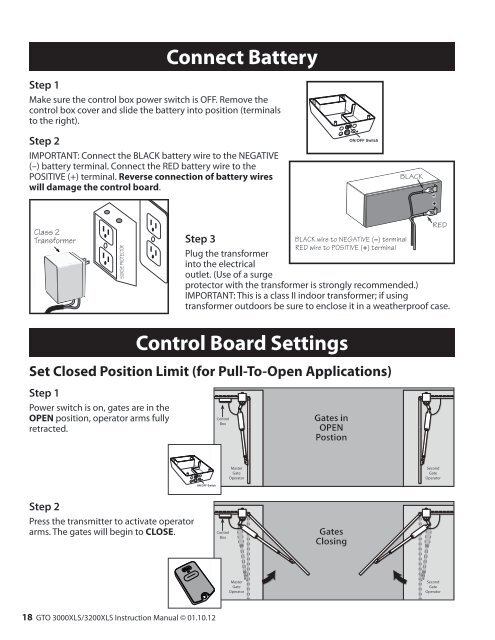
Connect BatteryStep 1Make sure the control box power switch is OFF. Remove thecontrol box cover and slide the battery into position (terminalsto the right).Step 2IMPORTANT: Connect the BLACK battery wire to the NEGATIVE(–) battery terminal. Connect the RED battery wire to thePOSITIVE (+) terminal. Reverse connection of battery wireswill damage the control board.ON/OFF SwitchBLACKStep 1Power switch is on, gates are in theOPEN position, operator arms fullyretracted.Step 3Plug the transformerinto the electricaloutlet. (Use of a surgeBLACK wire to NEGATIVE (–) terminalRED wire to POSITIVE (+) terminalREDprotector with the transformer is strongly recommended.)IMPORTANT: This is a class II indoor transformer; if usingtransformer outdoors be sure to enclose it in a weatherproof case.Control Board SettingsSet Closed Position Limit (for Pull-To-Open Applications)ControlBoxGates inOPENPostionMasterGateOperatorSecondGateOperatorON/OFF SwitchStep 2Press the transmitter to activate operatorarms. The gates will begin to CLOSE.ControlBoxGatesClosingMasterGateOperatorSecondGateOperator18 <strong>GTO</strong> 3000XLS/3200XLS Instruction <strong>Manual</strong> © 01.10.12