User Manual - Polaris S.p.A.
User Manual - Polaris S.p.A.
User Manual - Polaris S.p.A.

Create successful ePaper yourself
Turn your PDF publications into a flip-book with our unique Google optimized e-Paper software.
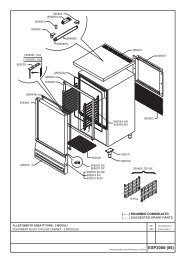
Adjustment instructions4.11.2004 Rev. 1.1Icons on the displayPic. 6.2.3.21. Degrees Celsius;2. Degrees Fahrenheit;3. High temperature alarm4. Low temperature alarm5. Critical temperature (high or low)6. Digital input alarm;7. Alarm list;8. Clock symbol:9. Date symbol:10. IR data transmission in progress;11. Indicates access to the "Function menu";12. Start time;13. End time.6.2.4 Setting up the clockIf "rtC" and the temperature alternate on the upper display when energising the device, itmeans that the clock needs to be set.To set the clock, proceed as follows:1. Press any key; the writing "Hur" will appear immediately on the lower display, andthe stored time on the upper one;2. Press the SET (P1) key; the hour digits will start blinking;3. Set the hour using the arrow keys (P3 and P4);4. Press SET to confirm the hour; the controller will display the next parameter;5. Repeat steps 2, 3 and 4 to set the remaining parameters of the clock: - Min: minutes(0÷60); - UdA: day of the week (Sun=Sunday, Mon= Monday; tuE = Tuesday,UEd = Wednesday, tHu = Thursday, Fri = Friday, SAt = Saturday; - dAy: day ofthe month (0÷31); - Mon: month (1÷12); - yEA: year (00÷99); - Hd1, Hd2, Hd3:days to which the non-working defrost schedule should be applied. (nu, Sun, Mon,tuE, UEd, tHu, Fri, SAt).18