SDU-IQ Installation Instructions
SDU-IQ Installation Instructions
SDU-IQ Installation Instructions

Create successful ePaper yourself
Turn your PDF publications into a flip-book with our unique Google optimized e-Paper software.
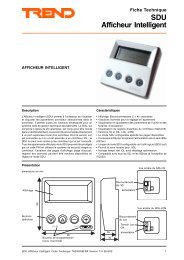
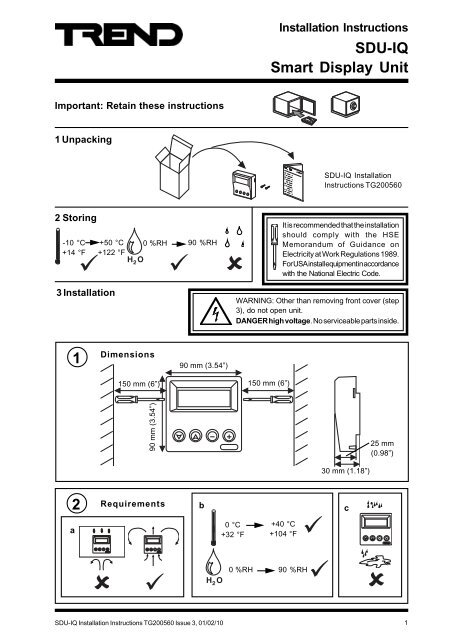
<strong>Installation</strong> <strong>Instructions</strong><strong>SDU</strong>-<strong>IQ</strong>Smart Display UnitImportant: Retain these instructions1 Unpacking<strong>SDU</strong>-<strong>IQ</strong> <strong>Installation</strong><strong>Instructions</strong> TG2005602 Storing-10 °C+14 °F3 <strong>Installation</strong>+50 °C 0 %RH 90 %RH+122 °FH 2 OIt is recommended that the installationshould comply with the HSEMemorandum of Guidance onElectricity at Work Regulations 1989.For USA install equipment in accordancewith the National Electric Code.WARNING: Other than removing front cover (step3), do not open unit.DANGER high voltage. No serviceable parts inside.1Dimensions90 mm (3.54”)150 mm (6”) 150 mm (6”)90 mm (3.54”)25 mm(0.98”)30 mm (1.18”)2 Requirements b ca0 °C+32 °FH 2 O+40 °C+104 °F0 %RH 90 %RH<strong>SDU</strong>-<strong>IQ</strong> <strong>Installation</strong> <strong>Instructions</strong> TG200560 Issue 3, 01/02/10 1
)*+,8" 8, 2 ! " # $ % & ' <strong>SDU</strong>-<strong>IQ</strong><strong>Installation</strong> <strong>Instructions</strong>3 <strong>Installation</strong> (continued)7Connect to <strong>IQ</strong>If <strong>IQ</strong>2xx (excluding <strong>IQ</strong>250)Note that <strong>SDU</strong>-<strong>IQ</strong> cannot be connected to a controller with local supervisor port already used(e.g. wireless sensor receiver XW/R/<strong>IQ</strong>, NDP, <strong>IQ</strong>View (RS232), local PC or to /ADL, /ATM, orXNC220 controllers).Note that sUperv port addr must set to zero (default)Standard cables connect signal plus power for <strong>IQ</strong>204, later <strong>IQ</strong>21x, later <strong>IQ</strong>22x, <strong>IQ</strong>23x, <strong>IQ</strong>241/242, <strong>IQ</strong>246<strong>IQ</strong>2xxRD/<strong>SDU</strong>-<strong>IQ</strong>2COMMSCABLE/3MRD/<strong>SDU</strong>-<strong>IQ</strong>2COMMSCABLE/10Mlocal supervisor portRJ11RJ11<strong>SDU</strong>rear viewmaximum distance 25 m (28 yds)If required a cable can be made to the required length, wired as below25 m (28 yds) maximum$#!"4 4 "!#$ For early <strong>IQ</strong>21x, early <strong>IQ</strong>22x, and <strong>IQ</strong>251, use of adapter RD/<strong>SDU</strong>-ADAPTOR <strong>IQ</strong>2xx, in additionto RJ11 to RJ11 standard cable, facilitates connection of power from <strong>IQ</strong>’s 24 Vdc auxiliary outputsupply.24 Vdc2 terminalRD/<strong>SDU</strong>-<strong>IQ</strong>2COMMSCABLE/3Mauxiliary powerRD/<strong>SDU</strong>-<strong>IQ</strong>2COMMSCABLE/10Moutputsignal<strong>IQ</strong>2xx RJ11 RJ11RJ11RD/<strong>SDU</strong>-ADAPTOR <strong>IQ</strong>2xxNote that the <strong>IQ</strong> controller may be connected while powered; if not power up controller.8Mount UnitStandard UK pattress wall box60 mmor panel60 mm50 mm2 off (M3.5 x 35 mm)screws providedØ4 mm(M3.5 screw)46 mmØ4 mm(M3.5screw)4<strong>SDU</strong>-<strong>IQ</strong> <strong>Installation</strong> <strong>Instructions</strong> TG200560 Issue 3, 01/02/10
<strong>Installation</strong> <strong>Instructions</strong><strong>SDU</strong>-<strong>IQ</strong>3 <strong>Installation</strong> (continued)9Replace Front Cover10Check Start Up Reset1 2 3 4Comms failureor no sensors set upSENSOR 1FLOOR 1 Space Temp20.3 DegCDisplays first labelled sensor- if set to defaults* One of these will show ‘Failed’<strong>SDU</strong>-<strong>IQ</strong> V2.05FLASH CHECK *EEPROM CHECK *<strong>SDU</strong>-<strong>IQ</strong> V2.05FLASH CHECK OKEEPROM CHECK OK<strong>SDU</strong>-<strong>IQ</strong> V2.05Firmware version<strong>SDU</strong>-<strong>IQ</strong> <strong>Installation</strong> <strong>Instructions</strong> TG200560 Issue 3, 01/02/10 5
<strong>SDU</strong>-<strong>IQ</strong><strong>Installation</strong> <strong>Instructions</strong>3 <strong>Installation</strong> (continued)11Check Operation - MonitorNote that the full sequence given below may only be shown in Unrestricted modes. The RestrictedModes show only those pages on the Restricted list, and Display and Directory modules show directoriesat level 1, and display pages at level 2. The Home page and Alarm Log are optional (see step 6d).Plant Room 120/03/02 08:045 A I H . H 5 F = ? A 6 A F ! , A C +1 2 3 41 2 3 4Home pageSensorSee over ContinuedNote that if there are on modulesof type (sensors, knob, switch,driver, digital input) set up with alabel it will jump to the next type.KnobSwitchDriverDigital InputTime ZoneAlarm Log(see noteadjacent)TimeCalendars6<strong>SDU</strong>-<strong>IQ</strong> <strong>Installation</strong> <strong>Instructions</strong> TG200560 Issue 3, 01/02/10
<strong>Installation</strong> <strong>Instructions</strong><strong>SDU</strong>-<strong>IQ</strong>3 <strong>Installation</strong> (continued)12Check Operation - Monitor (Continued)5 A I H . H 5 F = ? A 6 A F ! , A C +Note that only modules withlabels (not necessarilysequential) will be displayed.1 2 3 4ContinuedSensor 1Sensor 2Sensor 3Sensor (last)Note that if the <strong>SDU</strong> is connected to an <strong>IQ</strong> whose firmware is less than <strong>IQ</strong>2xxV3, the alarm log pageshould be disabled as described in step 15 prior to this test, otherwise selecting the alarm log pagecan cause the <strong>SDU</strong> to require a power reset before continuing operation.<strong>SDU</strong>-<strong>IQ</strong> <strong>Installation</strong> <strong>Instructions</strong> TG200560 Issue 3, 01/02/10 7
<strong>SDU</strong>-<strong>IQ</strong><strong>Installation</strong> <strong>Instructions</strong>3 <strong>Installation</strong> (continued)12Check Operation - AdjustKnob 1Room 1 Setpoint20.01 DegCKnob 1Room 1 Setpoint20.01 DegCKnob 1Room 1 Setpoint20.01 DegC1 2 3 41 2 3 41 2 3 4DigitalOFFONif PIN required seestep 15AnalogueUnits20.32Tenths20.32Hundredths20.328<strong>SDU</strong>-<strong>IQ</strong> <strong>Installation</strong> <strong>Instructions</strong> TG200560 Issue 3, 01/02/10
<strong>Installation</strong> <strong>Instructions</strong><strong>SDU</strong>-<strong>IQ</strong>3 <strong>Installation</strong> (continued)13Enter PINIf required2 1 # 1 2 3 4aPIN 5 * * *bc PIN X 5 * *de PIN X X 5 *fg PIN X X X 5h5 A I H . H 5 F = ? A 6 A F ! , A C +1 2 3 4<strong>SDU</strong>-<strong>IQ</strong> <strong>Installation</strong> <strong>Instructions</strong> TG200560 Issue 3, 01/02/10 9
<strong>SDU</strong>-<strong>IQ</strong><strong>Installation</strong> <strong>Instructions</strong>3 <strong>Installation</strong> (continued)14Set ContrastTEXTTEXTTEXT15Set <strong>SDU</strong> ModeIf required. Note that if the <strong>SDU</strong> is connected to an <strong>IQ</strong> whose firmware is less than<strong>IQ</strong>2xxV3, the alarm log page should be disabled as described below otherwise selectingthe alarm log page can cause the <strong>SDU</strong> to require a power reset before continuing operation.a Remove front cover - see step 3b Set mode5 A I H . H 5 F = ? A 6 A F ! , A C +5 2 - / ! "5 A I H . H 5 F = ? A 6 A F ! , A C +Display Mode = 1Display Mode = 11Default - Display Mode 0:No home page, alarm log enabledModePage Set0 Unrestricted1 Unrestricted2 Unrestricted3 Unrestricted4 Restricted5 Restricted6 Restricted7 Restricted8 Display and Directory9 Display and Directory10Display and Directory11Display and DirectoryHomePageNoYesNoYesNoYesNoYesNoYesNoYesAlarmLogYe sYe sNoNoNoNoNoNoNoNoNoNoNote that if the home page is enabled, the controllers identifier [R(D)] should be set up, otherwisethe first line of the home page will show the label of the previous item displayed.c Replace front cover - see step 910<strong>SDU</strong>-<strong>IQ</strong> <strong>Installation</strong> <strong>Instructions</strong> TG200560 Issue 3, 01/02/10
SPENG<strong>Installation</strong> <strong>Instructions</strong><strong>SDU</strong>-<strong>IQ</strong>3 <strong>Installation</strong> (continued)16Engineering ResetsIf need temporary Unrestricted mode for Commissioning or need Manual reset (e.g. aftermultiple mode changes as in step 15)1 2 3 4Hold 5 secs - 10 secs Tempory Unrestricted Mode - returns to previousmode 20 seconds after last key press.Hold 10 secs or greater Manual Reset17Set up Parametersif required<strong>SDU</strong> Data SheetTA200559Set up the following parameters in <strong>IQ</strong> using <strong>SDU</strong>:KnobsSwitchesTime Zone *Day of week (1 to 14) Period (1 to 3) *Time Zone 0 has Special Days (1 to 5)Start hours, minutes Stop hours, minutesTime hrs, minutes, day of month, month, yeardaylight saving on, day of month, monthdaylight saving off, day of month, monthCalendars Use (next, free, every)Start dateStop dateSpecial day type for each time zone<strong>SDU</strong>-<strong>IQ</strong> <strong>Installation</strong> <strong>Instructions</strong> TG200560 Issue 3, 01/02/10 11
<strong>SDU</strong>-<strong>IQ</strong><strong>Installation</strong> <strong>Instructions</strong>4 DisposalWEEE Directive :At the end of their useful life the packagingand product should be disposed of by asuitable recycling centre.Do not dispose of with normal household waste.Do not burn.Please send any comments about this or any other Trend technical publication to techpubs@trendcontrols.com© 2010 Honeywell Technologies Sàrl, ECC Divison. All rights reserved. Manufactured for and on behalf of the Environmental and Combustion ControlsDivision of Honeywell Technologies Sàrl, Z.A. La Pièce, 16, 1180 Rolle, Switzerland by its Authorized Representative, Trend Control Systems Ltd.Trend Control Systems Limited reserves the right to revise this publication from time to time and make changes to the content hereofwithout obligation to notify any person of such revisions or changes.Trend Control Systems LimitedAlbery House, Springfield Road, Horsham, West Sussex, RH12 2PQ, UK. Tel:+44 (0)140321888 Fax:+44 (0)1403241608 www.trendcontrols.comTrend Control Systems USA6670 185th Avenue NE, Redmond, Washington 98052, USA. Tel: (425)897-3900, Fax: (425)869-8445 www.trendcontrols.com12<strong>SDU</strong>-<strong>IQ</strong> <strong>Installation</strong> <strong>Instructions</strong> TG200560 Issue 3, 01/02/10