Yeoman CL - The Stove Yard
Yeoman CL - The Stove Yard
Yeoman CL - The Stove Yard
- No tags were found...

Create successful ePaper yourself
Turn your PDF publications into a flip-book with our unique Google optimized e-Paper software.
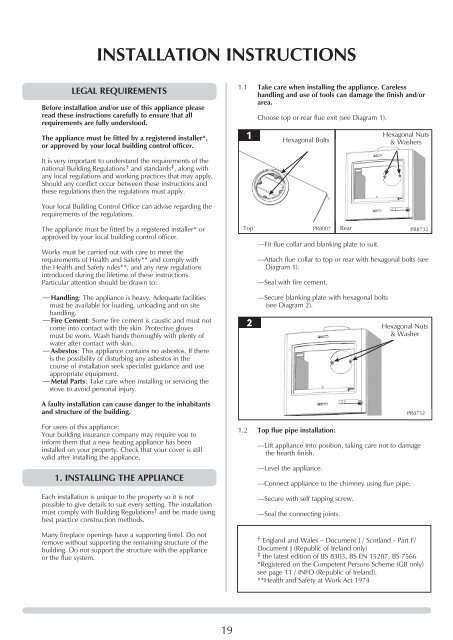
INSTALLATION INSTRUCTIONSLegal requirementsBefore installation and/or use of this appliance pleaseread these instructions carefully to ensure that allrequirements are fully understood.<strong>The</strong> appliance must be fitted by a registered installer*,or approved by your local building control officer.1.1 Take care when installing the appliance. Carelesshandling and use of tools can damage the finish and/orarea.Choose top or rear flue exit (see Diagram 1).Hexagonal BoltsHexagonal Nuts& WashersIt is very important to understand the requirements of thenational Building Regulations† and standards‡, along withany local regulations and working practices that may apply.Should any conflict occur between these instructions andthese regulations then the regulations must apply.Your local Building Control Office can advise regarding therequirements of the regulations.<strong>The</strong> appliance must be fitted by a registered installer* orapproved by your local building control officer.Works must be carried out with care to meet therequirements of Health and Safety** and comply withthe Health and Safety rules**, and any new regulationsintroduced during the lifetime of these instructions.Particular attention should be drawn to:—Handling: <strong>The</strong> appliance is heavy. Adequate facilitiesmust be available for loading, unloading and on sitehandling.—Fire Cement: Some fire cement is caustic and must notcome into contact with the skin. Protective glovesmust be worn. Wash hands thoroughly with plenty ofwater after contact with skin.—Asbestos: This appliance contains no asbestos. If thereis the possibility of disturbing any asbestos in thecourse of installation seek specialist guidance and useappropriate equipment.—Metal Parts: Take care when installing or servicing thestove to avoid personal injury.A faulty installation can cause danger to the inhabitantsand structure of the building.TopPR8007Rear—Fit flue collar and blanking plate to suit.PR8732—Attach flue collar to top or rear with hexagonal bolts (seeDiagram 1).—Seal with fire cement.—Secure blanking plate with hexagonal bolts(see Diagram 2).Hexagonal Nuts& WasherPR8732For users of this appliance:Your building insurance company may require you toinform them that a new heating appliance has beeninstalled on your property. Check that your cover is stillvalid after installing the appliance.1. INSTALLING THE ApplianceEach installation is unique to the property so it is notpossible to give details to suit every setting. <strong>The</strong> installationmust comply with Building Regulations† and be made usingbest practice construction methods.Many fireplace openings have a supporting lintel. Do notremove without supporting the remaining structure of thebuilding. Do not support the structure with the applianceor the flue system.1.2 Top flue pipe installation:—Lift appliance into position, taking care not to damagethe hearth finish.—Level the appliance.—Connect appliance to the chimney using flue pipe.—Secure with self tapping screw.—Seal the connecting joints.† England and Wales – Document J / Scotland - Part F/Document J (Republic of Ireland only)‡ the latest edition of BS 8303, BS EN 15287, BS 7566*Registered on the Competent Persons Scheme (GB only)see page 11 / INFO (Republic of Ireland).**Health and Safety at Work Act 197419