Yeoman CL - The Stove Yard
Yeoman CL - The Stove Yard
Yeoman CL - The Stove Yard
- No tags were found...

Create successful ePaper yourself
Turn your PDF publications into a flip-book with our unique Google optimized e-Paper software.
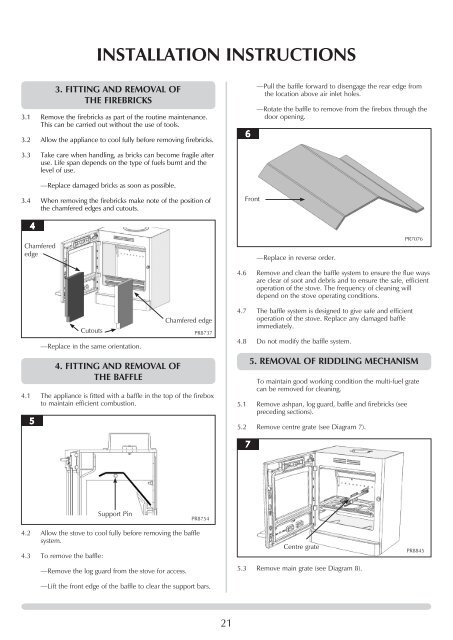
INSTALLATION INSTRUCTIONS3. FITTING AND REMOVAL OFTHE FIREBRICKS3.1 Remove the firebricks as part of the routine maintenance.This can be carried out without the use of tools.—Pull the baffle forward to disengage the rear edge fromthe location above air inlet holes.—Rotate the baffle to remove from the firebox through thedoor opening.3.2 Allow the appliance to cool fully before removing firebricks.3.3 Take care when handling, as bricks can become fragile afteruse. Life span depends on the type of fuels burnt and thelevel of use.—Replace damaged bricks as soon as possible.3.4 When removing the firebricks make note of the position ofthe chamfered edges and cutouts.FrontChamferededge—Replace in reverse order.PR70764.6 Remove and clean the baffle system to ensure the flue waysare clear of soot and debris and to ensure the safe, efficientoperation of the stove. <strong>The</strong> frequency of cleaning willdepend on the stove operating conditions.Cutouts—Replace in the same orientation.4. FITTING AND REMOVAL OFTHE BAFFLEChamfered edgePR87374.1 <strong>The</strong> appliance is fitted with a baffle in the top of the fireboxto maintain efficient combustion.4.7 <strong>The</strong> baffle system is designed to give safe and efficientoperation of the stove. Replace any damaged baffleimmediately.4.8 Do not modify the baffle system.5. REMOVAL OF RIDDLING MECHANISMTo maintain good working condition the multi-fuel gratecan be removed for cleaning.5.1 Remove ashpan, log guard, baffle and firebricks (seepreceding sections).5.2 remove centre grate (see Diagram 7).Support PinPR87544.2 Allow the stove to cool fully before removing the bafflesystem.4.3 To remove the baffle:—Remove the log guard from the stove for access.—Lift the front edge of the baffle to clear the support bars.Centre grate5.3 Remove main grate (see Diagram 8).PR884521