Yeoman CL - The Stove Yard
Yeoman CL - The Stove Yard
Yeoman CL - The Stove Yard
- No tags were found...

Create successful ePaper yourself
Turn your PDF publications into a flip-book with our unique Google optimized e-Paper software.
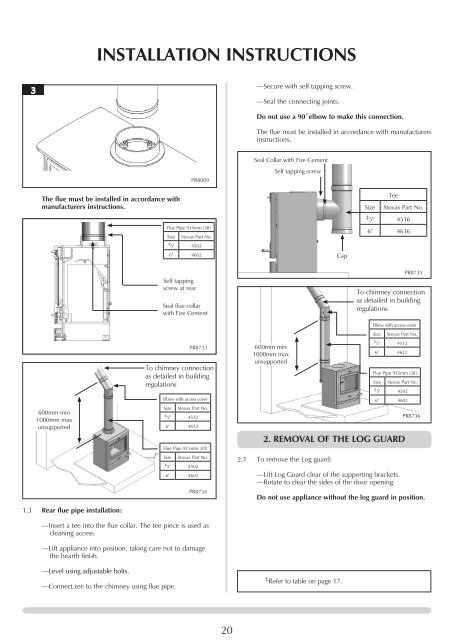
INSTALLATION INSTRUCTIONS—Secure with self tapping screw.—Seal the connecting joints.Do not use a 90˚elbow to make this connection.<strong>The</strong> flue must be installed in accordance with manufacturersinstructions.PR8009Seal Collar with Fire CementSelf tapping screw<strong>The</strong> flue must be installed in accordance withmanufacturers instructions.Flue Pipe 915mm (3ft)SizeStovax Part No.‡ 5" 4502TeeSize Stovax Part No.‡ 5" 45166" 46166" 4602CapSelf tappingscrew at rearSeal flue collarwith Fire CementPR8735To chimney connectionas detailed in buildingregulationsPR8733To chimney connectionas detailed in buildingregulations600mm min1000mm maxunsupportedElbow with access coverSize Stovax Part No.‡ 5" 45126" 4612Flue Pipe 915mm (3ft)Size Stovax Part No.‡ 5" 4502600mm min1000mm maxunsupported1.3 Rear flue pipe installation:Elbow with access coverSize Stovax Part No.‡ 5" 45126" 4612Flue Pipe 915mm (3ft)Size Stovax Part No.‡ 5" 45026" 4602PR87346" 46022. REMOVAL OF THE LOG GUARD2.1 To remove the Log guard:—Lift Log Guard clear of the supporting brackets.—Rotate to clear the sides of the door opening.PR8736Do not use appliance without the log guard in position.—Insert a tee into the flue collar. <strong>The</strong> tee piece is used ascleaning access.—Lift appliance into position, taking care not to damagethe hearth finish.—Level using adjustable bolts.—Connect tee to the chimney using flue pipe.‡Refer to table on page 17.20