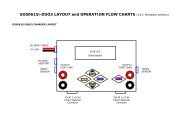
GENERAL SETUP <strong>and</strong> NOTESThe EOS0720iNET3 comes with male 4mm Bullet connectors (aka ‘banana plugs’) attached to the power INPUT cables.These cables are appropriate for attaching directly to most high-quality AC-DC power supply units, such as the BK Precision(USA) model 1692(15V, 40A, 600W). Also included are large Terminal Clips with matching 4mm female bullet connectors, forattaching directly to 12V~24V lead-acid batteries.The Output side 4mm Male Connector + Cable assemblies (#HP-EOSOUTCORD) are also supplied. Carefully solder yourpreferred battery connector to the free ends, with correct Red (+) / Black (-) Polarity. If you make up additional output cables,note that MINIMUM inner cable diameter should be 2.5mm (14ga) <strong>and</strong> MAXIMUM cable length is 20cm (12”).It is critically important that you use either a fully charged 12V~24V lead-acid automobile battery (or better, deep-cyclemarine battery) - or a high quality AC-DC power supply in the range of 12V to 28V DC output, with minimum current rating of10A. When charging high voltage batteries at high current the AC/DC Power Supply (PS) should be 14.5V minimum with ratingof 350W or more, to insure best <strong>per</strong>formance. Note that PS load control features DO allow you to use lower-rated power suppliesreliably, but that total charger output wattage will be limited accordingly. (See details later in this manual).If you have any trouble charging after confirming that input <strong>and</strong> output cables are pro<strong>per</strong>ly connected <strong>and</strong> of the pro<strong>per</strong>materials, be sure to check the charger on an automotive battery. Many problems are associated with poor quality orinadequate switching AC-DC power supplies. Use PS Load control as needed to reduce load on your PS, or upgrade your PS.If, after carefully reading the following pages on usage, you have any difficulty using the charger please refer to thetroubleshooting guide <strong>and</strong> warranty terms at the end of these instructions. It is best to carefully check your charger beforemaking a return, as problems in setup, cabling, or power supply are much more common than defects in the charger. Chargersreturned by the user <strong>and</strong> later found not defective will only be returned to the user at the user’s expense <strong>and</strong> may incur a servicecharge.<strong>Memory</strong> <strong>Positions</strong> for Charging, <strong>and</strong> <strong>Settings</strong> <strong>per</strong> <strong>Battery</strong> <strong>Type</strong>Twenty MEMORY positions allow you to set <strong>and</strong> store parameters for CHARGING your various packs, such as BATTERY TYPE[NiMH, NiCd, LiPo, LiIon, LiFePO4, (A123), Lead-Acid], battery CAPACITY, Charge RATE, Cutoff Voltage, Tem<strong>per</strong>ature, <strong>and</strong> more.BATTERY CHARGING - Let’s try it once to learn it….(Example: LiPo battery with balance connector. Follow the flow charts as you go…)MODE: Before Charging/Discharging is started: Scrolls between MENUS for MEMORY (Charging), USERSETUP, DATA VIEW, BALANCER. MODE also selects SOLO <strong>and</strong> SYNC modesMODE: During Charging/Discharging: Scrolls between VIEW MODES: MEMORY, DATA VIEW, And DATAQUICK VIEW screens.UP/DOWN: Scroll through the settings within Menus, Data Views, <strong>and</strong> Selects values for <strong>Settings</strong>ENTER: Selects any Setting to CHANGE (short push) <strong>and</strong> Charge START / Charge STOP (long push)Attach the charger to an appropriate DC power supply. Connect the Output Cable 4mm bullet connectors to the Red (+) <strong>and</strong>Black (-)output port on right side of the charger. Connect your <strong>Battery</strong> Main Connector to the Mating Connector you havepreviously soldered to the Output Cable set. Connect your Lithium Polymer battery Balance Connector to the EOS BalanceMulti-Adapter. ALWAYS USE THE BALANCER(s) WHEN CHARGING LITHIUM BASED PACKS FOR SAFETY!!(See end of these instructions for more information on balance multi-adapters for various-br<strong>and</strong> lithium packs).Note: Always connect the Output Cable set to charger first, then battery. After charging is finished, always disconnect the<strong>Battery</strong> main wire connectors from Output Cable set first, then disconnect Output Cable set from charger. Shorting of mainleads can damage the charger <strong>and</strong> will not be covered under warranty.After the Welcome screen, the charger will display the most recently used memory position.(see flowchart (2) MEMORY DISPLAY at this time)Pressing ENTER once will make the <strong>Memory</strong> Position start flashing. Flashing values can be changed with UP / DOWN keys.While Mem Position is flashing, Press DOWN to scroll through the ten available memory positions.Press ENTER again to confirm the memory position that you wish to use.From the memory screen, now press DOWN to get to BATT TYPE, press ENTER to start BATT TYPE flashing for selection.Press DOWN until you see your desired <strong>Battery</strong> <strong>Type</strong> (LiPo in this case). Press ENTER to confirm.Press DOWN again to select Pack Voltage which matches your batteryNote: the Charger shows both pack voltage <strong>and</strong> the number of cells in Series (S) on this screen, matching the Voltage <strong>and</strong><strong>Battery</strong> <strong>Type</strong> you have selected. If the “S” <strong>and</strong> the Voltage don’t match your battery, you have the Wrong <strong>Battery</strong> <strong>Type</strong>selected (like confusing LiIon 3.6v with LiPo 3.7v types). Use UP key to reach BATT TYPE again, <strong>and</strong> reset BATT TYPE pro<strong>per</strong>ly.Press DOWN to get to BATT CAPACITY; press ENTER to make the mAh value flash <strong>and</strong> adjust with the UP or DOWN buttonsuntil it matches your battery, by increments of 100mAh (to max of 50,000mAh). Press ENTER to confirm.If your battery is 730mAh, for example, you could set this to 700mAh. The common CHARGE RATE (set in next screen) forlithium is 1C of capacity (equal to 0.7A for a 700mAh setting).Press DOWN to get to CHG CURRENT. Max allowed charge rate for Lithium Polymer (LiPo 3.7v/cell) is 2C default, but selectablein USER SETUP, LIPO MAX C setting (1C~5C). CAUTION! For other cell types, there is no restriction, up to the 20A limit of thecharger, so BE SURE you know what CHG CURRENT setting to use for your battery (see also below text on cell types).Press DOWN to TEMPERATURE CUT-OFF. Requires option part #HP-EOSTMPSEN temp sensor; this is most often used byadvanced users for NiMH charging. The Default setting is 50 degrees Celsius.2
Press DOWN to SAFETY TIMER - Adjustable between 20 <strong>and</strong> 300 minutes. An alarm will sound during charging after selectedtime interval during charging has elapsed. Set the time for about 30% longer than it should take your pack to charge.Keep in mind that a badly balanced pack may take longer than normal to charge, so don’t set this too tight. A Lipo pack at 1Crate might take as much as 120 minutes to charge, so timer of about 160~180 minutes may be appropriate. Note that whileother safety checks based on capacity <strong>and</strong> voltage are also working for you, charging should never be left unattended in anycase.Press DOWN to TCS CAPACITY – For LiPo <strong>and</strong> LiIon battery types Terminal Capacity Selection is available from 50% to 100% ofpack capacity. During the charge, the EOS 0720i NET3 will continually estimate capacity in the pack, <strong>and</strong> either terminate thecharge or sound a signal tone (<strong>and</strong> continue charging) when your selected TCS <strong>per</strong>centage is reached, depending on the valuefor you set for TCS END ACTION. See end of manual for more details on TCS.Press DOWN to TCS END ACTION – Values are CONTINUE <strong>and</strong> STOP. CONTINUE is the default. In this case, when TCS% isreached for settings 50% to 95%, the charger will “beep” 10 times, but continue charging to 100% until stopped. If TCSACTION is set to STOP, the charger will stop charging at that TCS setting <strong>and</strong> - if balancing is complete – then give COMPLETE(END) Buzzer according to you buzzer settings. (or continue till balanced, then give End buzzer).Press DOWN to TVC = YOUR RISK! NEVER change this from default 0mV setting, unless you have CAREFULLY read <strong>and</strong>understood the information on TVC function given on pages 5&6, AND FULLY ACCEPT ANY CONSEQUENCES AND ALL RISKS!Press DOWN to DSCH CURRENT – If you’ll be discharging, you’ll set the discharge current here. Note that depending on the voltage of thepack, the current you set may not be obtainable if the total Volts multiplied by Current (A) exceeds 80W.Press DOWN to DSCH VOLTAGE <strong>per</strong> cell – Lithium types should only be discharged for storage, so we recommend that you use STOREMODE for that. Otherwise, you need to be sure of the V/cell setting yourself, according to your battery type. Over-discharge can damage packs.Pressing DOWN for a last time returns you to the ‘<strong>Memory</strong> Select’ screen.At this point, see flowchart (7) LiIo / LiPo / A123 BATTERY START. Holding the ENTER key pressed down for two secondsor more will start the CHARGE, STORE, or DISCHARGE process (select with UP/DOWN Keys) for LiPo, LiIon, <strong>and</strong> A123 types, nomatter where in the MEMORY (CHARGE) screens you may be. Additionally- if balancer circuits are connected <strong>and</strong> you have twoNET3 chargers networked by data cable – SYNC MODE is available via ENTER (short push) <strong>and</strong> UP/DOWN arrow keys.With “CHARGE START SOLO MODE” selected, hold down ENTER for 2 seconds. Hold down ENTER again, the charger will thenread **BATTERY CHECK** <strong>and</strong> then ask you to confirm the number of cells in your battery pack. Press ENTER (short press) fora final time to start charging. (if balancer is connected, a 10-second countdown occurs, then auto start). If TVC Function is setto anything other than the default 0mV, the TVC setting will show on the screen for a few seconds before charging begins. IFthe TVC setting is NOT as you wish (default STRONGLY SUGGESTED), STOP <strong>and</strong> reset TVC, then begin charge again!(see pages 5&6 for full details on TVC function)Note: If the Lithium-based pack is NOT connected to the balancer port, the Charger will read NO BALANCER. We stronglyrecommend using the balancer at ALL times.Holding down ENTER (2 seconds) at any time while charging a battery will then STOP charging (or discharging, etc…).MODE SELECTIONSBefore Charging/Discharging/Store are in progress, Pressing the MODE button will scroll you through the MEMORY, DATA VIEW,BALANCER <strong>and</strong> USER SETUP screens, allowing you to change parameters as you like (see charts for each)During Charging/Discharging/Store , Pressing the MODE button will scroll you through the MEMORY, BALANCER <strong>and</strong> QUICKVIEW Data screens. (see chart (9) OPERATION <strong>and</strong> FINISH DISPLAY)* MEMORY – Short-press UP/DOWN buttons to scroll through the data presented. At the top memory screen (showing C: A),you can press ENTER <strong>and</strong> UP/DOWN to change charge current if desired. You can also LONG-press (2-seconds) UP button tosee each screen presented in turn at two-second intervals.* BALANCER – UP/DOWN buttons to see detailed information on cell balancing, <strong>and</strong> individual cell voltages* QUICK VIEW – Shows the following useful info on a single screen:CAPACITY mAh/Ah (Charged in “C” or Discharged out “D”)INPUT VOLTAGE (Vi)PACK VOLTAGE (V)CHARGE CURRENT (A)CAPACITY (%) of the pack at current time.---- DATA VIEWPress the MODE button until you reach the DATA VIEW screen. (see chart (3) Data View Display)Use the UP or DOWN key to scroll through the various information presented:*INPUT – Current input voltage from the power supply*OUTPUT – The output voltage of charger while charging, or pack voltage of the battery while connected but not charging*BAT. RES – The internal resistance (IR) of the battery pack in mΩ.(IR value appears some seconds after charge is started, <strong>and</strong> will become more accurate as charge progresses)*TEMP <strong>and</strong> PEAK TEMP – Current Temp, <strong>and</strong> Peak Temp recorded during the charge (requires optional temp sensor)*CHARGE TIME, CHARGE CURRENT*PEAK CHARGE VOLTAGE(see chart #3 for other information screens available under Data View)3