RayClic Unpowered Installation Instructions - California Detection ...
RayClic Unpowered Installation Instructions - California Detection ...
RayClic Unpowered Installation Instructions - California Detection ...

You also want an ePaper? Increase the reach of your titles
YUMPU automatically turns print PDFs into web optimized ePapers that Google loves.
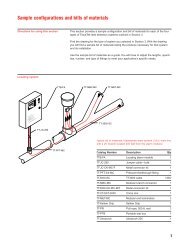
2<strong>RayClic</strong>-S, <strong>RayClic</strong>-T, <strong>RayClic</strong>-X <strong>Installation</strong> <strong>Instructions</strong>If you experience difficulty during installation, refer to the “Troubleshooting Guide” on page 7.Drip loopsFor pipe-mounted applications followsteps 1 through 10 (pages 2–4).For roof-mounted applications,follow steps 2 through 9 (pages 2–4),then turn to “Roof <strong>Installation</strong>” on page 5.Splice, Tee, and Cross <strong>Installation</strong>12• Place kit on pipe and attach with plastic cable ties.• Allow enough extra heating cable to make service loops as required.• Make sure end of heating cable is cut clean.34Do not cut throughmetal braid or innerjacket.• Score around and down the outer jacket of the heating cable3 1/8-inches from the end.• Remove the outer jacket.• Place metal clip over the base of exposed braid.3 1 /8"