

311832D - High-Flo Lowers, Instructions-Parts List ... - Graco Inc.
311832D - High-Flo Lowers, Instructions-Parts List ... - Graco Inc.
311832D - High-Flo Lowers, Instructions-Parts List ... - Graco Inc.

You also want an ePaper? Increase the reach of your titles
YUMPU automatically turns print PDFs into web optimized ePapers that Google loves.
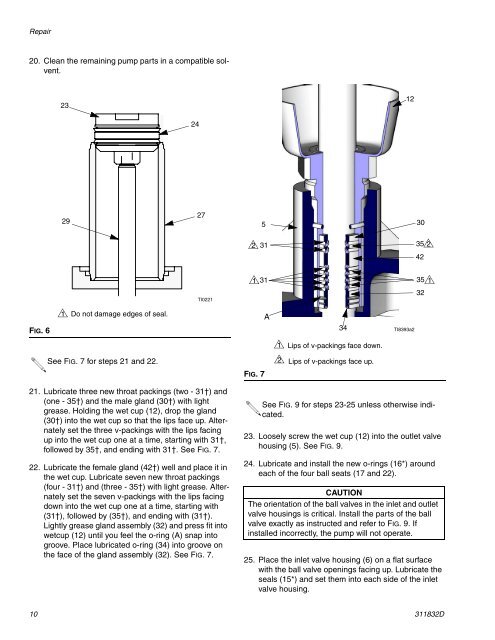
Repair20. Clean the remaining pump parts in a compatible solvent.23122429275302 3135 242TI02211 3135 132FIG. 61 Do not damage edges of seal.A34TI8393a21Lips of v-packings face down.See FIG. 7 for steps 21 and 22.2Lips of v-packings face up.FIG. 721. Lubricate three new throat packings (two - 31†) and(one - 35†) and the male gland (30†) with lightgrease. Holding the wet cup (12), drop the gland(30†) into the wet cup so that the lips face up. Alternatelyset the three v-packings with the lips facingup into the wet cup one at a time, starting with 31†,followed by 35†, and ending with 31†. See FIG. 7.22. Lubricate the female gland (42†) well and place it inthe wet cup. Lubricate seven new throat packings(four - 31†) and (three - 35†) with light grease. Alternatelyset the seven v-packings with the lips facingdown into the wet cup one at a time, starting with(31†), followed by (35†), and ending with (31†).Lightly grease gland assembly (32) and press fit intowetcup (12) until you feel the o-ring (A) snap intogroove. Place lubricated o-ring (34) into groove onthe face of the gland assembly (32). See FIG. 7.See FIG. 9 for steps 23-25 unless otherwise indicated.23. Loosely screw the wet cup (12) into the outlet valvehousing (5). See FIG. 9.24. Lubricate and install the new o-rings (16*) aroundeach of the four ball seats (17 and 22).CAUTIONThe orientation of the ball valves in the inlet and outletvalve housings is critical. Install the parts of the ballvalve exactly as instructed and refer to FIG. 9. Ifinstalled incorrectly, the pump will not operate.25. Place the inlet valve housing (6) on a flat surfacewith the ball valve openings facing up. Lubricate theseals (15*) and set them into each side of the inletvalve housing.10 <strong>311832D</strong>


