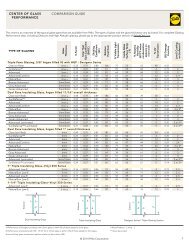
PDF - Pella.com
PDF - Pella.com
PDF - Pella.com

Create successful ePaper yourself
Turn your PDF publications into a flip-book with our unique Google optimized e-Paper software.
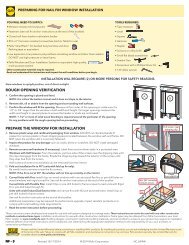
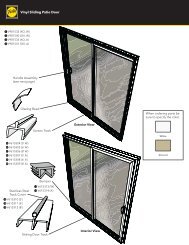
1 ROUGH OPENING PREPARATION (continued):B. Confirm the door will fit the opening.side, and in the center.Note: 1-1/2" or more of solid wood blocking isrequired around the perimeter of the opening.Fix any problems with the rough opening beforeproceeding.For Replacement Installation where nail fin is NOTbeing used, go to Step 5.Interior1BC. Apply flashing paper at the bottomrough opening. Position the top edge of the flashingpaper with the top of the sill plate. Center the flashingpaper with the opening width. Staple the flashing paperto the sill plate.Note: Sill flashing paper is not required for installationon concrete floors.D. Apply flashing paper to the sides of the roughopeninglonger than the height of the rough opening. Applyone piece to each jamb. Position the edge of theflashing paper with the inside edge of the trimmer (jackstud), and center the flashing paper with the height ofthe rough opening. Staple the flashing paper to thetrimmer.Exterior1D1CFOR DOORS USING OPTIONAL SILL PAN GO TO STEP 1I.E. Apply sill flashing tape #1.than the opening width. Apply at the bottom of the opening asNote: The tape is cut 12" longer than the width so that it willextend 6" up each side of the opening.F. Tab the sill flashing tape and fold.and press firmly to adhere it to the water resistive barrier. Apply sill flashing tape #2.In-swing doors: face of the framing.Note: The flashing tape may not fully cover the framing members.H. Attach the aluminum sill support or wood blocking to thePlace the sill support flush with the subfloor.GO TO STEP 2