


Create successful ePaper yourself
Turn your PDF publications into a flip-book with our unique Google optimized e-Paper software.
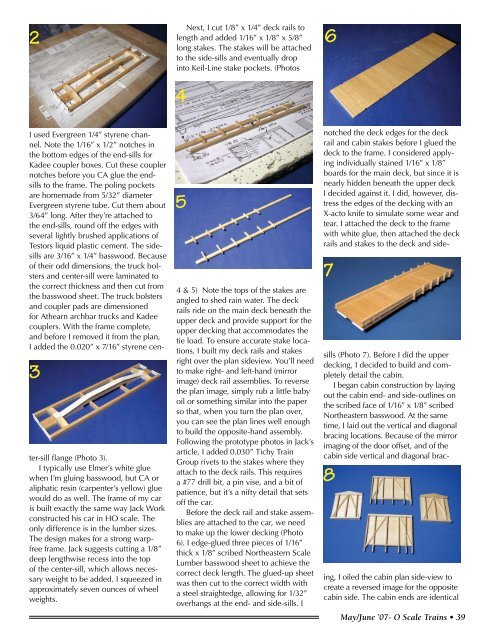
2Next, I cut 1/8” x 1/4” deck rails tolength and added 1/16” x 1/8” x 5/8”long stakes. The stakes will be attachedto the side-sills and eventually dropinto Keil-Line stake pockets. (Photos463I used Evergreen 1/4” styrene channel.Note the 1/16” x 1/2” notches inthe bottom edges of the end-sills forKadee coupler boxes. Cut these couplernotches before you CA glue the endsillsto the frame. The poling pocketsare homemade from 5/32” diameterEvergreen styrene tube. Cut them about3/64” long. After they’re attached tothe end-sills, round off the edges withseveral lightly brushed applications ofTestors liquid plastic cement. The sidesillsare 3/16” x 1/4” basswood. Becauseof their odd dimensions, the truck bolstersand center-sill were laminated tothe correct thickness and then cut fromthe basswood sheet. The truck bolstersand coupler pads are dimensionedfor Athearn archbar trucks and Kadeecouplers. With the frame complete,and before I removed it from the plan,I added the 0.020” x 7/16” styrene center-sillflange (Photo 3).I typically use Elmer’s white gluewhen I’m gluing basswood, but CA oraliphatic resin (carpenter’s yellow) gluewould do as well. The frame of my caris built exactly the same way Jack Workconstructed his car in HO scale. Theonly difference is in the lumber sizes.The design makes for a strong warpfreeframe. Jack suggests cutting a 1/8”deep lengthwise recess into the topof the center-sill, which allows necessaryweight to be added. I squeezed inapproximately seven ounces of wheelweights.54 & 5) Note the tops of the stakes areangled to shed rain water. The deckrails ride on the main deck beneath theupper deck and provide support for theupper decking that accommodates thetie load. To ensure accurate stake locations,I built my deck rails and stakesright over the plan sideview. You’ll needto make right- and left-hand (mirrorimage) deck rail assemblies. To reversethe plan image, simply rub a little babyoil or something similar into the paperso that, when you turn the plan over,you can see the plan lines well enoughto build the opposite-hand assembly.Following the prototype photos in Jack’sarticle, I added 0.030” Tichy TrainGroup rivets to the stakes where theyattach to the deck rails. This requiresa #77 drill bit, a pin vise, and a bit ofpatience, but it’s a nifty detail that setsoff the car.Before the deck rail and stake assembliesare attached to the car, we needto make up the lower decking (Photo6). I edge-glued three pieces of 1/16”thick x 1/8” scribed Northeastern <strong>Scale</strong>Lumber basswood sheet to achieve thecorrect deck length. The glued-up sheetwas then cut to the correct width witha steel straightedge, allowing for 1/32”overhangs at the end- and side-sills. I78notched the deck edges for the deckrail and cabin stakes before I glued thedeck to the frame. I considered applyingindividually stained 1/16” x 1/8”boards for the main deck, but since it isnearly hidden beneath the upper deckI decided against it. I did, however, distressthe edges of the decking with anX-acto knife to simulate some wear andtear. I attached the deck to the framewith white glue, then attached the deckrails and stakes to the deck and sidesills(Photo 7). Before I did the upperdecking, I decided to build and completelydetail the cabin.I began cabin construction by layingout the cabin end- and side-outlines onthe scribed face of 1/16” x 1/8” scribedNortheastern basswood. At the sametime, I laid out the vertical and diagonalbracing locations. Because of the mirrorimaging of the door offset, and of thecabin side vertical and diagonal bracing,I oiled the cabin plan side-view tocreate a reversed image for the oppositecabin side. The cabin ends are identicalMay/June ’07- O <strong>Scale</strong> <strong>Trains</strong> • 39


