


You also want an ePaper? Increase the reach of your titles
YUMPU automatically turns print PDFs into web optimized ePapers that Google loves.
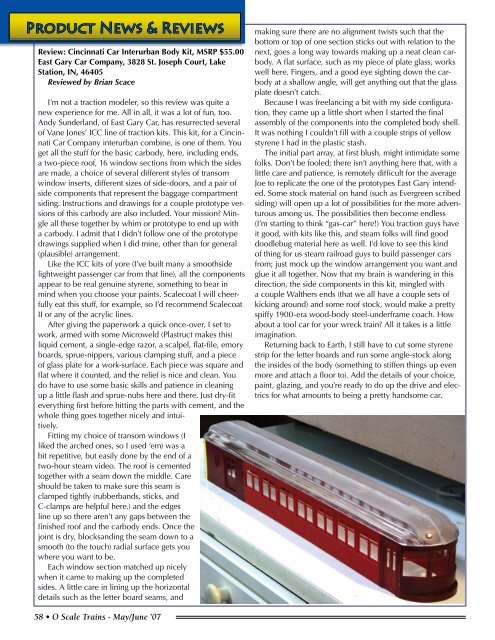
Product News & ReviewsReview: Cincinnati Car Interurban Body Kit, MSRP $55.00East Gary Car Company, 3828 St. Joseph Court, LakeStation, IN, 46405Reviewed by Brian ScaceI’m not a traction modeler, so this review was quite anew experience for me. All in all, it was a lot of fun, too.Andy Sunderland, of East Gary Car, has resurrected severalof Vane Jones’ ICC line of traction kits. This kit, for a CincinnatiCar Company interurban combine, is one of them. Youget all the stuff for the basic carbody, here, including ends,a two-piece roof, 16 window sections from which the sidesare made, a choice of several different styles of transomwindow inserts, different sizes of side-doors, and a pair ofside components that represent the baggage compartmentsiding. Instructions and drawings for a couple prototype versionsof this carbody are also included. Your mission? Mingleall these together by whim or prototype to end up witha carbody. I admit that I didn’t follow one of the prototypedrawings supplied when I did mine, other than for general(plausible) arrangement.Like the ICC kits of yore (I’ve built many a smoothsidelightweight passenger car from that line), all the componentsappear to be real genuine styrene, something to bear inmind when you choose your paints. <strong>Scale</strong>coat I will cheerfullyeat this stuff, for example, so I’d recommend <strong>Scale</strong>coatII or any of the acrylic lines.After giving the paperwork a quick once-over, I set towork, armed with some Microweld (Plastruct makes this)liquid cement, a single-edge razor, a scalpel, flat-file, emoryboards, sprue-nippers, various clamping stuff, and a pieceof glass plate for a work-surface. Each piece was square andflat where it counted, and the relief is nice and clean. Youdo have to use some basic skills and patience in cleaningup a little flash and sprue-nubs here and there. Just dry-fiteverything first before hitting the parts with cement, and thewhole thing goes together nicely and intuitively.Fitting my choice of transom windows (Iliked the arched ones, so I used ‘em) was abit repetitive, but easily done by the end of atwo-hour steam video. The roof is cementedtogether with a seam down the middle. Careshould be taken to make sure this seam isclamped tightly (rubberbands, sticks, andC-clamps are helpful here.) and the edgesline up so there aren’t any gaps between thefinished roof and the carbody ends. Once thejoint is dry, blocksanding the seam down to asmooth (to the touch) radial surface gets youwhere you want to be.Each window section matched up nicelywhen it came to making up the completedsides. A little care in lining up the horizontaldetails such as the letter board seams, andmaking sure there are no alignment twists such that thebottom or top of one section sticks out with relation to thenext, goes a long way towards making up a neat clean carbody.A flat surface, such as my piece of plate glass, workswell here. Fingers, and a good eye sighting down the carbodyat a shallow angle, will get anything out that the glassplate doesn’t catch.Because I was freelancing a bit with my side configuration,they came up a little short when I started the finalassembly of the components into the completed body shell.It was nothing I couldn’t fill with a couple strips of yellowstyrene I had in the plastic stash.The initial part array, at first blush, might intimidate somefolks. Don’t be fooled; there isn’t anything here that, with alittle care and patience, is remotely difficult for the averageJoe to replicate the one of the prototypes East Gary intended.Some stock material on hand (such as Evergreen scribedsiding) will open up a lot of possibilities for the more adventurousamong us. The possibilities then become endless(I’m starting to think “gas-car” here!) You traction guys haveit good, with kits like this, and steam folks will find gooddoodlebug material here as well. I’d love to see this kindof thing for us steam railroad guys to build passenger carsfrom; just mock up the window arrangement you want andglue it all together. Now that my brain is wandering in thisdirection, the side components in this kit, mingled witha couple Walthers ends (that we all have a couple sets ofkicking around) and some roof stock, would make a prettyspiffy 1900-era wood-body steel-underframe coach. Howabout a tool car for your wreck train? All it takes is a littleimagination.Returning back to Earth, I still have to cut some styrenestrip for the letter boards and run some angle-stock alongthe insides of the body (something to stiffen things up evenmore and attach a floor to). Add the details of your choice,paint, glazing, and you’re ready to do up the drive and electricsfor what amounts to being a pretty handsome car.58 • O <strong>Scale</strong> <strong>Trains</strong> - May/June ’07


