Dante-MY16-AUD & Rio series HA Remote Control Guide
Dante-MY16-AUD & Rio series HA Remote Control Guide
Dante-MY16-AUD & Rio series HA Remote Control Guide

You also want an ePaper? Increase the reach of your titles
YUMPU automatically turns print PDFs into web optimized ePapers that Google loves.
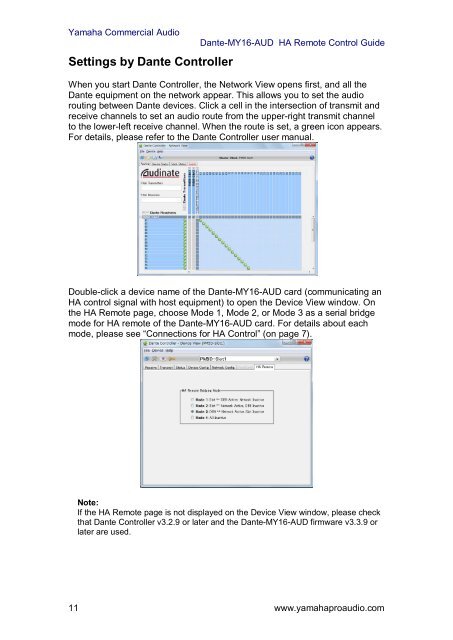
Yamaha Commercial AudioSettings by <strong>Dante</strong> <strong>Control</strong>ler<strong>Dante</strong>-<strong>MY16</strong>-<strong>AUD</strong> <strong>HA</strong> <strong>Remote</strong> <strong>Control</strong> <strong>Guide</strong>When you start <strong>Dante</strong> <strong>Control</strong>ler, the Network View opens first, and all the<strong>Dante</strong> equipment on the network appear. This allows you to set the audiorouting between <strong>Dante</strong> devices. Click a cell in the intersection of transmit andreceive channels to set an audio route from the upper-right transmit channelto the lower-left receive channel. When the route is set, a green icon appears.For details, please refer to the <strong>Dante</strong> <strong>Control</strong>ler user manual.Double-click a device name of the <strong>Dante</strong>-<strong>MY16</strong>-<strong>AUD</strong> card (communicating an<strong>HA</strong> control signal with host equipment) to open the Device View window. Onthe <strong>HA</strong> <strong>Remote</strong> page, choose Mode 1, Mode 2, or Mode 3 as a serial bridgemode for <strong>HA</strong> remote of the <strong>Dante</strong>-<strong>MY16</strong>-<strong>AUD</strong> card. For details about eachmode, please see “Connections for <strong>HA</strong> <strong>Control</strong>” (on page 7).Note:If the <strong>HA</strong> <strong>Remote</strong> page is not displayed on the Device View window, please checkthat <strong>Dante</strong> <strong>Control</strong>ler v3.2.9 or later and the <strong>Dante</strong>-<strong>MY16</strong>-<strong>AUD</strong> firmware v3.3.9 orlater are used.11 www.yamahaproaudio.com