C-13872 Instruction E44 Owner's Manual.pdf - Enviro
C-13872 Instruction E44 Owner's Manual.pdf - Enviro
C-13872 Instruction E44 Owner's Manual.pdf - Enviro

Create successful ePaper yourself
Turn your PDF publications into a flip-book with our unique Google optimized e-Paper software.
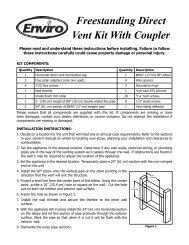
DiRect Vent VeRticaL Vent teRmination:<br />
instaLLation instRuctions:<br />
Initial Installation<br />
QUALIFIED INSTALLERS ONLY<br />
1. Plan your installation and clearances to combustibles. The <strong>E44</strong> may be installed and vented into<br />
any solid fuel fireplace that has been installed in accordance with the National, Provincial/State and<br />
local building codes and has been constructed of non-combustible materials. Also refer to the InItIal<br />
InstallatIon - preparIng your e44 For InstallatIon and clearances to combustIbles sections. Refer to<br />
Figure 24 throughout installation.<br />
2. Stretch the Ø3” (76mm) flex vent liners to the length needed to ensure they can be easily connected<br />
to the vent terminals.<br />
3. Install the flex pipe assembly up through the chimney, ensure that the pipe slides through far enough<br />
to connect onto the vent cap.<br />
4. Most vent caps can be installed onto chimneys with flue openings up to 16” (406mm) x 16” (406mm)<br />
and the actual flashing is 18”x18” (refer to Figure 28). If the chimney is smaller the cap should be<br />
trimmed down and folded over.<br />
5. Apply a bead of stove cement sealant to the top section of the Ø3” (76mm) exhaust vent collar plate.<br />
Slide the Ø3” (76mm) flex vent over the flue collar and secure with three (3) sheet metal screws<br />
evenly spaced.<br />
6. Place a bead of high temperature silicone on the intake collar of the fireplace, slide the Ø3” (76mm)<br />
flex intake liner over the collar, secure the flex liner with three (3) sheet metal screws evenly spaced.<br />
7. At the top of the chimney, apply a bead of stove cement sealant to the Ø3” (76mm) pipe of the<br />
exhaust vent terminal (refer to Figure 26). Slide the flex liner onto the vent terminal and secure with<br />
three (3) sheet metal screws evenly spaced.<br />
8. Place a bead of high temperature silicone on the intake collar of the vent terminal (refer to Figure 26).<br />
Slide the Ø3” (76mm) flex intake liner over the collar, secure the flex liner with three (3) sheet metal<br />
screws evenly spaced.<br />
9. Make a tight connection between the gas fireplace insert flue collar and the fireplace chimney at the<br />
top of the chimney. Secure the vent terminal to the chimney using adequate sealant, and according<br />
to local building codes.<br />
APPROVED TERMINATIONS:<br />
-Simpson Dura-Vent<br />
46DVA-VCH cap with 46DVA-GK<br />
termination adapter<br />
or 46DVA-CL33 termination kit<br />
-ICC TM-4SVT cap with TM-CTA<br />
termination adapter<br />
Trim flashing<br />
as required.<br />
18"<br />
(457mm)<br />
18"<br />
(457mm)<br />
Figure 28: Generic Vent Cap Dimensions.<br />
23