You also want an ePaper? Increase the reach of your titles
YUMPU automatically turns print PDFs into web optimized ePapers that Google loves.
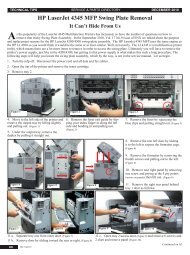
TECHNICAL TIPS SERVICE & PARTS DIRECTORY DECEMBER <strong>2010</strong>AHP LaserJet 4345 MFP Swing Plate RemovalIt Can’t Hide From Uss the popularity of the LaserJet 4345 Multifunction Printers has increased, so have the number of questions on how toremove that tricky Swing Plate Assembly. In the September <strong>2010</strong>, Vol. 17 No.9 issue of <strong>ENX</strong> we talked about the purposeand replacement reasons for the HP LaserJet 4200/4300 swing-plate assembly. The HP LaserJet 4345 MFP uses the same engine asthe HP LJ 4300 so you would think it would be the same or at least similar. Well, not exactly. The LJ 4345 is a multifunction printer(mfp), which means there are a lot more items to remove in order to access the swing plate. Ultimately you will have to remove theprinter’s power supply, just like in the 4200/4300, but getting to that power supply is what makes this such a long procedure. Thefollowing steps will help you locate the swing plate assembly, which by the way, is not in the service manual. Let us begin.1. Turn the mfp off. Disconnect the power cord and all data and fax cables.2. Open the top of the printer and remove the toner cartridge.3. Remove tray 2.Figure 1 Figure 2 Figure 34. Move to the left side of the printer andremove the output tray by lifting slightlyand pulling out. (Figure 1)5. Under the output tray, remove theduplex by pulling it straight out.6. Remove the fuser exit guide by slippingyour index finger in along the leftside and bending in and pulling out.(Figure 2)7. Remove the fuser by squeezing theblue clips and pulling straight out. (Figure 3)8. Remove the rear left door by slidingit to the left to expose the formatter cage.(Figure 4)9. Remove the formatter by removing thethumb screws and pulling out to the left.(Figure 5)10. Remove rear right panel by removingone screw and prying at the 5 pry points(arrows on panels) then lift out. (Figure 6)Figure 4 Figure 5 Figure 611. Remove the right rear panel behindtray 1 door as follows:Figure 7Figure 8Tray 2 access doorFigure 9 Figure 1011 a. Separate tray one from outer door. (Figure 7)11 b. Remove door by sliding toward the rear or right. (Figure 8)60 enx magazine11 c. Open tray 2 access door (Figure 9) and remove 6 screws and2 clips and remove panel (Figure 10).Continued on 62