- Page 1 and 2: PanelView Plus Terminals 400, 600,
- Page 3 and 4: Summary of Changes The information
- Page 5 and 6: Table of Contents Preface Objective
- Page 7 and 8: Table of Contents 7 DH-485/DH+/Remo
- Page 9 and 10: Objectives Intended Audience Parts
- Page 11 and 12: Chapter Objectives Software Support
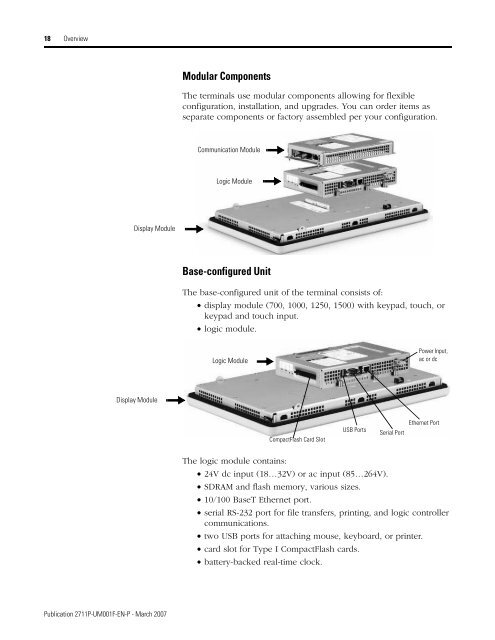
- Page 13 and 14: Base-configured Unit with RS-232 an
- Page 15 and 16: Display and Input Options Overview
- Page 17: PanelView Plus 700 to 1500 Terminal
- Page 21 and 22: Programmable Function Keys (optiona
- Page 23 and 24: Display Modules (700 to 1500 only)
- Page 25 and 26: Backlights (700 to 1500 only) Cat.
- Page 27 and 28: Communication Adapters Overview 27
- Page 29 and 30: Chapter Objectives Hazardous Locati
- Page 31 and 32: Table 2.2, Required Circuit Paramet
- Page 33 and 34: Required Tools Installation 33 When
- Page 35 and 36: Mounting Slots Installation 35 Foll
- Page 37 and 38: Mount the 700 to 1500 Terminal in a
- Page 39 and 40: Product Dimensions 90 3.54) Product
- Page 41 and 42: 193 (7.58) 179 (7.04) 290 (11.40) 2
- Page 43 and 44: 282 (11.12) 282 (11.12) 416 (16.36)
- Page 45 and 46: Chapter Objectives Wiring and Safet
- Page 47 and 48: Power Connections 47 2. Gently pry
- Page 49 and 50: DC Power Connections 400 and 600 Te
- Page 51 and 52: 700 to 1500 dc Terminals Functional
- Page 53 and 54: Functional Earth Connection Power C
- Page 55 and 56: Reset the Terminals Power Connectio
- Page 57 and 58: Chapter Objectives Access Configura
- Page 59 and 60: Navigation Buttons Configuration Mo
- Page 61 and 62: Load an Application List of .MER ap
- Page 63 and 64: Configure Communications Configurat
- Page 65 and 66: Configuration Mode 65 You return to
- Page 67 and 68: Configure the Controller Address Co
- Page 69 and 70:
Define an Ethernet IP Address Confi
- Page 71 and 72:
Define Name Server Addresses Config
- Page 73 and 74:
Remote Log Destination Configuratio
- Page 75 and 76:
List of files stored in CompactFlas
- Page 77 and 78:
Modify Display Settings Configurati
- Page 79 and 80:
Configure the Screen Saver Configur
- Page 81 and 82:
Font Linking Courier New MS Mincho
- Page 83 and 84:
Configure Keypad Settings for the T
- Page 85 and 86:
Enable or Disable the Cursor on Tou
- Page 87 and 88:
Configure Print Options Configurati
- Page 89 and 90:
Configure Startup Options Configura
- Page 91 and 92:
Run the Loaded Application on Start
- Page 93 and 94:
Start RSView ME Station Software an
- Page 95 and 96:
Configure Startup Tests Configurati
- Page 97 and 98:
View and Clear the System Event Log
- Page 99 and 100:
Configuration Mode 99 2. Press the
- Page 101 and 102:
Modify the Date, Time, or Time Zone
- Page 103 and 104:
Change the Time Zone Configuration
- Page 105 and 106:
Configuration Mode 105 3. Press OK.
- Page 107 and 108:
Change the Short Date Format Config
- Page 109 and 110:
Chapter Objectives Windows CE .NET
- Page 111 and 112:
Windows CE .NET Operating System Ot
- Page 113 and 114:
Start Menu and Taskbar Windows CE .
- Page 115 and 116:
PanelView Plus CE Memory Windows CE
- Page 117 and 118:
Control Panel Applications Windows
- Page 119 and 120:
Identification and Notes Windows CE
- Page 121 and 122:
4. Click OK in the title bar. Windo
- Page 123 and 124:
Keyboard Windows CE .NET Operating
- Page 125 and 126:
Windows CE .NET Operating System 12
- Page 127 and 128:
Backlight Windows CE .NET Operating
- Page 129 and 130:
Tests Windows CE .NET Operating Sys
- Page 131 and 132:
System Windows CE .NET Operating Sy
- Page 133 and 134:
Date/Time Windows CE .NET Operating
- Page 135 and 136:
Internet Options Windows CE .NET Op
- Page 137 and 138:
Chapter Objectives Required Tools P
- Page 139 and 140:
Install and Replace Components 139
- Page 141 and 142:
Install RAM or Internal CompactFlas
- Page 143 and 144:
Install and Replace Components 143
- Page 145 and 146:
Communication Module Connector Logi
- Page 147 and 148:
Install and Replace Components 147
- Page 149 and 150:
Install and Replace Components 149
- Page 151 and 152:
Remove battery by lifting up the ed
- Page 153 and 154:
6. Remove the sealing gasket. Insta
- Page 155 and 156:
Replace the Backlight Install and R
- Page 157 and 158:
Backlight b. Insert the new backlig
- Page 159 and 160:
Replace the Keypad Legend Inserts I
- Page 161 and 162:
Use an External CompactFlash Card I
- Page 163 and 164:
Chapter Objectives Wiring and Safet
- Page 165 and 166:
PanelView Plus and PanelView Plus C
- Page 167 and 168:
Communication Port Isolation Termin
- Page 169 and 170:
Serial Connections Base-configured
- Page 171 and 172:
Computer Connections Terminal Conne
- Page 173 and 174:
Cables Terminal Connections 173 The
- Page 175 and 176:
DH+ Status Indicator Condition Indi
- Page 177 and 178:
DH-485 Connections for 400 and 600
- Page 179 and 180:
To Controller Remote I/O Connection
- Page 181 and 182:
Minimum Requirements Terminal Conne
- Page 183 and 184:
DeviceNet Module NAP and Redundant
- Page 185 and 186:
DeviceNet Connections 2711P-RN10C D
- Page 187 and 188:
DeviceNet Module (MOD) Status Indic
- Page 189 and 190:
Chapter Objectives Transfer Applica
- Page 191 and 192:
Terminate Connection on PanelView P
- Page 193 and 194:
Upgrade Firmware 193 3. From the Fi
- Page 195 and 196:
Upgrade Firmware 195 If other termi
- Page 197 and 198:
2. Select Upgrade firmware on termi
- Page 199 and 200:
Upgrade Firmware 199 8. From the Fi
- Page 201 and 202:
Upgrade Firmware 201 Ignore this er
- Page 203 and 204:
Load PanelView Plus CE Components Y
- Page 205 and 206:
Chapter Objectives LED Indicators T
- Page 207 and 208:
Check the Startup Messages for Erro
- Page 209 and 210:
Startup Information Messages (1) (2
- Page 211 and 212:
Startup Error Messages (1) (2) Trou
- Page 213 and 214:
Isolate Problems with the Touch Scr
- Page 215 and 216:
Isolate Problems with the Mouse Tro
- Page 217 and 218:
Ethernet Connnection Troubleshoot t
- Page 219 and 220:
Advanced Diagnostics for CE Termina
- Page 221 and 222:
Restart in Safe Mode Troubleshoot t
- Page 223 and 224:
Electrical Environmental Specificat
- Page 225 and 226:
Mechanical Specifications 225 Attri
- Page 227 and 228:
Device Vendor Model Compatible USB
- Page 229 and 230:
Download Fonts to Terminal PanelVie
- Page 231 and 232:
Available Fonts for Terminal Applic
- Page 233 and 234:
Programmable Key Definitions Append
- Page 235 and 236:
Security Considerations Appendix E
- Page 237 and 238:
A ac power 400, 600 19 700 to 1500
- Page 239 and 240:
K keyboard compatibility 227 mouse
- Page 244:
Rockwell Automation Support Rockwel