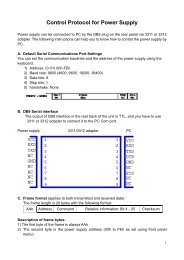
GPS Data Logger User's Manual - Ventus
GPS Data Logger User's Manual - Ventus
GPS Data Logger User's Manual - Ventus

Create successful ePaper yourself
Turn your PDF publications into a flip-book with our unique Google optimized e-Paper software.
2008<br />
<strong>GPS</strong> <strong>Data</strong> <strong>Logger</strong> User’s <strong>Manual</strong><br />
2008 April
Contents<br />
Read <strong>GPS</strong> Log From Device ...................................................................................................................... 3<br />
Clear <strong>Data</strong> <strong>Logger</strong> Memory ...................................................................................................................... 4<br />
<strong>Data</strong> <strong>Logger</strong> Configuration ....................................................................................................................... 5<br />
Track List Window ................................................................................................................................... 7<br />
Add Place Mark ....................................................................................................................................... 8<br />
Add Photos .............................................................................................................................................. 9<br />
Browse photos ...................................................................................................................................... 10<br />
GeoTag – Save <strong>GPS</strong> Information into Photos .......................................................................................... 10<br />
Photo List Window ................................................................................................................................ 11<br />
Upload Photos to Flickr ......................................................................................................................... 11<br />
Shift Photo Time .................................................................................................................................... 12<br />
Photo Comments................................................................................................................................... 13<br />
Media List View ..................................................................................................................................... 13<br />
Google Earth Viewing ............................................................................................................................ 14<br />
Save As KMZ File .................................................................................................................................... 14<br />
Altitude Graph ....................................................................................................................................... 14<br />
Speed graph .......................................................................................................................................... 15<br />
Track Editing .......................................................................................................................................... 15<br />
Save and Open Project .......................................................................................................................... 18<br />
Time Zone Setting ................................................................................................................................. 18<br />
Options ................................................................................................................................................. 19
Read <strong>GPS</strong> Log From Device<br />
Step 1 – Connect <strong>Data</strong> <strong>Logger</strong> to PC USB port. Please make sure the <strong>Data</strong><br />
<strong>Logger</strong> power is turn on.<br />
Step 2 – Menu command “File” -> “Read log…” Users have to input product<br />
key at the first time. The product key is on the cover of installation CD.<br />
<strong>GPS</strong> Photo Tagger will automatically detect the port and baud rate and read in<br />
the <strong>GPS</strong> tracks.<br />
A track list window will be popped up. Select the tracks to import.
Tracks will be shown on the Google Map window.<br />
Clear <strong>Data</strong> <strong>Logger</strong> Memory<br />
Menu command “File” -> “Clear log” will clear the data stored in device, so the<br />
device memory are enough for next usage.
<strong>Data</strong> <strong>Logger</strong> Configuration<br />
Connect <strong>Data</strong> <strong>Logger</strong> to PC and turn on <strong>Data</strong> <strong>Logger</strong>. Menu command “File” -><br />
“Config <strong>GPS</strong>…” If <strong>Data</strong> <strong>Logger</strong> is not connected, the <strong>GPS</strong> Log Setting area will be<br />
disabled. Please make sure the <strong>Data</strong> <strong>Logger</strong> power switch is turn on when connect.<br />
Connection Setting:
Auto Scan <strong>GPS</strong> Module (Recommended)<br />
The program will automatically detect the com port and the baud rate. It is<br />
recommended to set to auto scan.<br />
<strong>Manual</strong> Setting<br />
Users can also manually set the port and baud rate. Although it can speed up the initial<br />
connect time, but it is not recommended unless users understand the valid port and<br />
baud rate.<br />
Reset Device<br />
Reset the <strong>GPS</strong> device when the behavior is abnormal.<br />
<strong>GPS</strong> Log Setting<br />
There are 4 log modes: General mode, vehicle mode, cycling mode, and<br />
hiking mode. Users can also change the default setting of these 4 modes.<br />
Log every () seconds:<br />
Specify the log period. For example, if specify 3 seconds, the <strong>GPS</strong> device will log<br />
every 3 seconds.<br />
Log every () meters:<br />
Specify the log distance. For example, if specify 10 meters, the <strong>GPS</strong> device will<br />
log every 10 meters.<br />
Log over () km/h:<br />
Specify the log speed. For example, if specify 20 km/h, the <strong>GPS</strong> device will log<br />
when the speed is over 20 km/h.<br />
Note: <strong>GPS</strong> device will log only when the log period, log distance, and log speed all meet<br />
the criteria.<br />
<strong>Data</strong> Log Memory<br />
A bar show how many percentage of memory is used in the <strong>Data</strong> <strong>Logger</strong><br />
device. Users can use “Clear Log” to clear all the memory.
When data logger memory is full<br />
Overwrite: Overwrite the earliest logged data.<br />
Stop Log: Stop data logging.<br />
Track List Window<br />
Tracks are list on the top. Users can change the colors and line widths of tracks.<br />
Press “Play” button, Google map window will animate the whole trip by moving the current position.<br />
Check “Photo Slide Show” will show photo while animate trips.
Add Place Mark<br />
To add a new place mark, please click on the blue balloon icon, and then<br />
click on the position of new place marker. The “Place Mark Property” dialog<br />
will be pop up for editing.<br />
Users can manually add photos to the place mark, or delete photos from<br />
the place mark.
Add Photos<br />
Users can add photo from a file folder, or selected files.<br />
Add photo from a folder: Menu command “Photo” -> “Add Photo…” -><br />
“From Folder”. Select a folder to add photo.<br />
Add photo from selected files: Menu command “Photo” -> “Add Photo…” -><br />
“From Files”. Use Ctrl-Click, or Shift-Click to select multiple files.<br />
The photo will show on the Photo View window. Users can add comments<br />
to each photo. Users can also rotate, delete photo.<br />
When photos are added, <strong>GPS</strong> Photo Tagger will automatically match photo<br />
and <strong>GPS</strong> logged waypoints by time. Place marks will be created as a<br />
placeholder for photos.
Browse photos<br />
Click on the “next photo” and “prev photo” buttons to browse the photos.<br />
Current photo and current place mark will be synchronized.<br />
Synchronized<br />
GeoTag – Save <strong>GPS</strong> Information into Photos<br />
Menu command “Photo” -> “Write <strong>GPS</strong> info into photos” will save the<br />
latitude, longitude, and altitude into photo.<br />
A progress window will show the writing progress.
Photo List Window<br />
Photo list window will show the attributes of photos. The information includes<br />
“file name”, “date”, “place mark”, “latitude”, “longitude”, and “Geotagged<br />
flag”.<br />
Upload Photos to Flickr<br />
Menu command “Photo” > “Upload Photos to Flickr…” will invoke upload<br />
wizard. Users can set “Title”, “description”, “Tag”, “Public or Private”, and<br />
“Upload photo size”.
If you want to upload geotagged photos directly on Flickr web site:<br />
You have to turn on the following option. "Your Account">"Privacy &<br />
Permissions">"Import EXIF location data: Yes"<br />
After the option is turned on, the uploaded photo will be put on map.<br />
Go to Flickr > “You” > “Your map”, you can browse your photos on the map.<br />
Shift Photo Time<br />
Menu command “Photo” -> “Shift photo time…” will invoke the shift photo<br />
time window. All the photo will be added (or subtracted) the specified time.<br />
The dates are saved in the Exif parts of Jpeg or Tiff file. After the shift, <strong>GPS</strong><br />
Photo Tagger will automatically match the photo and track waypoints again.<br />
User can put more than 365 in days.
Photo Comments<br />
Support multi-language comments. The comments will be uploaded to Flickr,<br />
packed in the kml file.<br />
Media List View<br />
Users can import not only photos. All other media files are allowed to be<br />
imported and tagged to tracks according to the file create times.
Google Earth Viewing<br />
Command “File” -> “View in Google Earth” will invoke Google Earth to view<br />
the tracks and photos. Users have to install the Google earth.<br />
http://earth.google.com/<br />
Save As KMZ File<br />
Menu command “File” -> “Export as Kmz…” to save the tracks and photos in<br />
kmz file. You can import kmz file to Google Earth. You can also send kmz file to<br />
friends to share their trips with friends as long as they have installed Google<br />
Earth on their computers.<br />
The picture size packed in the kmz file can be set in the options dialog. Menu<br />
command “Tools” -> “Options” > “Google Earth” > “Photo size in KMZ”.<br />
Altitude Graph<br />
Switch to “Altitude View” window will show the altitude graph. The waypoints<br />
with photos on it will be marked with red square. Moving cursor on red square<br />
will display the photo. You can pan left, pan right, zoom in, zoom out in the<br />
altitude graph.
Speed graph<br />
Switch to “Speed View” window will show the speed graph. The waypoints with<br />
photos on it will be marked with red square. Moving cursor on red square will<br />
display the photo. You can pan left, pan right, zoom in, zoom out in the altitude<br />
graph.<br />
Track Editing<br />
Switch to folder “Track Editor” on the left window. Move the cursor on the<br />
track will show the preselected waypoint time. Click on track to select the<br />
whole track.
- Shift-Click multiple selections<br />
Select one waypoint, and then shift-click on another waypoints. The<br />
waypoints between these two waypoints will all be selected.<br />
- Ctrl-Click multiple selections<br />
Ctrl-Click on waypoints will toggle the waypoints selections.<br />
- Area selection<br />
Click on “Area Selection”button, drag an rectangle area. All the<br />
waypoints and place marks in the rectangle area will be selected.<br />
- Delete waypoints<br />
Click on “Remove” button to remove the selected objects.<br />
- Split tracks<br />
Click on a waypoint, and click right mouse button. Select command<br />
“Split Track”.
- Merge tracks<br />
Command “Track” > “Merge Tracks”.<br />
Select the tracks. Press OK button.<br />
- Undo/Redo<br />
press “undo” “redo” buttons to undo/redo the edit actions. Multiple<br />
layers of undo/redo are suppoted.
Save and Open Project<br />
Menu command “File” -> “Save project” will save the tracks and photo as a<br />
project file.<br />
Menu command “File” -> “Open project…” will open the saved project. The<br />
project, photos, and photo comments will be restored after the project<br />
opened.<br />
Time Zone Setting<br />
There are two time zone settings in “<strong>GPS</strong> Photo Tagger”. One is “Photo time<br />
zone”, the other is “Display time zone”. “Photo time zone” is set to the same<br />
time zone of your digital camera. The “Display time zone” is set for displaying<br />
purpose. For example, If you are an Englishman and you travel to United State.<br />
The “Photo time zone” should be set to “England” because your digital camera<br />
time zone is in England, and the display time zone should be set to “United<br />
State”.<br />
The “Photo time zone” by default is set to the PC default value. In most of the<br />
case the default value is correct.<br />
Menu command “Tools” -> “Options” will invoke the options dialog. You can<br />
set “Photo Time Zone” in the dialog.
The “display time zone” setting is in the status bar.<br />
Options<br />
Menu command “Tools” > “Options…”
Distance unit:<br />
Metric: Kilometer / meters will be used for displaying.<br />
Imperial: Miles / feet will be used for displaying.<br />
Lat/Long:<br />
Degrees, minutes, seconds: Latitude and longitude will be display like 23°12’20”<br />
Degrees: Latitude and longitude will be display like 23.22152°<br />
Photo Time Zone:<br />
The time zone of your digital camera time setting<br />
Max photo/track diff time:
The setting is used to match photo and track waypoints. Photo Tagger will match photos<br />
and waypoints by time. It will find the nearest waypoint time to locate the photo. Yet, if<br />
the closest waypoint time is more than the “Max photo/track diff time”, it will not<br />
match the photo.<br />
Group Photos when distance is less than:<br />
When two photos’ distance is less than the setting, these two photos will be put in the<br />
same place mark.<br />
Photo size in KMZ:<br />
The size of the photos packed in the KMZ file. It is related to the command “File” ><br />
“Export As KMZ…”<br />
Preferred Language:<br />
Set the languages for menu, buttons and messages.
![[1] Signalformen am Oszilloskop bei der Offset-Kalibrierung - ELV](https://img.yumpu.com/23357707/1/184x260/1-signalformen-am-oszilloskop-bei-der-offset-kalibrierung-elv.jpg?quality=85)
![[1] PostGreSQL-Installationsanleitung - ELV](https://img.yumpu.com/22696073/1/184x260/1-postgresql-installationsanleitung-elv.jpg?quality=85)